Branches multiply the basic functionality offered by commits by allowing users to fork their history. Creating a new branch is akin to requesting a new development environment, complete with an isolated working directory, staging area, and project history.
This gives you the same peace of mind as committing a "safe" copy of your project, but you now have the additional capacity to work on multiple versions at the same time. Branches enable a non-linear workflow-the ability to develop unrelated features in parallel. As we'll discover later on, a non-linear workflow is an important precursor to the distributed nature of Git's collaboration model.
Unlike SVN or CVS, Git's branch implementation is incredibly efficient. SVN enables branches by copying the entire project into a new folder, much like you would do without any revision control software. This makes merges clumsy, error-prone, and slow. In contrast, Git branches are simply a pointer to a commit. Since they work on the commit level instead of directly on the file level, Git branches make it much easier to merge diverging histories. This has a dramatic impact on branching workflows.
Manipulating Branches
Git separates branch functionality into a few different commands. The git branch command is used for listing, creating, or deleting branches.
Listing Branches
First and foremost, you'll need to be able to view your existing branches:
git branch
This will output all of your current branches, along with an asterisk next to the one that's currently "checked out" (more on that later):
* master
some-feature
quick-bug-fix
The master branch is Git's default branch, which is created with the first commit in any repository. Many developers use this branch as the "main" history of the project-a permanent branch that contains every major change it goes through.
Creating Branches
You can create a new branch by passing the branch name to the same git branch command:
git branch <name>
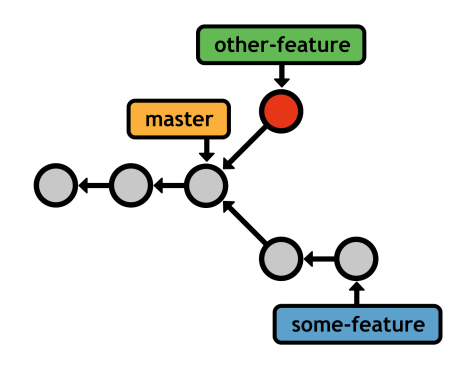
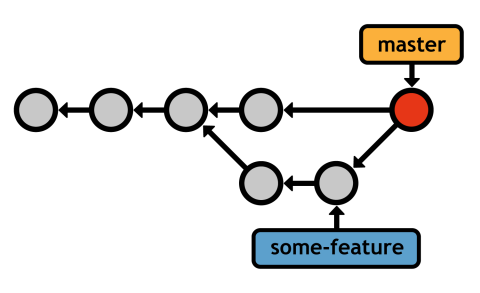
This creates a pointer to the current HEAD, but does not switch to the new branch (you'll need git checkout for that). Immediately after requesting a new branch, your repository will look something like the following.
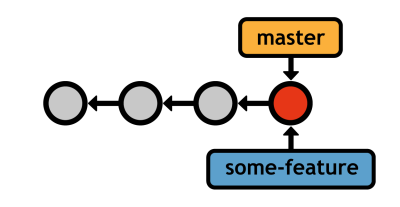
Your current branch (master) and the new branch (some-feature) both reference the same commit, but any new commits you record will be exclusive to the current branch. Again, this lets you work on unrelated features in parallel, while still maintaining sensible histories. For example, if your current branch was some-feature, your history would look like the following after committing a snapshot.
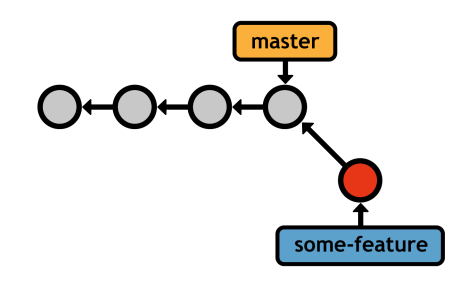
some-feature branchThe new HEAD (denoted by the highlighted commit) exists only in the some-feature branch. It won't show up in the log output of master, nor will its changes appear in the working directory after you check out master.
You can actually see the new branch in the internal database by opening the file .git/refs/heads/<name>. The file contains the ID of the referenced commit, and it is the sole definition of a Git branch. This is the reason branches are so lightweight and easy to manage.
Deleting Branches
Finally, you can delete branches via the -d flag:
git branch -d <name>
But, Git's dedication to never losing your work prevents it from removing branches with unmerged commits. To force the deletion, use the -D flag instead:
git branch -D <name>
Unmerged changes will be lost, so be very careful with this command.
Checking Out Branches
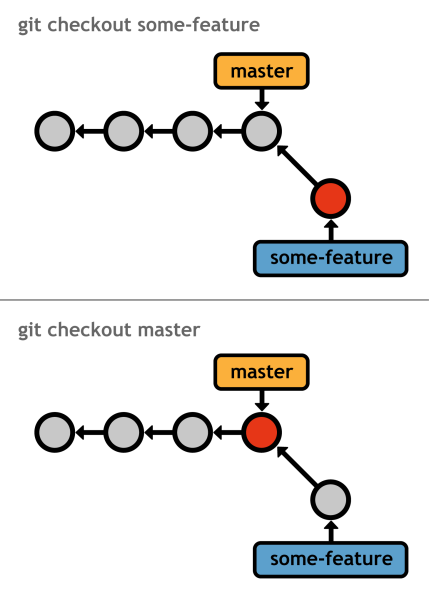
Of course, creating branches is useless without the ability to switch between them. Git calls this "checking out" a branch:
git checkout <branch>
After checking out the specified branch, your working directory is updated to match the specified branch's commit. In addition, the HEAD is updated to point to the new branch, and all new commits will be stored on the new branch. You can think of checking out a branch as switching to a new project folder-except it will be much easier to pull changes back into the project.
With this in mind, it's usually a good idea to have a clean working directory before checking out a branch. A clean directory exists when there are no uncommitted changes. If this isn't the case, git checkout has the potential to overwrite your modifications.
As with committing a "safe" revision, you're free to experiment on a new branch without fear of destroying existing functionality. But, you now have a dedicated history to work with, so you can record the progress of an experiment using the exact same git add and git commit commands from earlier in the book.
This functionality will become even more powerful once we learn how to merge divergent histories back into the "main" branch (e.g., master). We'll get to that in a moment, but first, there is an important use case of git checkout that must be considered...
Detached HEADs
Git also lets you use git checkout with tags and commit IDs, but doing so puts you in a detached HEAD state. This means that you're not on a branch anymore-you're directly viewing a commit.
You can look around and add new commits as usual, but since there is no branch pointing to the additions, you'll lose all your work as soon as you switch back to a real branch. Fortunately, creating a new branch in a detached HEAD state is easy enough:
git checkout -b <new-branch-name>
This is a shortcut for git branch <new-branch-name> followed by git checkout <new-branch-name>. After which, you'll have a shiny new branch reference to the formerly detached HEAD. This is a very handy procedure for forking experiments off of old revisions.
Merging Branches
Merging is the process of pulling commits from one branch into another. There are many ways to combine branches, but the goal is always to share information between branches. This makes merging one of the most important features of Git. The two most common merge methodologies are:
- The "fast-forward" merge
- The "3-way" merge
They both use the same command, git merge, but the method is automatically determined based on the structure of your history. In each case, the branch you want to merge into must be checked out, and the target branch will remain unchanged. The next two sections present two possible merge scenarios for the following commands:
git checkout master
git merge some-feature
Again, this merges the some-feature branch into the master branch, leaving the former untouched. You'd typically run these commands once you've completed a feature and want to integrate it into the stable project.
Fast-Forward Merges
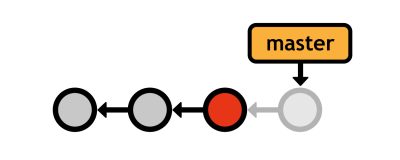
The first scenario looks like this:
We created a branch to develop some new feature, added two commits, and now it's ready to be integrated into the main code base. Instead of rewriting the two commits missing from master, Git can "fast-forward" the master branch's pointer to match the location of some-feature.

After the merge, the master branch contains all of the desired history, and the feature branch can be deleted (unless you want to keep developing on it). This is the simplest type of merge.
Of course, we could have made the two commits directly on the master branch; however, using a dedicated feature branch gave us a safe environment to experiment with new code. If it didn't turn out quite right, we could have simply deleted the branch (opposed to resetting/reverting). Or, if we added a bunch of intermediate commits containing broken code, we could clean it up before merging it into master (see Rebasing below). As projects become more complicated and acquire more collaborators, this kind of branched development makes Git a fantastic organizational tool.
3-Way Merges
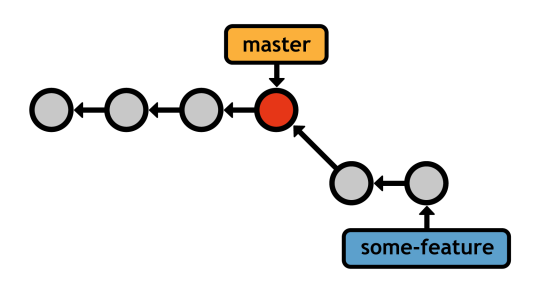
But, not all situations are simple enough for a fast-forward commit. Remember, the main advantage of branches is the ability to explore many independent lines of development simultaneously. As a result, you'll often encounter a scenario that looks like the following:
This started out like a fast-forward merge, but we added a commit to the master branch while we were still developing some-feature. For example, we could have stopped working on the feature to fix a time-sensitive bug. Of course, the bug-fix should be added to the main repository as soon as possible, so we wind up in the scenario shown above.
Merging the feature branch into master in this context results in a "3-way" merge. This is accomplished using the exact same commands as the fast-forward merge from the previous section.
Git can't fast-forward the master pointer to some-feature without backtracking. Instead, it generates a new merge commit that represents the combined snapshot of both branches. Note that this new commit has two parent commits, giving it access to both histories (indeed, running git log after the 3-way merge shows commits from both branches).
The name of this merge algorithm originates from the internal method used to create the merge commit. Git looks at three commits to generate the final state of the merge.
Merge Conflicts
If you try to combine two branches that make different changes to the same portion of code, Git won't know which version to use. This is called a merge conflict. Obviously, this can never happen during a fast-forward merge. When Git encounters a merge conflict, you'll see the following message:
Auto-merging index.html
CONFLICT (content): Merge conflict in <file>
Automatic merge failed; fix conflicts and then commit the result.
Instead of automatically adding the merge commit, Git stops and asks you what to do. Running git status in this situation will return something like the following:
# On branch master
# Unmerged paths:
#
#       both modified:      <file>
Every file with a conflict is stored under the "Unmerged paths" section. Git annotates these files to show you the content from both versions:
<<<<<<< HEAD
  This content is from the current branch.
=======
    This is a conflicting change from another branch.
>>>>>>> some-feature
The part before the ======= is from the master branch, and the rest is from the branch you're trying to integrate.
To resolve the conflict, remove the <<<<<<, =======, and >>>>>>> notation, and change the code to whatever you want to keep. Then, tell Git you're done resolving the conflict with the git add command:
git add <file>
That's right; all you have to do is stage the conflicted file to mark it as resolved. Finally, complete the 3-way merge by generating the merge commit:
git commit
The log message is seeded with a merge notice, along with a "conflicts" list, which can be particularly useful when trying to figure out where something went wrong in a project.
And that's all there is to merging in Git. Now that we have an understanding of the mechanics behind Git branches, we can take an in-depth look at how veteran Git users leverage branches in their everyday workflow.
Branching Workflows
The workflows presented in this section are the hallmark of Git-based revision control. The lightweight, easy-to-merge nature of Git's branch implementation makes them one of the most productive tools in your software development arsenal.
All branching workflows revolve around the git branch, git checkout, and git merge commands presented earlier this chapter.
Types of Branches
It's often useful to assign special meaning to different branches for the sake of organizing a project. This section introduces the most common types of branches, but keep in mind these distinctions are purely superficial-to Git, a branch is a branch.
All branches can be categorized as either permanent branches or topic branches. The former contain the main history of a project (e.g., master), while the latter are temporary branches used to implement a specific topic, then discarded (e.g., some-feature).
Permanent Branches
Permanent branches are the lifeblood of any repository. They contain every major waypoint of a software project. Most developers use master exclusively for stable code. In these workflows, you never commit directly on master-it is only an integration branch for completed features that were built in dedicated topic branches.
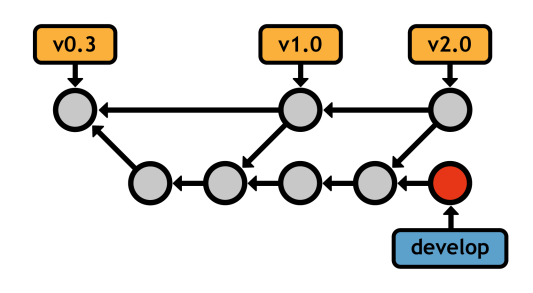
In addition, many users add a second layer of abstraction in another integration branch (conventionally called develop, though any name will suffice). This frees up the master branch for really stable code (e.g., public commits), and uses develop as an internal integration branch to prepare for a public release. For example, the following diagram shows several features being integrated in develop, then a single, final merge into master, which symbolizes a public release.
master branch exclusively for public releasesTopic Branches
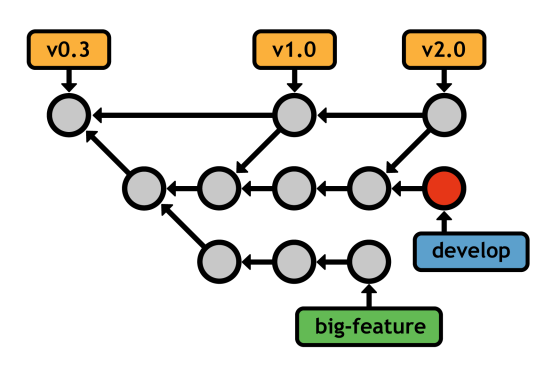
Topic branches generally fall into two categories: feature branches and hotfix branches. Feature branches are temporary branches that encapsulate a new feature or refactor, protecting the main project from untested code. They typically stem from another feature branch or an integration branch, but not the "super stable" branch.
Hotfix branches are similar in nature, but they stem from the public release branch (e.g., master). Instead of developing new features, they are for quickly patching the main line of development. Typically, this means bug fixes and other important updates that can't wait until the next major release.
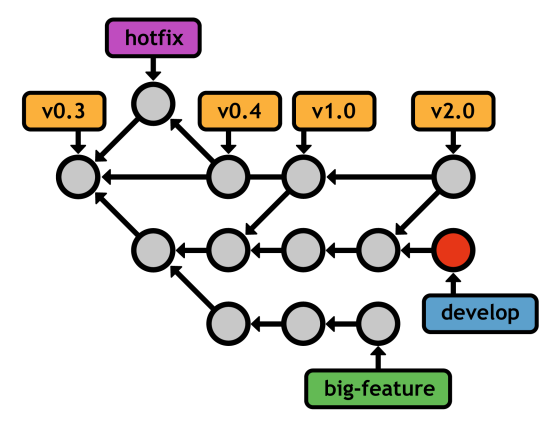
master with a hotfix branchAgain, the meanings assigned to each of these branches are purely conventional-Git sees no difference between master, develop, features, and hotfixes. With that in mind, don't be afraid to adapt them to your own ends. The beauty of Git is its flexibility. When you understand the mechanics behind Git branches, it's easy to design novel workflows that fit your project and personality.
Rebasing
Rebasing is the process of moving a branch to a new base. Git's rebasing capabilities make branches even more flexible by allowing users to manually organize their branches. Like merging, git rebase requires the branch to be checked out and takes the new base as an argument:
git checkout some-feature
git rebase master
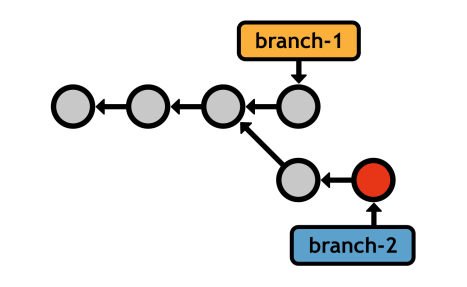
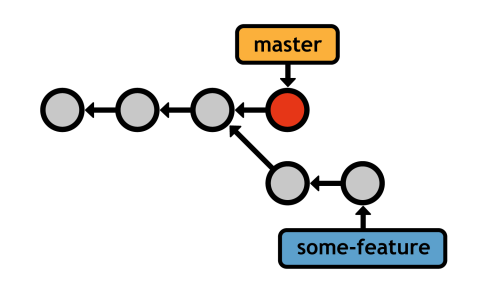
This moves the entire some-feature branch onto the tip of master:
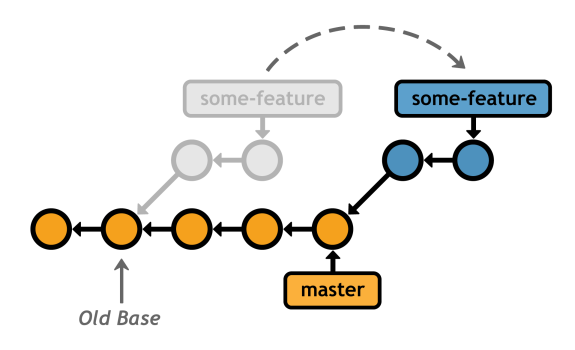
some-feature onto the master branchAfter the rebase, the feature branch is a linear extension of master, which is a much cleaner way to integrate changes from one branch to another. Compare this linear history with a merge of master into some-feature, which results in the exact same code base in the final snapshot:
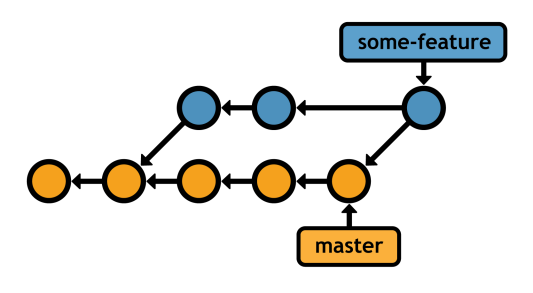
master into some-feature with a 3-way mergeSince the history has diverged, Git has to use an extra merge commit to combine the branches. Doing this many times over the course of developing a long-running feature can result in a very messy history.
These extra merge commits are superfluous-they exist only to pull changes from master into some-feature. Typically, you'll want your merge commits to mean something, like the completion of a new feature. This is why many developers choose to pull in changes with git rebase, since it results in a completely linear history in the feature branch.
Interactive Rebasing
Interactive rebasing goes one step further and allows you to change commits as you're moving them to the new base. You can specify an interactive rebase with the -i flag:
git rebase –i master
This populates a text editor with a summary of each commit in the feature branch, along with a command that determines how it should be transferred to the new base. For example, if you have two commits on a feature branch, you might specify an interactive rebase like the following:
pick 58dec2a First commit for new feature
squash 6ac8a9f Second commit for new feature
The default pick command moves the first commit to the new base just like the normal git rebase, but then the squash command tells Git to combine the second commit with the previous one, so you wind up with one commit containing all of your changes:
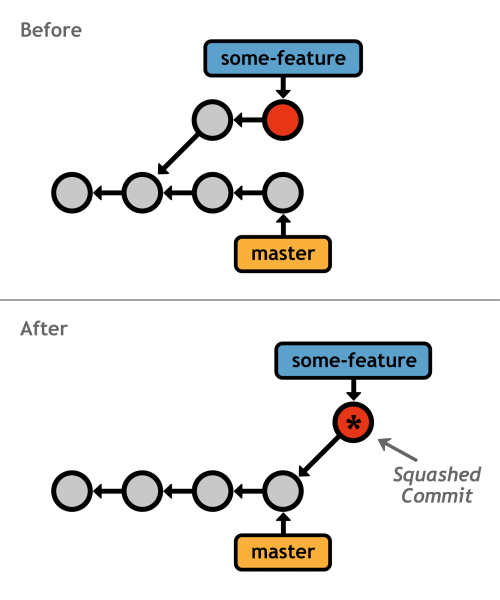
some-feature branchGit provides several interactive rebasing commands, each of which are summarized in the comment section of the configuration listing. The point is interactive rebasing lets you completely rewrite a branch's history to your exact specifications. This means you can add as many intermediate commits to a feature branch as you need, then go back and fix them up into meaningful progression after the fact.
Other developers will think you are a brilliant programmer, and knew precisely how to implement the entire feature in one fell swoop. This kind of organization is very important for ensuring large projects have a navigable history.
Rewriting History
Rebasing is a powerful tool, but you must be judicious in your rewriting of history. Both kinds of rebasing don't actually move existing commits-they create brand new ones (denoted by an asterisk in the above diagram). If you inspect commits that were subjected to a rebase, you'll notice that they have different IDs, even though they represent the same content. This means rebasing destroys existing commits in the process of "moving" them.
As you might imagine, this has dramatic consequences for collaborative workflows. Destroying a public commit (e.g., anything on the master branch) is like ripping out the basis of everyone else's work. Git won't have any idea how to combine everyone's changes, and you'll have a whole lot of apologizing to do. We'll take a more in-depth look at this scenario after we learn how to communicate with remote repositories.
For now, just abide by the golden rule of rebasing: never rebase a branch that has been pushed to a public repository.
This lesson represents a chapter from Git Succinctly, a free eBook from the team at Syncfusion.

Comments