Each release of Xcode presents developers with enhanced tools to help building their apps. This year's release, Xcode 6, introduces new ways for developers to design and build their software. In this tutorial, I'll outline the new and improved features in Xcode 6 and take a look at how you can use them.
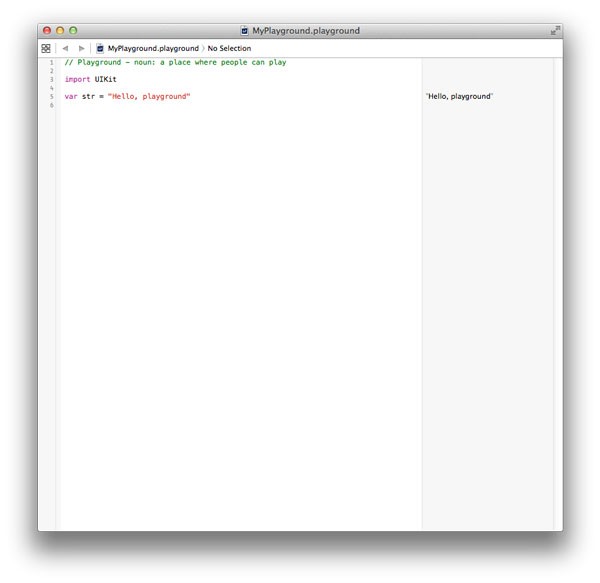
1. Playgrounds
During this year's WWDC, Apple introduced Swift, a new programming language for developing software for its devices. In line with this, Xcode 6 comes with a new feature called Playgrounds that provides an interactive work area where developers can write Swift code and get live feedback without having to run the code on a device or simulator. This is a nice addition to Xcode as you can now experiment with code and get quick, real-time results before incorporating it into your main code base.
2. Interface Builder
A major topic at this year's WWDC was building adaptive applications. Instead of building applications that target specific screen sizes, developers are encouraged to develop applications that adapt to the device they run on, irrespective of its screen size.
This is a move that started a couple of releases back with the introduction of Auto Layout in iOS 6, enabling developers to create apps that work on both the 3.5" and 4.0" screens. It's now been further improved to enable iOS developers to build apps that run on all supported iPhones, including the new 4.7" iPhone 6 and 5.5" iPhone 6 Plus, and iPads using the same code base.
Interface Builder has undergone major changes that enable developing such adaptive apps. New features have also been added that improve the user interface design process. We will look at these new changes next.
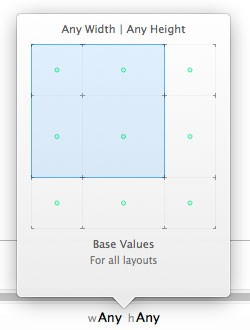
Size Classes
Size classes define the canvas size used in layouts. They allow you to specify how the application's user interface changes when the available size of your view controller changes. This makes it possible to have a unified storyboard when building a universal application. Previously you had to design two separate storyboards, one for iPad and one for iPhone.
A size class identifies a relative amount of display space for the height (vertical dimension) and width (horizontal dimension). There are currently two size classes, compact and regular. For example, an iPhone in portrait will have a compact width and regular height. An iPad will have a regular width and height in both portrait and landscape orientations.
But you should note that a size class doesn't necessarily map to one device in one orientation. For instance, an iPad can have a view with an iPhone style layout (a compact horizontal and a regular vertical size class) when presented on a smaller space on the device, and an iPad style layout (a regular horizontal and a regular vertical size class) when the available space is larger.
You change size classes by using the Size Classes control near the layout toolbar at the bottom of the Interface Builder canvas. Interface Builder starts you out in the any width and any height size class where you can lay out common user interface components and constraints for the different screen sizes and orientations. You then update the parts that need to change when the available screen size changes by making changes to the user interface in the different size classes.
Adaptive Segue Types
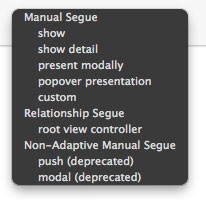
Xcode 6 introduces adaptive segue types that are more suitable for the new adaptive layouts since they present views differently according to the environment they are run in. For example, using Show Detail with a Split View on an iPad will replace the Detail, but on an iPhone it's going to push that Detail aside onto the Master. Some of the old segues, such as push and modal, are now deprecated.
Live Rendering
The Interface Builder canvas is more interactive than ever. Previously, you had to run your app to see changes related to custom objects, custom fonts, and localization. Now, you can select custom fonts from the Interface Builder font picker and have them show up in the Interface Builder canvas.
You can even create custom objects and have them render on the Interface Builder canvas. You do this by creating a custom framework, adding your custom class to that target, and marking that class with the @IBDesignable flag (IB_DESIGNABLE in Objective-C). This lets Interface Builder know that a class can display custom content on its canvas.
Other than being able to view custom objects in Interface Builder, you can also mark properties with the @IBInspectable flag and have them appear in the Interface Builder inspector menu, in which they can be edited just like any other properties on your views. It is not a requirement for a class to be marked designable for it to have inspectable properties.
You can also specify design time only code. You can use this, for example, to pre-populate the view with example data to get a more accurate feel for the interface. You do this by overriding the prepareForInterfaceBuilder method. Other than that, you can use #if TARGET_INTERFACE_BUILDER to opt code in or out of being run in the final Interface Builder rendering.
Preview Editor
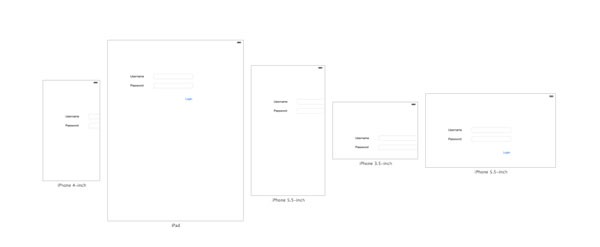
The Preview Editor now allows you to view multiple previews of different simulated devices side by side. Not only can you see how your app looks on different devices, but you can also set each of the devices to be in either portrait or landscape mode. This provides a fast way to preview your app's user interface on different devices and orientations without first running it.
3. Game Development
Apple added new game technologies to Xcode 6 and iOS 8, namely SceneKit and Metal. SceneKit, which was previously available on OS X, is a 3D scene renderer. Metal is a framework that can be used to create highly optimized graphics rendering and computational tasks thanks to its low-overhead access to the A7 and A8 GPU.
SpriteKit has also been improved with per-pixel physics occlusion, physics fields, universal kinematics and constraints, shaders, lightings, and shadows.
Another significant new feature in SpriteKit is the SpriteKit Level Editor that lets you visually assemble scenes. Just as you can create your user interface in Interface Builder without writing any code, you can do the same when in a SpriteKit game with the SpriteKit Level Editor.
4. OS X Development
Storyboards
Storyboards have now been introduced to OS X development. Just as in iOS development, they let you set up your view layouts and wire views together with different segue animations. At the time of writing, some features, including storyboards, are still disabled in Xcode (6.0.1) for OS X development pending the OS X Yosemite release.
Gesture Recognizers
Gesture recognizers are now available in AppKit. These are used pretty much in the same way as in iOS development. You can view the available gestures in the Object Library in Interface Builder.
5. Localization
Localization is done differently in Xcode 6 than it was previously. You can now export all of your localizable content into XLIFF, which is the industry standard that's understood by a lot of translation services. When you get the translations back, you import them and Xcode will merge the new content into your project. You should have one XLIFF file for each language you support in your app.
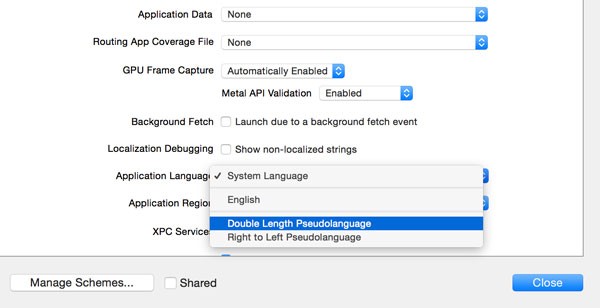
You can now preview localized content without changing your device's or simulator's locale in Settings. To do this, select Product > Scheme > Edit Scheme, then select Run and click on the Options tab. You can select your language of choice from the Application Language menu. Xcode comes with the Double Length Pseudolanguage that you can test with if you haven't added any other language. When you run the app, you should see the localized content.
You can also view localized content without running your app. To do this, you use the Preview Editor to switch between the different languages that your app supports. The default language will display in the bottom-right corner of the editor and when you click on it, you are presented with a list of the available languages. To test it out without adding a language, you can use the Double Length Pseudolanguage.
6. iOS Simulator
Named Devices
Xcode 6 now presents named simulators that correspond to specific devices, such as iPhone 5s, instead of the previous generic names, such as 64-bit iPhone Retina.
Resizable Simulator
Among the devices you can choose from are the resizable iPhone and resizable iPad. These allow you to specify the width, height, and size classes of the simulator. With this, you can test the adaptivity of your app on all of Apple's existing devices as well as any future devices, without needing to download a simulator for each device.
Simulator Custom Configurations
With the new iOS simulator, you can keep data and configuration settings grouped together. Run one configuration for one version of an app with its own data and another configuration for a different app version. This means that you can simulate having multiple users on your machine. Each user will have their own data and configurations.
7. HomeKit Accessory Simulator
The HomeKit framework allows your app to communicate with and control connected accessories in a user’s home. In the beta versions of Xcode 6, the HomeKit Accessory Simulator came as part of Xcode, but it's is now part of the Hardware I/O Tools for Xcode. You can download it at the iOS Dev Center.
8. Debugging
View Debugging
Xcode 6 makes debugging your app's user interface much easier with the live view debugging feature. You are now able to pause your running app and dissect the paused user interface in a 3D view. The view debugger shows you your view hierarchy and Auto Layout constraints. If you select a view, you can inspect its properties in the inspector or jump to the relevant code in the assistant editor. With this, you can inspect issues such issues as Auto Layout conflicts, see why a view is hidden or clipped, etc.
To start the live view debugger, launch your app and click the Debug View Hierarchy button on the debug toolbar.

Your app pauses and you're presented with a 3D visualization of its user interface. You can drag anywhere on the canvas to rotate the view.
You can switch between various view states with the buttons below the canvas.

From left to right:
- Show Clipped Content: This option hides or shows content that's being clipped in a selected view.
- Show Constraints: It shows the Auto Layout constraints of a selected view.
- Reset Viewing Area: This resets the canvas to its default state.
- Adjust View Mode: This mode lets you select how you want to see your views. There's an option to see it as a wireframe, the view's contents, or both.
- Zoom Out, Actual Size, Zoom In: This lets you set the view's scale.
Quick Look
Quick Look was introduced in Xcode 5 and it enables you to view an object's contents when debugging. Quick Look supports common objects like images, bezier paths, map locations, etc.
In Xcode 6, this has been improved to support two new object types, views (UIView and NSView) and custom objects. To enable Quick Look for custom objects, you implement the debugQuickLookObject method in the custom class.
Enhanced Queue Debugging
The debug navigator records and displays recently executed blocks as well as enqueued blocks. You can use it to see where your enqueued blocks are and to examine the details of what’s been set up to execute. You can enable block debugging by selecting the Debug > Debug Workflow > Always Show Pending Blocks in Queues menu option.
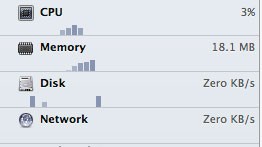
Debug Gauges
Debug gauges provide information about your app's resource usage while debugging. Xcode 6 features updated gauges, which include graphing profiling for the new Metal framework and iCloud support for documents in the Cloud and CloudKit features.
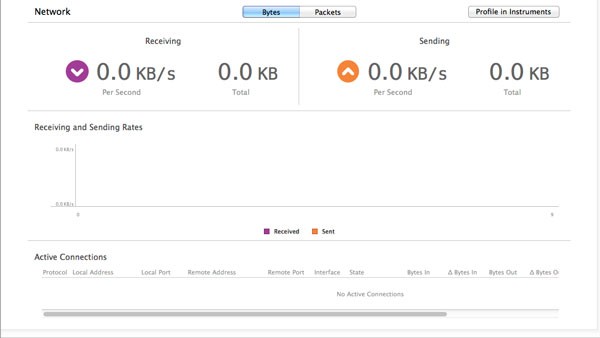
Other than these improvements, Xcode 6 introduces two new debug gauges, network and disk activity.
Network activity shows how much data your app is sending and receiving as well as a list of open connections. You can view a history timeline to monitor the network usage, helping you work out when and why spikes in network usage or network failures happened.
Disk activity shows real-time information of your app's reads and writes to disk. It also gives information on all the open files. There is a history timeline of this disk I/O activity for you to monitor.

9. Asset Catalog
Asset catalogs now support size classes. This means you can now easily adapt your user interface for compact and regular height or width by providing different images for each size class.
Previously asset catalogs only supported PNG images, but in Xcode 6, support for JPEG and PDF vector images has been added.
10. Launch Images
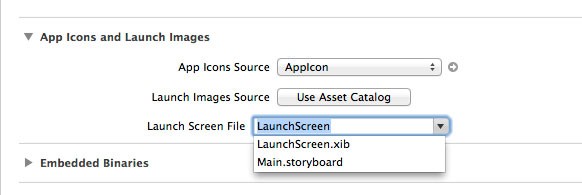
You can use a XIB or storyboard as your application's launch image. The operating system generates the necessary launch images for your app. With this, you don't need to provide individual assets for the launch images and you can design it in Interface Builder.
To set a XIB or storyboard as your app's launch image, select the project in the Project Navigator and choose a target from the list of targets. Under the General tab, locate the section App Icons and Launch Images and select the correct file from the menu labeled Launch Screen File.
11. Testing
Asynchronous Testing
New APIs have been added to XCTest framework that enable testing asynchronous code. This is done through expectation objects, XCTestExpectation, which describe expected events. XCTestCase has a new API that waits for the expectation to fulfill and sets a timeout on it. A completion handler is called either when all the events are fulfilled or when the timeout it hit. It can be waiting on multiple asynchronous events at the same time. You can now easily test for system interactions that execute asynchronously, such as file I/O, network requests, etc.
Performance Measurement
The enhanced XCTest framework can now quantify the performance of each part of an app. Xcode runs your performance tests and lets you define a baseline performance metric. Each subsequent test run compares performance, displays the change over time, and—by highlighting the problem area—alerts you to sudden regressions a code commit could introduce. If the average performance measure deviates considerably from the baseline, the test will fail. This is a great way to detect performance regressions in your app.
Test Profiling
With the introduction of performance testing comes the ability to profile tests in Instruments. You can select a test or test suite to profile and do further investigation and analysis in Instruments to find out why the test failed and find the cause of the regression.
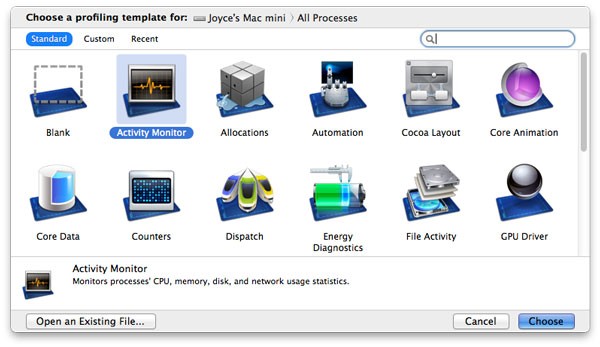
12. Instruments
Instruments has an updated user interface. With the new template chooser, you can select your device and target as well as the starting point for your profiling session.
There is a new Counters template that has been combined with Events to provide a powerful view into individual CPU events. You can even specify formulas to measure event aggregates, ratios, and more.
In Xcode 6, Instruments also ships with support for Swift and you can also use it to profile app extensions. There's also support for simulator configurations. The simulator configurations are treated like devices by Instruments, making it easy to launch or attach to processes in the simulator.
Conclusion
Apple continues to improve its developer tools and this is seen in every major release of Xcode. Xcode 6 improves on its predecessors to give developers tools that will improve their workflow and make the whole development process significantly better.

Comments