If you’re an Android developer, then you may have heard good things about RxJava, a popular open-source implementation of the ReactiveX library that brings reactive programming to the Java Virtual Machine (JVM).
RxJava is designed to take the pain out of working with asynchronous streams of data—although as you'll see, RxJava's definition of "data" is pretty broad. Because RxJava is a JVM-compatible library, you can use it on a wide range of platforms, but in this series I’ll show you how to use RxJava 2 for Android development.
By the end of this series you’ll have mastered all the RxJava 2 essentials so you can start creating highly reactive apps that can process a wide range of synchronous and asynchronous data—all using code that’s more concise and manageable than you’d typically be able to achieve with Java alone.
In addition to providing an introduction for RxJava newcomers, if you’re a RxJava 1 veteran who’s looking to make the leap to RxJava 2, then this series will help make this transition as smooth as possible. While upgrading to the latest version of a library may not sound like a big deal, RxJava 2 isn't your typical update—it's a complete rewrite of RxJava. With so much change it's easy to get confused, so taking some time to familiarize yourself with RxJava 2 from a beginner's perspective could save you a lot of time and frustration in the long run.
In this first post, I'll be covering what RxJava is and the key benefits it offers Android developers. We'll also take an in-depth look at the core components of any RxJava project: Observers, Observables, and subscriptions. By the end of this tutorial, you'll have created a simple "Hello World"-style application that includes all of these core components.
The other major building blocks of RxJava are operators, so in part two I’ll be exploring the different ways you can use operators to transform, combine, filter and manipulate your application's data.
In the final installment, we'll move beyond the core RxJava library and take a look at RxAndroid, an entire library that's packed with all the Android-specific extensions you’ll need to unlock the full potential of reactive programming for Android.
We have lots to cover, so let's start with the essentials:
What Is RxJava, Anyway?
RxJava is a library that lets you create applications in the reactive programming style. At its core, reactive programming provides a clean, efficient way of processing and reacting to streams of real-time data, including data with dynamic values.
These data streams don't necessarily have to take the form of traditional data types, as RxJava pretty much treats everything as a stream of data—everything from variables to properties, caches, and even user input events like clicks and swipes.
The data emitted by each stream can either be a value, an error, or a "completed" signal, although you don’t necessarily have to implement the last two. Once you've created your data-emitting streams, you combine them with reactive objects that consume and then act on this data, performing different actions depending on what the stream has emitted. RxJava includes a whole bunch of useful operators to work with streams, making it easy to do things like filtering, mapping, delaying, counting, and much more.
To create this workflow of data streams and objects that react to them, RxJava extends the Observer software design pattern. Essentially, in RxJava you have Observable objects that emit a stream of data and then terminate, and Observer objects that subscribe to Observables. An Observer receives a notification each time their assigned Observable emits a value, an error, or a completed signal.
So at a very high level, RxJava is all about:
- Creating an
Observable. - Giving that
Observablesome data to emit. - Creating an
Observer. - Assigning the
Observerto anObservable. - Giving the
Observertasks to perform whenever it receives an emission from its assignedObservable.
Why RxJava?
Learning any new technology requires time and effort, and as a data-oriented library, RxJava isn't always the easiest API to get to grips with.
To help you decide whether learning RxJava is worth the initial investment, let's explore some of the key benefits of adding the RxJava library to your Android projects.
More Concise, Readable Code
Code that's complex, verbose and difficult to read is always bad news. Messy code is more prone to bugs and other inefficiencies, and if any errors do occur then you’re going to have a much tougher time tracking down the source of these errors if your code is a mess.
Even if your project does build without any errors, complex code can still come back to haunt you—typically when you decide to release an update to your app a few months down the line, boot up your project, and are immediately confronted with a wall of tangled, confusing code!
RxJava simplifies the code required to handle data and events by allowing you to describe what you want to achieve, rather than writing a list of instructions for your app to work through. RxJava also provides a standard workflow that you can use to handle all data and events across your application—create an Observable, create an Observer, assign the observable to that observer, rinse and repeat. This formulaic approach makes for very straightforward, human-readable code.
Multithreading Made Easy
Modern Android applications need to be able to multi-task. At the very least, your users will expect to be able to continue interacting with your app's UI while your application is performing some work in the background, such as managing a network connection, downloading a file, or playing music. The problem is that Android is single-threaded by default, so if your app is ever going to multi-task successfully then you'll need to create some additional threads.
Out of the box, Android does provide a number of ways of creating additional threads, such as services and IntentServices, but none of these solutions are particularly easy to implement, and they can quickly result in complex, verbose code that’s prone to errors.
RxJava aims to take the pain out of creating multi-threaded Android apps, by providing special schedulers and operators. These give you an easy way of specifying the thread where work should be performed and the thread where the results of this work should be posted. RxJava 2.0 includes a number of schedulers by default, including Schedulers.newThread, which is particularly useful as it creates a new thread.
To change the thread where work is performed, you just need to change where an observer subscribes to an observable, using the subscribeOn operator. For example, here we’re creating a new thread and specifying that the work should be performed on this new thread:
observable.subscribeOn(Schedulers.newThread())
Another long-standing problem with multithreading on Android is that you can only update your app's UI from the main thread. Typically, whenever you need to post the results of some background work to your app's UI, you have to create a dedicated Handler.
Once again, RxJava has a much more straightforward solution. You can use the observeOn operator to specify that an Observable should send its notifications using a different scheduler, which essentially allows you to send your Observable’s data to the thread of your choice, including the main UI thread.
This means that with just two lines of code, you can create a new thread and send the results of work performed on this thread to Android's main UI thread:
          .subscribeOn(Schedulers.newThread())
          .observeOn(AndroidSchedulers.mainThread())
Okay, so technically we're cheating a little here, as AndroidSchedulers.mainThread is only available as part of the RxAndroid library, which we won’t be looking at until part three. However, this example does give you a glimpse into RxJava and RxAndroid’s power to simplify an area of Android development that's known for being overly complicated.
Increased Flexibility
Observables emit their data in a way that completely hides the way that data was created. Since your observers can't even see how the data was created, you're free to implement your Observables in whatever way you want.
Once you've implemented your Observables, RxJava provides a huge range of operators that you can use to filter, merge and transform the data that’s being emitted by these Observables. You can even chain more and more operators together until you've created exactly the data stream your application needs.
For example, you could combine data from multiple streams, filter the newly merged stream, and then use the resulting data as the input for a subsequent data stream. And remember that in RxJava pretty much everything is treated as a stream of data, so you can even apply these operators to non-traditional "data", such as click events.
Create More Responsive Apps
Gone are the days when an app could get away with loading a page of content and then waiting for the user to tap the Next button. Today, your typical mobile app needs to be able to react to an ever-growing variety of events and data, ideally in real time. For example, your typical social networking app needs to be constantly listening for incoming likes, comments and friend requests, while managing a network connection in the background and responding immediately whenever the user taps or swipes the screen.
The RxJava library was designed to be able to manage a wide range of data and events simultaneously and in real time, making it a powerful tool for creating the kind of highly responsive applications that modern mobile users expect.
Adding RxJava to Android Studio
If you've decided that RxJava does have something to offer your Android development practice, then the first step to becoming an RxJava master is adding the library to your project.
Create a new Android Studio project with the settings of your choice, and then open your module-level build.gradle file and add the latest version of io.reactivex.rxjava2:rxjava as a dependency.
At the time of writing, RxJava 2.0.5 was the most recent release, so my build.gradle file looks like this:
dependencies {
  compile fileTree(dir: 'libs', include: ['*.jar'])

  androidTestCompile('com.android.support.test.espresso:espresso-core:2.2.2', {
      exclude group: 'com.android.support', module: 'support-annotations'
  })

  compile 'com.android.support:appcompat-v7:25.1.0'
  testCompile 'junit:junit:4.12'

  compile 'io.reactivex.rxjava2:rxjava:2.0.5'
}
When prompted, click Sync now.
Next, open your MainActivity file and add the imports you'll need to start working with the core RxJava features:
import io.reactivex.Observable;
import io.reactivex.ObservableEmitter;
import io.reactivex.ObservableOnSubscribe;
import io.reactivex.Observer;
import io.reactivex.disposables.Disposable;
If you're migrating from RxJava 1, then these imports might not be what you were expecting, as RxJava 1 used a completely different package name (rx to be precise).
However, this isn't an arbitrary name change: the different package names give you the option to use RxJava 1 and RxJava 2 side by side in the same project. If you’re halfway through a project that uses RxJava 1, then you can add the RxJava 2 library and start using the updated 2 features immediately, without breaking any of your RxJava 1 code.
If you're starting your RxJava journey with version 2, then just be aware that if you encounter any RxJava tutorials or code using the rx package name, then this is RxJava 1 code and is unlikely to be compatible with the version 2 library.
The Building Blocks of RxJava
So far, we've only looked at RxJava at a very high level. It's time to get more specific and take an in-depth look at two of the most important components that’ll crop up time and time again throughout your RxJava work: Observers and Observables.
By the end of this section, not only will you have a solid understanding of these two core components, but you'll have created a fully functioning application consisting of an Observable that emits data and an Observer that reacts to these emissions.
Create an Observable
An Observable is similar to an Iterable in that, given a sequence, it'll iterate through that sequence and emit each item, although Observables typically don't start emitting data until an Observer subscribes to them.
Each time an Observable emits an item, it notifies its assigned Observer using the onNext() method. Once an Observable has transmitted all of its values, it terminates by calling either:
-
onComplete: Called if the operation was a success. -
onError: Called if anExceptionwas thrown.
Let's look at an example. Here, we're creating an Observable that emits the numbers 1, 2, 3 and 4, and then terminates.
Observable<Integer> observable = Observable.create(new ObservableOnSubscribe<Integer>() {
  @Override

  public void subscribe(ObservableEmitter<Integer> e) throws Exception {
      //Use onNext to emit each item in the stream//
      e.onNext(1);
      e.onNext(2);
      e.onNext(3);
      e.onNext(4);

      //Once the Observable has emitted all items in the sequence, call onComplete//
      e.onComplete();
  }
 }
);
Note that in this example I’m spelling out exactly what’s happening, so don't let the amount of code put you off! This is much more code than you’ll typically use to create Observables in your real-life RxJava projects.
Create an Observer
Observers are objects that you assign to an Observable, using the subscribe() operator. Once an Observer is subscribed to an Observable, it’ll react whenever its Observer emits one of the following:
-
onNext: TheObservablehas emitted a value. -
onError: An error has occurred. -
onComplete: TheObservablehas finished emitting all its values.
Let’s create an Observer that's subscribed to our 1, 2, 3, 4 Observable. To help keep things simple, this Observer will react to onNext, onError and onComplete by printing a message to Android Studio’s Logcat Monitor:
Observer<Integer> observer = new Observer<Integer>() {
  @Override
  public void onSubscribe(Disposable d) {
      Log.e(TAG, "onSubscribe: ");
  }

  @Override
  public void onNext(Integer value) {
      Log.e(TAG, "onNext: " + value);
  }

  @Override
  public void onError(Throwable e) {
      Log.e(TAG, "onError: ");
  }

  @Override
  public void onComplete() {
      Log.e(TAG, "onComplete: All Done!");
  }
};

//Create our subscription//
observable.subscribe(observer);
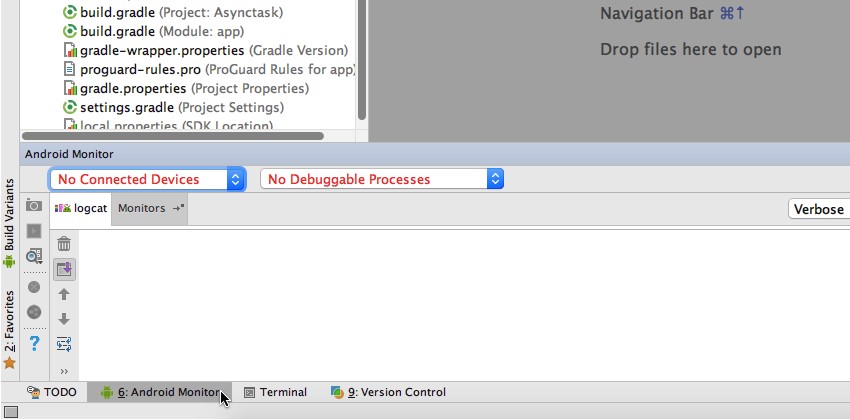
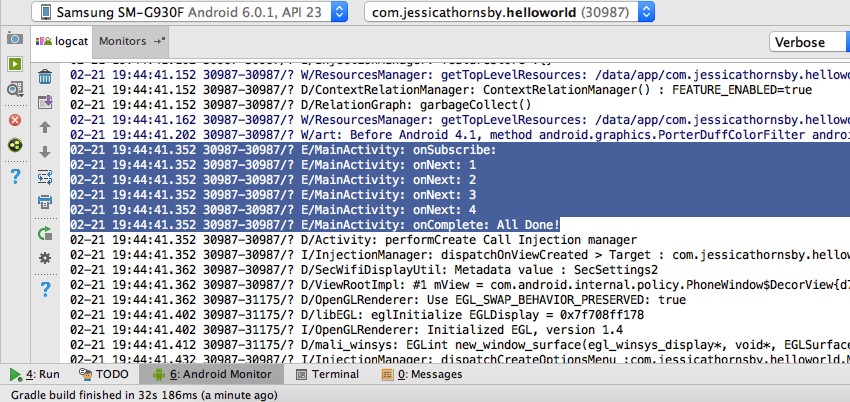
Open Android Studio's Logcat Monitor by selecting the Android Monitor tab from the bottom of the Android Studio window (where the cursor is positioned in the screenshot below) and then selecting the Logcat tab.
To put this code to the test, either attach your physical Android device to your development machine or run your project on a compatible AVD. As soon as your app appears onscreen, you should see the data being emitted by your Observable.
Creating an Observable With Less Code
Although our project is emitting data successfully, the code we're using isn't exactly concise—particularly the code we're using to create our Observable.
Thankfully, RxJava provides a number of convenience methods that allow you to create an Observable using much less code:
1. Observable.just()
You can use the .just() operator to convert any object into an Observable. The result Observable will then emit the original object and complete.
For example, here we're creating an Observable that'll emit a single string to all its Observers:
Observable<String> observable = Observable.just("Hello World!");
2. Observable.from()
The .from() operator allows you to convert a collection of objects into an observable stream. You can convert an array into an Observable using Observable.fromArray, a Callable into an Observable using Observable.fromCallable, and an Iterable into an Observable using Observable.fromIterable.
3. Observable.range()
You can use the .range() operator to emit a range of sequential integers. The first integer you provide is the initial value, and the second is the number of integers you want to emit. For example:
Observable<Integer> observable = Observable.range(0, 5);
4. Observable.interval()
This operator creates an Observable that emits an infinite sequence of ascending integers, with each emission separated by a time interval chosen by you. For example:
Observable<Long> observable = Observable.interval(1, TimeUnit.SECONDS)
5. Observable.empty()
The empty() operator creates an Observable that emits no items but terminates normally, which can be useful when you need to quickly create an Observable for testing purposes.
Observable<String> observable = Observable.empty();
Conclusion
In this article, we covered the fundamental building blocks of RxJava.
At this point, you know how to create and work with Observers and Observables, and how to create a subscription so that your Observables can start emitting data. We also briefly looked at a few operators that allow you to create a range of different Observables, using much less code.
However, operators aren't just a handy way of cutting down on the amount of code you need to write! Creating an Observer and an Observable is simple enough, but operators are where you really begin to see what's possible with RxJava.
So in the next post, we'll explore some of RxJava's most powerful operators, including operators that can finally make multi-threading on Android a pain-free experience. Stay tuned to learn the real power of the RxJava library.
In the meantime, check out some of our other posts and courses about Android development here on Envato Tuts+!
 Android StudioCoding Functional Android Apps in Kotlin: Getting Started
 AndroidCoding an Android App With Flutter and Dart
 Android SDKWhat's New in Firebase? Updates From the Firebase Dev Summit
 AndroidMigrate an Android App to Material Design
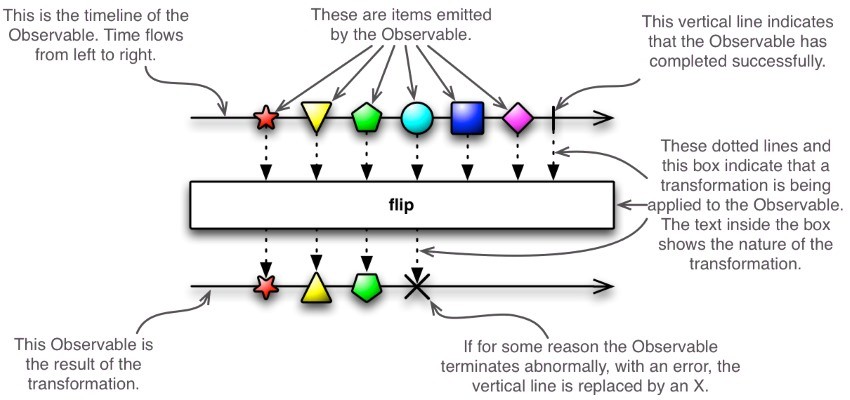
Observable dataflow diagrams are from the ReactiveX documentation, and are licensed under Creative Commons Attribution 3.0 License.

Comments