The Kindle Fire is the new touchscreen and e-book reader from Amazon. This device has generated a lot of buzz, and for good reason! It is currently the best selling Android tablet, with millions of units already sold. This tutorial will teach you how to begin making apps with the Android SDK specifically targeted for the Kindle Fire.
If you thought it would be as simple as plugging in the Kindle Fire device to your development machine via a USB cable (it doesn't come with one) and loading your apps using the Android tools, you might be surprised to find that it's not quite that simple -- though it is close. Today, we'll walk you through the driver configuration necessary so you can connect to Kindle Fire for debugging your Android applications. We’ll also talk about some of the ways that Kindle Fire differs from your typical Android tablet.
Part 0: Preparing for Development
Getting started with Kindle Fire development has a few prerequisites, most of them involving hardware. While these aren't strictly required, part I focuses on items related to the hardware.
Step 1: Getting a Kindle Fire
If you don't already have a Kindle Fire device, you'll need to get one. Kindle Fire is cheap compared to buying most Android smartphones at full price. A typical smartphone, off contract, usually runs $600 to $800 USD (and sometimes thousands more on contract, if you count the wireless fees). Amazon’s Kindle Fire, however, is just $200 USD. Point is: it's cheap enough to seriously consider acquiring at least one for testing purposes, even if you work independently.
Step 2: Getting a USB Cable
You'll also need a USB cable. Kindle Fire, as a budget device, does not come with a data cable. Instead, Amazon assumes users will never connect it to a computer but rather use cloud data transfer via WiFi for all of their needs. This is great for consumers, but developers will want direct access for debugging. If you've got a pile of Android devices like many developers, you probably already have the right cable. Specifically, you'll want a USB cable with a micro-B connection on one end. That's the same connection you'll find on the Samsung Nexus S phone, for example. It's pretty standard fare for Android devices, especially phones.
Step 3: Android SDK
Finally, make sure you have the Android SDK installed and a development environment, such as Eclipse. You'll want to have API Level 10 SDK installed and, if on Windows, the Google USB driver package.
Part I: Connecting to the Kindle Fire
Connecting your Kindle Fire to your computer requires some manual tweaking, whether on a Mac or a Windows machine. You'll need to get this going before you can start loading apps and debugging directly on your Kindle Fire.
[Windows] Step 1: Editing Files
On a Windows development machine, you'll need to edit two files and then ensure that the connected Kindle Fire device is using the correct driver. You can edit these files using your favorite text editor. Because locations vary, we'll reference the file locations with a general description of the location, but you'll have to ultimately find the file for yourself.
First, edit the adb_usb.ini file found in the .android folder of your user directory. Add one line to the bottom of the file:
0x1949
Second, edit the android_winusb.inf file. You may need to edit the permissions of the file before modifications will be allowed. Add the following two lines (and the comment, if you wish) to both the [Google.NTx86] and [Google.NTamd64] sections:
;Kindle Fire
%SingleAdbInterface% = USB_Install, USB\VID_1949&PID_0006
%CompositeAdbInterface% = USB_Install, USB\VID_1949&PID_0006&MI_01
Now you're ready to plug the cable in and configure the USB driver.
[Windows] Step 2: Using the Google USB Driver
Now when you connect your Kindle Fire, your computer will be ready. Once connected, you'll have to manually choose to use the Google USB driver. You do this from the system’s Device Manager, as with any USB device. In brief, from the Device Manager, find the Kindle device, choose Update Driver Software, choose Browse for driver, find the android_winusb.inf file, and install it. Once done, the Kindle device will show up under Android Phones, Android Composite ADB Interface.
[Mac] Step 1: Editing the ADB File
On a Mac, the process is a little different. You only need to edit one file: the adb_usb.ini file, which is found in the .android folder of your home directory. Add the following two lines to it:
0x1949
0x0006
With this, you're ready to plug in the cable and move on to the final step.
[Mac] Step 2 & [Windows] Step 3: Restarting ADB
Once you have edited the appropriate files on either Mac or Windows, be sure to restart adb and check to see that the device now appears in the devices list when you perform the adb devices command, like so:
adb kill-server
adb start-server
adb devices
Provided your output looks something like:
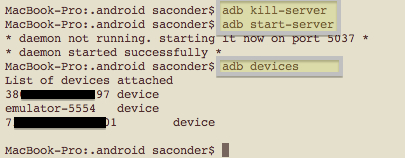
you should be ready to go.
Part II: Kindle Fire Development Tips
Make no mistake: Kindle Fire is a tablet device, but it does not run a tablet-optimized version of Android. Kindle Fire is an Android device, but does not run the typical Google apps nor does it have the typical Android user experience. Kindle Fire is not a phone and not really even a communications device. That is, there are many device limitations and differences to be aware of when developing and testing applications for distribution on Amazon's Kindle Fire.
Here is a list of some tips to get you started. This list is by no means comprehensive.
Tip 1: No Google
Kindle Fire has no Google services. In particular, when developing apps make sure to use the AOSP version of the SDK -- not the Google APIs version. For example, assume any Google specific intents will fail.
Tip 2: A Tablet Without Honeycomb or Ice Cream Sandwich
Amazon built the Kindle Fire OS using Android 2.3.4, Gingerbread (API Level 10). This is not a tablet-optimized version of Android. As such, to get some APIs useful for tablet development, such as Fragments, you must leverage the Android Support Package.
Kindle Fire is still a large screen device, though. Make sure your app has large screen device support marked in the manifest file and test in both portrait and landscape mode thoroughly.
Tip 3: Use Amazon Appstore for Android
As Kindle Fire has no Google services, it does not have Android Market installed. Instead, it uses Amazon's Appstore for Android. You'll need to publish your applications on Amazon's Appstore and any other applications that our application integrates with must be published this way as well.
Tip 4: Limited Hardware
Kindle Fire has no camera, no Bluetooth, no microphone, no 3G radio (at least, for now), few hardware sensors, and almost no physical buttons. In fact, there's only one button -- the power button. This means several things: If your app requires any of the hardware support that Kindle Fire does not have, your app won't work very well (if at all) on the device. Ideally, design your applications to support optional hardware features conditionally, and provide alternative behavior when the features or services are unavailable.
When it comes to in-app instructions, don't reference the physical buttons the device does not have. It doesn't have volume buttons. It doesn't have physical buttons for Menu, Back, Home, etc.
Tip 5: Software Differences
The Kindle Fire OS may not look like the Android OS you're used it. It's got a custom user experience, with a home screen that lists the most recently used items -- not just apps, but books, music, movies, etc. Users can also pin favorites to the home screen. Missing is any sort of live wallpaper or App Widget support. The top status bar can be tapped to open, but swiping down doesn't work. Notifications will show in the tray as you might be accustomed to, but not on the status bar. Instead, just a number shows up to indicate the number of notifications. These changes simplify the user experience and serve to remind us developers that it's a special, branded device -- an ebook reader at heart -- and not your vanilla Android tablet.
Tip 6: Fuzzy App Icons
If you're loading apps through ADB or another method, you may have noticed that the app icons on the home screen are small and fuzzy compared to the apps and books that show up through the Kindle Fire interface. As it turns out, the graphics for apps and media purchased through Amazon are loaded from a web service rather than referenced from the manifest file. So, once you get your application on the Amazon Appstore, and download it via the store, your application icon graphics appear correctly.
Conclusion
Amazon's Kindle Fire is a top selling popular Android tablet. It has no Google services and the platform has been customized by Amazon, so supporting this device may not come as easily as other Android tablets. You've learned how to get connected to it and have been introduced to several tips to get started developing for Amazon's Kindle Fire. Let us know what apps you’re thinking of writing for this exciting new device in the comments!
About the Authors
Mobile developers Lauren Darcey and Shane Conder have coauthored several books on Android development: an in-depth programming book entitled Android Wireless Application Development, Second Edition and Sams Teach Yourself Android Application Development in 24 Hours, Second Edition. When not writing, they spend their time developing mobile software at their company and providing consulting services. They can be reached at via email to [email protected], via their blog at androidbook.blogspot.com, and on Twitter @androidwireless.
Need More Help Writing Android Apps? Check out our Latest Books and Resources!


Comments