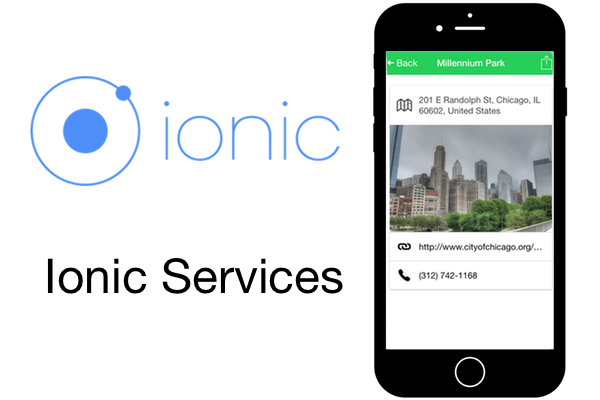
1. Introduction to Services
In the first and second part of this series on Ionic, we set up local development and built a couple of views to load a list of parks using some of the Ionic components, such as base navigation and list components. In this tutorial, we're going to dig into how Ionic provides a number of services that allow you to programmatically manage the app and interface.
Previously, we demonstrated how Ionic provides interactive features through components, which are used as HTML elements (implemented as Angular directives). However, there are some interface elements that don't make sense as components instantiated with HTML, such as a loader or action sheet overlays.
Let's start by taking a look at the role services play in your app. I've identified three primary types of services in Ionic:
- component services
- delegate services
- assistive services
Component Services
Component services empower the use of components, but instead of using HTML to declare them (like we saw with ionNavBar) they are managed using JavaScript. In other words, you'll be leveraging these components by adding code to your controllers. We'll be using two of these in the example below.
It can be useful to think of these services as components that have a life cycle. Typically, you want them to load at a specific point and, after they are done, they are removed. For example, $ionicModal allows you to create a modal. Modals have a life cycle, they are opened and closed for specific reasons. You might have a modal that asks users to log in or they can close the model to skip it, thus completing the life cycle.
Delegate Services
Some of the components have a companion delegate service that can modify or manage the component. You may want to programmatically manipulate a component after it was created and these services are designed to make that possible. They are so named since they delegate behavior to the component.
The ionNavBar component has a delegate service called $ionicNavBarDelegate. This service has several methods, but one example is the title() method, which allows you to update the title of the navigation bar. The scope of the features available for each delegate service varies, but they should be easy to spot in the documentation by the name.
Assistive Services
The last category are services that provide some sort of assistive functionality or provide information. There are only a few of them and they don't quite fit into the other two categories. Some examples are:
-
$ionicPlatform: helps you interact with the device hardware -
$ionicGesture: allows you to handle gesture events -
$ionicPosition: tells you the location of elements on the screen
These assistive services tend to help you develop logic or handle interaction. They don't generate or modify components on their own.
We'll also look at a few other things in this tutorial:
- CSS components, which are only visual and provide no functional logic unlike their JavaScript component siblings
- Ionic events, which we can leverage to hook
into events, for example, when the view is loading or has finished loading
- more navigation features, which make it easy to navigate, manage state, and add buttons to the navigation bar
Source Files
In this tutorial, we're going to extend the app we started in previous tutorial. Just a reminder, the app is designed to provide users information about their local public facilities, such as libraries and parks. The app already displays a list of parks in Chicago and now we'll add the ability to display loading indicators, view individual park detail screens, open an action menu, and implement some basic sharing features.
You can view the completed project on GitHub. The final example is also available to preview.
You can download the files or check them out using Git. Once you have the files on your machine, you need to run npm install to set up the project. If you check the code out using Git, you can code along if you reset the repo to match where the last part ended by running git checkout –b start. Once you have the files, start your Ionic server by running ionic serve.
2. Implementing a Loading Indicator
Currently, the app loads data and there is a little circle indicator from the infinite scroll component that displays until it loads. However, we actually want to overlay the entire app so it is very clear the app is loading.
The $ionicLoading service is very useful to overlay and block the user from interacting with the app until data has loaded. It is configurable. For example, you can declare if a loading icon or some text appears, if you want the backdrop or not, or if it should automatically hide after a certain length of time. You can see the loader in action in the screenshot below.
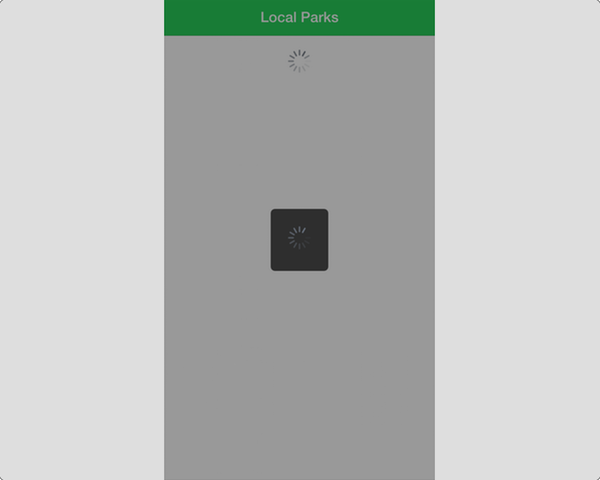
Open www/views/places.js to make a few modifications to use the loader. First, we need to inject the service into our controller by adding $ionicLoading to the function parameters. The service is pretty simple, it only has two methods, show() and hide(). We can make the loader show and hide by calling the methods like you see here in this snippet.
.controller('PlacesController', function($http, $scope, $ionicLoading, Geolocation) {
  var vm = this;
  var base = 'https://civinfo-apis.herokuapp.com/civic/places?type=park&location=' + Geolocation.geometry.location.lat + ',' + Geolocation.geometry.location.lng;
  var token = '';
  vm.canLoad = true;
  vm.places = [];

  $ionicLoading.show();

  vm.load = function load() {
    var url = base;
    if (token) {
      url += '&token=' + token;
    }

    $http.get(url).then(function handleResponse(response) {
      vm.places = vm.places.concat(response.data.results);
      token = response.data.next_page_token;

      if (!response.data.next_page_token) {
        vm.canLoad = false;
      }
      $scope.$broadcast('scroll.infiniteScrollComplete');
      $ionicLoading.hide();
    });
  };
});
The $ionicLoading.show() method is called as soon as the controller is loaded, which means it fires immediately. Now we need to tell the loader to hide after the data has finished loading as you see right after the $broadcast.
You may notice that the $ionicLoading.hide() method is called every time the data is loaded. This is not a problem. Since the loader is already hidden, this call doesn't have any effect.
We've now implemented an Ionic service. Pretty simple. Right? Some are a little more complex and we'll be working on another example using the action sheet. Before we get to that, though, we want to expand our app to have two views for both the notes list and viewing a note individually.
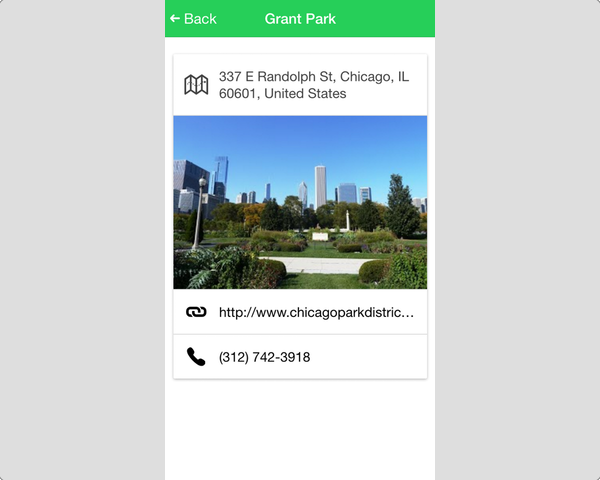
3. Adding the Note View
Our next step is to make a new view that will display more detail about a particular park. The information can vary from park to park, but we'll be focused on getting an image, website, phone, and address information. The results of adding this view are shown here.
To make a new view, create a file at www/views/place/place.js and include the content you see below. This is the controller and state definition for the place view.
angular.module('App')
.config(function($stateProvider) {
  $stateProvider.state('place', {
    url: '/places/:place_id',
    controller: 'PlaceController as vm',
    templateUrl: 'views/place/place.html',
    resolve: {
      Place: function($http, $stateParams) {
        var url = 'https://civinfo-apis.herokuapp.com/civic/place?place_id=' + $stateParams.place_id;
        return $http.get(url);
      }
    }
  });
})
.controller('PlaceController', function($scope, Place) {
  var vm = this;

  vm.place = Place.data.result;
});
If you take a look at the config() method, you see that we're declaring a new state. This is the ui-router in action, so you should consult the ui-router documentation for all the details about declaring states.
The object definition shows we're using a URL of /places/:place_id. When you see a part of the URL with a colon in front, such as :place_id, it marks this part of the path as a state parameter. The state is able to pull the value and provide it to you using the $stateParams object. For example, /places/12345 would result in $stateParams.place_id = '12345'.
You've seen the other parts of the definition previously, except for the resolve property. This is a feature that allows you to request various functions to be called prior to the state being created. It accepts an object of key and function values, so here we have Place as the key and the result of the function will be assigned to it.
In the function, it can accept parameters to inject, similar to what you can do with a controller. Here, the $http and $stateParams services are injected. The function then uses the value from the place_id passed via the URL and builds and returns an HTTP request. This is essentially what is done in the places view, except the controller does it.
The resolve feature is smart enough to determine that if you return a promise, it will wait for that promise to resolve before creating the state. In other words, $http.get() returns a promise to load the data and ui-router waits until the data is available before creating the state and passing the Place to the controller. The resolve feature is pretty useful for preloading data in your apps and this is a fairly basic example of how to leverage it.
Now that we have the state defined, the controller is declared and assigns the resulting data from Place (this is what was resolved in the state) to vm.place. We also need to make our template for this state, so create a new file at www/views/place/place.html and add the following content to it.
<ion-view view-title="{{vm.place.name}}">
  <ion-content>
    <div class="card" ng-if="vm.place">
      <div class="item item-text-wrap item-icon-left">
        <i class="icon ion-map"></i> {{vm.place.formatted_address}}</p>
      </div>
      <div class="item item-image" ng-if="vm.place.photos[0].photo_reference">
        <img ng-src="{{'https://civinfo-apis.herokuapp.com/civic/photo?photo_id=' + vm.place.photos[0].photo_reference}}">
      </div>
      <a ng-if="vm.place.website" class="item item-icon-left" ng-href="{{vm.place.website}}" target="_system">
        <i class="icon ion-link"></i> {{vm.place.website}}
      </a>
      <a ng-if="vm.place.formatted_phone_number" class="item item-icon-left" ng-href="tel://{{vm.place.formatted_phone_number}}">
        <i class="icon ion-ios-telephone"></i> {{vm.place.formatted_phone_number}}
      </a>
    </div>
  </ion-content>
</ion-view>
This template starts by using the ionView to wrap the content, so the Ionic navigation system can keep track of it properly. It also assigns a title based on the name of the place. The ionContent wrapper contains the primary content, and you'll notice that the template uses CSS classes instead of elements to create a card component.
In the previous part, we talked about how some of the components are CSS classes only. The card is one example of that. Conceptually, it is like a list. The inner contents stack vertically like a list, but the styling appears more like a card. This leverages the card stylings, which include features like image support, icons, and other neat layouts featured in the documentation.
There are a few ngIf directives used since there is no guarantee that the data returned will have a phone number or website. The ngIf directive make sure no empty values are displayed. It also uses ngHref or ngSrc to correctly build links.
You'll also notice the use of the tel:// protocol, which, when used on a phone, should prompt the user to call the number when they select it. It's a handy feature that is easy to use and integrates nicely on a physical device. Some programs on your computer, like Skype, may also try to handle making a phone call for you, depending on your settings.
This should give us a working view, but how do we navigate to it? We'll need to make a couple small modifications to make the navigation work from the places view.
4. Navigating Between Views
The ui-router provides a ui-sref directive that is used to link items to another state. In this case, we want each of the items in the list of the places view to link to the corresponding place view.
Open www/views/places/places.html and add the directive to link to each place. Update the ionItem with the new attribute here.
<ion-item ng-repeat="place in vm.places" class="item-avatar" ui-sref="place({place_id: place.place_id})">
The ui-sref directive has a format where you can link to another state by its name, not by some URL like you do with href. This is handy since URLs may change. It also can accept parameters to use to build the URL and, in our case, we want to pass the place.place_id property. The ui-sref takes properties as an object, so state-name({param: value}) is the syntax.
Now preview the app and select a park, it will navigate to the new place view and you can look at the address bar to see the URL adds a place_id value. However, we've now got a problem. How do we get back to the list?
We use the ionNavBackButton functionality to give us an automatic back button. Open www/index.html and add the following snippet inside the ionNavBar. This adds a back button that will only be displayed when there is a place to go back to.
<ion-nav-bar class="bar-balanced">
  <ion-nav-back-button class="button-clear">
    <i class="ion-arrow-left-c"></i> Back
  </ion-nav-back-button>
</ion-nav-bar>
Ionic's navigation is smart enough to keep track of the history while you use the app. If there is a previous view to return to, it will show the back button. Otherwise, it will simply be hidden.
We also want to declare that the places view should never show the back button, which we can do by adding the hideBackButton directive in www/views/places/places.html.
<ion-view view-title="Local Parks" hide-back-button="true">
While you are developing and previewing in the browser, sometimes the history gets reset. For example, when you are on the place view and you save a change in your editor, the browser reloads automatically and resets the history. In this case the back button doesn't appear as expected. You can fix this by returning back to the list and refreshing to set the history straight.
We've made good progress, but right now, when you tap an item in the list, it waits to transition to the new view until the API call returns with the data. It might appear fast to you, but sometimes it can be slow if the API is slow. It might cause someone to think the app is stuck, slow, or that it didn't register their tap since it didn't immediately start to react to the tap. We address this with some of the life cycle events that help us set up a loader to display during this time.
5. Adding the Loader During Transitions
To provide a better user experience, we are going to use the $ionicLoading service to overlay the app while the data loads for the place view. In order to know when to show and hide the loader, we use the life cycle events.
These events are fired based on navigation events, such as before/after entering a view or before/after leaving a view. You can do anything that might be required at these points in time, such as resetting some data or perhaps use it to submit usage information.
To demonstrate it, let's add one event listener to the places view that handles triggering the loader when you start to navigate to the place view. Open www/views/places/places.js and add the following to the controller. You also need to make sure that $scope is declared in the controller function parameters so it is available.
$scope.$on('$ionicView.beforeLeave', function() {
  $ionicLoading.show();
});
This is a scope event listener that is listening for the $ionicView.beforeLeave event (see Angular scope events). Ionic broadcasts this event to your controller and calls the anonymous function declared here. This function simply calls the $ionicLoading.show() method to turn on the loader.
This triggers the loader to appear as soon as the user taps an item. Now we add a similar snippet to the place view that handles hiding the loader when the view has finished loading. Open www/views/place/place.js and add the following to the controller. You need to add both $ionicLoading and $scope to the controller function parameters since they are not currently injected.
$scope.$on('$ionicView.afterEnter', function() {
  $ionicLoading.hide();
});
This listens for a different scope event that fires when the view has finished and calls the function to hide the loader. The loader is displayed in the time between the instant the user taps a place to view until the view has fully loaded. You could try other events and see when they trigger.
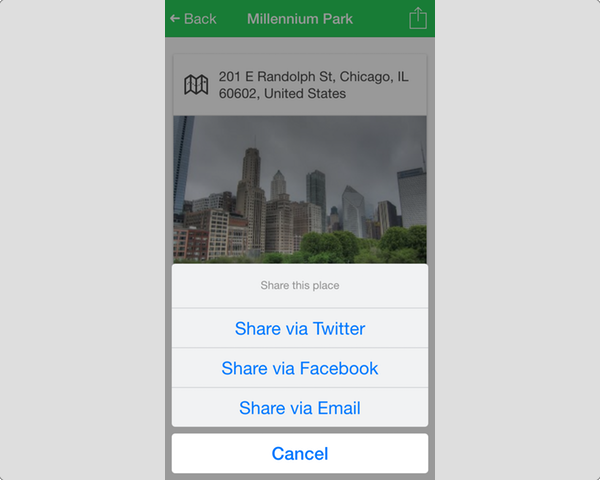
The last thing we do in this tutorial is set up an action sheet sharing button that allows you to post to Twitter, Facebook, or email and share the park information.
6. Sharing Button Using Action Sheet Service
Action sheets are pretty useful for providing a list of additional options. The intention is usually for situations where you want to present a list of actions that are grouped and, in our example, it is a list of ways to share the park information. The action sheet we'll build looks like this.
The action sheet service is a bit more complex than the loading service, because it handles configuration and user inputs. Open www/views/place/place.js and add this new method to your controller. You also need to make sure that $ionicActionSheet is injected into your controller.
vm.openSheet = function() {
  var sheet = $ionicActionSheet.show({
    titleText: 'Share this place',
    buttons: [
      { text: 'Share via Twitter' },
      { text: 'Share via Facebook' },
      { text: 'Share via Email'}
    ],
    cancelText: 'Cancel',
    buttonClicked: function(index) {
      if (index === 0) {
        window.open('https://twitter.com/intent/tweet?text=' +
          encodeURIComponent('I found this great place! ' + vm.place.url));
      } else if (index === 1) {
        window.open('https://www.facebook.com/sharer/sharer.php?u=' + vm.place.url);
      } else if (index === 2) {
        window.open('mailto:?subject=' + encodeURIComponent('I found this great place!') + '&body=' + vm.place.url);
      }
      sheet();
    }
  });
};
The openSheet() method is responsible for creating the action sheet. It does this by calling $ionicActionSheet.show(), which returns a function that is stored on sheet. That allows you to close the sheet when you are done with it later by calling sheet(). The show() method takes an object with a number of properties that we'll break down. There are several examples of Ionic services that follow this pattern, such as modals and popovers, so you can always handle closing them.
The sheet manages the title using the titleText property and is typically used to inform the user how to use the buttons. The cancelText property accepts a string that is used to enable a cancel button. If you don't declare this, no cancel button will be selected. You can also cancel by tapping in the backdrop outside of the buttons.
To declare the buttons you use the buttons property, which is an array of objects that have a text property. They are displayed in the order they are declared, so sort them accordingly.
The buttonClicked property takes a function and it passes the index of the button that was selected (as it was declared in buttons). Therefore, you can figure out what to do based on which index is passed. In this function, the index is checked and either opens Facebook, Twitter, or uses mailto: to trigger the email client.
It may open these links in the Facebook, Twitter, or email apps, depending on the user settings and perhaps the device, but it will at least open the links outside of your app (in an external browser). The final piece is to call the sheet() method, which closes the action sheet.
The action sheet is now ready for action, but we still need to add a button to trigger the sheet. To do this, we add a navigation bar button to the place view that calls vm.openSheet(). Open www/views/place/place.html and add the ionNavButtons snippet between the ionView and ionContent.
<ion-view view-title="{{vm.place.name}}">
  <ion-nav-buttons side="right">
    <button class="button button-clear" ng-click="vm.openSheet()">
      <i class="icon ion-ios-upload-outline"></i>
    </button>
  </ion-nav-buttons>
  <ion-content>
Here is yet another useful Ionic navigational feature that allows you to add a navigation bar button to a particular view using ionNavButtons. Any buttons inside are added to the navigation bar and you can configure on which side they appear.
At this point, everything is working. Users can open the action sheet to share the park with their friends.
Conclusion
In this tutorial, we covered Ionic services and how they are used. Along the way, we discovered a number of other Ionic features:
- Ionic services are called in controllers and typically have a life cycle independent of the current view.
- The
$ionicLoadingservice is useful to show and hide a loading indicator while your app loads data or has to otherwise block the user interface. - The
$ionicActionSheetservice presents the user with a list of buttons overlaying the app to provide easy access to important actions. - Ionic navigation features also include the
ionNavBackButtonto automatically show a back button when it is possible to go back.ionNavButtonsallows you to add navigation bar buttons to specific views. - Ionic has CSS components, like the card, that have no special interactive features and are used just by declaring CSS classes.
In the next installment, we'll dig even further into some of the navigation features of Ionic.
Create an Ionic Template and Win $1000
If you're already comfortable with the Ionic framework, then you may want to consider entering Envato's Most Wanted contest for Ionic templates. How? Create a unique Ionic template and submit it to Envato Market by 27 April 2016.
The five best templates receive $1000. Interested? Read more on the contest's website for details about the contest's requirements and guidelines.

Comments