The HealthKit framework was introduced last year at WWDC 2014 as a single place where apps can store, share, and read health-related data. The new Health app, which is the user's view into that data, was one of the flagship features of iOS 8.
One of the main benefits of HealthKit is that fitness and health-related apps can effortlessly share data with each other. During the past year, many developers adopted HealthKit into their apps and tech-savvy users have come to expect that any fitness app integrates with HealthKit.
There are many benefits, gotchas, and best practices when working with this new and exciting framework. Recently, I've had first-hand experience working with the HealthKit framework when I add support for HealthKit to one of my apps, Routie. If you are considering using HealthKit in your own app, then this tutorial is for you.
Why Should I Care About HealthKit?
I've already mentioned some of the benefits of HealthKit, but if you are not sold yet, then let me just say that it's really not that hard to integrate HealthKit. I would even go further and say that it's easier than most other new frameworks that Apple introduced. Obviously, this depends heavily on what you want to achieve with it. But in general, I would say that the ratio between the effort it takes to integrate HealthKit and the benefits it brings to your users is very favorable.
Apart from the straightforward integration into existing apps, it also brings the possibility of building entirely new category of apps. For example, you can pull various data from HealthKit, such as the user's workouts or blood pressure, and display them in an interesting way, leaving the hard work of collecting that data to other apps.
What Will You Learn?
My goal with this tutorial is to teach you the basics by building a sample app. In addition, I will give you a number of useful tips and tricks on how you could or should integrate HealthKit in your own apps. After reading this article, you should have a basic understanding of HealthKit, ready to use it in your apps.
What You Should Know
The following list includes a number of basic facts about HealthKit that you should be aware of:
- The HealthKit framework is available since iOS 8. Note that it's only available on iPhone, not iPad.
- Apple is serious about privacy and that's why you must explicitly request access to read and/or write to HealthKit for each data type you need to access. The user has the option to allow access for some types and deny it for others.
- The HealthKit framework makes heavy use of subclassing.
- There are two main data types, characteristics and samples. Characteristics, such as the user's birth date or blood type, usually don't change. Sample represent data at a particular point in time.
- Quantity samples are the most common data types. They include the user's height and weight, steps taken, the user's temperature, pulse rate, etc.
- Workouts, which belong to the samples category, are intended specifically for representing runs, walks, rides, etc.
For more information about the HealthKit framework, visit Apple's HealthKit Framework Reference.
Before We Get Started
I know you are probably eager to start with the sample project by now, but there are a few important things that you should be aware of before you dive in.
- The HealthKit store is encrypted when user's phone is locked. This means that you won't be able to read from it when your app is in the background. Writing to HealthKit, however, works even when the phone is locked.
- You must explain in your App Store description and in your app how your app will use the data obtained from HealthKit. Failing to do so might result in rejection of your app.
- There is a new section in the App Store review guidelines that covers HealthKit. You should definitely read through it before you decide whether to add support for HealthKit or not.
- Once your app integrates with HealthKit, you must provide a privacy policy for it. Apple even recommends some documents that specify what Health-related privacy policies should look like. It's important that the privacy policy tells the user how your app treats the their data.
Now that we got this out of the way, let's get started with the tutorial.
The Project
We will build a simple app that integrates with HealthKit and explains some of the basic concepts of the framework. In particular, we will:
- create a new project from scratch and enable HealthKit
- ask the user's permission to access their health-related data
- read the user's birth date
- write a weight sample to HealthKit
- write a workout to HealthKit
1. Setting Up the Project
Launch Xcode and select File > New > Project... From the iOS > Application section, select the Tabbed Application template and click Next.
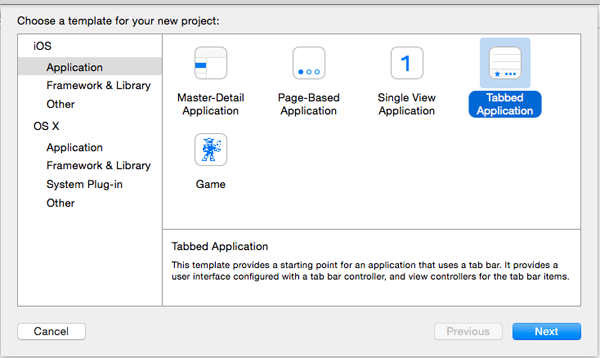
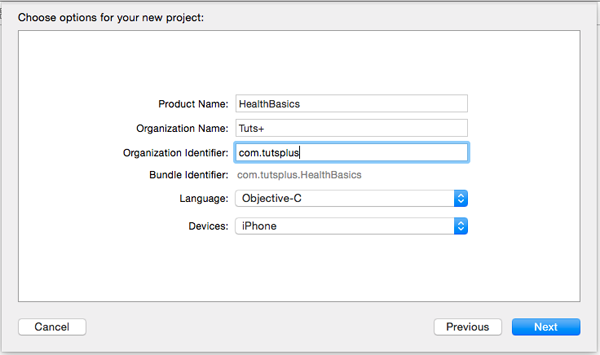
Enter HealthBasics as the project's Product Name and click Next. Select where you want to save the project and click Create.
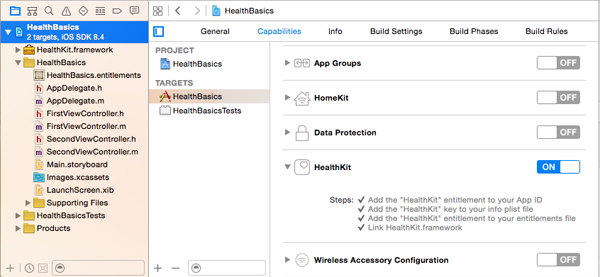
2. Enabling HealthKit
In the Project Navigator on the left, click the project, select the HealthBasics target, and open the Capabilities tab at the top. Scroll down to the HealthKit section and enable HealthKit toggling the switch on the right. Behind the scenes, Xcode will do the necessary for you to enable HealthKit.
3. Creating the User Interface
For this project, we won't be using size classes. Because size classes are enabled by default, we need to manually disable them in Xcode. In the Project Navigator on the left, select Main.storyboard. Open the File Inspector on the right and uncheck the checkbox labeled Use Size Classes.
Xcode will show you a warning dialog. Dismiss it by clicking Disable Size Classes, but make to keep size class data for iPhone as shown below.

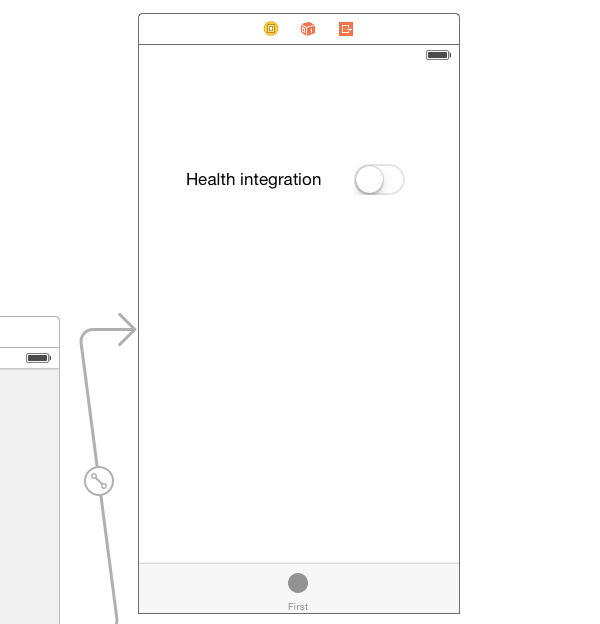
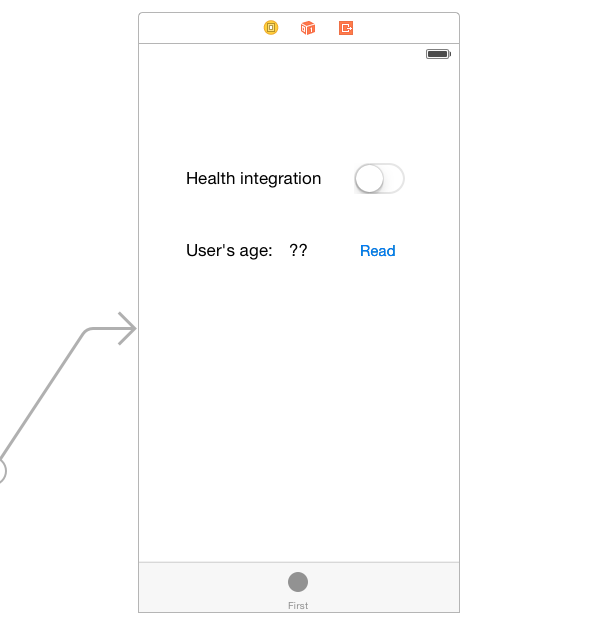
Remove the two labels in the First View Controller. Next, drag a label and a switch from the Object Library on the right onto the First View Controller. Change the label's text to Health integration and set the state of the switch to off.
Add two more labels and a button to the First View Controller. Change the first label's text to User's age:, change the second label's text to ??, and align them horizontally as shown in the below screenshot. Finally, change the button's title to Read and position it to the right of the second label. The first scene should now look like this:
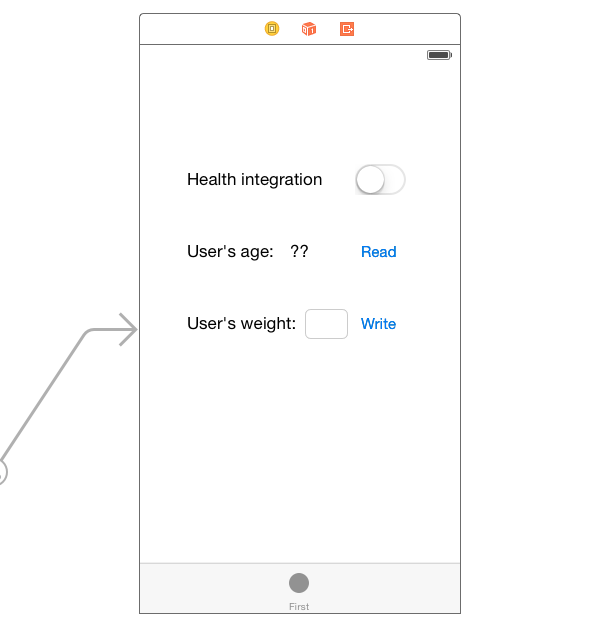
We're not done yet. Add one more label, a text field, and a button to the First View Controller, aligning them horizontally as shown below. Change the label's text to User's weight: and change the button's title to Write.
Select the text field you've just added and, in the Attributes Inspector, change its Keyboard Type to Numbers and Punctuation. That's it. The first scene should now look like this:
4. Creating the HealthKit Manager
We are going to keep HealthKit-related code in a separate class, the GSHealthKitManager class. Let's create that class now.
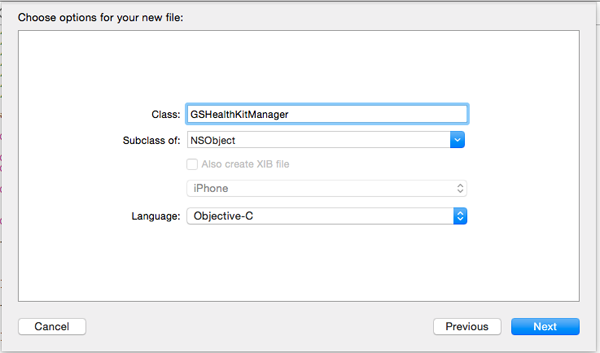
In the Project Navigator, right-click the HealthBasics group and select New File.... Make sure Cocoa Touch Class is selected from the list of templates and click Next. Name the class GSHealthKitManager and click Next.
Open the header file of the GSHealthKitManager class and replace the file's contents with the following code. Later, we will call these methods from the FirstViewController class.
#import <UIKit/UIKit.h>

@interface GSHealthKitManager : NSObject

+ (GSHealthKitManager *)sharedManager;

- (void)requestAuthorization;

- (NSDate *)readBirthDate;
- (void)writeWeightSample:(CGFloat)weight;

@end
Next, ope the implementation file of the GSHealthKitManager class and replace its contents with the following:
#import "GSHealthKitManager.h"
#import <HealthKit/HealthKit.h>


@interface GSHealthKitManager ()

@property (nonatomic, retain) HKHealthStore *healthStore;

@end


@implementation GSHealthKitManager

+ (GSHealthKitManager *)sharedManager {
    static dispatch_once_t pred = 0;
    static GSHealthKitManager *instance = nil;
    dispatch_once(&pred, ^{
        instance = [[GSHealthKitManager alloc] init];
        instance.healthStore = [[HKHealthStore alloc] init];
    });
    return instance;
}

- (void)requestAuthorization {

    if ([HKHealthStore isHealthDataAvailable] == NO) {
        // If our device doesn't support HealthKit -> return.
        return;
    }

    NSArray *readTypes = @[[HKObjectType characteristicTypeForIdentifier:HKCharacteristicTypeIdentifierDateOfBirth]];

    NSArray *writeTypes = @[[HKObjectType quantityTypeForIdentifier:HKQuantityTypeIdentifierBodyMass]];

    [self.healthStore requestAuthorizationToShareTypes:[NSSet setWithArray:readTypes]
                                             readTypes:[NSSet setWithArray:writeTypes] completion:nil];
}

- (NSDate *)readBirthDate {
    NSError *error;
    NSDate *dateOfBirth = [self.healthStore dateOfBirthWithError:&error];   // Convenience method of HKHealthStore to get date of birth directly.

    if (!dateOfBirth) {
        NSLog(@"Either an error occured fetching the user's age information or none has been stored yet. In your app, try to handle this gracefully.");
    }

    return dateOfBirth;
}

- (void)writeWeightSample:(CGFloat)weight {

    // Each quantity consists of a value and a unit.
    HKUnit *kilogramUnit = [HKUnit gramUnitWithMetricPrefix:HKMetricPrefixKilo];
    HKQuantity *weightQuantity = [HKQuantity quantityWithUnit:kilogramUnit doubleValue:weight];

    HKQuantityType *weightType = [HKQuantityType quantityTypeForIdentifier:HKQuantityTypeIdentifierBodyMass];
    NSDate *now = [NSDate date];

    // For every sample, we need a sample type, quantity and a date.
    HKQuantitySample *weightSample = [HKQuantitySample quantitySampleWithType:weightType quantity:weightQuantity startDate:now endDate:now];

    [self.healthStore saveObject:weightSample withCompletion:^(BOOL success, NSError *error) {
        if (!success) {
            NSLog(@"Error while saving weight (%f) to Health Store: %@.", weight, error);
        }
    }];
}

@end
While most of the HealthKit-related code is easy enough to understand, let's go over each method to make sure we're on the same page.
-
sharedManageris a class method that creates the singleton object the first time it is called, and returns that instance each time the method is invoked. Thedispatch_oncefunction is a GCD (Grand Central Dispatch) function that guarantees that the block passed to it is called only once, even if thesharedManagermethod would get called from multiple threads at the same time. -
requestAuthorizationis a method that asks the HealthKit store for permissions to read and/or write the specific data that we need. You need to call this method before you use any of the writing/reading APIs of theHKHealthStoreclass. In case the user denies some (or all) permissions, HealthKit won't inform you about that. The fact that the user doesn't want to share some types of data is information in itself. That's how much Apple cares about privacy. - The
readBirthDatemethod returns the user's birth date. It returnnilif there was an error or if the user hasn't entered a birth date. -
writeWeightSample:saves a weight measurement to HealthKit. I've commented the code so you should have a general idea of what's going on in the method. Once we have theHKQuantitySampleobject, we save it to theHKHealthStoreinstance, using itssaveObject:withCompletion:method. This method is used for every type of health data and we will also use it in the second part of this tutorial when saving workouts.
In this step, you encountered a number of HealthKit classes. You can read more about each class in the HealthKit Framework Reference, but I'll give you a brief summary of each class.
-
HKHealthStoreThis is your window to HealthKit data. Apple recommends using just one instance of this class in your app and that lends itself to the singleton pattern really well. You use it for asking the user for permissions, saving samples and/or workouts to HealthKit, and querying the stored data. These are just a few of the tasks of theHKHealthStoreclass. -
HKUnitInstances of this class can represent either basic units, such as meters, seconds, and grams, or complex units that are created by combining basic units, such as km/h or or g/m³. Complex units can be conveniently created from strings. -
HKQuantityInstances of this class store a value (represented by double) for a given unit (represented byHKUnit). You can use thedoubleValueForUnit:method to convert the quantity's value to the unit that's passed in. An example of such a conversion would be creating distance quantity with unit of meters and asking for its value in feet. -
HKQuantityTypeHealthKit uses quantity types to create samples that store a numerical value. It is recommended to usequantityTypeForIdentifier:when creating quantity types. A few examples of quantity types are cycling distance, energy burned, steps, and flights climbed. -
HKQuantitySampleAn instance of this class represents a sample that has a quantity type (represented byHKQuantityType), a quantity (represented byHKQuantity), and a start and end date. In case the sample doesn't span over a period of time, the end date can be the same as the start date.
We can now use the GSHealthKitManager singleton from anywhere in our application to work with HealthKit.
Conclusion
In this tutorial, you learned about the basics of the HealthKit framework. I've introduced you to the framework and pointed out some of the caveats to watch out for. We've also built the foundation of the sample app and implemented the GSHealthKitManager class, which we'll use to interact with HealthKit.
In the second part of this series, we'll continue building the sample app and further integrate HealthKit. You can find the source files for this tutorial on GitHub.

Comments