When WordPress 3 presented us with the new Menus functionality, it changed the way we viewed navigation menus forever. No longer were we bound to using the normal page listing functions or building our own custom menu functions to integrate category and page menus as well as external or hard linked items within a nav menu. But just how custom can we get with this new functionality? In this tutorial, we'll dive deep into everything that the wp_nav_menu function can do, use the Walker Class to add a sub description, and touch on some of its related functions.
The Parameters
The function has several parameters to work with. Here are the defaults as listed in the WordPress.org Codex:
<?php $defaults = array(
	'theme_location'  => ,
	'menu'            => ,
	'container'       => 'div',
	'container_class' => 'menu-{menu slug}-container',
	'container_id'    => ,
	'menu_class'      => 'menu',
	'menu_id'         => ,
	'echo'            => true,
	'fallback_cb'     => 'wp_page_menu',
	'before'          => ,
	'after'           => ,
	'link_before'     => ,
	'link_after'      => ,
	'items_wrap'      => '<ul id=\"%1$s\" class=\"%2$s\">%3$s</ul>',
	'depth'           => 0,
	'walker'          =>
);
?>

<?php wp_nav_menu( $defaults ); ?>
Theme Location
Using this parameter, we can set a theme location which is then used on the Menus page to set a menu to work in that part of your theme, without having to manually define which menu should appear there. This is very helpful for theme distributors because you're able to use conditionals to display a menu only if the user has defined a menu for that location. The only other requirement is that you use the function register_nav_menu() to register those locations. This is usually done from your function files when you're setting up support for menus.
Let's start building our custom menu function parameters assuming that we've registered a theme location called "primary".
$params = array(
	'theme_location' => 'primary'
);
Menu
This parameter is used to manually define which menu should be used. In our example, we are only setting a generic menu location and not defining an exact one to use, but if we were wanting to tell the function to use a menu called "Primary Navigation", our parameters would look like this:
$params = array(
	'theme_location' => 'primary',
	'menu' => 'Primary Navigation'
);
Container
By default, our menu will be wrapped in a div, but if you're like me, you usually don't need this and probably want to cut back on the amount of divs and other tags being used to keep your code as tidy as possible. You could also use this parameter to define a different tag such as an html5 <section> or <nav>. For our example, we don't want a container to change the default container values since the Twenty Eleven theme styles rely on it being there.
Container Class and Container ID
As you can pretty much guess, these parameters are used to set a class and an ID to the container. Since we're omitting this altogether, we have no need to define values.
Menu Class and Menu ID
These work just like the previous parameters except this time we definitely want to set an ID of "nav" because that is the ID we'll use in our stylesheet to style the navigation bar.
$params = array(
	'theme_location' => 'primary',
	'container' => false,
	'menu_id' => 'nav'
);
Echo
You can use this parameter to tell whether you want to display (echo) the results, or return it for use in PHP. This item is boolean so to return it simply set this parameter to 0.
Fallback CB
This is a callback function that you can fallback to if no menu is found. By default it uses the old stand by wp_page_menu() and passes all of the same parameters to this function as well.
Before and After
These items are used to define what can be placed before and after the anchor tags (<a></a>). You could use these to precede each item with a vertical bar, or wrap the nav items in a span tag.
Link Before and Link After
These work the same as the previous items we covered except that whatever you define will be inside of the anchor tags. Our example doesn't require that we use these so we'll ignore them and let the default empty item be.
Items Wrap
By default, the items are wrapped in an unordered list with the menu id and menu class. This parameter lets you change that if you so desire.
Depth
This parameter is really nice for when you want to use the same menu twice but don't want any child items to display in the location you're setting up with the wp_nav_menu() function. For instance, if you want the primary navigation to include a second level dropdown, you could leave this at the default setting. Then if you wanted to use the same parent items in a footer navigation and omit the child items, you could set this parameter to a depth of 1. The default "0" means all levels will be output. To keep our example concise, we're assuming that the primary navigation doesn't include any child items.
Walker
The parameter is used to define a walker object which can be used to manipulate how the entire function works and outputs its information. We'll go over a good example in the next section.
Adding a Description to the Nav Menu Items
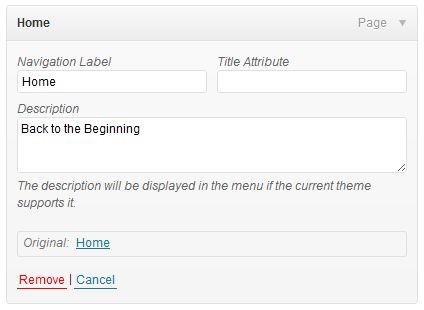
For our example, we want to add a sub description to each main menu item. The functionality to add the description itself is already in place in the WordPress Menu system. To turn this on, go to Menus and then press the screen options tab in the top right corner. The option you need to make sure is clicked should say, "Description". With this checked, a menu item should now look like this:
Once we have our descriptions filled out, we'll need to create the walker class and add it to the wp_nav_menu() parameters. We'll call the class description_navigation so our complete parameters code should look like this:
$params = array(
	'theme_location' => 'primary',
	'menu_id' => 'nav',
	'walker' => new description_walker()
);
wp_nav_menu($params);
The Walker Class
Now we're ready to add those descriptions in using our Walker class:
class description_walker extends Walker_Nav_Menu {
	function start_el(&$output, $item, $depth, $args) {
		global $wp_query;
		$indent = ( $depth ) ? str_repeat( "\t", $depth ) : '';

		$class_names = $value = '';

		$classes = empty( $item->classes ) ? array() : (array) $item->classes;

		$class_names = join( ' ', apply_filters( 'nav_menu_css_class', array_filter( $classes ), $item ) );
		$class_names = ' class="'. esc_attr( $class_names ) . '"';

		$output .= $indent . '<li id="menu-item-'. $item->ID . '"' . $value . $class_names .'>';

		$attributes  = ! empty( $item->attr_title ) ? ' title="'  . esc_attr( $item->attr_title ) .'"' : '';
		$attributes .= ! empty( $item->target )     ? ' target="' . esc_attr( $item->target     ) .'"' : '';
		$attributes .= ! empty( $item->xfn )        ? ' rel="'    . esc_attr( $item->xfn        ) .'"' : '';
		$attributes .= ! empty( $item->url )        ? ' href="'   . esc_attr( $item->url        ) .'"' : '';
		$description  = ! empty( $item->description ) ? '<span>'.esc_attr( $item->description ).'</span>' : '';

		if($depth != 0) {
			$description = $append = $prepend = "";
		}

		$item_output = $args->before;
		$item_output .= '<a'. $attributes .'>';
		$item_output .= $args->link_before .apply_filters( 'the_title', $item->title, $item->ID );
		$item_output .= $description.$args->link_after;
		$item_output .= '</a>';
		$item_output .= $args->after;

		$output .= apply_filters( 'walker_nav_menu_start_el', $item_output, $item, $depth, $args );
	}
}
There is a lot going on here. For more information on Walker classes in general, let me refer you to another tutorial: Understanding the Walker Class. The most important part you should understand here is that we're rebuilding the output of each link item and adding in the description. On line 19 of the snippet above you can see where we get the item description if it exists and make it the value of $description wrapped in a span tag so that we can style the descriptions separately. Then in lines 24-29 where we piece the link item back together, we add in the description right before the close of the anchor tag so that it becomes part of the link itself.
Using the Twenty Eleven theme, you should now have something that looks like this:

Style It Up
Let's add a bit of styling to make it more legible:
#nav a {
	line-height: 20px;
	padding: 10px 15px;
}

#nav a span {
	display: block;
	font-size: 11px;
	color: #ccc;
}

#nav a:hover span {
	color: #999;
}
This will change the height and padding of each link, cause the description within the span tag to drop to its own line, and adjust the font sizes and colors a bit for a final result that looks like this:

Relation Functions
Not only can you use wp_nav_menu() to output your menu with all customizations, you can go a little further with some of its related functions.
has_nav_menu()
This function is great for only displaying a particular menu if that menu has been assigned to your theme location. For instance, you may want to create a top navigation on your theme for lesser navigation items that a user may not want in their main navigation. This could be things like a home link, "Advertise With Us", or other lower calls to action. But as a theme distributor, if you don't know if that's going to be something the user wants to use, simply use a condition like so:
if (has_nav_menu('top-menu')) {
	wp_nav_menu('theme_location='top-menu');
}
wp_get_nav_menu_items()
This function will return an array of items from a particular menu. This may be particular useful if you want to build a custom menu list without using a Walker Class. You lose a lot of functionality such as the menu item's current class, but it's a great way to loop through an array of menu items for a simple solution.
Conclusion
There are a lot of things you can do to customize your navigation menus when you know more about the flexibility that is offered with built in parameters and being able to have greater control with the Walker Class. Need to add another span tag with the class of "icon" for custom icons to each item? No problem.
Being able to have full control over the placement and output of menus extends your capabilities as a theme developer an unmeasurable amount of possibilities. What are some of the things you can use that Walker class to do?

Comments