In the previous articles, we examined the MVC architecture and created our first controller, model, and view in the OpenCart application. We did this in order to help gain a better understanding of the core application.
To take things a step further, we're going to look at creating a custom module for OpenCart.
What Are OpenCart Modules?
OpenCart modules are analogous to add-ons, plugins, or extensions in other content management systems. It's through modules that OpenCart gives us the ability to extend its functionality without having to edit the application's files.
As with many other content management systems, it's generally considered to be a best practice to extend functionality of the core application through the provided APIs and OpenCart is no different. Modules allow us to introduce, remove, or modify functionality of the core application that's done in a compartmentalized and maintainable way.
OpenCart has its own Extension Market where a large number of extensions are already available. Or you can check out the wide range of OpenCart modules and extensions on Envato Market.
If you need a particular task completed in OpenCart and are struggling to do it yourself, try ordering one of the great value custom OpenCart development services on Envato Studio.
Our First Module
In order to get acclimated with OpenCart's module system, we can write the obligatory "Hello World" module. This will take input from the dashboard and display it on the front-end of the site.
Note that OpenCart has a number of pre-build modules. As such, we'll try to leverage those when possible when working on our own. To get started, perform the following:
- Create an Controller to Admin Path:
admin/controller/module/helloworld.php. - Create a Language File to Admin Path:
admin/language/english/module/helloworld.php. - Create a View to Admin Path:
admin/view/template/module/helloworld.tpl.
1. The Language File
As discussed in our previous articles, the language file contains the static text what should be displayed in our view file. For the helloworld.php language file, the following variables contain the possible text fields what we require to display in our module:
<?php
// Heading
$_['heading_title']       = 'Hello World';

// Text
$_['text_module']         = 'Modules';
$_['text_success']        = 'Success: You have modified module Hello World!';
$_['text_content_top']    = 'Content Top';
$_['text_content_bottom'] = 'Content Bottom';
$_['text_column_left']    = 'Column Left';
$_['text_column_right']   = 'Column Right';

// Entry
$_['entry_code']          = 'Hello World Code:';
$_['entry_layout']        = 'Layout:';
$_['entry_position']      = 'Position:';
$_['entry_status']        = 'Status:';
$_['entry_sort_order']    = 'Sort Order:';

// Error
$_['error_permission']    = 'Warning: You do not have permission to modify module Hello World!';
$_['error_code']          = 'Code Required';
?>
1. The Controller
Open the "Hello World" controller file that we just created and add the class class ControllerModuleHelloworld extends Controller {} following the Class Naming Convention. Next, place the following code inside the class.
Step 1: The Default Function
private $error = array(); // This is used to set the errors, if any.

public function index() {   // Default function
    $this->language->load('module/helloworld'); // Loading the language file of helloworld

	$this->document->setTitle($this->language->get('heading_title')); // Set the title of the page to the heading title in the Language file i.e., Hello World

	$this->load->model('setting/setting'); // Load the Setting Model  (All of the OpenCart Module & General Settings are saved using this Model )


	if (($this->request->server['REQUEST_METHOD'] == 'POST') && $this->validate()) { // Start If: Validates and check if data is coming by save (POST) method
		$this->model_setting_setting->editSetting('helloworld', $this->request->post);		// Parse all the coming data to Setting Model to save it in database.

		$this->session->data['success'] = $this->language->get('text_success'); // To display the success text on data save

		$this->redirect($this->url->link('extension/module', 'token=' . $this->session->data['token'], 'SSL')); // Redirect to the Module Listing
	} // End If

	/*Assign the language data for parsing it to view*/
	$this->data['heading_title'] = $this->language->get('heading_title');

	$this->data['text_enabled'] = $this->language->get('text_enabled');
	$this->data['text_disabled'] = $this->language->get('text_disabled');
	$this->data['text_content_top'] = $this->language->get('text_content_top');
	$this->data['text_content_bottom'] = $this->language->get('text_content_bottom');
	$this->data['text_column_left'] = $this->language->get('text_column_left');
	$this->data['text_column_right'] = $this->language->get('text_column_right');

	$this->data['entry_code'] = $this->language->get('entry_code');
	$this->data['entry_layout'] = $this->language->get('entry_layout');
	$this->data['entry_position'] = $this->language->get('entry_position');
	$this->data['entry_status'] = $this->language->get('entry_status');
	$this->data['entry_sort_order'] = $this->language->get('entry_sort_order');

	$this->data['button_save'] = $this->language->get('button_save');
	$this->data['button_cancel'] = $this->language->get('button_cancel');
	$this->data['button_add_module'] = $this->language->get('button_add_module');
	$this->data['button_remove'] = $this->language->get('button_remove');


    /*This Block returns the warning if any*/
	if (isset($this->error['warning'])) {
		$this->data['error_warning'] = $this->error['warning'];
	} else {
		$this->data['error_warning'] = '';
	}
	/*End Block*/

	/*This Block returns the error code if any*/
	if (isset($this->error['code'])) {
		$this->data['error_code'] = $this->error['code'];
	} else {
		$this->data['error_code'] = '';
	}
	/*End Block*/


	/* Making of Breadcrumbs to be displayed on site*/
	$this->data['breadcrumbs'] = array();

	$this->data['breadcrumbs'][] = array(
		'text'      => $this->language->get('text_home'),
		'href'      => $this->url->link('common/home', 'token=' . $this->session->data['token'], 'SSL'),
		'separator' => false
	);

	$this->data['breadcrumbs'][] = array(
		'text'      => $this->language->get('text_module'),
		'href'      => $this->url->link('extension/module', 'token=' . $this->session->data['token'], 'SSL'),
		'separator' => ' :: '
	);

	$this->data['breadcrumbs'][] = array(
		'text'      => $this->language->get('heading_title'),
		'href'      => $this->url->link('module/helloworld', 'token=' . $this->session->data['token'], 'SSL'),
		'separator' => ' :: '
	);

	/* End Breadcrumb Block*/

	$this->data['action'] = $this->url->link('module/helloworld', 'token=' . $this->session->data['token'], 'SSL'); // URL to be directed when the save button is pressed

	$this->data['cancel'] = $this->url->link('extension/module', 'token=' . $this->session->data['token'], 'SSL'); // URL to be redirected when cancel button is pressed


	/* This block checks, if the hello world text field is set it parses it to view otherwise get the default hello world text field from the database and parse it*/

	if (isset($this->request->post['helloworld_text_field'])) {
		$this->data['helloworld_text_field'] = $this->request->post['helloworld_text_field'];
	} else {
		$this->data['helloworld_text_field'] = $this->config->get('helloworld_text_field');
	}
	/* End Block*/

	$this->data['modules'] = array();

	/* This block parses the Module Settings such as Layout, Position,Status & Order Status to the view*/
	if (isset($this->request->post['helloworld_module'])) {
		$this->data['modules'] = $this->request->post['helloworld_module'];
	} elseif ($this->config->get('helloworld_module')) {
		$this->data['modules'] = $this->config->get('helloworld_module');
	}
	/* End Block*/

	$this->load->model('design/layout'); // Loading the Design Layout Models

	$this->data['layouts'] = $this->model_design_layout->getLayouts(); // Getting all the Layouts available on system

	$this->template = 'module/helloworld.tpl'; // Loading the helloworld.tpl template
	$this->children = array(
		'common/header',
		'common/footer'
	);  // Adding children to our default template i.e., helloworld.tpl

	$this->response->setOutput($this->render()); // Rendering the Output
}
Step 2: Validation Method
As we tried to validate data on save in default function. So here comes the validation method.
/* Function that validates the data when Save Button is pressed */
    protected function validate() {

		/* Block to check the user permission to manipulate the module*/
		if (!$this->user->hasPermission('modify', 'module/helloworld')) {
			$this->error['warning'] = $this->language->get('error_permission');
		}
		/* End Block*/

		/* Block to check if the helloworld_text_field is properly set to save into database, otherwise the error is returned*/
		if (!$this->request->post['helloworld_text_field']) {
			$this->error['code'] = $this->language->get('error_code');
		}
		/* End Block*/

		/*Block returns true if no error is found, else false if any error detected*/
		if (!$this->error) {
			return true;
		} else {
			return false;
		}
		/* End Block*/
	}
	/* End Validation Function*/
Now save the file and you're done with the Admin Controller of our Hello World Module!
3. View File
As previously done in controller, you have to create some HTML for the view. For that, we'll do the following:
Step 1: Build Some Basic Controls
A form is an element that will contain elements like an text input element, a textarea, and buttons for saving or canceling input.
To create a form like this, review the code below:
<?php echo $header; ?>
<div id="content">
  <div class="breadcrumb">
    <?php foreach ($breadcrumbs as $breadcrumb) { ?>
    <?php echo $breadcrumb['separator']; ?><a href="<?php echo $breadcrumb['href']; ?>"><?php echo $breadcrumb['text']; ?></a>
    <?php } ?>
  </div>
  <?php if ($error_warning) { ?>
  <div class="warning"><?php echo $error_warning; ?></div>
  <?php } ?>
  <div class="box">
    <div class="heading">
      <h1><img src="view/image/module.png" alt="" /> <?php echo $heading_title; ?></h1>
      <div class="buttons"><a onclick="$('#form').submit();" class="button"><?php echo $button_save; ?></a><a href="<?php echo $cancel; ?>" class="button"><?php echo $button_cancel; ?></a></div>
    </div>
    <div class="content">
      <form action="<?php echo $action; ?>" method="post" enctype="multipart/form-data" id="form">
        <table class="form">
          <tr>
            <td><span class="required">*</span> <?php echo $entry_code; ?></td>
            <td><textarea name="helloworld_text_field" cols="40" rows="5"><?php echo $helloworld_text_field; ?></textarea>
              <?php if ($error_code) { ?>
              <span class="error"><?php echo $error_code; ?></span>
              <?php } ?></td>
          </tr>
        </table>
Step 2: Adding a Table List
Under the form, a table list will appear where we can settle the module position and the page where the module to be displayed.
<table id="module" class="list">
          <thead>
            <tr>
              <td class="left"><?php echo $entry_layout; ?></td>
              <td class="left"><?php echo $entry_position; ?></td>
              <td class="left"><?php echo $entry_status; ?></td>
              <td class="right"><?php echo $entry_sort_order; ?></td>
              <td></td>
            </tr>
          </thead>
          <?php $module_row = 0; ?>
          <?php foreach ($modules as $module) { ?>
          <tbody id="module-row<?php echo $module_row; ?>">
            <tr>
              <td class="left"><select name="helloworld_module[<?php echo $module_row; ?>][layout_id]">
                  <?php foreach ($layouts as $layout) { ?>
                  <?php if ($layout['layout_id'] == $module['layout_id']) { ?>
                  <option value="<?php echo $layout['layout_id']; ?>" selected="selected"><?php echo $layout['name']; ?></option>
                  <?php } else { ?>
                  <option value="<?php echo $layout['layout_id']; ?>"><?php echo $layout['name']; ?></option>
                  <?php } ?>
                  <?php } ?>
                </select></td>
              <td class="left"><select name="helloworld_module[<?php echo $module_row; ?>][position]">
                  <?php if ($module['position'] == 'content_top') { ?>
                  <option value="content_top" selected="selected"><?php echo $text_content_top; ?></option>
                  <?php } else { ?>
                  <option value="content_top"><?php echo $text_content_top; ?></option>
                  <?php } ?>
                  <?php if ($module['position'] == 'content_bottom') { ?>
                  <option value="content_bottom" selected="selected"><?php echo $text_content_bottom; ?></option>
                  <?php } else { ?>
                  <option value="content_bottom"><?php echo $text_content_bottom; ?></option>
                  <?php } ?>
                  <?php if ($module['position'] == 'column_left') { ?>
                  <option value="column_left" selected="selected"><?php echo $text_column_left; ?></option>
                  <?php } else { ?>
                  <option value="column_left"><?php echo $text_column_left; ?></option>
                  <?php } ?>
                  <?php if ($module['position'] == 'column_right') { ?>
                  <option value="column_right" selected="selected"><?php echo $text_column_right; ?></option>
                  <?php } else { ?>
                  <option value="column_right"><?php echo $text_column_right; ?></option>
                  <?php } ?>
                </select></td>
              <td class="left"><select name="helloworld_module[<?php echo $module_row; ?>][status]">
                  <?php if ($module['status']) { ?>
                  <option value="1" selected="selected"><?php echo $text_enabled; ?></option>
                  <option value="0"><?php echo $text_disabled; ?></option>
                  <?php } else { ?>
                  <option value="1"><?php echo $text_enabled; ?></option>
                  <option value="0" selected="selected"><?php echo $text_disabled; ?></option>
                  <?php } ?>
                </select></td>
              <td class="right"><input type="text" name="helloworld_module[<?php echo $module_row; ?>][sort_order]" value="<?php echo $module['sort_order']; ?>" size="3" /></td>
              <td class="left"><a onclick="$('#module-row<?php echo $module_row; ?>').remove();" class="button"><?php echo $button_remove; ?></a></td>
            </tr>
          </tbody>
          <?php $module_row++; ?>
          <?php } ?>
          <tfoot>
            <tr>
              <td colspan="4"></td>
              <td class="left"><a onclick="addModule();" class="button"><?php echo $button_add_module; ?></a></td>
            </tr>
          </tfoot>
        </table>
      </form>
    </div>
  </div>
</div>
Step 3: Adding Some JavaScript
As you can see in the previous step, there is an "Add Module" button. Specifically, we have: <a onclick="addModule();" class="button"><?php echo $button_add_module; ?></a> where user can add multiple rows to display the output of the module in different layouts on different positions.
For that, we need to write some JavaScript that will append a row to the table list. This will improve the user interface for those using our module:
<script type="text/javascript"><!--
var module_row = <?php echo $module_row; ?>;

function addModule() {
	html  = '<tbody id="module-row' + module_row + '">';
	html += '  <tr>';
	html += '    <td class="left"><select name="helloworld_module[' + module_row + '][layout_id]">';
	<?php foreach ($layouts as $layout) { ?>
	html += '      <option value="<?php echo $layout['layout_id']; ?>"><?php echo addslashes($layout['name']); ?></option>';
	<?php } ?>
	html += '    </select></td>';
	html += '    <td class="left"><select name="helloworld_module[' + module_row + '][position]">';
	html += '      <option value="content_top"><?php echo $text_content_top; ?></option>';
	html += '      <option value="content_bottom"><?php echo $text_content_bottom; ?></option>';
	html += '      <option value="column_left"><?php echo $text_column_left; ?></option>';
	html += '      <option value="column_right"><?php echo $text_column_right; ?></option>';
	html += '    </select></td>';
	html += '    <td class="left"><select name="helloworld_module[' + module_row + '][status]">';
    html += '      <option value="1" selected="selected"><?php echo $text_enabled; ?></option>';
    html += '      <option value="0"><?php echo $text_disabled; ?></option>';
    html += '    </select></td>';
	html += '    <td class="right"><input type="text" name="helloworld_module[' + module_row + '][sort_order]" value="" size="3" /></td>';
	html += '    <td class="left"><a onclick="$(\'#module-row' + module_row + '\').remove();" class="button"><?php echo $button_remove; ?></a></td>';
	html += '  </tr>';
	html += '</tbody>';

	$('#module tfoot').before(html);

	module_row++;
}
//--></script>
Step 4: Adding a Footer
The last thing, we need to add a child footer in the end of the view:
<?php echo $footer; ?>
At this point, we're done preparing our first Hello World module. At this point, it's time to check whether our module is working or not.
To do that, login to dashboard and go to the Extensions > Modules page where you'll see a list of modules of OpenCart System. There will also be "Hello World" listed with an "Uninstalled" State, click on "Install" and try editing the module and you'll see a screen something like this:
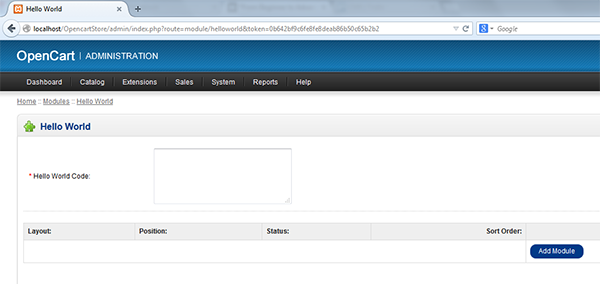
You can input some random value and try saving it, Now try editing the module again and you'll see you input entered as default.
Conclusion
In this article, we tried to build a basic OpenCart Module using MVC. It's easy to manipulate OpenCart Modules if you're familiar with the core concepts of MVC. This article gives just a basic idea how to develop a simple module following some simple steps.
In our next article, we're going to work with the frontend and will try to extend it for a store frontend. Please provide us with your feedback in the comments below!

Comments