I really like asynchronous module definition (AMD); it’s a great solution for managing the many JavaScript files in a web application. However, I do find it to be a bit of a hassle; some of the most popular libraries aren’t AMD-ready by default, so you’ll have to find shimmed version. Then, you require an extra library for the actual AMD functionality!
Jam solves all these problems; as you’ll see, it actually makes using AMD easier than not using it!
One of the reasons why I love Jam so much is that it’s a command line utility. You’ll never have to download a library manually again! Of course, this means that you’ll have to be comfortable on the command line for this tutorial to be useful.
One more thing, before we start: while I do explain a bit about AMD in this tutorial, I assume you understand what it is and why you would want to use it. If you’re a Tuts+ Premium member, you can check out these tutorials to get you up to speed:
Installing It
Jam is a Node module, so assuming that you have Node and npm installed, just run this on the command line:
npm install -g jamjs
Notice that we’re using the -g flag, so that Jam is installed globally. This is because we’re installing a binary that we can use for multiple projects.
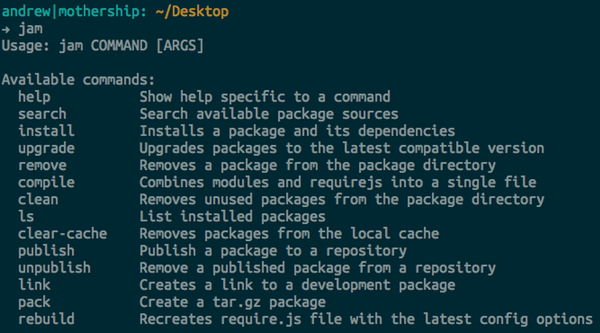
Once that has run, you should have a jam binary in your PATH (it’s installed to /usr/local/bin). You can see a list of the available Jam commands by running jam:
So, let’s start looking at some of these commands!
Downloading Packages
I’ve created an example project directory and cd-ed into it from the terminal. Now, let’s say we want to use jQuery in this project. There's no need to download the latest version or paste a link to a CDN. Just run this on the command line:
jam install jquery
You should see a few lines of output, implying that jQuery has been downloaded. If you check out your project directory, you should see that several files have been created:
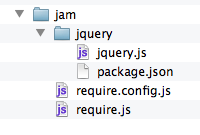
Jam creates a jam folder for us; this is where all the libraries we install with Jam will be kept. Notice, that’s also where the require.js file is held. Yes, it’s the RequireJS library that Jam is using.
So, installing a library is that simple. How about using it?
Using Libraries
In your project directory (but outside that jam folder), create a file named app.js. This will be a module of our own, so we have to use the define function (given to us by RequireJS). If you’ve used AMD before, you know that the define function takes two parameter: the array of dependencies and module function, which returns the module object. The module name is taken from the file path and name.
So, here’s a really basic module:
define(['jquery'], function ($) {
    return {
        init: function () {
            $("#main").text("Using Jam");
        };
});
In the dependency array, we require jQuery; we don’t have to use a whole path string, because require.js is configured so that just ”<lib-name>” will fetch the right path. The library will then be passed to our function. Then, in the function, we return a simple object with an init method that does a bit of jQuery magic.
Now, let’s create an index.html file. Really bare-bones:
<div id="main"></div>

<script src="jam/require.js"></script>
<script>
    require(['app'], function (App) {
        App.init();
    });
</script>
This time, we’re not using the define function, because we’re not defining a module. We’re just requiring other modules for our use, so we use the require function. If you load this up in the browser, you should see that the jQuery code in our module is being executed.
Maintaining Your Project
Before looking at a more advanced usage of Jam, let’s cover a few more basic commands.
We just installed jQuery 1.8.0. But let’s say jQuery 1.8.1 comes out; how do you go about updating your project? Couldn’t be simpler:
jam upgrade
# or
jam upgrade jquery
If you’ve installed a package, and then find you won’t need it, you can easily remove it with jam remove
:
jam remove jquery
You can see a list of all currently installed packages by running jam ls.
Those are the basics of using Jam. Let’s look at some more advanced uses.
Using the Package.json File
Using Jam by itself is great, but it can really do more if you’ve got a package.json file. If you’ve worked with Node much, you’ll probably be familiar with package.json files: they’re used for recording information about modules and cataloging dependencies for apps.
Let’s say we’ve got an Express app; to get this, install Express with npm install -g express and then run express myapp. Inside the myapp folder, the default package.json file for an Express app looks something like this:
{
    "name": "application-name",
    "version": "0.0.1",
    "private": true,
    "scripts": {
        "start": "node app"
    },
    "dependencies": {
        "express": "3.0.0beta7",
        "jade": "*"
    }
}
Jam actually has a few properties that we can add to this file; this won’t just make working with Jam easier: it will also make it easier for others to quickly get set up with the project (perhaps after cloning it off Github). We’ll start by adding a jam object literal as a root property:
{
// . . .
    "jam" : {

    }
}
The first useful property is the “packageDir”; as you know, this is a folder named jam by default. In an Express app, however, the client-side JS files should go in a static directory, usually called public. So, let’s do this:
"jam": {
    "packageDir": "public/lib"
}
Now, all the libraries (and require.js) will be in the lib folder, in public. However, when requesting the files, we don’t want to request /public/lib/file.js: we want to get /lib/file.js. So, we have to set the baseUrl:
"jam": {
    "packageDir": "public/lib",
    "baseUrl": "public"
}
Now, we can set dependencies in their own hash:
"jam": {
    "packageDir": "public/lib",
    "baseUrl": "public",
    "dependencies": {
        "jquery": "1.8.0",
        "backbone": null
    }
}
This says that we want to download jQuery 1.8.0 and the latest version of Backbone. Now save and close that package.json file and let’s install these libraries.
To do that, you simply run:
jam install
As you can see, both jQuery and Backbone are installed. Notice, also, that Underscore.js was installed; that’s because it’s a dependency of Backbone.
To make sure this all works, let’s build a super-small Express app. If you’ve never worked with Express before, don’t worry. We’ll just be adjusting a view.
In the myapp folder that Express generated, open views/index.jade in your favourite text editor. Remove all the content and replace it with this:
#main

script(src="lib/require.js")
script
    require(['app'], function (App) {
        // we'll come back to this.
    });
This is Jade code, and is similar to HAML. It should be fairly self-explanatory: the first line creates a <div> with an id with main. Then, we have two script tags.
We’ll put some JavaScript in there in a moment. First, in the public folder, create an app.js file and put this in it:
define(['jquery', 'backbone', 'underscore'], function ($, BB, _) {
    var site = new BB.Model({
        name: "Nettuts+",
        url: "http://net.tutsplus.com",
        twitter: "envatowebdev"
    }),

        SiteView = BB.View.extend({
        el: "#main",
        template: _.template("<p><a href='<%= url %>'><%= name %></a> | " +
                "<a href='http://twitter.com/<%= twitter %>'>@<%= twitter %></a></p>"),
        render: function () {
            this.el.innerHTML = this.template(this.model.toJSON());
            return this;
        }
    });

    return {
        site: site,
        SiteView: SiteView
    };
});
This does assume a little familiarity with Backbone, but it’s not too hard: We’re just creating a simple model, and a new View class to render that model (the View will render in the div#main element). The important things to notice here is how we’re using all three of our dependencies in the first define parameter. Then, they become the parameters of our module function. At the end, we return an object with our model and the View class.
Now, back in our views/index.jade file, we can fill in the content of that require call.
require(['app'], function (App) {
    new App.SiteView({ model: App.site }).render();
});
Now, back on the command line, let’s install the Express dependencies and start up the server:
npm install && npm start
Once the server starts, head over to localhost:3000. You should see the rendered view: just two links. Super-simple, but we know all the parts are working.
Compiling Your Scripts
The next step when using AMD is to compile the many script files you’ve got into a single file, to be used in production. Again, Jam makes this incredibly easy. Just run this:
jam compile output.js
This output.js file will have the contents of require.js as well as all our libraries, so it can replace the require.js file we’re currently pulling into our index.jade. However, the Jam docs suggest something that makes it even easier: overwrite that require.js. This way, you don’t have to change anything in your HTML files or templates. So, I’ll run this:
jam compile public/lib/require.js
Now, if you refresh the page, you’ll notice we’re loading our single require.js file, and then using that to get our app.js file. But let’s take this one step further: run
jam compile -i app public/lib/require.js
Here, we’re telling it that the input (-i) for the compilation should be the app module. Jam knows to look in the public folder, because of our package.json settings, and, of course, the file will be
I should note that if you install another package via Jam, this compiled require.js file will be overwritten. Everything will still work, just as before; you’ll just have to recompile before pushing to production again. You can reset the file on your own by running jam rebuild (You can also use this command to rebuild the require.js file after changing configuration options in the package.json).
Finding Packages
Well, up until this point, Jam is all pretty slick. But there’s a catch, of course: the whole idea of Jam depends on the packages you want being available, right? So how do you find these packages?
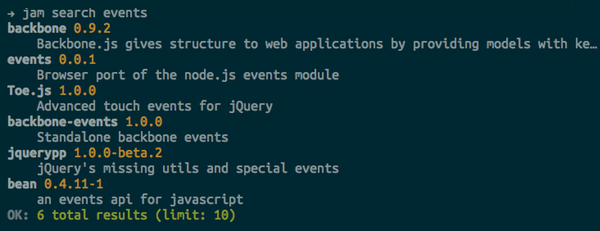
Two ways. First, there’s the command line tool jam search. Just add a search term and you’ll get a list of the available packages that match your query. For example, here’s what I get when I run jam search events:
If you’d prefer a GUI, you can head over to http://jamjs.org/packages to browse through the available ones.
If you’re interested in developing packages to share via Jam, you shouldn’t find it to difficult. Check out the package development documentation for details on what to do.
Conclusion
It makes a "kinda-tough" best practice as frictionless as possible!
AMD is a great way to organize a large JavaScript application, but it can be a bit of a hassle to use. Like I said, that’s why I love Jam: it makes a "kinda-tough" best practice as frictionless as possible! Before, I wouldn’t use AMD because of the extra work; now, with Jam, it’s easier to use it than not to.
So, what do you think of Jam? Will it make AMD easier for you? Or do you already have an AMD workflow that you prefer? Let’s hear it in the comments!

Comments