With the introduction of iOS 5, hundreds of new API's have become available to iOS developers. One of the less publicized features was the addition of a geocoding API as part of the Core Location framework. The class handling the geocoding requests is CLGeocoder. In the next twenty minutes, I will show you how to build an application that converts a physical address into a pair of coordinates by using CLGeocoder.
What is geocoding? Geocoding is a fancy word for associating a pair of coordinates with a physical address (reverse geocoding) and vice-versa (forward geocoding). Even though MapKit has had the ability to reverse geocode coordinates with MKReverseGeocoder since the release of iOS 3, MKReverseGeocoder has been deprecated as of iOS 5. CLGeocoder handles geocoding in iOS 5 and it does it in an easy and elegant manner. As its name indicates, CLGeocoder is part of the powerful Core Location framework. In addition to reverse geocoding, CLGeocoder can also translate physical addresses into locations (forward geocoding) and that is exactly what we will do in this tutorial.
We will build an application that lets the user enter a street, city, and country, and our application will return a latitude and longitude for the address as well as a possible name of the location, a so-called area of interest.
How does CLGeocoder do this? The Core Location framework connects to a web service behind the scenes, but you, as a developer, don't have to deal with the nitty gritty details. CLGeocoder is therefore very easy to use.
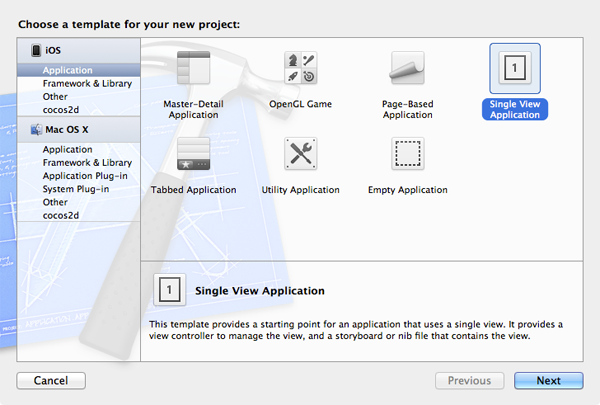
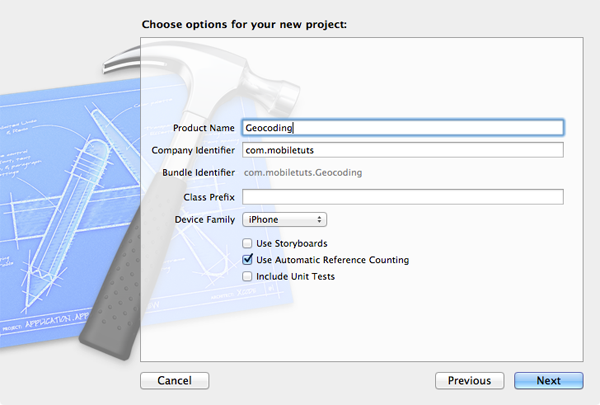
Step 1: Project Setup
Fire up Xcode and create a new project by choosing the Single View Application template. Name your application Geocoding, enter a company identifier, select iPhone for the device family, and make sure to check Use Automatic Reference Counting. You can leave the Class Prefix field empty and the remaining checkboxes unchecked. Choose a location to save your project and hit Create.
Step 2: Creating the User Interface
We start by creating the user interface of our application. Before opening our view controller's XIB file, however, we need to create six outlets and one action. Select your view controller's header file and declare the outlets and action as shown in the snippet below.
#import <UIKit/UIKit.h>

@interface ViewController : UIViewController {
    __weak UITextField *_streetField;
    __weak UITextField *_cityField;
    __weak UITextField *_countryField;
    __weak UIButton *_fetchCoordinatesButton;
    __weak UILabel *_nameLabel;
    __weak UILabel *_coordinatesLabel;
}

@property (nonatomic, weak) IBOutlet UITextField *streetField;
@property (nonatomic, weak) IBOutlet UITextField *cityField;
@property (nonatomic, weak) IBOutlet UITextField *countryField;
@property (nonatomic, weak) IBOutlet UIButton *fetchCoordinatesButton;
@property (nonatomic, weak) IBOutlet UILabel *nameLabel;
@property (nonatomic, weak) IBOutlet UILabel *coordinatesLabel;

- (IBAction)fetchCoordinates:(id)sender;

@end
The first three outlets are instances of UITextField in which the user can enter a street, city, and country. The fourth outlet is an instance of UIButton that will trigger our action when the user taps it. The final two outlets are instances of UILabel which we will use to display the results of our geocoding request. If our geocoding request returns successfully, we will display the name of the location in the first label (more about this later) and the coordinates of the location in the second label. Don't worry if this confuses you. It will make more sense once we wire everything up in our xib file.
We also declare one method that will (1) fire and (2) handle our geocoding request. This action will be hooked up to our button. Are you wondering why we need an outlet for our button? I will tell you more about that at the end of this tutorial.
Don't forget to synthesize accessors for the outlets. You should also create an empty implementation of our action to avoid any compiler warnings.
@synthesize streetField = _streetField, cityField = _cityField, countryField = _countryField, fetchCoordinatesButton = _fetchCoordinatesButton, nameLabel = _nameLabel, coordinatesLabel = _coordinatesLabel;

- (IBAction)fetchCoordinates:(id)sender {
    NSLog(@"Fetch Coordinates");
}
Ready? Head over to our view controller's xib file and drag three text fields, one button, and two labels to your view controller's view. Position them like I have in the figure below and give the button a title of Fetch Coordinates to let the user know what will happen when the button is tapped.
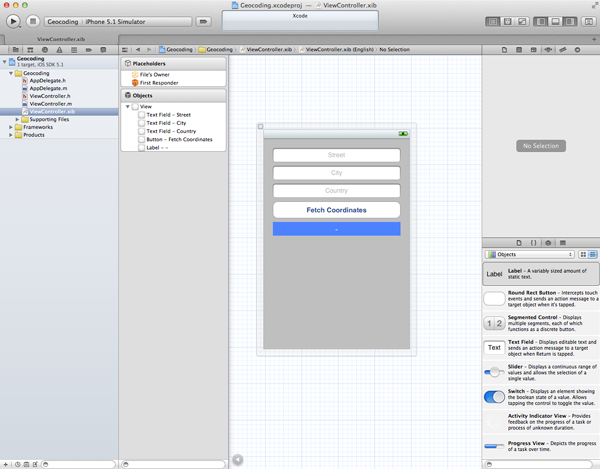
Make sure to add a placeholder to each text field to let the user know what type of information each text field expects. I have also configured the labels to have white text on a blue background to let it stand out.
Let's see what we have so far. The user can enter a street and number in the first text field, a city in the second text field, and a country in the third text field. When the user taps the Fetch Coordinates button, our application will make a geocoding request for the address that the user has entered. If our request is successful, we display the name of the location and the coordinates (latitude and longitude) in the labels.
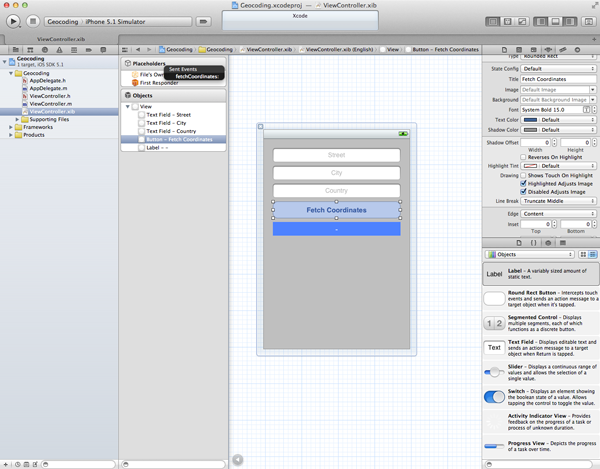
With the user interface in place, we are ready to wire up our outlets and action. For the outlets, press the control key and drag from the File's Owner to the text fields and choose the appropriate IBOutlet from the menu that pops up. Do the same for the button and labels. For the action, press the control key once more and drag from our button to the File's Owner and choose the fetchCoordinates: method from the menu that shows up. This will connect our action to the button's UIControlEventTouchUpInside event and that is exactly what we want.
Step 3: Adding Core Location To The Mix
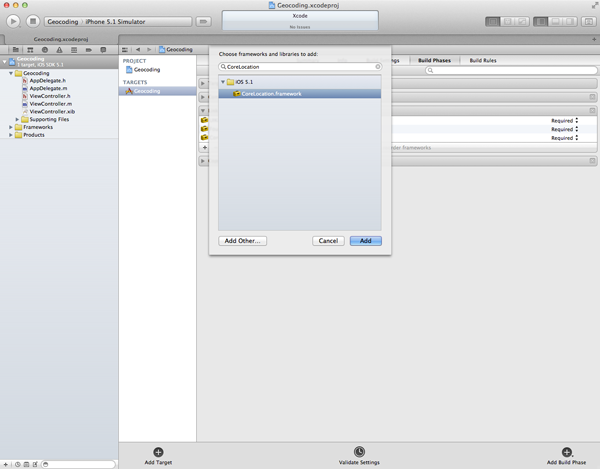
Before we start implementing the fetchCoordinates: method, we need to add the Core Location framework to our project. Select our project in the Project Navigator and choose the only target in the targets list. At the top, choose the Build Phases tab and open the Link Binary With Libraries drawer. Hit the plus sign and choose Core Location from the list that appeaers. Our project is now linked against the Core Location framework.
There is one last thing we need to do before we can make use of the Core Location framework. Navigate back to our view controller's header file and add a new import statement below the UIKit import statement.
#import <UIKit/UIKit.h>
#import <CoreLocation/CoreLocation.h>
The import statement imports the Core Location framework headers and ensures that we can use its functionality in our view controller. We also need to create an instance variable for the geocoder object that we will use to make geocoding requests. As I mentioned at the start of this tutorial, we will be using an instance of CLGeocoder for this purpose. Add an instance variable and a property to your view controller's header file and don't forget to synthesize its accessors in your view controller's implementation file. We are now ready to do some magic.
#import <UIKit/UIKit.h>
#import <CoreLocation/CoreLocation.h>

@interface ViewController : UIViewController {
    CLGeocoder *_geocoder;

    __weak UITextField *_streetField;
    __weak UITextField *_cityField;
    __weak UITextField *_countryField;
    __weak UIButton *_fetchCoordinatesButton;
    __weak UILabel *_nameLabel;
    __weak UILabel *_coordinatesLabel;
}

@property (nonatomic, strong) CLGeocoder *geocoder;

@property (nonatomic, weak) IBOutlet UITextField *streetField;
@property (nonatomic, weak) IBOutlet UITextField *cityField;
@property (nonatomic, weak) IBOutlet UITextField *countryField;
@property (nonatomic, weak) IBOutlet UIButton *fetchCoordinatesButton;
@property (nonatomic, weak) IBOutlet UILabel *nameLabel;
@property (nonatomic, weak) IBOutlet UILabel *coordinatesLabel;

- (IBAction)fetchCoordinates:(id)sender;

@end
// Remember to synthesize the geocoder:
@synthesize geocoder = _geocoder;


- (IBAction)fetchCoordinates:(id)sender {
    NSLog(@"Fetch Coordinates");
}
Step 4: Forward Geocoding
I will go through the fetchCoordinates: method step by step. We first check if our geocoder instance is set. If this is not the case, we initialize it. It is often good practice to only initialize an object when you actually need it.
if (!self.geocoder) {
    self.geocoder = [[CLGeocoder alloc] init];
}
In this example we will make a forward geocoding request, which means that we send an address to the web service that Core Location talks to and it will send location data back to us. The method that we will be using accepts an address string, which means that we need to concatenate the address data from our text fields.
NSString *address = [NSString stringWithFormat:@"%@ %@ %@", self.streetField.text, self.cityField.text, self.countryField.text];
Finally, we call geocodeAddressString:completionHandler: on our geocoder object. This method accepts two arguments: (1) our address string and (2) a completion block. This is another neat application of blocks that demonstrates the power they harness.
[self.geocoder geocodeAddressString:address completionHandler:^(NSArray *placemarks, NSError *error) {
    if ([placemarks count] > 0) {
        CLPlacemark *placemark = [placemarks objectAtIndex:0];
        CLLocation *location = placemark.location;
        CLLocationCoordinate2D coordinate = location.coordinate;

        self.coordinatesLabel.text = [NSString stringWithFormat:@"%f, %f", coordinate.latitude, coordinate.longitude];

        if ([placemark.areasOfInterest count] > 0) {
            NSString *areaOfInterest = [placemark.areasOfInterest objectAtIndex:0];
            self.nameLabel.text = areaOfInterest;
        } else {
            self.nameLabel.text = @"No Area of Interest Was Found";
        }
    }
}];
The completion block takes two arguments, (1) an array of locations (so-called placemarks) and (2) an error in case something goes wrong. Why do we get an array of locations instead of just one location? When the address we send to the web service is not specific enough, it is possible that the web service returns not one, but several placemarks that match the address. Several what? A placemark, an instance of CLPlacemark, is a container for data associated with a pair of coordinates. It contains more than just the coordinates, such as the street, city, and country, and also areas of interest, such as buildings, national parks, and historic monuments.
For our project, we only want the coordinate of the placemark and the area of interest if there is one. I encourage you to log the entire array of placemarks to the console to see what it contains. This is always a good way to explore new API's.
In our completion block, we first check whether our array of placemarks contains any objects, in other words, has the web service been able to associate a location with our address. If we have a non-empty array, we grab the first object. Of course, in a real application you might want to do some error checking to make sure you found a placemark that is of interest to you and also ensure that the error of the completion block is nil.
One of the properties of a CLPlacemark instance is its location, which is a CLLocation object. If you are not familiar with CLLocation objects, they contain the coordinate (CLLocationCoordinate2D) that we are looking for, but also a measure for the accuracy of the location. CLLocation objects are used throughout the Core Location framework and are amazingly useful.
To display the result of our request on the screen, we grab the latitude and longitude of the placemark's location property and display it in our label. We also check if the placemark's array of areas of interest is non-empty. If it is, then we grab the first object it contains (an instance of NSString) and display it in our first label. If no areas of interest were found, we tell the user by displaying a simple message.
I want to add one final touch to our applicatoin to improve the user experience and also to follow Apple's guidelines. When we make a geocoding request, we don't get an immediate response. As I mentioned earlier, the Core Location framework talks to a web service and receives a response. When the response arrives depends on various factors, such as the speed of our network connection. The documentation of CLGeocoder states that requests to the webserivce should be made sparingly. In other words, the user (1) shouldn't make several requests in a short time interval by tapping the button multiple times and (2) the user shouldn't be able to make a request before the active request has returned a response. To accomplish the latter, we disable the button until the request is finished (successfully or unsuccessfully). To do this, we disable the button before we make the request and enable the button again in the completion block. Take a look at the complete implementation of our fetchCoordinates: method for clarification. Run your application and enter an address to put it through its paces.
- (IBAction)fetchCoordinates:(id)sender {
    if (!self.geocoder) {
        self.geocoder = [[CLGeocoder alloc] init];
    }

    NSString *address = [NSString stringWithFormat:@"%@ %@ %@", self.streetField.text, self.cityField.text, self.countryField.text];

    self.fetchCoordinatesButton.enabled = NO;

    [self.geocoder geocodeAddressString:address completionHandler:^(NSArray *placemarks, NSError *error) {
        if ([placemarks count] > 0) {
            CLPlacemark *placemark = [placemarks objectAtIndex:0];
            CLLocation *location = placemark.location;
            CLLocationCoordinate2D coordinate = location.coordinate;

            self.coordinatesLabel.text = [NSString stringWithFormat:@"%f, %f", coordinate.latitude, coordinate.longitude];

            if ([placemark.areasOfInterest count] > 0) {
                NSString *areaOfInterest = [placemark.areasOfInterest objectAtIndex:0];
                self.nameLabel.text = areaOfInterest;
            }
        }

        self.fetchCoordinatesButton.enabled = YES;
    }];
}
We could take it one step further by displaying an activity indicator during the request and hiding the button, but I leave that up to you as a challenge. I have added this feature to the source code that accompanies this tutorial.
Conclusion
Core Location has become a very powerful framework and CLGeocoder is just one of the many classes that help you accomplish a complex task with ease and very little overhead. Enjoy!

Comments