WordPress offers the Quick Edit form to manage taxonomy term information... which is great, but what if you want to edit more than just your term name and slug? This tutorial will explain how to extend this wonderful WordPress feature to update more than the basics.
Introduction
The Quick Edit feature in WordPress is a simple tool used to allow users to edit pieces of data associated with posts, pages and terms without the hassle of navigating to a separate page prior to editing the data. The use of Quick Edit is ubiquitous throughout WordPress and this tutorial will teach readers how to harness the power of this feature to use with taxonomy terms. After working through the following five steps, you will be able to successfully add taxonomy term meta data via the Quick Edit panel in WordPress.
-
Preparing a Practical Example
- Registering the Custom Taxonomy
- Enabling Taxonomy Term Meta Data
- Creating Term List Table Columns
- Adding Content to the Quick Edit Form
- Saving Form Data
- Pre-Populating Form Fields
Step 1 Preparing a Practical Example
In order to demonstrate how to add taxonomy term meta data with Quick Edit, I will work through an example of attaching meta data to terms in a "president" taxonomy in the context of a plugin. For this example, the main goal will be to attach two pieces of meta data to each president taxonomy term: start date, and end date. A president taxonomy may be useful for a political blogger who desires to categorize posts by presidents discussed.
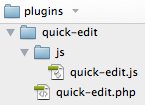
For this example, I will be creating a plugin that uses the following directory and file structure:
-
quick-edit
-
js
- quick-edit.js
- quick-edit.php
-
js
The main "quick-edit" folder should be placed in the plugins folder to be utilized as a plugin. Create this file structure to prepare for the rest of the tutorial. If done correctly, the file structure should look like the following image.
To make sure that WordPress recognizes the plugin as a plugin, the standard plugin header information needs to be added. Adding the following comment at the top of "quick-edit.php" will allow the plugin to be recognized by WordPress.
<?php
/*
Plugin Name: WP Tuts Quick Edit For Taxonomy Terms Plugin Example
Plugin URI: http://wp.tutsplus.com
Description: This plugin illustrates Quick Edit for Taxonomy Terms.
Version: 1.0
Author: Your Name
Author URI: http://yourdomain.com
License: GPL2
*/>
After adding the header information, activate the plugin through the WordPress Plugins page. The example plugin is all setup and ready to go for the rest of the tutorial.
Registering the Custom Taxonomy
Before jumping into adding to the Quick Edit form, the president taxonomy needs to be registered and WordPress needs to be prepared to handle term meta data. Registering custom taxonomies will not be covered in this tutorial in depth as it has been thoroughly addressed in other places. For the present example, a "president" taxonomy needs to be registered. This operation will be completed with the "register_taxonomy" function.
function my_taxonomies()
{
	// Add new taxonomy, make it hierarchical (like categories)
	$labels = array(
		'name' => _x('Presidents', 'taxonomy general name', 'my_plugin'),
		'singular_name' => _x('President', 'taxonomy singular name', 'my_plugin'),
		'search_items' =>  __('Search Presidents', 'my_plugin'),
		'all_items' => __('All Presidents', 'my_plugin'),
		'parent_item' => __('Parent President', 'my_plugin'),
		'parent_item_colon' => __('Parent President:', 'my_plugin'),
		'edit_item' => __('Edit President', 'my_plugin'),
		'update_item' => __('Update President', 'my_plugin'),
		'add_new_item' => __('Add New President', 'my_plugin'),
		'new_item_name' => __('New President Name', 'my_plugin'),
		'menu_name' => __('Presidents', 'my_plugin'),
	);

	register_taxonomy(
		'president',
		array('post'),
		array(
			'hierarchical' => true,
			'labels' => $labels,
			'show_ui' => true,
			'query_var' => true,
			'rewrite' => array(
				'slug' => 'president'
			)
		)
	);
}
add_action('init', 'my_taxonomies', 10, 1);
This code snippet creates a new custom taxonomy of type "president". The taxonomy is specified to work with post type "post" and is a hierarchical taxonomy similar to the built in "category" taxonomy. To get things started, populate the the presidents taxonomy with the last three United States presidents:
- Bill Clinton
- George W. Bush
- Barack Obama
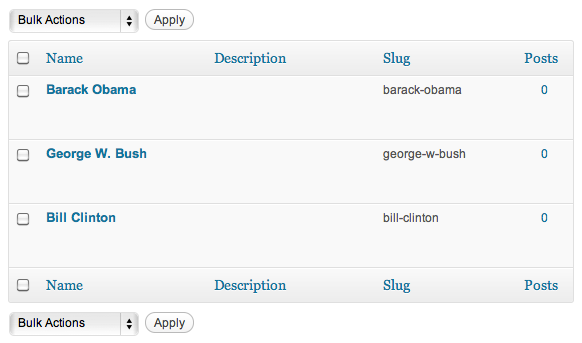
If everything has gone properly at this point, you should have a link for "Presidents" under the "Posts" menu and you should have a term list table that looks like the following image.
While this work has not done anything towards the task of enabling Quick Edit for term meta data, it has setup a taxonomy to work with in this example.
Enabling Taxonomy Term Meta Data
The next task is to prepare WordPress to handle term meta data. In WordPress 2.9, a set of useful functions were added to WordPress core that laid most of the groundwork for term meta management. The "add_metadata", "update_metadata", and "get_metadata" functions enabled a simple method to manage term meta; however, these functions only provide part of the solution. In order to add term meta, one must first add a table to the WordPress database for these functions to manage the data.
Fortunately, Jacob Goldman has written a wonderful plugin, Simple Term Meta, that handles this task, as well as provides developers with useful functions (e.g., "add_term_meta", "update_term_meta", "get_term_meta") to handle term meta management. In essence, this plugin adds a taxonomy term meta data API to the WordPress system. As Mr. Goldman puts it:
"WordPress offers meta data support for posts, users, and comments out of the box. But it's missing meta support for taxonomy terms (a tag, category, or custom taxonomy terms)! This plug-in adds full, efficient support for term meta based on the post meta framework built into WordPress. Adds a 'postmeta' table, and post meta functions that should be familiar to anyone who has worked with WordPress post meta."
For the present example, this plugin must be installed in order to work with term meta. Before proceeding, make sure to download and install Simple Term Meta. With this plugin installed, it is time to begin coding the Quick Edit form.
"For an extended discussion of managing the term meta using Simple Term Meta and creating a UI for adding and editing taxonomy term meta data, please see my article 'Adding Metadata to Taxonomy Terms'."
Step 2 Creating Term List Table Columns
In the previous image of the presidents taxonomy page, notice that there are four columns in the term list table: Name, Description, Slug, and Posts. Ultimately, our plugin will attach a Start Date and End Date to each president. As with the other term data, the Start Date and End Date should be displayed in this table. This goal can easily be accomplished with a few WordPress filters.
First of all, the headers will be added
function my_column_header($columns)
{
	$columns['start-date'] = __('Start Date', 'my_plugin');
	$columns['end-date'] = __('End Date', 'my_plugin');
	return $columns;
}
add_filter('manage_edit-president_columns', 'my_column_header', 10, 1);
Using the manage_{$screen->id}_columns filter, two extra columns are added to the term list table. The manage_{$screen->id}_columns filter sends one argument to the callback function my_column_header. This argument $columns is an array of columns for the current screen.
By simply adding items to the array, and returning that array, new columns will be added to the term list table. The filter manage_{$screen->id}_columns is a variable filter in that the actual name of the filter changes depending on the current screen being viewed. In the case of viewing a taxonomy management page, the variable part of the filter will begin with "edit-" and end with the name of the current taxonomy. Since we are adding to the president taxonomy, this value is "president", which was specified when the taxonomy was initially defined. Use the following filters for the standard WordPress taxonomies:
- Categories: manage_edit-category_columns
- Post Tags: manage_edit-post_tag_columns
- Link Categories: manage_edit-link_category_columns
Now that the columns are added, the columns need to be prepared to display the term meta for the individual terms, which is accomplished with the next code snippet.
function my_column_value($empty = '', $custom_column, $term_id)
{
	return esc_html(get_term_meta($term_id, $custom_column, true));
}
add_filter('manage_president_custom_column', 'my_column_value', 10, 3);
The term meta values are added by the manage_{$screen->taxonomy}_custom_column filter. The variable part of this filter refers to the current taxonomy, which, in this case, is "president". The manage_{$screen->taxonomy}_custom_column filter accepts three arguments:
-
$empty: a deprecated argument that should be left empty -
$custom_column: the name of the current column (e.g., 'start-date', 'end-date') -
$term_id: the id of the present taxonomy term
The last two arguments are used to find the value of the term meta value of interest. Later in the tutorial, the "start-date" and "end-date" will be added to the database using the add_term_meta function from the term meta API provided by the Simple Term Meta plugin. The values will be stored with the keys "start-date" and "end-date". The get_term_meta function takes the key and term id as arguments to locate the proper meta value.
Obviously, the $term_id sent to the my_column_value function is the term id needed and is thus used for the $term_id argument in the get_term_meta function. Fortunately, in this case, the $column_name variable is identical to the key for the term meta. As such, it is used as the second argument in the get_term_meta function.
Finally, the call to the get_term_meta function is wrapped in the esc_html function, which is a basic WordPress formatting function that escapes HTML on display.
At this point in the tutorial, this code will return an empty string because no term meta has yet to be set. Once these dates are added, they will appear in the correct row and column in the term list table. With the previous two snippets added, the term list table is beginning to take shape.
Now that the columns are set, it is time to add to the Quick Edit form in preparation for adding term meta to the terms.
Step 3 Adding Content to the Quick Edit Form
Adding content to the Quick Edit form is the easiest part of this tutorial; however, there are a few potential pitfalls if you are not careful. The quick_edit_custom_box action allows for easy access to add additional fields to the Quick Edit form. The following function adds the custom fields to the Quick Edit form
function my_quick_edit_custom_box($column_name, $screen, $name)
{
	if($name != 'president' && ($column_name != 'start-date' || $column_name != 'end-date')) return false;
?>
	<fieldset>
		<div id="my-custom-content" class="inline-edit-col">
			<label>
				<span class="title"><?php if($column_name == 'start-date') _e('Start Date', 'my_plugin'); else _e('End Date', 'my_plugin'); ?></span>
				<span class="input-text-wrap"><input type="text" name="<?php echo $column_name; ?>" class="ptitle" value=""></span>
			</label>
		</div>
	</fieldset>
<?php
}
add_action('quick_edit_custom_box', 'my_quick_edit_custom_box', 10, 3); ?>
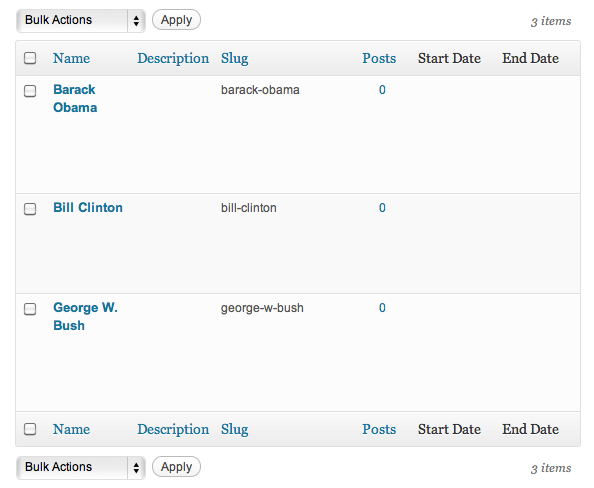
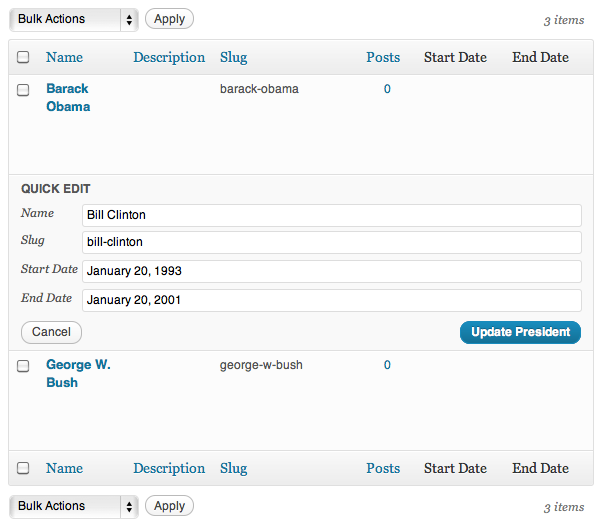
Before jumping into the explanation of this function, click one of the "Quick Edit" links on the presidents taxonomy page. You should see something similar to the following image.
The basic concept with this function and action is quite simple. For each column that is added via the manage_{$screen->id}_columns filter, the quick_edit_custom_box is called. This allows for custom form fields (or any content for that matter) to be added for each column that is defined.
It is important to note at this point that if you have not added any columns to the term list table, you would not be able to add any content via the quick_edit_custom_box action.
The quick_edit_custom_box accepts three arguments:
-
$column_name: the key for the value(s) added in themy_column_headerfunction -
$screen: the current screen -
$name: name of the current taxonomy
In the my_quick_edit_custom_box, only the $column_name and $name arguments are utilized. First, a check is made to ensure that the fields are being printed out only in the correct context. If the current taxonomy is not "president", the fields should not display.
Next, the fields should only displayed when the quick_edit_custom_box action is executed for either the "start-date" or "end-date" column. As such, the conditional statement checks that the column is one of those two values. This step is important in order to guarantee that the fields are not generated for unexpected columns. For instance, the built in "link_category" taxonomy has an extra column called "links". When you utilize this filter on that taxonomy and do not check for the specific columns that were added to the columns list, an extra field will be printed. Note that the standard "name", "description", and "slug" fields do not call the quick_edit_custom_box.
Now that the appropriate context is verified, the form field is printed out. The value of the $column_name variable allows us to determine the context of the current use of the quick_edit_custom_box action.
As such, it can be used to set the label and the name field. Since our column keys, "start-date" and "end-date" will be the same as the keys used for the term meta, the $column_name
variable is used for the name attribute in the text input field. Note that this function is executed once for each column that is defined. The first time it is called, the "Start Date" field will be generated with the appropriate label. On the second execution, the "End Date" field will be generated with the appropriate label.
In order to keep the markup consistent with the existing form, I simply copied the HTML used for the standard WordPress fields and pasted it into the my_quick_edit_custom_box function. This will give the resulting form a consistent look and feel. The value for the field is not set at this point.
This form is generated as a "dummy" form that will be cloned and placed each time the "Quick Edit" link is clicked. When a "Quick Edit" link is clicked, a javascript function will populate the field with the current value if one is set. If you view the source code for the Presidents taxonomy page, the Quick Edit form is located near the closing <div> of the body content--nowhere near the term list table.
With the fields all ready to go, the next step is to save the values to the database.
Step 4 Saving Form Data
Saving the start date and end date of the president terms will require utilizing a function provided by Simple Term Meta, update_term_meta. This function works similarly to the function used to save post meta, update_post_meta. The main difference, of course, is that the update_term_meta function saves data for terms, as opposed to posts. This function takes four arguments, three of which will be used in the present implementation of the function:
-
$term_id: id of the term that the meta data is associated with -
$meta_key: name of the meta data value -
$meta_value: value for the meta data -
$prev_value: previous value of metadata; helps differentiate between two pieces of metadata with identical term_id and meta_key
The following function will save both the start date and the end date when the term is updated.
function my_save_term_meta($term_id)
{
	$allowed_html = array(
		'b' => array(),
		'em' => array (),
		'i' => array (),
		'strike' => array(),
		'strong' => array(),
	);
    if(isset($_POST['start-date']))
		update_term_meta($term_id, 'start-date', wp_kses($_POST['start-date'], $allowed_html));
	if(isset($_POST['end-date']))
		update_term_meta($term_id, 'end-date', wp_kses($_POST['end-date'], $allowed_html));
}
A few things should be noted with this function. First of all, before submitting the data, the function checks to make sure that the $_POST array contains the expected value. If it exists, the term meta data is updated. If no term meta data currently exists for the term with the specified key, a new value is created. The update_term_meta will handle determining whether an entry in the table needs to be added or updated.
The $term_id value that is passed to the function is the id of the current term and, therefore, is sent to the update_term_meta function along with the meta key ("start-date"), and the meta value ('$_POST['start-date']'). As an aside, it would be a mortal sin to not validate this data before sending it to the database. In this example, I use wp_kses with the most basic HTML tags allowed to sanitize HTML tags when saving to the database.
I am only doing very basic data sanitization to remind readers that data sanitization and validation is very important; however, I do not further address this issue here in order to stay on task and not confuse the issue with complex validation routines. As such, I recommend reading some articles about the issue if you are not familiar with validation and sanitization of data.
Simply adding this function to the file will not complete the task of saving this data; the function needs to be executed using a WordPress hook. Since the idea is to run this function when a term is updated, the edited_$taxonomy hook is the appropriate hook for the job. The $taxonomy portion of the hook is a variable that takes the name of the taxonomy that is being edited. For this example, this hook will be utilized using edited_president. The following snippet will call the my_save_term_meta at the appropriate time.
add_action('edited_president', 'my_save_term_meta', 10, 1);
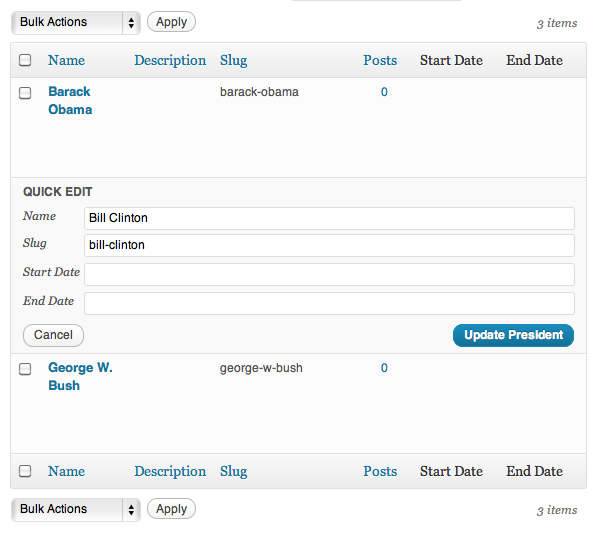
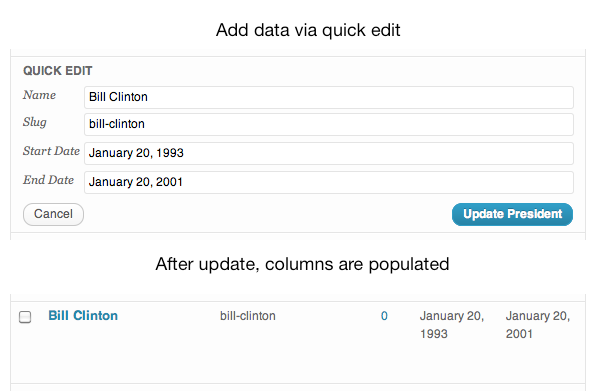
With the my_save_term_meta written and executed on the edited_president hook, the data should be saved in the database and it should appear in the correct columns. If everything is working as it should, the results should look something like the following image.
Step 5 Pre-Populating Form Fields
Before taking the victory lap for this task, it is important to notice that the solution, as it stands, is lacking a critical usability feature. More specifically, for a term that has the start date and end date added, the values are not populated in the form field when Quick Edit is invoked. I alluded to this earlier in Step 3 when I stated that the values for the form field are not added when the form is created; rather, they are populated using Javascript when Quick Edit is invoked. Pre-populating these form fields is an important addition for users as it makes updating the data very simple, especially when typos are made.
To pre-populate the fields, jQuery will be utilized to determine which values go in which fields. To get a sense of how WordPress handles the standard columns, I recommend taking a look at the "edit" method in the "inline-edit-tax-dev.js" file located in the "wp-admin/js/" directory of WordPress core. Using this code as a guide, I developed the following function to insert the existing values in the form fields when Quick Edit is invoked. Add this function to the "js/quick-edit.js" file that you created in the first step of the tutorial.
jQuery(document).ready(function(){
	jQuery('.editinline').live('click', function(){
		var tag_id = jQuery(this).parents('tr').attr('id');
		var start_date = jQuery('.start-date', '#'+tag_id).text();
		var end_date = jQuery('.end-date', '#'+tag_id).text();
		jQuery(':input[name="start-date"]', '.inline-edit-row').val(start_date);
		jQuery(':input[name="end-date"]', '.inline-edit-row').val(end_date);
		return false;
	});
});
Let us walk through this code to understand what is happening. Within the call to the jQuery ready function, the second line assigns a "click" event to each Quick Edit link. The third line attempts to find the id of the current table row in the term list table. This id value is necessary to contextual jQuery selectors later in the function. Extracting the HTML from the term list table looks like the following (Note: numerous lines have been removed for readability and to illustrate the concept):
<tr id="tag-33" style="display: table-row; ">
	.......
	<td class="name column-name">
		.......
		<div class="row-actions">
			.......
			<span class="inline hide-if-no-js">
				<a href="#" class="editinline">Quick Edit</a> |
			</span>
			.......
		</div>
		<div class="hidden" id="inline_33">
			<div class="name">Bill Clinton</div>
			<div class="slug">bill-clinton</div>
			<div class="parent">0</div>
		</div>
	</td>
	.......
	<td class="start-date column-start-date">January 20, 1993</td>
	<td class="end-date column-end-date">January 20, 2001</td>
</tr>
Looking back at the third line of the jQuery function, one can see that when the current instance of the Quick Edit link, which has the "editinline" class, is clicked, the function attempts to find the parent table row (parents('tr')) and, once it is located, get its id. In this case, the tag_id variable will be "tag-33". With that id value in hand, the fourth line of the jQuery function searches for the class "start-date" in the context of the table row that has an id that is equivalent to the tag_id variable.
The text of that matched element is returned and assigned to the start_date variable. In this case, the text in the table cell with class "start-date" that is inside the table row with id "tag-33" is "January 20, 1993", the start date that we are trying to find. The next line of code mirrors this process for the end date value. Since these values have been located, the next step is to use them to populate the appropriate fields. The sixth line of the jQuery function does just that. It attempts to locate a input with name attribute "start-date" that is part of the element that has class "inline-edit-row" (jQuery(':input[name="start-date"]', '.inline-edit-row')).
If you look back at the HTML written for the Quick Edit form that was added using the quick_edit_custom_box hook, you will see that an input with name "start-date" was created that was inside a div with class "inline-edit-row". This line of jQuery will match this input and set the value of the "value" attribute to the text string held in the start_date variable. In this case, the input with name equal to "start-date" will have its "value" attribute set to "January 20, 1993". The same steps are then carried out for "end-date" and that input field will be similarly populated.
Now that this function has been written and added to the "quick-edit.js" file, it needs to be enqueued using wp_enqueue_script. The following function and action adds the script to the head section of the HTML when the presidents taxonomy page is loaded.
function my_add_admin_scripts()
{
	global $pagenow;

	if($pagenow == 'edit-tags.php' && (isset($_GET['taxonomy']) && $_GET['taxonomy'] == 'president') && !isset($_GET['action']))
	{
		wp_register_script(
			'quick-edit-js',
			plugins_url('/js/quick-edit.js', __FILE__),
			array('jquery')
		);
		wp_enqueue_script('quick-edit-js');
	}
}
add_action('admin_enqueue_scripts', 'my_add_admin_scripts', 10, 1);
This function first checks the current context to determine if the Javascript is needed. If the page is "edit-tags.php", the current taxonomy is "president", and the "action" parameter is not set (i.e., the page is not the edit term page), the Javascript file is added to the scripts queue. One of the biggest pet peeves amongst the WordPress development community is not being mindful of where Javascript and CSS files are being added. Since this script is only needed when the user is on the presidents taxonomy page, it is only added then. The rest of the function registers the script and adds it using wp_enqueue_script. Finally, this function is executed on the "admin_init" action, which is run early in the process of loading pages within the WordPress administration panel. If everything is executed correctly, the form fields should be populated when the "Quick Edit" links are clicked.
Conclusion
The present tutorial taught you how to make use of the Quick Edit feature in the term list table to add content to edit term meta data. With this strategy, you can add your own elements to the Quick Edit area in your next plugin or theme. It should be noted that if you are using Quick Edit, you should also have a way to add and edit fields normally via the add and edit taxonomy terms pages. You can find some great tutorials on this topic and combine your knowledge gained in this tutorial to create an excellent and usable way for users to manage taxonomy term meta data. Finally, I want to give a special thanks to Rarst for taking a look at my code for this tutorial before publishing it!

Comments