Your application lacks a cool whizbang feature? Let other interested developers extend your application through add-ons. By opening up your app to additional functionality down the line, you can build a thriving community around your application, potentially even a marketplace!
In today's tutorial, we're going to learn just that!
Step 0 - Our Game Plan
Depending on which version of Visual Studio you're using, and the version of the framework you're targeting, some screenshots may look slightly different.
We're going to build a proof-of-concept application that, upon start-up, loads add-ons that it finds in one of its subdirectories. These add-ons are .NET assemblies that contain at least one class which implements a particular interface as defined by us. The concepts in this tutorial should be easily transferred into your existing applications without much hard work. Then we'll look at a more complete example utilizing UI components loaded from an add-on.
This tutorial was written using Microsoft Visual Studio 2010, in VB.NET targeting .NET Framework 4.0. The salient concepts of this tutorial should work in other CLR languages, from .NET Framework 1.1 upwards. There is some minor functionality which will not work in other CLR languages - but should be very easily ported - and some concepts like generics which obviously won't work in .NET 1.1 etc.
Note: This is an expert level tutorial for people happy with converting code between different CLR languages and versions of the .NET framework. It's more 'replacing your car engine' than 'how to drive'.
Step 1 - Initial Small Scale Implementation
Note: Your references may be different depending on which version of the .NET Framework you're targeting.
Let's start by implementing a small-scale version of our application. We will need three projects in our solution:
-
ConsoleAppA: A console application -
ClassLibA: A class library -
AddonA: A class library that will act as our add-on
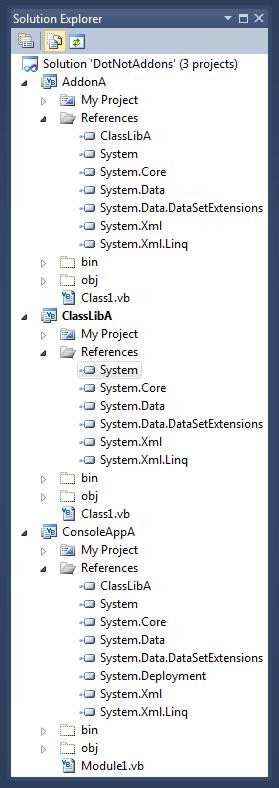
Add a reference from both ConsoleAppA and and AddonA to ClassLibA. Solution explorer should then look as follows:
Creating the Add-on Interface
For a compiled class to be considered compatible, every add-on for our application will need to implement a specific interface. This interface will define the required properties and operations that the class must have so that our application can interact with the add-on without hitches. We could also use an abstract/MustInherit class as the basis for add-ons but in this example we'll use an interface.
Here is the code for our interface, which should be placed in a file called IApplicationModule within the ClassLibA class library.
Public Interface IApplicationModule

    ReadOnly Property Id As Guid
    ReadOnly Property Name As String

    Sub Initialise()

End Interface
The properties and methods you define in the interface are arbitrary. In this case,, I have defined two properties and one method, but in practice you can and should change these as required.
We're not going to use the Id or Name properties in our first example, but they're useful properties to implement, and you'd probably want these present if you're using add-ons in production.
Creating an Add-on
Now let's create the actual add-on. Again, for any class to be considered an add-on for our application, it needs to implement our interface - IApplicationModule.
Here is the code for our basic add-on, which should be placed in a file called MyAddonClass within the AddonA class library.
Imports ClassLibA

Public Class MyAddonClass
    Implements IApplicationModule

    Public ReadOnly Property Id As System.Guid Implements ClassLibA.IApplicationModule.Id
        Get
            Return New Guid("adb86b53-2207-488e-b0f3-ecd13eae4042")
        End Get
    End Property

    Public Sub Initialise() Implements ClassLibA.IApplicationModule.Initialise
        Console.WriteLine("MyAddonClass is starting up ...")
        'Perform start-up initialisation here ...
    End Sub

    Public ReadOnly Property Name As String Implements ClassLibA.IApplicationModule.Name
        Get
            Return "My first test add-on"
        End Get
    End Property
End Class
Step 2 - Finding Add-ons at Runtime
Next, we need a way to find add-ons for our application. In this example, we'll assume that an Addons folder has been created in the executable's directory. If you're testing this within Visual Studio, bear in mind the default project output directory for projects, namely ./bin/debug/, so you would need a ./bin/debug/Addons/ directory.
Time to Reflect
Place the TryLoadAssemblyReference method below into Module1 of ConsoleAppA. We investigate the loaded assembly through the use of Reflection. A pseudo-code walkthrough of its functionality is as follows:
- Try to load the given dllFilePath as a .NET assembly
- If we've successfully loaded the assembly, proceed
- For each module in the loaded assembly
- For each type in that module
- For each interface implemented by that type
- If that interface is our add-on interface (
IApplicationModule),then - Keep a record of that type. Finish searching.
- Finally, return any valid types found
    Private Function TryLoadAssemblyReference(ByVal dllFilePath As String) As List(Of System.Type)
        Dim loadedAssembly As Assembly
        Dim listOfModules As New List(Of System.Type)
        Try
            loadedAssembly = Assembly.LoadFile(dllFilePath)
        Catch ex As Exception
        End Try
        If loadedAssembly IsNot Nothing Then
            For Each assemblyModule In loadedAssembly.GetModules
                For Each moduleType In assemblyModule.GetTypes()
                    For Each interfaceImplemented In moduleType.GetInterfaces()
                        If interfaceImplemented.FullName = "ClassLibA.IApplicationModule" Then
                            listOfModules.Add(moduleType)
                        End If
                    Next
                Next
            Next
        End If
        Return listOfModules
    End Function
Firing up our Add-ons
Finally, we can now load a compiled class that implements our interface into memory. But we don't have any code to find, instantiate, or make method calls on those classes. Next we'll put together some code that does just that.
The first part is to find all files which might be add-ons, as below. The code performs some relatively straightforward file searching, and for each DLL file found, attempts to load all of the valid types from that assembly. DLLs discovered under the Addons folder aren't necessarily add-ons - they could simply contain extra functionality required by an add-on, but not actually be an add-on per se.
        Dim currentApplicationDirectory As String = My.Application.Info.DirectoryPath
        Dim addonsRootDirectory As String = currentApplicationDirectory & "\Addons\"
        Dim addonsLoaded As New List(Of System.Type)

        If My.Computer.FileSystem.DirectoryExists(addonsRootDirectory) Then
            Dim dllFilesFound = My.Computer.FileSystem.GetFiles(addonsRootDirectory, Microsoft.VisualBasic.FileIO.SearchOption.SearchAllSubDirectories, "*.dll")
            For Each dllFile In dllFilesFound
                Dim modulesFound = TryLoadAssemblyReference(dllFile)
                addonsLoaded.AddRange(modulesFound)
            Next
        End If
Next we need to do something each valid type we've found. The code below will create a new instance of the type, type the type, call the Initialise() method (which is just an arbitrary method we defined in our interface), and then keep a reference to that instantiated type in a module level list.
        If addonsLoaded.Count > 0 Then
            For Each addonToInstantiate In addonsLoaded
                Dim thisInstance = Activator.CreateInstance(addonToInstantiate)
                Dim thisTypedInstance = CType(thisInstance, ClassLibA.IApplicationModule)
                thisTypedInstance.Initialise()
                m_addonInstances.Add(thisInstance)
            Next
        End If
Putting it all together, our console application should begin to look something like so:
Imports System.Reflection

Module Module1

    Private m_addonInstances As New List(Of ClassLibA.IApplicationModule)

    Sub Main()
        LoadAdditionalModules()

        Console.WriteLine('Finished loading modules ...')
        Console.ReadLine()
    End Sub

    Private Sub LoadAdditionalModules()
        Dim currentApplicationDirectory As String = My.Application.Info.DirectoryPath
        Dim addonsRootDirectory As String = currentApplicationDirectory & '\Addons\'
        Dim addonsLoaded As New List(Of System.Type)

        If My.Computer.FileSystem.DirectoryExists(addonsRootDirectory) Then
            Dim dllFilesFound = My.Computer.FileSystem.GetFiles(addonsRootDirectory, Microsoft.VisualBasic.FileIO.SearchOption.SearchAllSubDirectories, "*.dll")
            For Each dllFile In dllFilesFound
                Dim modulesFound = TryLoadAssemblyReference(dllFile)
                addonsLoaded.AddRange(modulesFound)
            Next
        End If

        If addonsLoaded.Count > 0 Then
            For Each addonToInstantiate In addonsLoaded
                Dim thisInstance = Activator.CreateInstance(addonToInstantiate)
                Dim thisTypedInstance = CType(thisInstance, ClassLibA.IApplicationModule)
                thisTypedInstance.Initialise()
                m_addonInstances.Add(thisInstance)
            Next
        End If
    End Sub

    Private Function TryLoadAssemblyReference(ByVal dllFilePath As String) As List(Of System.Type)
        Dim loadedAssembly As Assembly
        Dim listOfModules As New List(Of System.Type)
        Try
            loadedAssembly = Assembly.LoadFile(dllFilePath)
        Catch ex As Exception
        End Try
        If loadedAssembly IsNot Nothing Then
            For Each assemblyModule In loadedAssembly.GetModules
                For Each moduleType In assemblyModule.GetTypes()
                    For Each interfaceImplemented In moduleType.GetInterfaces()
                        If interfaceImplemented.FullName = 'ClassLibA.IApplicationModule' Then
                            listOfModules.Add(moduleType)
                        End If
                    Next
                Next
            Next
        End If
        Return listOfModules
    End Function
End Module
Trial Run
At this point we should be able to perform a full build of our solution. When your files have been built, copy the compiled assembly output of the AddonA project into the Addons folder of ConsoleAppA. The Addons folder should be created under the /bin/debug/ folder. On my machine using Visual Studio 2010, default project locations and a solution called "DotNetAddons" the folder is here:
C:\Users\jplenderleith\Documents\Visual Studio 2010\Projects\DotNetAddons\ConsoleAppA\bin\Debug\Addons
We should see the following output when we run the code is run:
MyAddonClass is starting up ...
Finished loading modules ...
As it stands it's not flashy or impressive but it does demonstrate a key piece of functionality, namely that at runtime we can pick up an assembly and execute code within that assembly without having any existing knowledge about that assembly. This is the foundation of building more complex add-ons.
Step 3 - Integrating with a User Interface
Next, we'll take a look at building a couple of add-ons to provide additional functionality within a Windows Forms application.
Similar to the existing solution, create a new solution with the following projects:
-
WinFormsAppA: A Windows Forms application -
ClassLibA: A class library -
UIAddonA: A class library that will house a couple of add-ons with UI components
Similar to our previous solution, both the WinFormsAppA and UIAddonA projects should have references to the ClassLibA. The UIAddonA project will also need a reference to the System.Windows.Forms for access to functionality.
The Windows Forms Application
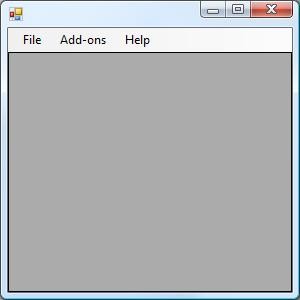
We'll make a quick and simple UI for our application consisting of a MenuStrip and a DataGridView. The MenuStrip control should have three MenuItems
- File
- Add-ons
- Help
Dock the DataGridView to its parent container - the form itself. We'll put together some code to display some mock data in our grid. The Add-ons MenuItem will be populated by any add-ons that have been loaded on application start-up.
Here's a screenshot of the application at this point:
Let's write some code to give the main form of WinFormsAppA some functionality. When the form loads it'll call the LoadAddons() method which is currently empty - we'll fill that in later. Then we generate some sample employee data to which we bind our DataGridView.
Public Class Form1

    Private m_testDataSource As DataSet
    Private m_graphicalAddons As List(Of System.Type)

    Private Sub Form1_Load(ByVal sender As Object, ByVal e As System.EventArgs) Handles Me.Load
        LoadAddons()
        m_testDataSource = GenerateTestDataSet()
        With DataGridView1
            .AutoGenerateColumns = True
            .AutoResizeColumns()
            .DataSource = m_testDataSource.Tables(0)
        End With
    End Sub

    Private Sub LoadAddons()

    End Sub

    Private Function GenerateTestDataSet() As DataSet
        Dim newDataSet As New DataSet
        Dim newDataTable As New DataTable
        Dim firstNames = {"Mary", "John", "Paul", "Justyna", "Michelle", "Andrew", "Michael"}
        Dim lastNames = {"O'Reilly", "Murphy", "Simons", "Kelly", "Gates", "Power"}
        Dim deptNames = {"Marketing", "Sales", "Technical", "Secretarial", "Security"}

        With newDataTable
            .Columns.Add("EmployeeId", GetType(Integer))
            .Columns.Add("Name", GetType(String))
            .Columns.Add("IsManager", GetType(Boolean))
            .Columns.Add("Department", GetType(String))
        End With

        For i = 1 To 100
            Dim newDataRow As DataRow = newDataTable.NewRow()
            With newDataRow
                .Item("EmployeeId") = i
                .Item("Name") = firstNames(i Mod firstNames.Count) & " " & lastNames(i Mod lastNames.Count)
                .Item("IsManager") = ((i Mod 20) = 0)
                .Item("Department") = deptNames(i Mod deptNames.Count)
            End With
            newDataTable.Rows.Add(newDataRow)
        Next

        newDataSet.Tables.Add(newDataTable)
        Return newDataSet
    End Function

End Class
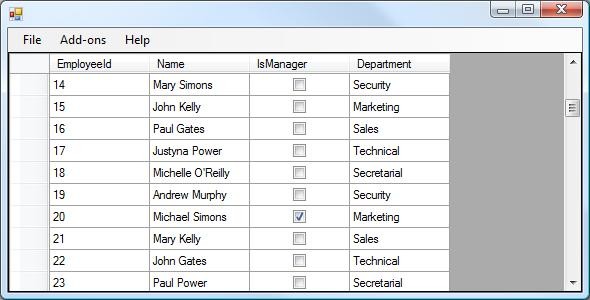
When we run the application it should look like so:
We'll come back to our empty LoadAddons() after we've defined the add-on interfaces.
Add-on Interface
Let's define our add-on interface. UI components will be listed under the Add-ons MenuStrip, and will open up a windows form that has access to the data to which our DataGrid is bound. To the ClassLibA project add a new interface file called IGraphicalAddon and paste in the following code into the file:
Public Interface IGraphicalAddon

    ReadOnly Property Name As String
    WriteOnly Property DataSource As DataSet
    Sub OnClick(ByVal sender As Object, ByVal e As System.EventArgs)

End Interface
- We have a
Nameproperty, which is pretty self-explanatory. - The
DataSourceproperly is used to 'feed' data to this add-on. - The
OnClickmethod, which will be used as the handler when users click on our add-on's entry in the Addons menu.
Loading the Add-ons
Add a class library called AddonLoader to the ClassLibA assembly project, with the following code:
Imports System.Reflection

Public Class AddonLoader
    Public Enum AddonType
        IGraphicalAddon = 10
        ISomeOtherAddonType2 = 20
        ISomeOtherAddonType3 = 30
    End Enum

    Public Function GetAddonsByType(ByVal addonType As AddonType) As List(Of System.Type)
        Dim currentApplicationDirectory As String = My.Application.Info.DirectoryPath
        Dim addonsRootDirectory As String = currentApplicationDirectory & "\Addons\"
        Dim loadedAssembly As Assembly
        Dim listOfModules As New List(Of System.Type)

        If My.Computer.FileSystem.DirectoryExists(addonsRootDirectory) Then
            Dim dllFilesFound = My.Computer.FileSystem.GetFiles(addonsRootDirectory, Microsoft.VisualBasic.FileIO.SearchOption.SearchAllSubDirectories, "*.dll")
            For Each dllFile In dllFilesFound

                Try
                    loadedAssembly = Assembly.LoadFile(dllFile)
                Catch ex As Exception
                End Try
                If loadedAssembly IsNot Nothing Then
                    For Each assemblyModule In loadedAssembly.GetModules
                        For Each moduleType In assemblyModule.GetTypes()
                            For Each interfaceImplemented In moduleType.GetInterfaces()
                                If interfaceImplemented.Name = addonType.ToString Then
                                    listOfModules.Add(moduleType)
                                End If
                            Next
                        Next
                    Next
                End If

            Next
        End If

        Return listOfModules
    End Function
End Class
You could use code similar to this to restrict add-on developers to build only specific types of add-ons
In this class, we've provided a way to load different types of add-ons. You could use code similar to this to restrict add-on developers to build only specific types of add-ons, or to at least categorise them. In our example, we'll just be using the first add-on type declared, namely IGraphicalAddon.
If we had other add-on types in our project, for example to enhance reporting functionality or provide some useful keyboard shortcuts, then we don't want them listed in our Add-ons menu, as there's no point in someone being able to click on that add-on.
Having said that though, it may be desirable to add a reference to all add-ons under some menubar, click on which would cause the add-on's options form to be displayed. This however is beyond of the scope of this tutorial.
The Graphical Add-on
Let's build the actual UI add-on. To the UIAddonA assembly project add the following two files; a class called UIReportAddon1 and a windows form called UIReportAddon1Form. The UIReportAddon1 class will contain the following code:
Imports ClassLibA

Public Class UIReportAddon1
    Implements ClassLibA.IGraphicalAddon

    Private _dataSource As DataSet
    Public WriteOnly Property DataSource As System.Data.DataSet Implements IGraphicalAddon.DataSource
        Set(ByVal value As System.Data.DataSet)
            _dataSource = value
        End Set
    End Property

    Public ReadOnly Property Name As String Implements IGraphicalAddon.Name
        Get
            Return "Managers Report"
        End Get
    End Property

    Public Sub OnClick(ByVal sender As Object, ByVal e As System.EventArgs) Implements IGraphicalAddon.OnClick
        Dim newUiReportingAddonForm As New UIReportAddon1Form
        newUiReportingAddonForm.SetData(_dataSource)
        newUiReportingAddonForm.ShowDialog()
    End Sub
End Class
To UIReportAddon1Form add a DataGridView that's docked within its parent container. Then add the following code:
Public Class UIReportAddon1Form

    Private m_providedDataSource As DataSet

    Public Sub SetData(ByVal DataSource As System.Data.DataSet)
        m_providedDataSource = DataSource
        FilterAndShowData()
    End Sub

    Private Sub FilterAndShowData()
        Dim managers = m_providedDataSource.Tables(0).Select("IsManager = True")
        Dim newDataTable = m_providedDataSource.Tables(0).Clone
        For Each dr In managers
            newDataTable.ImportRow(dr)
        Next
        DataGridView1.DataSource = newDataTable
    End Sub

    Private Sub UIReportAddon1Form_Load(ByVal sender As Object, ByVal e As System.EventArgs) Handles Me.Load
        Text = "List of managers"
    End Sub
End Class
We're simply providing the means to send data to the form, and then let it decide what to do with said data. In this case, we're going to perform a Select() on a DataTable, retrieving back a list of all employees who are managers.
Back to our Main UI
Now it's time to complete our unfinished LoadAddons() method in our WinFormsAppA project. This code will instruct the GetAddonsByType method of ClassLibA.AddonLoader to find a particular type of add-on - in this case IGraphicalAddon add-ons.
For each add-on found, the following actions are performed
- Create a new instance of the add-on
- Type the add-on instance to IGraphicalAddon
- Populate its DataSource property
- Add the add-on to the Add-ons menu item
- Add a handler for that menu item's Click event
    Private Sub LoadAddons()
        Dim loader As New ClassLibA.AddonLoader
        Dim addonsLoaded = loader.GetAddonsByType(ClassLibA.AddonLoader.AddonType.IGraphicalAddon)

        For Each graphicalAddon In addonsLoaded
            Dim thisInstance = Activator.CreateInstance(graphicalAddon)
            Dim typedAddon = CType(thisInstance, ClassLibA.IGraphicalAddon)
            typedAddon.DataSource = m_testDataSource
            Dim newlyAddedToolstripItem = AddonsToolStripMenuItem.DropDownItems.Add(typedAddon.Name)
            AddHandler newlyAddedToolstripItem.Click, AddressOf typedAddon.OnClick
        Next
    End Sub
Testing our UI
Ensure you can perform a full successful compile of the solution. Copy the UIAddonA.dll from the output debug folder of the UIAddonA project into the /bin/debug/Addons/ folder of the WinFormsAppA project. When you run the project, you should see a grid of data, as before. If you click into the Add-ons menu however you should now see a reference to the newly created add-on.
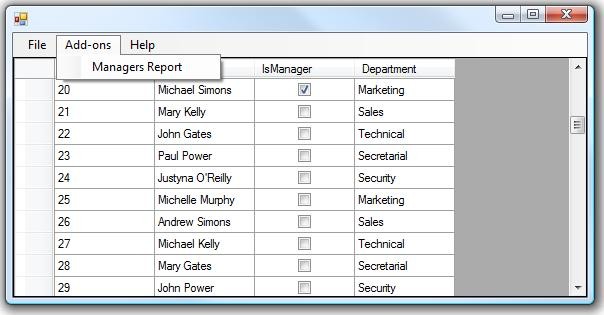
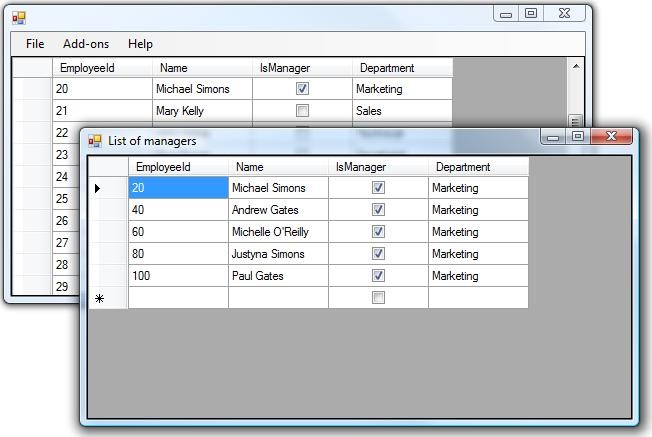
When we click on the Managers Report menu item, this will case a method call to the OnClick method implemented in our add-on, which will cause UIReportAddon1Form to appear, as below.
Wrap Up
We've seen two examples of building an application which can pickup and run add-ons as required. As I mentioned earlier, it should be easy enough to integrate this type of functionality into existing applications. The question of how much control you'll need (or want) to give third party developers is another matter entirely.
I hope you had fun with this tutorial! Thank you so much for reading!

Comments