As with every major release, iOS 7 includes many new APIs that developers can take advantage of in their applications. In this tutorial, we'll take a look at a brand new framework introduced in iOS 7, the Multipeer Connectivity framework. This framework adds support for discovering, connecting to, and communicating with nearby services, such as iOS devices. In this tutorial, I will show you how to create a simple, multi-player game using this new framework.
Introduction
A wide range new APIs have been introduced in iOS 7, giving developers new possibilities and opportunities. The framework that's drawn my attention is the Multipeer Connectivity framework. It offers a number of neat features that I'd like to demonstrate in this tutorial.
1. Framework Overview
Before we start working with the Multipeer Connectivity framework, it's important to get to know the framework first. The purpose of the framework is to allow nearby devices to communicate with one another, which includes exchanging data such as images and video.
It's important to understand the meaning of the term nearby in the context of the Multipeer Connectivity framework. The framework defines nearby devices as devices that are on the same Wi-Fi network or can communicate over Bluetooth. The Multipeer Connectivity framework cannot be used to communicate between devices over the web, for example. That's not what the Multipeer Connectivity framework was designed for.
Before two devices can start exchanging data, they first need to connect to one another. This involves two phases, 1 discovering nearby devices and 2 establishing a session between devices. In the discovery phase, one device searches or browses for devices in its vicinity. If a device wishes to be discoverable, it needs to advertise itself. This enables the browsing device to find the advertising device.
When the first device finds an advertising device, it sends a request to the device to establish a connection, which the advertiser can accept or decline. By accepting the invitation, a session is established, which means the devices can start communicating. A connection between two devices has one of three possible states, 1 not connected, 2 connecting, or 2 connected. At any time, a device can end a session, which closes the connection between the devices.
Browsing
The Multipeer Connectivity framework provides two avenues for browsing for other devices. The first option is to use a specialized view controller subclass that does everything for you. This is the approach that we'll be using in this tutorial. Sending the invitation and establishing a session is all taken care of for you. Of course, this doesn't fit every use case. Another option is to manually implement the logic to browse for nearby devices. This, however, is a topic we won't cover in this tutorial.
In the context of the Multipeer Connectivity framework, a device is referred to as a peer and each peer has a unique identifier or peerID and a display name. The latter is the name the user has given its device, for example, "Gabriel's iPhone". The display name is an important piece of information as it's the only way that users know which device belongs to whom.
Data
The data that can be transferred between peers is limited to three types, 1 NSData instances, 2 resources, such as files and documents, and 3 streaming data. In this tutorial, I'll show you how to send and receive data objects, that is, NSData instances. We won't cover resources and streams in this tutorial.
Data can be sent using one of two modes, a reliable mode, which is slower, but guarantees that the transmitted data is received by the receiver, and unreliable, which is much more performant, but doesn't guarantee that the data that's sent by one peer is received by the other or is received in the order that it was sent in. Which mode you choose depends on the needs of your application.
This is everything you need to know about the Multipeer Connectivity framework to get started. Let me end this introduction by mentioning the four classes that we'll be working with in this tutorial.
-
MCPeerID: An instance of this class represents a peer in a multipeer session. -
MCSession: This class is used to manage communication between peers in a session. -
MCAdvertiserAssistant: This class is used to help with advertising a peer to nearby devices. -
MCBrowserViewController: ThisUIViewControllersubclass takes care of presenting nearby devices to the user and helps establishing a multipeer session.
2. Application Overview
Let's take a brief look at the sample application we're about to create. The goal of this tutorial is to show how to establish a connection between nearby devices and exchange data, instances of NSData, between the connected devices.
I'm sure you can think of many use cases for the Multipeer Connectivity framework. In this tutorial, however, I've chosen for a very simple game, which I've named Guess the Secret Number. In the game, one person picks a number within a predefined range that other players of the game need to guess. After every guess, the host of the game, the person who picked the number, informs the player whether she's made a correct guess and whether the secret number is higher or lower. That's simple enough, right?
3. Project Setup
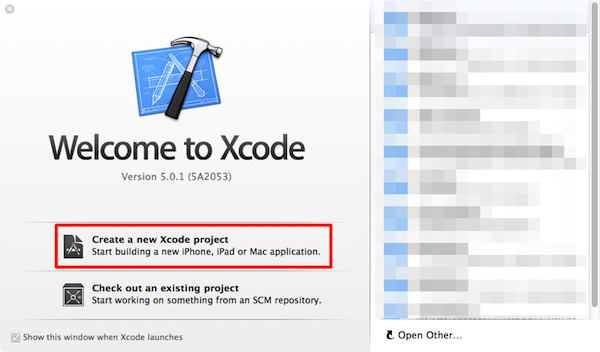
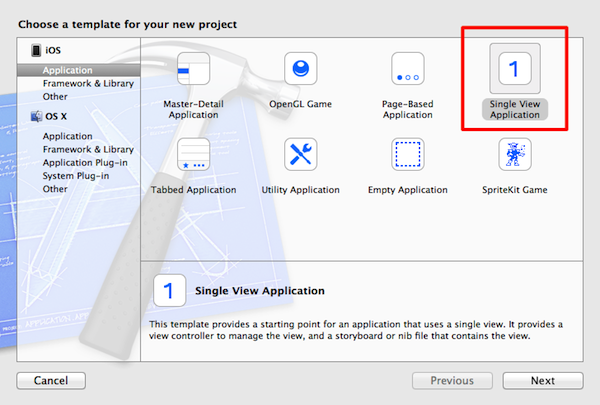
Let's get started by creating a new project in Xcode as shown below. Select the Single View Application template from the list of templates in the iOS Application category and click Next.
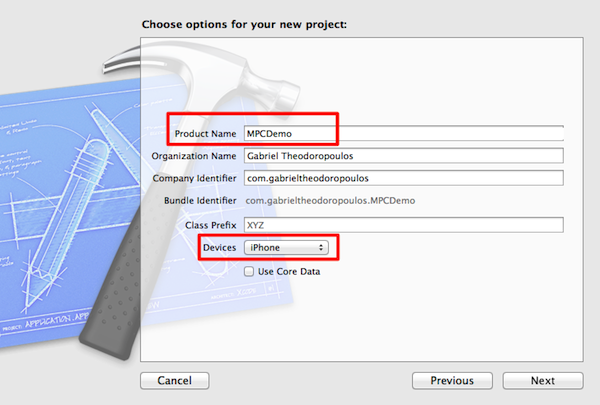
Give your project a name, enter a company identifier, and select iPhone from the Devices menu. Click the Next button to continue.
Tell Xcode where you'd like to save the project files and click the Create button to continue.
4. Handling Multipeer Connectivity
There's quite a bit of boilerplate code that we need to write to establish and manage a multipeer session. To make sure that we don't repeat ourselves, we'll centralize this logic in a custom class that we can reuse in our project. That's what we'll do in this section.
Step 1
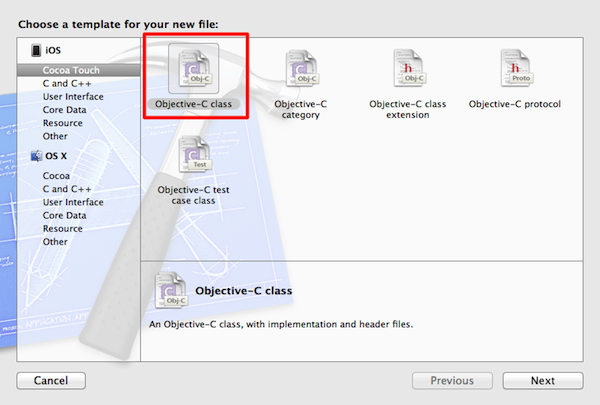
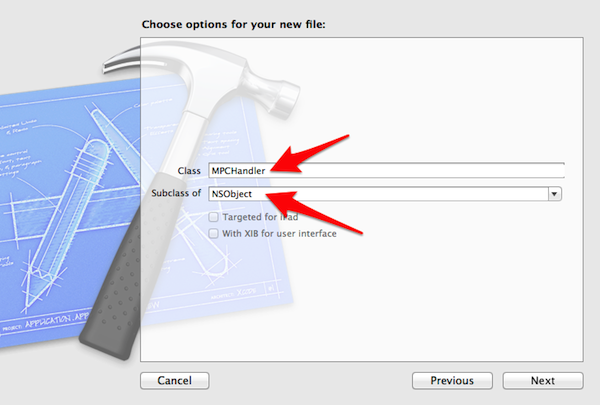
Create a new class in Xcode by selecting New > File... from the File menu. Choose Objective-C class from the iOS Cocoa Touch category and click Next.
Name the new class MPCHandler, set its superclass to NSObject, and click the Next button. Tell Xcode where you'd like to store the class files and hit Create.
Step 2
Open the header file of the MPCHandler class and start by adding an import statement for the Multipeer Connectivity framework as shown below.
#import <Foundation/Foundation.h>
#import <MultipeerConnectivity/MultipeerConnectivity.h>

@interface MPCHandler : NSObject

@end
Since the MPCHandler class will be in charge of managing a multipeer session, it needs to conform to the MCSessionDelegate protocol as shown below. We also declare four properties that will help us with this task.
#import <Foundation/Foundation.h>
#import <MultipeerConnectivity/MultipeerConnectivity.h>

@interface MPCHandler : NSObject <MCSessionDelegate>

@property (nonatomic, strong) MCPeerID *peerID;
@property (nonatomic, strong) MCSession *session;
@property (nonatomic, strong) MCBrowserViewController *browser;
@property (nonatomic, strong) MCAdvertiserAssistant *advertiser;

@end
Notice that these are the classes that I mentioned earlier in this tutorial. The peerID object will represent the device and it will also be included in every communication between peers along with any data that is exchanged between peers. The session object contains and manages the multipeer session. We'll talk more about this class later in this tutorial. The browser object holds a reference to a MCBrowserViewController instance, which we'll use to discover nearby devices and to create a multipeer session between them. The advertiser object takes care of advertising a device as well as handling incoming invitations.
Before we take a look at the implementation of the MPCHandler class, we need to declare four methods as shown below. The first method, setupPeerWithDisplayName:, accepts one argument, the display or public name that will be used for the device. The advertiseSelf: method also takes one argument to indicate whether the device should be visible to other devices. The setupSession method will be in charge of setting up a multipeer session, while the setupBrowser method will be responsible for setting up the MCBrowserViewController instance.
#import <Foundation/Foundation.h>
#import <MultipeerConnectivity/MultipeerConnectivity.h>

@interface MPCHandler : NSObject <MCSessionDelegate>

@property (nonatomic, strong) MCPeerID *peerID;
@property (nonatomic, strong) MCSession *session;
@property (nonatomic, strong) MCBrowserViewController *browser;
@property (nonatomic, strong) MCAdvertiserAssistant *advertiser;

- (void)setupPeerWithDisplayName:(NSString *)displayName;
- (void)setupSession;
- (void)setupBrowser;
- (void)advertiseSelf:(BOOL)advertise;

@end
Let's start with the implementation of the setupPeerWithDisplayName: method. In this method, we create an instance of the MCPeerID class and pass it displayName. That's it.
- (void)setupPeerWithDisplayName:(NSString *)displayName {
    self.peerID = [[MCPeerID alloc] initWithDisplayName:displayName];
}
In setupSession, we create an MCSession instance by passing the peerID instance variable and set the session's delegate to our MPCHandler instance. It's important that we invoke setupPeerWithDisplayName: before we setup the session, because the peerID instance variable cannot be nil.
- (void)setupSession {
    self.session = [[MCSession alloc] initWithPeer:self.peerID];
    self.session.delegate = self;
}
The implementation of setupBrowser couldn't be easier. All we do in this method is initialize an instance of MCBrowserViewController by passing the service type and the session we created in setupSession. The first argument is the type of service to browse for. It uniquely identifies the service and must be between 1 and 15 characters long. Note that the service type can only contain ASCII lowercase letters, numbers, and hyphens. We store a reference to the browser view controller in the _browser instance variable.
- (void)setupBrowser {
    self.browser = [[MCBrowserViewController alloc] initWithServiceType:@"my-game" session:_session];
}
In advertiseSelf:, we initialize an instance of the MCAdvertiserAssistant class by passing the same service type we used to instantiate the MCBrowserViewController instance. We also pass the session object and we set the discovery info to nil since we don't provide any discovery info about the device to nearby devices during the discovery phase.
If the advertise parameter of advertiseSelf: is set to YES, we call start on the MCAdvertiserAssistant object to start the assistant and begin advertising the service. If advertise is set to NO, we stop the advertiser assistant and set the advertiser property to nil.
- (void)advertiseSelf:(BOOL)advertise {
    if (advertise) {
        self.advertiser = [[MCAdvertiserAssistant alloc] initWithServiceType:@"my-game" discoveryInfo:nil session:self.session];
        [self.advertiser start];

    } else {
        [self.advertiser stop];
        self.advertiser = nil;
    }
}
Step 3
You may have noticed that Xcode displays a few warnings since we haven't implemented the required MCSessionDelegate methods yet. Let's get rid of these warnings by implementing the MCSessionDelegate protocol. The methods that we'll implement are shown below.
- (void)session:(MCSession *)session peer:(MCPeerID *)peerID didChangeState:(MCSessionState)state {

}

- (void)session:(MCSession *)session didReceiveData:(NSData *)data fromPeer:(MCPeerID *)peerID {

}

- (void)session:(MCSession *)session didStartReceivingResourceWithName:(NSString *)resourceName fromPeer:(MCPeerID *)peerID withProgress:(NSProgress *)progress {

}

- (void)session:(MCSession *)session didFinishReceivingResourceWithName:(NSString *)resourceName fromPeer:(MCPeerID *)peerID atURL:(NSURL *)localURL withError:(NSError *)error {

}

- (void)session:(MCSession *)session didReceiveStream:(NSInputStream *)stream withName:(NSString *)streamName fromPeer:(MCPeerID *)peerID {

}
Let's take a look at each method of the protocol.
-
session:peer:didChangeState:: This delegate method is called every time the connection state of a peer changes. Remember that there are three possible states, not connected, connecting, and connected. We'll use this delegate method to keep track of the peers that connect and disconnect from the game. -
session:didReceiveData:fromPeer:: This method is called every time the device receives data from another peer. -
session:didStartReceivingResourceWithName:fromPeer:withProgress:: When the application has started receiving a resource, such as a file, from another peer, this method gets called. We won't cover this method in this tutorial. -
session:didFinishReceivingResourceWithName:fromPeer:atURL:withError:: As its name implies, this method is called when a resource was received by our application. - session:didReceiveStream:withName:fromPeer:: This method is called when a stream is received by the application. Since we won't be working with streams, we won't cover this method either.
Even though we won't be using the last three delegate methods in this tutorial, we need to implement them in our view controller to get rid of the compiler warnings.
In session:peer:didChangeState: and session:didReceiveData:fromPeer:, we post a notification using the notification center to make sure that any part of the application that is interested in the event can be notified about the event. This allows the view controllers of our application to add themselves as an observer of those notifications and respond to them if appropriately. This also means the implementation of these delegate methods is fairly simple as you can see below.
- (void)session:(MCSession *)session peer:(MCPeerID *)peerID didChangeState:(MCSessionState)state {
    NSDictionary *userInfo = @{ @"peerID": peerID,
                                @"state" : @(state) };

    dispatch_async(dispatch_get_main_queue(), ^{
        [[NSNotificationCenter defaultCenter] postNotificationName:@"MPCDemo_DidChangeStateNotification"
                                                            object:nil
                                                          userInfo:userInfo];
    });
}
We start by creating the notification's userInfo dictionary and post the notification by passing in the dictionary as the third argument of postNotificationName:object:userInfo:. Notice that we post the notification inside a dispatch_async block to ensure that the notification is posted on the main thread. This is important as we cannot guarantee that the delegate method is invoked on the main thread. The notification, however, needs to be posted on the main thread to make sure that every observer receives the notification.
The implementation of session:didReceiveData:fromPeer: looks very similar as you can see below.
- (void)session:(MCSession *)session didReceiveData:(NSData *)data fromPeer:(MCPeerID *)peerID {
    NSDictionary *userInfo = @{ @"data": data,
                                @"peerID": peerID };

    dispatch_async(dispatch_get_main_queue(), ^{
        [[NSNotificationCenter defaultCenter] postNotificationName:@"MPCDemo_DidReceiveDataNotification"
                                                            object:nil
                                                          userInfo:userInfo];
    });
}
The MPCHandler class is ready to be used so let's initialize it in the application's delegate.
Step 4
Open AppDelegate.h, add an import statement for the MPCHandler class, and declare a property of type MPCHandler.
#import <UIKit/UIKit.h>

#import "MPCHandler.h"

@interface AppDelegate : UIResponder <UIApplicationDelegate>

@property (strong, nonatomic) UIWindow *window;

@property (nonatomic, strong) MPCHandler *mpcHandler;

@end
Switch to the implementation file of the AppDelegate class and initialize the instance variable in application:didFinishLaunchingWithOptions:.
- (BOOL)application:(UIApplication *)application didFinishLaunchingWithOptions:(NSDictionary *)launchOptions {
    self.mpcHandler = [[MPCHandler alloc] init];

    return YES;
}
5. Options View Controller
As I've mentioned earlier, the application will have two view controllers. Xcode's Single View Application template has only one by default. Let's add a second view controller right now. Select New > File... from the File menu, choose Objective-C class from the iOS Cocoa Touch category on the left, and click Next.
Make sure that the new class inherits from UIViewController and set the Class field to OptionsViewController. The checkboxes should remain unchecked. Click Next to continue.
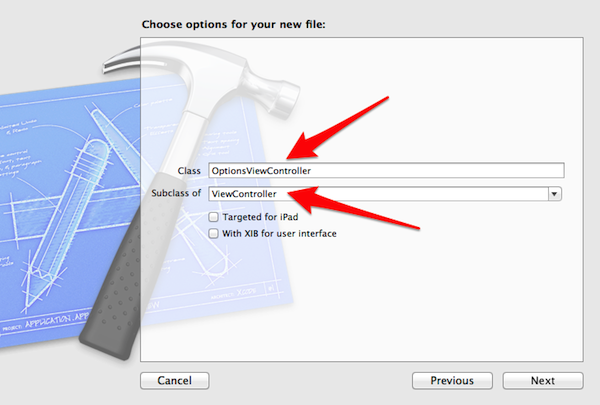
Tell Xcode where you'd like to save the class files and hit Create.
6. Create User Interface
It's time to create the application's user interface. Open the project's main storyboard (Main.storyboard) to get started.
Step 1
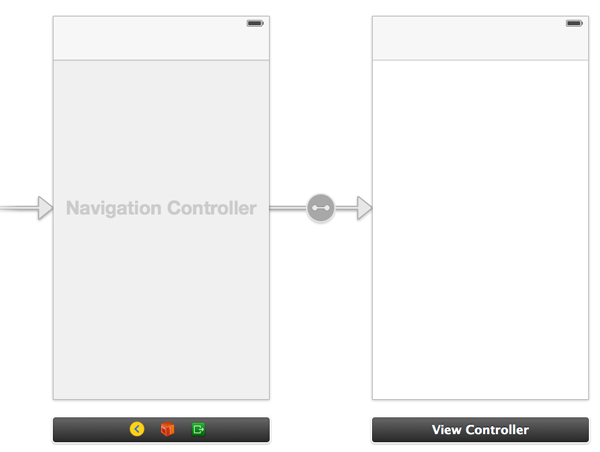
Select the view controller in the storyboard and select Embed In > Navigation Controller from the Editor menu. The result is that the view controller is embedded in a navigation controller and a navigation bar is added to the top of the view controller.
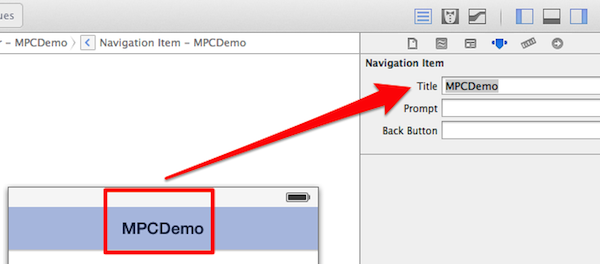
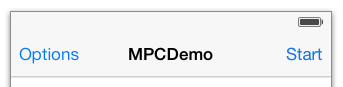
Select the view controller's navigation bar, open the Attributes Inspector on the right, and set the Title field to MPCDemo.
Drag two UIBarButtonItem instances from the Object Library to the navigation bar and update their titles as shown below.
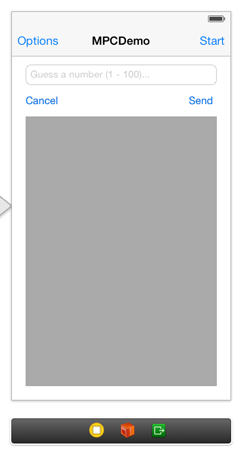
This is the view that players will see and use to enter a guess, send it to the other players, and keep track of previous guesses made in a game. To make all this possible, we need to add a text field, two buttons, and a text view. Take a look at the next screenshot for clarification. I've also included the attributes of each subview to help you with this task.
-
UITextField- Frame: X=20, Y=77, Width=280, Height=30
- Placeholder Text: Guess a number (1 - 100)...
-
UIButton- Frame: X=254, Y=115, Width=46, Height=30
- Title: Send
-
UIButton- Frame: X=20, Y=115, Width=48, Height=30
- Title: Cancel
-
UITextView- Frame: X=20, Y=153, Width=280, Height=395
- Text: Nothing (Delete the existing text)
- Background Color: Light Gray Color
- Text Color: White Color
- Editable: No
This is how the view controller should look after you've added the four subviews to its view.
Step 2
Before we move on to the OptionsViewController, let's declare and connect the necessary outlets and actions in the ViewController class. Open ViewController.h and update its contents as shown below.
#import <UIKit/UIKit.h>

@interface ViewController : UIViewController

@property (weak, nonatomic) IBOutlet UITextField *txtGuess;
@property (weak, nonatomic) IBOutlet UITextView *tvHistory;
@property (weak, nonatomic) IBOutlet UIButton *btnSend;
@property (weak, nonatomic) IBOutlet UIButton *btnCancel;

- (IBAction)startGame:(id)sender;
- (IBAction)sendGuess:(id)sender;
- (IBAction)cancelGuessing:(id)sender;

@end
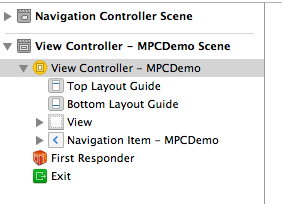
Revisit the project's main storyboard, select the ViewController instance, and connect the outlets and actions with the view controller's interface. If you're unfamiliar with this step, then let me show you how this works. Start by expanding the view controller's scene so you can see its associated objects.
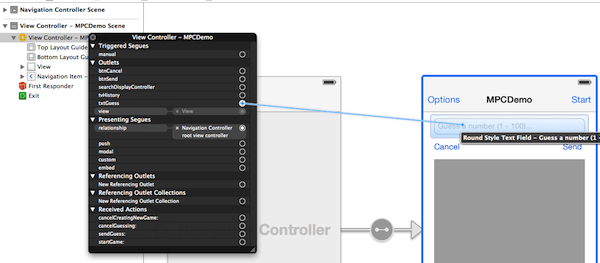
The next step is to ctrl click or right click the View Controller - MPCDemo object in the list, which should bring up a black popup window. In this window, you should see the outlets and actions that we declared earlier as well as a number of other items. To connect the outlet of the text field, click the circle on the right of the txtGuess outlet and drag to the text field in the user interface. A blue line appears to visualize the connection. Take a look at the next screenshot to better understand the process.
Before you continue, make sure that you've connected every outlet and action to its corresponding view in the user interface.
Step 3
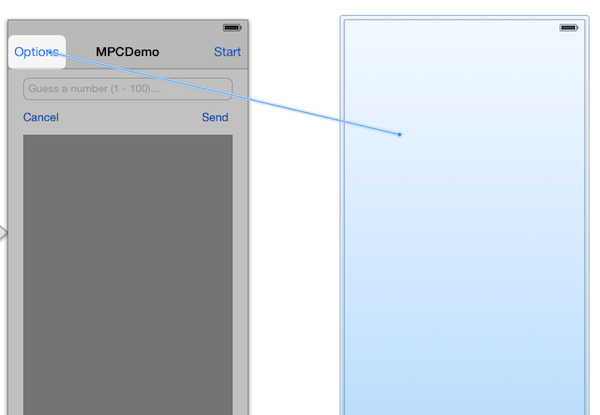
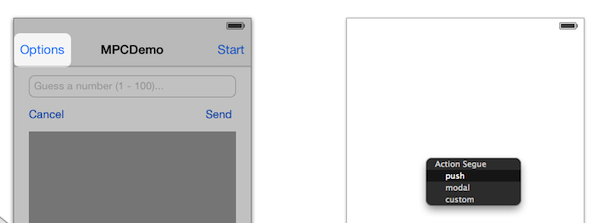
For the OptionsViewController class we need to add a new scene to the interface. Drag a UIViewController instance from the Object Library onto the canvas. To connect it with our existing scene, ctrl click or right click the bar button item labeled Options and drag to the new view controller. From the black popup window that appears, select Push from the list of options.
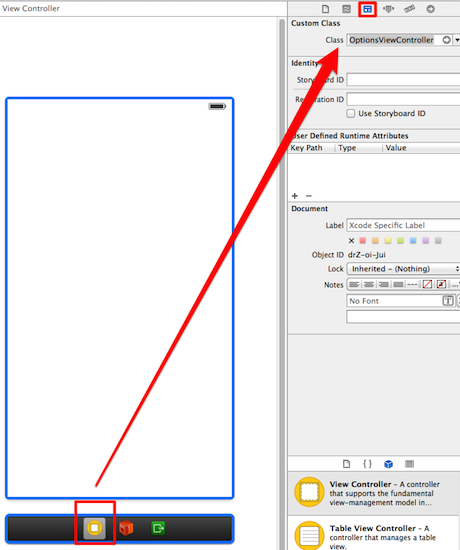
The class name of a new scene defaults to UIViewController, but that's something we want to change. At the bottom of the second scene, select the first item, open the Identity Inspector on the right, and set the Class field to OptionsViewController in the Custom Class section.
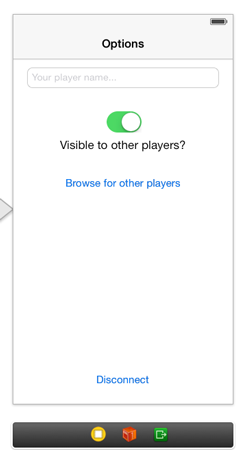
Select the navigation bar of the options view controller, and set the title to Options in the Attributes Inspector. Add five subviews to the view controller's view as shown below.
-
UITextField- Frame: X=20, Y=77, Width=280, Height=30
- Placeholder Text: Your player name...
-
UISwitch- Frame: X=136, Y=141, Width=51, Height=31
-
UIButton- Frame: X=76, Y=231, Width=168, Height=30
- Title: Browse for other players
-
UITextView- Frame: X=20, Y=269, Width=280, Height=241
- Text: Nothing (Delete existing contents)
- Editable: NO
-
UIButton- Frame: X=121, Y=518, Width=78, Height=30
- Title: Disconnect
The next screenshot should give you an idea of what the final result should look like.
Step 4
To finish the user interface of the options view controller, let's declare some outlets and actions in the view controller's header file. Open OptionsViewController.h and update its contents as shown below.
#import <UIKit/UIKit.h>

@interface OptionsViewController : UIViewController

@property (weak, nonatomic) IBOutlet UITextField *txtPlayerName;
@property (weak, nonatomic) IBOutlet UISwitch *swVisible;
@property (weak, nonatomic) IBOutlet UITextView *tvPlayerList;

- (IBAction)disconnect:(id)sender;
- (IBAction)searchForPlayers:(id)sender;
- (IBAction)toggleVisibility:(id)sender;

@end
Revisit the project's main storyboard and connect the outlets and actions with the user interface. We've completed the user interface of the game and we're ready to start writing some code to see the Multipeer Connectivity framework in action.
7. Discovering Other Players
The next step is to implement the OptionsViewController class, because we need a connection between two devices before we can play the game and focus on the game's logic. I'd like to start by showing you how to discover nearby players (devices) by using the built-in solution of the Multipeer Connectivity framework.
Step 1
The first step is to fetch the mpcHandler object we created earlier in the AppDelegate class. This implies that we need to access the mpcHandler object through the application delegate. Open OptionsViewController.m, navigate to the top of the file, and add an import statement for the header file of the AppDelegate class.
#import "OptionsViewController.h"

#import "AppDelegate.h"

@interface OptionsViewController ()

@end
In a class extension, declare a property that will store a reference to the AppDelegate instance.
#import "OptionsViewController.h"

#import "AppDelegate.h"

@interface OptionsViewController ()

@property (strong, nonatomic) AppDelegate *appDelegate;

@end
There's no need to instantiate an AppDelegate instance as this is automatically done during the application launch. In the view controller's viewDidLoad method, we grab a reference to the application delegate and set up the mpcHandler object. We initialize the peerID and session properties of the MPCHandler class by invoking the methods we declared and implemented earlier in this tutorial.
- (void)viewDidLoad {
    [super viewDidLoad];

    self.appDelegate = (AppDelegate *)[[UIApplication sharedApplication] delegate];

    [self.appDelegate.mpcHandler setupPeerWithDisplayName:[UIDevice currentDevice].name];
    [self.appDelegate.mpcHandler setupSession];
    [self.appDelegate.mpcHandler advertiseSelf:self.swVisible.isOn];
}
In viewDidLoad, we set up the peer by passing the device's name as the display name. We also initialize the session property of the MPCHandler instance that we will use later to establish a connection between peers. It's important that we do this after initializing the MCPeerID instance, because the session requires a valid peerID object during its initialization. Finally, we invoke advertiseSelf: and pass in the state of the switch in the options view controller's user interface. The default state of the switch is YES, which means that our device is discoverable by other devices.
Step 2
Presenting the browser view controller is as easy as it gets. However, the browser property of the MPCHandler instance needs to be initialized first. We want to show the browser view controller when the user taps the Browse for other players button. Let's implement the searchForPlayers: action next.
- (IBAction)searchForPlayers:(id)sender {
    if (self.appDelegate.mpcHandler.session != nil) {
        [[self.appDelegate mpcHandler] setupBrowser];

        [self presentViewController:self.appDelegate.mpcHandler.browser
                           animated:YES
                         completion:nil];
    }
}
Presenting the browser view controller requires two steps. First, we invoke setupBrowser on the application delegate's mpcHandler object to initialize the MCBrowserViewController instance and we then present that instance to the user. Note that we first verify whether the session object of the MPCHandler instance is not equal to nil, because the session object is used to initialize the MCBrowserViewController instance.
If you run the application and search for other players, you should see a view similar to the one in the next screenshot.
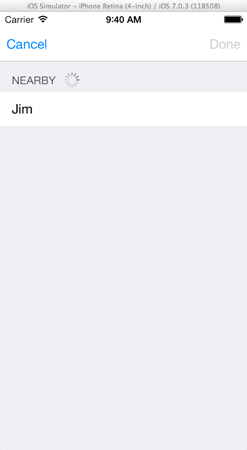
To test the application, you need at least two devices, for example, the iOS Simulator and a physical device. To create the above screenshot, I ran the application in the iOS Simulator and on a device. If you tap on a device's name, the selected device is moved to a section labeled Invitees as shown below.
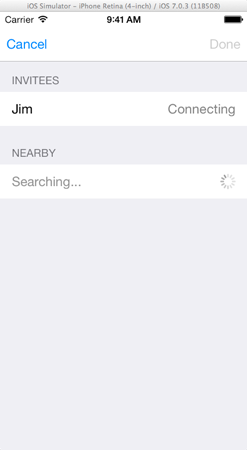
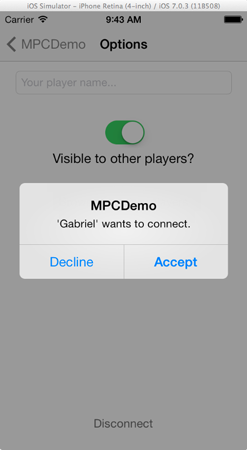
At the same time, an alert view is displayed on the second device, notifying the other player that you want to establish a connection. The invitee can either accept or decline the invitation. If the player accepts the invitation, the browser establishes a connection between the two devices.
When the second player accepts the invitation, the Done button of the browser view controller is enabled. However, if you try to tap the Cancel or Done buttons, you'll notice that nothing happens. Why is this? The explanation is simple, we first need to implement the MCBrowserViewControllerDelegate protocol in the OptionsViewController class. Let's do that now. First, however, update the searchForPlayers: action by setting the options view controller as the delegate of the browser view controller.
- (IBAction)searchForPlayers:(id)sender {
    if (self.appDelegate.mpcHandler.session != nil) {
        [[self.appDelegate mpcHandler] setupBrowser];
        [[[self.appDelegate mpcHandler] browser] setDelegate:self];

        [self presentViewController:self.appDelegate.mpcHandler.browser
                           animated:YES
                         completion:nil];
    }
}
However, this results in another compiler warning as the OptionsViewController doesn't conform to the MCBrowserViewControllerDelegate protocol yet. To fix this, open OptionsViewController.h, import the header files of the Multipeer Connectivity framework, and make the OptionsViewController conform to the MCBrowserViewControllerDelegate protocol.
#import <UIKit/UIKit.h>
#import <MultipeerConnectivity/MultipeerConnectivity.h>
@interface OptionsViewController : UIViewController <MCBrowserViewControllerDelegate>

@property (weak, nonatomic) IBOutlet UITextField *txtPlayerName;
@property (weak, nonatomic) IBOutlet UISwitch *swVisible;
@property (weak, nonatomic) IBOutlet UITextView *tvPlayerList;

- (IBAction)disconnect:(id)sender;
- (IBAction)searchForPlayers:(id)sender;
- (IBAction)toggleVisibility:(id)sender;

@end
We need to implement two methods of the MCBrowserViewControllerDelegate protocol to enable the Cancel and Done buttons. The implementations are identical, that is, dismissing the browser view controller. Open the implementation file of the OptionsViewController class and add the two delegate methods as shown below.
- (void)browserViewControllerDidFinish:(MCBrowserViewController *)browserViewController {
    [self.appDelegate.mpcHandler.browser dismissViewControllerAnimated:YES completion:nil];
}

- (void)browserViewControllerWasCancelled:(MCBrowserViewController *)browserViewController {
    [self.appDelegate.mpcHandler.browser dismissViewControllerAnimated:YES completion:nil];
}
If you run the application again, you'll see that the Cancel and Done buttons work as expected. By tapping the Done button, a connection is established behind the scenes and the browser view controller is dismissed.
8. Detecting Connection State Changes
The previous section was a key aspect of the Multipeer Connectivity framework. However, after tapping the Done button, we didn't notice any changes. Why is that? During the connection process, the devices that are connecting transition from the Not Connected state to the Connecting state, and, if all goes well, end in the Connected state. While these transitions take place, the session:peer:didChangeState: delegate method of the Multipeer Connectivity framework is called. As a result, the custom notification we set up in the MPCHandler class is posted on every state change.
It's our task to observe these notifications and respond appropriately when a peer is connected or disconnected from the user's device. Whenever the connection state changes, apart from the Connecting state, we'll update the text view of the OptionsViewController class with the players that are currently connected to the user's device.
First, we must add the view controller instance as an observer for MPCDemo_DidChangeStateNotification notifications. Update the view controller's viewDidLoad method as shown below.
- (void)viewDidLoad {
    [super viewDidLoad];

    self.appDelegate = (AppDelegate *)[[UIApplication sharedApplication] delegate];

    [self.appDelegate.mpcHandler setupPeerWithDisplayName:[UIDevice currentDevice].name];
    [self.appDelegate.mpcHandler setupSession];
    [self.appDelegate.mpcHandler advertiseSelf:self.swVisible.isOn];

    [[NSNotificationCenter defaultCenter] addObserver:self
                                             selector:@selector(peerChangedStateWithNotification:)
                                                 name:@"MPCDemo_DidChangeStateNotification"
                                               object:nil];
}
Remember that a notification with name MPCDemo_DidChangeStateNotification is posted each time the connection state of a peer changes. When this happens, the view controller's peerChangedStateWithNotification: is invoked. The implementation of peerChangedStateWithNotification: isn't difficult as you can see below. We extract the state of the peer from the notification's userInfo dictionary and, if it's not equal to MCSessionStateConnecting, we update the view controller's text view to display the states of every peer.
- (void)peerChangedStateWithNotification:(NSNotification *)notification {
    // Get the state of the peer.
    int state = [[[notification userInfo] objectForKey:@"state"] intValue];

    // We care only for the Connected and the Not Connected states.
    // The Connecting state will be simply ignored.
    if (state != MCSessionStateConnecting) {
        // We'll just display all the connected peers (players) to the text view.
        NSString *allPlayers = @"Other players connected with:\n\n";

        for (int i = 0; i < self.appDelegate.mpcHandler.session.connectedPeers.count; i++) {
            NSString *displayName = [[self.appDelegate.mpcHandler.session.connectedPeers objectAtIndex:i] displayName];

            allPlayers = [allPlayers stringByAppendingString:@"\n"];
            allPlayers = [allPlayers stringByAppendingString:displayName];
        }

        [self.tvPlayerList setText:allPlayers];
    }
}
As its name implies, the connectedPeers property of the session object is an array that contains the connected peers. We use a for loop to iterate over this array and populate the text view with the names of the connected peers.
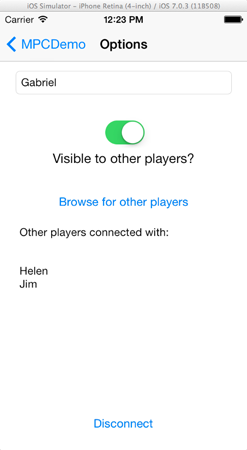
Run two instances of the application and establish a connection to see the result of our work. When you now tap the Done button, the text view will display a list of the peers that are connected to the user's device.
Conclusion
This wraps it up for the first part of this tutorial about the Multipeer Connectivity framework. We've covered several new APIs and laid the foundation of our game. In the next tutorial, we'll continue building the game by implementing the game's logic as well as integrating the Multipeer Connectivity framework to send data between the players of a game.

Comments