In this tutorial, I will show you how to create a simple, multi-player game using the Multipeer Connectivity framework that was introduced in iOS 7. In the first installment of this series, we laid the foundation of the game. In this article, we'll implement the game logic.
1. Implementing the Game Logic
At this point, the application is able to discover other nearby players, establish a connection, and display the connected peers in the text view of the options view controller. However, the implementation of the OptionsViewController class isn't finished yet.
Step 1
The options view controller contains a text field at the top of its view. We'll use this text field to let the user change the display name of the device. At the moment, the device name is used as the peer's display name. Let's explore how we can customize that display name.
Let's start by adopting the UITextFieldDelegate protocol in the OptionsViewController class. Open OptionsViewController.h and modify the class's interface as shown below.
@interface OptionsViewController : UIViewController <MCBrowserViewControllerDelegate, UITextFieldDelegate>
In the class's implementation file, set the view controller as the text field's delegate in the viewDidLoad method.
- (void)viewDidLoad {
    // ... //
    [self.txtPlayerName setDelegate:self];
}
We only need to implement one method of the UITextFieldDelegate protocol, textFieldShouldReturn:.
- (BOOL)textFieldShouldReturn:(UITextField *)textField {
    [self.txtPlayerName resignFirstResponder];

    if (self.appDelegate.mpcHandler.peerID != nil) {
        [self.appDelegate.mpcHandler.session disconnect];

        self.appDelegate.mpcHandler.peerID = nil;
        self.appDelegate.mpcHandler.session = nil;
    }

    [self.appDelegate.mpcHandler setupPeerWithDisplayName:self.txtPlayerName.text];
    [self.appDelegate.mpcHandler setupSession];
    [self.appDelegate.mpcHandler advertiseSelf:self.swVisible.isOn];

    return YES;
}
We first call resignFirstResponder on the text field to dismiss the keyboard. Next, if the peerID and session objects are not nil, we reset both by setting them to nil. We also call disconnect on the session object to disconnect the device from any peers it may be connect to. We then initialize the peerID object using the name entered by the user in the text field and set up the session object. Try this out by running the application and changing the display name. If all goes well, the custom name will be used instead of the name of the device.
There's one caveat, when using a custom display name, the device disconnects from any active session it's currently part of. This also means that any game that is in progress is ended. Even though we haven't added any measures to prevent this, make sure that you don't allow users to change the display name when the device is part of an active session.
Step 2
The next step is to implement the toggleVisibility: action we declared earlier. Its implementation couldn't be easier. Whenever the switch is toggled, we invoke the advertiseSelf: method of the mpcHandler object and pass it the state of the switch. Run the application to give it a try.
- (IBAction)toggleVisibility:(id)sender {
    [self.appDelegate.mpcHandler advertiseSelf:self.swVisible.isOn];
}
Step 3
We also need to implement the disconnect: action. Disconnecting a device from a session is just as easy. Take a look at the implementation of disconnect: below.
- (IBAction)disconnect:(id)sender {
    [self.appDelegate.mpcHandler.session disconnect];
}
That finishes it up for the OptionsViewController class. The application in its current state is able to establish a connection, update the device's display name, and disconnect from an active session. It's time to focus on the game itself by exploring how we can exchange data between peers.
2. Creating a New Game
Step 1
Let's now focus on the implementation of the ViewController class. Start by declaring a property for the application delegate and setting it in the view controller's viewDidLoad method. This involves three steps.
-
Open ViewController.m and add an import statement for the
AppDelegateclass.#import "AppDelegate.h"
-
Declare a property for the
AppDelegateobject.@interface ViewController () @property (nonatomic, strong) AppDelegate *appDelegate; @end -
In
viewDidLoad, store a reference to the application delegate in theappDelegateproperty.- (void)viewDidLoad { [super viewDidLoad]; self.appDelegate = (AppDelegate *)[UIApplication sharedApplication].delegate; }
Step 2
In the next step, we declare three properties that we'll use to keep track of the game's state.
@interface ViewController ()

@property (nonatomic, strong) AppDelegate *appDelegate;

@property (nonatomic) int secretNumber;
@property (nonatomic) BOOL hasCreatedGame;
@property (nonatomic) BOOL isGameRunning;

@end
- The
secretNumberproperty will store the secret number chosen by the player hosting the game. - The
hasCreatedGameflag indicates whether the current player is the one that started the current game. - The
isGameRunningflag indicates whether a game is currently in progress.
Step 3
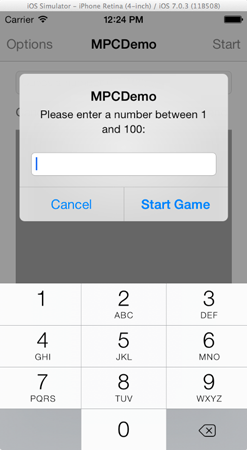
In order for a new game to be started, a secret number must be set by the player who starts the game. The primary focus of this tutorial is the Multipeer Connectivity framework, so we won't bother with a complex mechanism to set a secret number. And what's easier than an alert view asking the player for a secret number?
A new game starts when a player taps the Start button in the navigation bar, which means we need to implement the startGame: action. As you can see in its implementation below, we first check if a game is already in progress before presenting the alert view. We don't want to start a new game while another game is ongoing.
- (IBAction)startGame:(id)sender {
    if (!self.isGameRunning) {
        UIAlertView *newGameAlert = [[UIAlertView alloc] initWithTitle:@"MPCDemo"
                                                               message:@"Please enter a number between 1 and 100:"
                                                              delegate:self
                                                     cancelButtonTitle:@"Cancel"
                                                     otherButtonTitles:@"Start Game", nil];

        newGameAlert.alertViewStyle = UIAlertViewStylePlainTextInput;
        [[newGameAlert textFieldAtIndex:0] setKeyboardType:UIKeyboardTypeNumberPad];
        [newGameAlert show];
    }
}
By setting the alertViewStyle to UIAlertViewStylePlainTextInput, a text field is added to the alert view.
Step 4
Once the player has entered a secret number, there's three things we need to take care of.
- We need to handle the player's tap of the Start Game button.
- We also need to verify whether the chosen number falls between
1and100. - Other players of the game need to be notified that the game has started and a secret number has been set.
Let's start with the first task by implementing the alertView:clickedButtonAtIndex: delegate method of the UIAlertViewDelegate protocol. Open the view controller's header file and adopt the UIAlertViewDelegate protocol as shown below.
@interface ViewController : UIViewController <UIAlertViewDelegate>
Next, implement the alertView:clickedButtonAtIndex: method of the UIAlertViewDelegate protocol. To make sure that the alert view contains a text field, we first inspect its alertViewStyle property to see whether it's equal to UIAlertViewStylePlainTextInput. We also make sure that the Start Game button was tapped by verifying that the buttonIndex property of the tapped button is equal to 1.
- (void)alertView:(UIAlertView *)alertView clickedButtonAtIndex:(NSInteger)buttonIndex {
    if (alertView.alertViewStyle == UIAlertViewStylePlainTextInput && buttonIndex == 1) {

    }
}
We then extract the text field's input and convert it to an integer, which we store in the view controller's secretNumber property.
- (void)alertView:(UIAlertView *)alertView clickedButtonAtIndex:(NSInteger)buttonIndex {
    if (alertView.alertViewStyle == UIAlertViewStylePlainTextInput && buttonIndex == 1) {
        UITextField *textField = [alertView textFieldAtIndex:0];

        self.secretNumber = [textField.text intValue];
    }
}
The next step is checking whether the chosen number is between 1 and 100, which is very easy to do. If the number doesn't fall within the required range, we display an alert view to the player. If the secret number passes our test, however, we create a message for the other players and send it to the connected peers using the Multipeer Connectivity framework. How does this work?
- (void)alertView:(UIAlertView *)alertView clickedButtonAtIndex:(NSInteger)buttonIndex {
    if (alertView.alertViewStyle == UIAlertViewStylePlainTextInput && buttonIndex == 1) {
        UITextField *textField = [alertView textFieldAtIndex:0];
        self.secretNumber = [textField.text intValue];

        // Make sure that the given number is between 1 and 100.
        if (self.secretNumber >= 1 && self.secretNumber <= 100) {
            // Create a message to tell other players that a new game has been created,
            // convert it to a NSData object and send it.
            NSString *messageToSend = @"New Game";
            NSData *messageAsData = [messageToSend dataUsingEncoding:NSUTF8StringEncoding];
            NSError *error;

            [self.appDelegate.mpcHandler.session sendData:messageAsData
                                                  toPeers:self.appDelegate.mpcHandler.session.connectedPeers
                                                 withMode:MCSessionSendDataReliable
                                                    error:&error];

            // If any error occurs, just log it.
            // Otherwise set the following couple of flags to YES, indicating that the current player is the creator
            // of the game and a game is in progress.
            if (error != nil) {
                NSLog(@"%@", [error localizedDescription]);

            } else{
                self.hasCreatedGame = YES;
                self.isGameRunning = YES;

                [self.tvHistory setText:@""];
            }

        } else{
            UIAlertView *alert = [[UIAlertView alloc] initWithTitle:@"MPCDemo"
                                                            message:@"Please enter a valid number."
                                                           delegate:nil
                                                  cancelButtonTitle:nil
                                                  otherButtonTitles:@"Okay", nil];
            [alert show];
        }
    }
}
We create an NSString instance, set it's value to New Game, and encode the string to an NSData object. Remember that a NSString instance cannot be sent using the Multipeer Connectivity framework. It first needs to be converted to an NSData object.
The most interesting line of code is the one shown below. In this single line, we send the NSData object to all the connected peers. We pass the address of an NSError pointer to catch any errors that might be thrown during the process.
[self.appDelegate.mpcHandler.session sendData:messageAsData
                                      toPeers:self.appDelegate.mpcHandler.session.connectedPeers
                                     withMode:MCSessionSendDataReliable
                                        error:&error];
As you may have guessed, the sendData:toPeers:withMode:error: method is declared in the Multipeer Connectivity framework. Because we want every peer to receive the message, we pass self.appDelegate.mpcHandler.session.connectedPeers as the second argument. The method's third argument, MCSessionSendDataReliable, specifies the transmission mode. If you recall from the introduction, the Multipeer Connectivity framework can send data one of two ways, reliably or unreliably. In this example, it is key to send the data reliably to make sure that every player receives the message without hiccoughs.
If no error was thrown, we set hasCreatedGame and isGameRunning to YES. We also clear the text view to prepare the user interface for the new game.
3. Updating the User Interface
If you were to test the application in its current state, you'd notice that nothing has changed from the player's perspective. The other players aren't notified when a new game is started. We still need to take care of a few things to accomplish this.
First, however, we need to update the application's user interface to reflect the state of the current game. Currently, the buttons and text fields are enabled even when a new game has started. For example, when one player starts a new game, a player who has joined the game shouldn't be able to start a new game. We will implement a simple helper method to take care of this problem.
- (void)toggleSubviewsState:(BOOL)shouldEnable {
    self.btnCancel.enabled = shouldEnable;
    self.txtGuess.enabled = shouldEnable;
    self.btnSend.enabled = shouldEnable;
}
In toggleSubviewsState:, we enable or disable the buttons and text field depending on the state of the game. Let's invoke toggleSubviewsState: in the view controller's viewDidLoad method.
- (void)viewDidLoad {
    // ... //
    [self toggleSubviewsState:NO];
}
4. Handling Messages
Every time a peer receives an NSData object, the session:didReceiveData:fromPeer: delegate method of the Multipeer Connectivity framework is invoked. This also result in the posting of a notification as you may remember from earlier in this tutorial. To receive and handle these notifications, we need to add the view controller as an observer as shown below. Whenever a notification with a name of MPCDemo_DidReceiveDataNotification is posted, the handleReceivedDataWithNotification: method is invoked.
- (void)viewDidLoad {
    // ... //
    [[NSNotificationCenter defaultCenter] addObserver:self
                                             selector:@selector(handleReceivedDataWithNotification:)
                                                 name:@"MPCDemo_DidReceiveDataNotification"
                                               object:nil];
}
The implementation of handleReceivedDataWithNotification: may seem daunting so let's break it down in digestible chunks.
- (void)handleReceivedDataWithNotification:(NSNotification *)notification {
    // Get the user info dictionary that was received along with the notification.
    NSDictionary *userInfoDict = [notification userInfo];

    // Convert the received data into a NSString object.
    NSData *receivedData = [userInfoDict objectForKey:@"data"];
    NSString *message = [[NSString alloc] initWithData:receivedData encoding:NSUTF8StringEncoding];

    // Keep the sender's peerID and get its display name.
    MCPeerID *senderPeerID = [userInfoDict objectForKey:@"peerID"];
    NSString *senderDisplayName = senderPeerID.displayName;
}
We get the notification's userInfo dictionary, extract the NSData object, recreate the NSString object, and store it in a variable named message. The action we take next depends on the value of the message object. We also extract the name of the peer that sent the message, so we can use it to update the game's user interface.
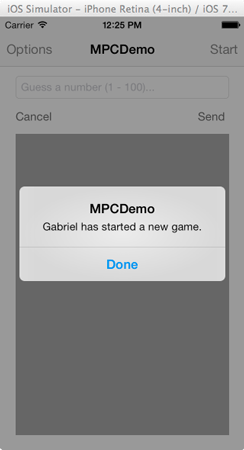
If the value of message is equal to the New Game, a new game has been started. We then notify the user of this event, update the value of isGameRunning, and update the user interface to let the player make guesses. Take a look at the updated implementation of handleReceivedDataWithNotification:.
- (void)handleReceivedDataWithNotification:(NSNotification *)notification {
    // Get the user info dictionary that was received along with the notification.
    NSDictionary *userInfoDict = [notification userInfo];

    // Convert the received data into a NSString object.
    NSData *receivedData = [userInfoDict objectForKey:@"data"];
    NSString *message = [[NSString alloc] initWithData:receivedData encoding:NSUTF8StringEncoding];

    // Keep the sender's peerID and get its display name.
    MCPeerID *senderPeerID = [userInfoDict objectForKey:@"peerID"];
    NSString *senderDisplayName = senderPeerID.displayName;

    if ([message isEqualToString:@"New Game"]) {
        // In case the message is about a new game, then show an alert view telling that the sender of the message
        // has just started a new game.
        NSString *alertMessage = [NSString stringWithFormat:@"%@ has started a new game.", senderDisplayName];

        UIAlertView *alert = [[UIAlertView alloc] initWithTitle:@"MPCDemo"
                                                        message:alertMessage
                                                       delegate:nil
                                              cancelButtonTitle:nil
                                              otherButtonTitles:@"Done", nil];

        [alert show];

        // Also, indicate that a game is in progress.
        self.isGameRunning = YES;

        // Enable all subviews.
        [self toggleSubviewsState:YES];

        // Clear all previous history from the text view.
        [self.tvHistory setText:@""];
    }
}
Two details are interesting to point out. First, the name of the player that started the game is mentioned in the alert view's message to make sure that the other players know who's hosting the game. Second, we invoke toggleSubviewsState: to update the user interface. If you test the application once more, you'll notice that an alert view is displayed to every connected player when a new game is started.
5. Play
Step 1
The next step is to add the ability for other players to make a guess at the secret number the host of the game has chosen. The flow we use to notify the connected peers is very similar to what we've seen so far. Let's start by implementing the sendGuess: action.
Before we send a guess to the other players in the game, we check if the player's guess is a valid number and falls within the required range. If it is, we convert the contents of the txtGuess text field to an NSData object and send it to the connected peers. On the device of the player who made the guess, we append the guess to the text view's contents.
- (IBAction)sendGuess:(id)sender {
    // Check if a number has been entered or not, and if it's valid.
    if (self.txtGuess.text.length == 0 || [self.txtGuess.text intValue] < 1 || [self.txtGuess.text intValue] > 100) {
        UIAlertView *alert = [[UIAlertView alloc] initWithTitle:@"MPCDemo"
                                                        message:@"Please enter a valid number."
                                                       delegate:nil
                                              cancelButtonTitle:nil
                                              otherButtonTitles:@"Okay", nil];
        [alert show];

    } else{
        // Convert the guess string to a NSData object and send it to all peers (players).
        NSData *guessAsData = [self.txtGuess.text dataUsingEncoding:NSUTF8StringEncoding];
        NSError *error;
        [self.appDelegate.mpcHandler.session sendData:guessAsData
                                          toPeers:self.appDelegate.mpcHandler.session.connectedPeers
                                         withMode:MCSessionSendDataReliable
                                            error:&error];

        // If any error occurs just log its description.
        if (error != nil) {
            NSLog(@"%@", [error localizedDescription]);
        }

        // Add to the history text view the number value given by the current player.
        NSString *history = [NSString stringWithFormat:@"I guessed the number: %@\n\n", self.txtGuess.text];
        [self.tvHistory setText:[history stringByAppendingString:self.tvHistory.text]];
    }

    self.txtGuess.text = @"";
    [self.txtGuess resignFirstResponder];
}
Step 2
When a valid guess is sent to the other players in the game, handleReceivedDataWithNotification: is invoked. We've already partially implemented this method earlier in this tutorial to notify other players when a new game starts. The current implementation includes only one conditional statement to check for a new game.
- (void)handleReceivedDataWithNotification:(NSNotification *)notification {
    // ... //

    if ([message isEqualToString:@"New Game"]) {
        // ... //
    }

    // ... //
}
It's time to add an else clause to handle other incoming messages. At the moment, we only want to handle a guess made by another player, which means that we need to check if the message contains a valid number. The following code snippet detects if the NSString object includes a number.
NSCharacterSet *numbersSet = [NSCharacterSet decimalDigitCharacterSet];
NSCharacterSet *messageSet = [NSCharacterSet characterSetWithCharactersInString:message];

if ([numbersSet isSupersetOfSet:messageSet]) {

}
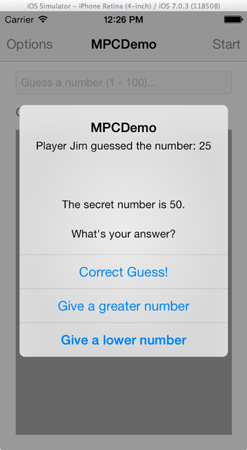
If the message does indeed contain a valid guess, we display it in the text view. Additionally, we check if the player is the host of the game and, if she is, we display an alert view with three possible actions to enable the application to send feedback to the other players. Take a look at the updated implementation of handleReceivedDataWithNotification: for clarification.
- (void)handleReceivedDataWithNotification:(NSNotification *)notification {
    // ... //

    if ([message isEqualToString:@"New Game"]) {
        // ... //

    } else {
        // Check if the message contains only digits. If that's the case, then
        // that means that it contains a guess from the player who sent it.
        NSCharacterSet *numbersSet = [NSCharacterSet decimalDigitCharacterSet];
        NSCharacterSet *messageSet = [NSCharacterSet characterSetWithCharactersInString:message];

        if ([numbersSet isSupersetOfSet:messageSet]) {
            // The message contains the guess from another player.
            // Convert it to a number.
            int guess = [message intValue];

            // Add this guess to the history text view.
            NSString *history = [NSString stringWithFormat:@"Player %@ guessed the number: %d\n\n", senderDisplayName, guess];
            [self.tvHistory setText:[history stringByAppendingString:self.tvHistory.text]];

            // If self is the game creator, then show all available options regarding this guess.
            if (self.hasCreatedGame) {
                NSString *optionsMessage = [NSString stringWithFormat:@"%@\n\nThe secret number is %d.\n\nWhat's your answer?", history, self.secretNumber];
                UIAlertView *optionsAlert = [[UIAlertView alloc] initWithTitle:@"MPCDemo"
                                                                       message:optionsMessage
                                                                      delegate:self
                                                             cancelButtonTitle:nil
                                                             otherButtonTitles:@"Correct Guess!", @"Give a greater number", @"Give a lower number", nil];
                [optionsAlert show];
            }
        }
    }
}
The next screenshot shows the alert view the host will see when a player makes a valid guess.
Step 3
To handle the response of the host, we need to update the alertView:clickedButtonAtIndex: method of the UIAlertViewDelegate protocol as shown below. All we do is sending the button's title as a message to the other players in the game.
- (void)alertView:(UIAlertView *)alertView clickedButtonAtIndex:(NSInteger)buttonIndex {
    if (alertView.alertViewStyle == UIAlertViewStylePlainTextInput && buttonIndex == 1) {
        // ... //

    } else {
        // Get the tapped button's title as the answer, convert it to a NSData object and send it to other players.
        NSString *selectedAnswer = [alertView buttonTitleAtIndex:buttonIndex];
        NSData *answerAsData = [selectedAnswer dataUsingEncoding:NSUTF8StringEncoding];
        NSError *error;
        [self.appDelegate.mpcHandler.session sendData:answerAsData
                                              toPeers:self.appDelegate.mpcHandler.session.connectedPeers
                                             withMode:MCSessionSendDataReliable
                                                error:&error];

        if (error != nil) {
            NSLog(@"%@", [error localizedDescription]);
        }

        // In case of correct guess then turn the flags to off.
        if (buttonIndex == 0) {
            self.hasCreatedGame = NO;
            self.isGameRunning = NO;
        }
    }
}
When an opponent makes a correct guess, we end the game by setting hasCreatedGame and isGameRunning to NO. In the next step, we'll handle the message sent to the other players in the game.
Step 4
I'm sure that you are starting to understand how the different pieces of the game fit together. It's a bit like a game of tennis in which the players hit a ball to one another until one drops the ball. To complete the game, we need to revisit handleReceivedDataWithNotification: one more time to handle the response sent by the host of the game after a player has made a valid guess.
We start by adding an else clause to the second if statement as shown below. All we do is appending the message, the title of the button the host has tapped, to the text view's contents. If the message is equal to Correct Guess, we end the game and disable the game's controls by invoking toggleSubviewsState: and passing NO to it.
- (void)handleReceivedDataWithNotification:(NSNotification *)notification {
    // ... //

    } else {
        // Check if the message contains only digits. If that's the case, then
        // that means that it contains a guess from the player who sent it.
        NSCharacterSet *numbersSet = [NSCharacterSet decimalDigitCharacterSet];
        NSCharacterSet *messageSet = [NSCharacterSet characterSetWithCharactersInString:message];

        if ([numbersSet isSupersetOfSet:messageSet]) {
            // ... //

        } else {
            // If the message doesn't contain digits, then it contains the answer from the player who started the game.
            // For starters, just show answer to the history text view.
            NSString *history = [NSString stringWithFormat:@"%@ says:\n%@\n\n", senderDisplayName, message];
            [self.tvHistory setText:[history stringByAppendingString:self.tvHistory.text]];

            // Check if the game creator answered that the last guess was the correct one. In that case, the game
            // should stop.
            if ([message isEqualToString:@"Correct Guess!"]) {
                self.isGameRunning = NO;

                [self toggleSubviewsState:NO];
            }
        }
    }
}
Step 5
The application is almost finished. All that's left for us to do is, implement the cancelGuessing: action. In this method, we hide the keyboard by calling resignFirstResponder on the txtGuess text field.
- (IBAction)cancelGuessing:(id)sender {
    [self.txtGuess resignFirstResponder];
}
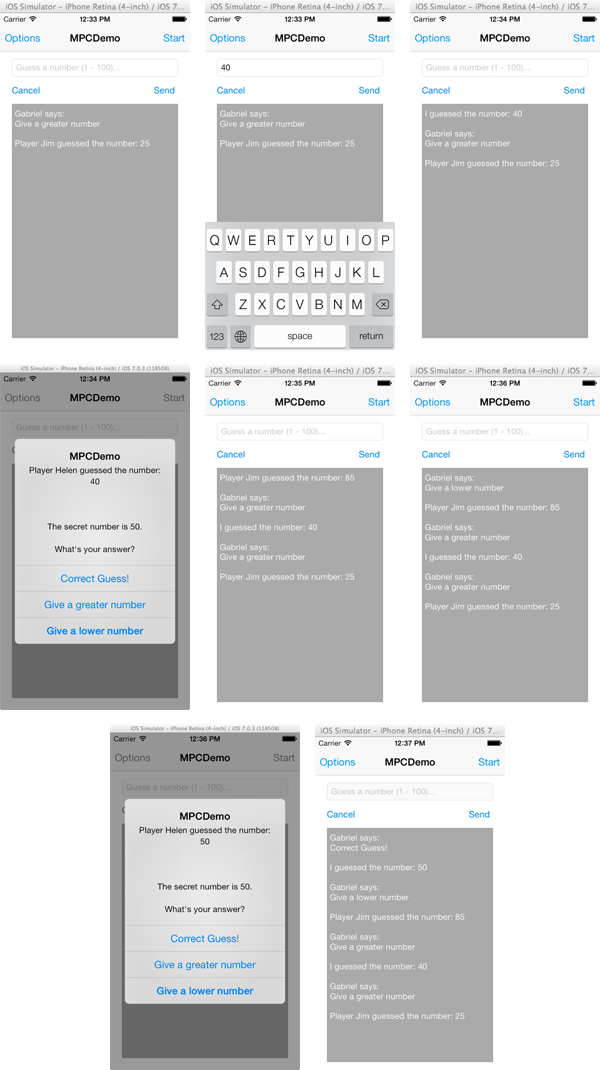
6. Build and Run
Our simple game is now ready to play. Keep in mind that the game's implementation is simple as the main focus of this tutorial has been exploring the Multipeer Connectivity framework that was introduced in iOS 7. The next screenshot should give you an idea of the various states the game can be in.
Conclusion
I've hopefully convinced you that the Multipeer Connectivity framework is a great new addition to the iOS SDK. This tutorial has showed you that sending data from peer to peer is very easy with the Multipeer Connectivity framework. The framework has a lot more to offer so I encourage you to explore Apple's documentation for a deeper understanding of its possibilities.

Comments