Recently I had the opportunity to look into Chrome Extension development. The scenario was pretty simple, I had to notify a group of users when someone from the group was using a website. A Chrome Extension was an obvious choice and after a bit of documentation I came across Simperium, a service that I could use to send and receive data real-time in my extension.
In this article we will see how simple it is to integrate real-time messaging into your Chrome Extension. To illustrate this, our final goal is a Chrome Extension that will send out real time updates about opened tabs to a separate monitoring page.
What Is Simperium

Simperium is a hosted service that will simply update the connected clients in real-time with any data that is written to it or changed. It does so in an efficient way, by only sending out data that has been changed. It can handle any JSON data and even provides an online interface to track any changes to it.
Getting Started
First off, you will have to create an account. There are various plans available at your disposal, however you can also choose the basic plan, which is free. After you are logged in, you will find yourself on the Dashboard.

To use Simperium, we will have to create an app, so go ahead and hit Add an App in the sidebar and name it whatever you wish.

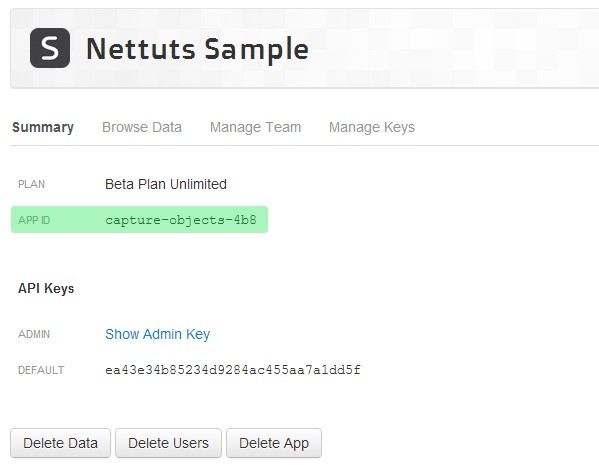
On the App Summary screen you will find a unique APP ID and a Default API Key.
You can use the API key to generate an access token on the fly, however for the purposes of this tutorial we will generate this token from the Simperium interface. Look for the Browse Data tab in the Dashboard and click Generate Token.

This will generate an Access Token that we can use together with the APP ID to connect to our Simperium app.
Let's See How This Works!
If you are like me and you can't wait to see how this works, you will want to create a simple test page.
<!DOCTYPE html>
<html>
	<head>

		<title>My Simperium testpage</title>
		<script src="http://code.jquery.com/jquery-latest.min.js" type="text/javascript"></script>
		<script type="text/javascript" src="https://js.simperium.com/v0.1/" type="text/javascript"></script>
		<script type="text/javascript" src="script.js" type="text/javascript"></script>
		<link rel="stylesheet" type="text/css" href="style.css">

	</head>
	<body>

		<h2>My Simperium testpage</h2>

		 <div class="content">
			 <div class="add_data">
				<textarea placeholder="Start typing here!"></textarea>
			</div>
			<div class="view_data">
				<h3>Your text will appear here:</h3>
				<div class="data"></div>
			</div>
		</div>

	</body>

</html>
To keep things nice looking, we will also add a bit of CSS, save this as style.css:
/* Reset all styles */

html,body,h2,h3,p,textarea,div {
	margin:0px;
	padding:0px;
}

/* End Reset */


h2 {
	font-family:arial, sans-serif;
	text-align:center;
	padding-top:50px;
}

h3 {
	font-family:arial,sans-serif;
	margin-bottom:30px;
}

p {
	font-family:arial, sans-serif;
	font-size:14px;
	color:#666;
}

textarea {
	font-family:arial, sans-serif;
	font-size:14px;
	width:380px;
	height:200px;
}

.content {
	width:800px;
	margin:auto;
	margin-top:50px;
}

.add_data {
	float:left;
	width:380px;
	margin-right:20px;
}

.view_data {
	float:right;
	width:400px;
}
Now, as you can see, we already included the Simperium Javascript library in our HTML, we just have to initialize it in our script. We can do this by creating a new file in the js subfolder with the name script.js, and pasting in the following code:
var simperium = new Simperium('SIMPERIUM_APP_ID', { token : 'SIMPERIUM_ACCESS_TOKEN'}); // Our credentials
var bucket = simperium.bucket('mybucket'); // Create a new bucket

bucket.start(); // Start our bucket

bucket.on('notify', function(id, data) { // This event fires when data in the bucket is changed
    $('.data').html("<p>"+data.text+"</p>");
});

$(document).ready(function() {

    $("textarea").on('input', function() {
        value = $(this).val();
        bucket.update("yourdata", {"text": value}); // We update our Simperium bucket with the value of the textarea
        $('.data').html("<p>"+value+"</p>");    // Our notify event doesn't fire locally so we update manually
    });

});
You will have to replace SIMPERIUM_APP_ID and SIMPERIUM_ACCESS_TOKEN with the credentials you previously generated for your app.
To test this, you have to open at least two instances of our test HTML file in the browser and you should see them update each other as you type.
The functionality is really simple, we initialize Simperium and create a new bucket. A bucket is basically a place to store our objects. Once our bucket is started, Simperium will keep it in sync, we just have to use the notify event. If we want to update the bucket, we use the update function. That's it!
This is the basic usage of Simperium, now we will combine this with a Chrome Extension to create something useful!
Our Chrome Extension
In this tutorial we will not cover the very basics of creating a Chrome Extension, if you need to catch up on that you can do so by reading Developing Google Chrome Extensions written by Krasimir Tsonev
The Basic Idea
Our steps will consist of the following:
- Initialize Simperium in our Extension.
- Use Chrome Extension Events to get notified when a tab is opened, closed or changed.
- Update our Simperium bucket with a list of the opened tabs.
- Create a separate HTML file to track opened tabs using Simperium events.
Let's jump right in by creating the basic structure of our extension which consists of:
- manifest.json - Manifest file
- background.js - Background script
The Manifest File
Our manifest file will look rather simple:
{
  "name": "Live Report",
  "version": "1.0",
  "description": "Live reporting of your opened tabs",
  "manifest_version":2,
  "background": {
    "persistent": true,
    "scripts": ["simperium.js", "background.js"]
  },
  "permissions":    [
    "webNavigation","tabs"
  ]
}
Paste this code into a blank file and save it as manifest.json.
As you can see, we only need to load the simperium library and our background script. We need to set the persistent option to true, so that Chrome will not unload these files to save memory.
The extension will use the chrome.webNavigation API so we need to set the webNavigation permission. We also need the tabs permission to have access to the title of the tabs.
The Background Script
Create a background.js file and save it next to manifest.json.
This the core of our extension, let's go through it step by step.
First things first, we need to initialize Simperium:
var simperium = new Simperium('SIMPERIUM_APP_ID', { token : 'SIMPERIUM_ACCESS_TOKEN'});
var data = simperium.bucket('tabs');

data.start();
Don't forget to replace SIMPERIUM_APP_ID and SIMPERIUM_ACCESS_TOKEN with the correct values you generated earlier.
In this case, we will create a new bucket called "tabs" to store our data.
The chrome.webNavigation and the chrome.tabs API
These APIs contain the events we'll use to catch them when a tab is opened, closed or changed.
chrome.tabs.onUpdated.addListener(function(tabId, changeInfo, tab) {

});
chrome.tabs.onUpdated will fire when a tab is updated. More specifically when you open a new tab or change its URL.
chrome.tabs.onRemoved.addListener(function(tabId, removeInfo) {

});
chrome.tabs.onRemoved will fire when you close a tab.
These two events seem to cover what we need, however it turns out that chrome.tabs.onUpdated does not fire when a tab is updated with a new page that is in the browser cache.
As a workaround, we can use chrome.webNavigation.onTabReplaced.
chrome.webNavigation.onTabReplaced.addListener(function(e){

});
According to the documentation: "Fired when the contents of the tab is replaced by a different (usually previously pre-rendered) tab."
The wording is not rock solid, but the event does work and will help us catch them when a tabs content is replaced with a cached page.
With these events, in theory, we could keep track of our tabs, however with these events firing multiple times this would be a tedious task.
Our solution is the chrome.tabs.query method.
chrome.tabs.query(queryInfo, function(tab){

});
Our callback function will return an array with all opened tabs. We can also set the queryInfo parameter to narrow the results, but for the purposes of this tutorial we will leave it empty.
Putting It All Together
Let's take a look at our final code:
var simperium = new Simperium('SIMPERIUM_APP_ID', { token : 'SIMPERIUM_ACCESS_TOKEN'});
var data = simperium.bucket('tabs');

data.start();

chrome.tabs.onUpdated.addListener(function(tabId, changeInfo, tab) {

	chrome.tabs.query({}, function(tabs){

       	updateTitles(tabs);

	});

});

chrome.tabs.onRemoved.addListener(function(tabId, removeInfo) {

	chrome.tabs.query({}, function(tabs){

       	updateTitles(tabs);

	});

});

chrome.webNavigation.onTabReplaced.addListener(function(e){

	chrome.tabs.query({}, function(tabs){

       	updateTitles(tabs);

	});

});

function updateTitles(tabs){
	var titles =[];

 	var length = tabs.length;

	for (var i = 0; i < length; i++) {

		titles[i]= tabs[i].title;

	}

	data.update("Tabs", {"Titles" : titles});

}
We use the events mentioned above to catch all tab events and query all opened tabs. To keep things simple, we created the updateTitles function that will go through our tabs array with a simple loop and assign the title value of every element to a new array.
In the last step, we update our Simperium object with our newly created array.
You can use the Browse Data tab in your Simperium Dashboard to verify if data is being changed correctly in your bucket, but we will also create a really simple HTML page to view our data.
This is our HTML:
<!DOCTYPE html>
<html>
	<head>

		<title>Tab viewer sample</title>
		<script src="http://code.jquery.com/jquery-latest.min.js" type="text/javascript"></script>
		<script type="text/javascript" src="https://js.simperium.com/v0.1/" type="text/javascript"></script>
		<script type="text/javascript" src="script.js" type="text/javascript"></script>
		<link rel="stylesheet" type="text/css" href="style.css">

	</head>
	<body>

		<h2>Tabs reported by Extension</h2>

		 <div class="tabs">
			<ul>
			</ul>
		</div>

	</body>

</html>
Looking at unstyled HTML is no pleasure, so just throw this in there to make things prettier:
/* Reset all styles */

html,body,h2,h3,p,textarea,div {
	margin:0px;
	padding:0px;
}

/* End Reset */


h2 {
	font-family:arial, sans-serif;
	text-align:center;
	padding-top:50px;
}

ul {
	list-style-type:none;
}

li {
	-moz-border-radius: 4px;
	border-radius: 4px;
	background-color:#eee;
	margin-bottom:3px;
	font-family: arial, sans-serif;
	padding: 10px;
	color: #333;
}


.tabs {
	width:800px;
	margin:auto;
	margin-top:50px;
}
Finally, some Javascript to retrieve the data from Simperium:
var simperium = new Simperium('SIMPERIUM_APP_ID', { token : 'SIMPERIUM_ACCESS_TOKEN'});
var data = simperium.bucket('tabs');


data.start();

data.on('notify', function(id, data) {

    $(".tabs ul").html("");

    var length  = data.Titles.length;

   	for (var i = 0; i < length; i++) {

		 $( "<li>"+data.Titles[i]+"</li>" ).appendTo(".tabs ul");

	}

});
We simply use the notify Simperium event to update our data in real-time. We generate the <li> tags with the titles inside an <ul> and that’s it!
Testing our result is actually really simple. If you load our extension in Chrome and open the Tab viewer HTML we just created, it will show all your opened tabs. Now, if you close or open a tab in Chrome our viewer HTML will instantly update with the new data. Navigating to a new page in any opened tab will also be caught by the extension and shown on our viewer page. We had our extension and the HTML file on the same machine, obviously this works with any pair of devices as long as they have an internet connection and one of them can run the extension.
Conclusion
In this tutorial we looked at Simperium and tab related events in Chrome. As you can see, it is quite easy to use them together, just don’t forget to set the persistent flag for your background page to true in your manifest file.
There are many uses that come to mind! Install the extension we created at home and upload the viewer HTML on a server. You can now view your opened tabs from anywhere. Pretty neat!
These technologies really make our applications more useable and integrating them is in fact pretty straightforward.
I hope you enjoyed this article and I encourage you to leave a comment if you get stuck or have any questions. Thanks and have fun!

Comments