This tutorial will teach you how to use GPUImage to apply image filters in real-time as the device's camera feed is displayed. Along the way, you'll learn how to automatically populate images within a carousel controller and how to resize images with UIImage+Categories.
Project Overview
Tutorial Prerequisites
This tutorial builds on a previous post entitled "Build a Photo App with GPUImage". The previous lesson demonstrated how to use UIImagePickerController to select photos from the device's photo album or camera, how to add the GPUImage library to your project, and how to use the GPUImageFilter class to enhance still camera frames. If you're already familiar with UIImagePickerController and can figure out how to add GPUImage to your project on your own, you should be able to pick up from where the last tutorial left off just fine.
Step 1: Import iCarousel
This project will make extensive use of an open-source project called iCarousel in order to add stylish display of selected photos.
In order to include iCarousel in your project, go to the official GitHub page and download the source code as a zip file. Extract the code from the ZIP file and then drag-and-drop the folder titled "iCarousel" into the Xcode Project Navigator. This folder should contain both iCarousel.h and iCarousel.m. Be sure to select "Create groups for any added folders" and check the box next to "Copy items into destination group's folder (if needed)" as well as the box next to your project's target name in the "Add to targets" area.
Next go to ViewController.m and add an import statement for iCarousel:
#import "ViewController.h"
#import "GPUImage.h"
#import "iCarousel/iCarousel.h"
Step 2: Import UIImage+Categories
Before we display our images with iCarousel, we'll need to scale them down to an acceptable size. Rather than write all of the code to do this by hand, we'll make use of the excellent UIImage+Categories project, which provides basic functionality for resizing images as well as a few other image manipulation tricks.
Download the UIImage+Categories code from GitHub and then create a new group with the same name within Xcode. Drag both the implementation and header files for UIImage+Alpha, UIImage+Resize, and UIImage+RoundedCorner into your project. Be sure to select "Create groups for any added folders" and check the box next to "Copy items into destination group's folder (if needed)" as well as the box next to your project's target name in the "Add to targets" area.
Within the ViewController.m file, import the image categories with the following line of code:
#import "ViewController.h"
#import "GPUImage.h"
#import "iCarousel.h"
#import "UIImage+Resize.h"
Step 3: Add the iCarousel View in IB
With the iCarousel code imported into our project, switch over to the MainStoryboard.storyboard file to rework our interface.
First, select the current UIImageView connected to the selectedImageView IBOutlet and delete it. Switch back to ViewController.m and modify the project code to read as follows:
@property(nonatomic, weak) IBOutlet iCarousel *photoCarousel;
@property(nonatomic, weak) IBOutlet UIBarButtonItem *filterButton;
@property(nonatomic, weak) IBOutlet UIBarButtonItem *saveButton;

- (IBAction)photoFromAlbum;
- (IBAction)photoFromCamera;
- (IBAction)saveImageToAlbum;
- (IBAction)applyImageFilter:(id)sender;

@end

@implementation ViewController

@synthesize photoCarousel, filterButton, saveButton;
On line 1 above, replace the selectedImageView outlet with a iCarousel outlet called photoCarousel. Swap out the variables in the synthesize statement on line 14 above as well.
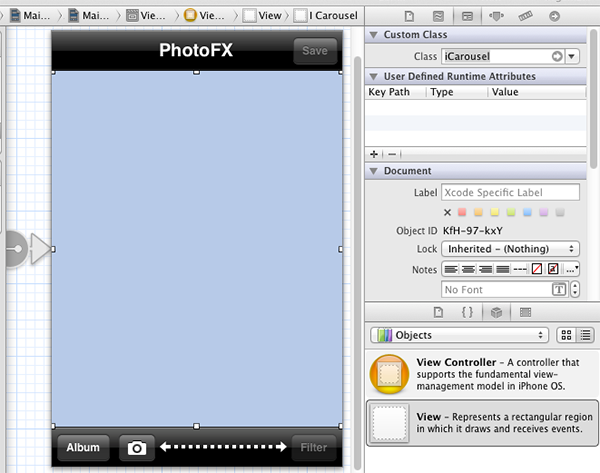
Go back to Interface Builder and drag a new UIView onto the view controller. With the new UIView selected, go to the "Identity inspector" tab within the Utilities pane and set the value for the "Class" field to "iCarousel". This tells Interface Builder that the UIView we added to the project should be instantiated as an instance of the iCarousel class.
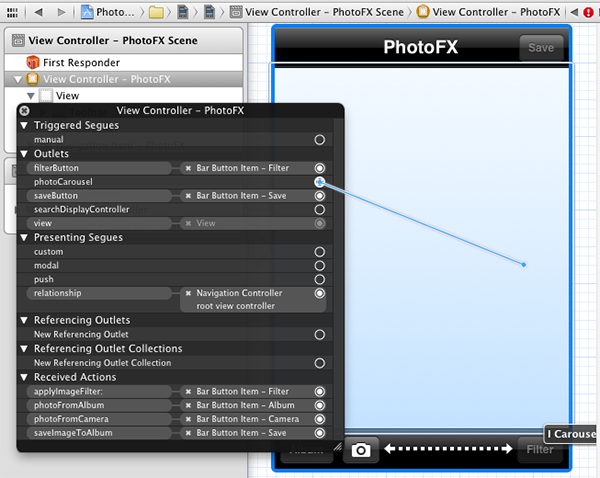
Now make a connection between the photoCarousel outlet just declared and the UIView just added as a subview.
We need to set both the data source and delegate for photoCarousel as well, and we can achieve this from within Interface Builder. First, go to ViewController.h and declare that this view controller will conform to the appropriate protocols:
#import <UIKit/UIKit.h>
#import "iCarousel/iCarousel.h"

@interface ViewController : UIViewController <UINavigationControllerDelegate, UIImagePickerControllerDelegate, UIActionSheetDelegate, iCarouselDataSource, iCarouselDelegate>
On line 2 we import iCarousel, and on line 4 we then declare conformance to both the delegate and the data source.
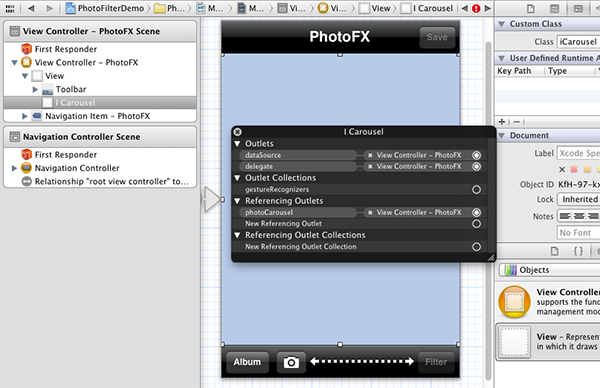
Back in the storyboard file, you can now map both the data source and the delegate to the view controller.
Before moving on, go ahead and change the background color of the iCarousel view to black.
Okay, just one more thing. We want the iCarousel view to appear below the UIToolbar in the view hierarchy. You can do this visually by simply dragging them to the correct order in Interface Builder:
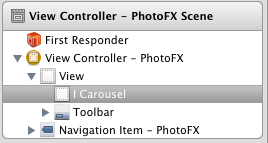
Note how the iCarousel view now appears before the Toolbar.
Save your work in Interface Builder.
Step 4: Implement the iCarousel Protocols
iCarousel uses a design pattern similar to UITableView in that a data source is used to feed input into the control and a delegate is used to handle interaction with the control.
For our project, the data source will be a simple NSMutableArray called "displayImages". Add this to the class extension in ViewController.m now:
#import "UIImage+Resize.h"

@interface ViewController ()
{
    NSMutableArray *displayImages;
}

@property(nonatomic, weak) IBOutlet iCarousel *photoCarousel;
Next, we want to allocate memory for the array in the class' designated initializer. In our case, the view controller will be instantiated from a Storyboard, so the proper initializer is initWithCoder:. However, if the class were to be instantiated programmatically from a XIB, the proper initializer would be initWithNibName:bundle:. In order to accommodate either initialization style, we'll write our own custom initializer and call it from both, like so:
- (void)customSetup
{
    displayImages = [[NSMutableArray alloc] init];
}

- (id)initWithNibName:(NSString *)nibNameOrNil bundle:(NSBundle *)nibBundleOrNil
{
    if ((self = [super initWithNibName:nibNameOrNil bundle:nibBundleOrNil]))
    {
        [self customSetup];
    }
    return self;
}

- (id)initWithCoder:(NSCoder *)aDecoder
{
    if ((self = [super initWithCoder:aDecoder]))
    {
        [self customSetup];
    }
    return self;
}
Now we can implement the data source and delegate. Start with the data source method numberOfItemsInCarousel:, like so:
#pragma mark
#pragma mark iCarousel DataSource/Delegate/Custom

- (NSUInteger)numberOfItemsInCarousel:(iCarousel *)carousel
{
    return [displayImages count];
}
This will tell iCarousel how many images to display by looking at the number of images stored in the data source array.
Next, write the method that will actually generate a view for each image displayed in the carousel:
- (UIView *)carousel:(iCarousel *)carousel viewForItemAtIndex:(NSUInteger)index reusingView:(UIView *)view
{
    // Create new view if no view is available for recycling
    if (view == nil)
    {
        view = [[UIImageView alloc] initWithFrame:CGRectMake(0, 0, 300.0f, 300.0f)];
        view.contentMode = UIViewContentModeCenter;
    }

   ((UIImageView *)view).image = [displayImages objectAtIndex:index];

    return view;
}
This is a good start, but there's one very significant issue with the above: the images should be scaled down before being supplied to iCarousel. Add the following lines of code to update the method:
- (UIView *)carousel:(iCarousel *)carousel viewForItemAtIndex:(NSUInteger)index reusingView:(UIView *)view
{
    // Create new view if no view is available for recycling
    if (view == nil)
    {
        view = [[UIImageView alloc] initWithFrame:CGRectMake(0, 0, 300.0f, 300.0f)];
        view.contentMode = UIViewContentModeCenter;
    }

    // Intelligently scale down to a max of 250px in width or height
    UIImage *originalImage = [displayImages objectAtIndex:index];

    CGSize maxSize = CGSizeMake(250.0f, 250.0f);
    CGSize targetSize;

    // If image is landscape, set width to 250px and dynamically figure out height
    if(originalImage.size.width >= originalImage.size.height)
    {
        float newHeightMultiplier = maxSize.width / originalImage.size.width;
        targetSize = CGSizeMake(maxSize.width, round(originalImage.size.height * newHeightMultiplier));
    } // If image is portrait, set height to 250px and dynamically figure out width
    else
    {
        float newWidthMultiplier = maxSize.height / originalImage.size.height;
        targetSize = CGSizeMake( round(newWidthMultiplier * originalImage.size.width), maxSize.height );
    }

    // Resize the source image down to fit nicely in iCarousel
    ((UIImageView *)view).image = [[displayImages objectAtIndex:index] resizedImage:targetSize interpolationQuality:kCGInterpolationHigh];

    return view;
}
Above, we set a maximum size of 250px for either the width or height of the image, and then we scale the opposite attribute down to match. This constrains the proportions of the image and looks much nicer than simply scaling down to a 250px by 250px square.
The above two methods are all iCarousel needs to start displaying images.
With the delegate and data source methods configured, now is a good time to setup the iCarousel object in the viewDidLoad method as well:
- (void)viewDidLoad
{
    [super viewDidLoad];

    // iCarousel Configuration
    self.photoCarousel.type = iCarouselTypeCoverFlow2;
    self.photoCarousel.bounces = NO;
}
With just a few more tweaks, the project will be able to display images within a carousel!
Step 5: Switch to the New Data Model
Earlier in this tutorial, we replaced the selectedImageView property with the photoCarousel property, updated the Storyboard interface to match, and created an NSMutableArray to act as the iCarousel data model. However, there are a few methods in ViewController.m still using the old data model that will prevent the project from compiling, so let's fix those now. Update the saveImageToAlbum method like so:
- (IBAction)saveImageToAlbum
{
    UIImage *selectedImage = [displayImages objectAtIndex:self.photoCarousel.currentItemIndex];
    UIImageWriteToSavedPhotosAlbum(selectedImage, self, @selector(image:didFinishSavingWithError:contextInfo:), nil);
}
Line 3 selects the UIImage from the data model that matches the current iCarousel index. Line 4 performs the actual disk write with that image.
Next, go to the UIImagePickerController delegate method and modify the code:
- (void)imagePickerController:(UIImagePickerController *)photoPicker didFinishPickingMediaWithInfo:(NSDictionary *)info
{
    self.saveButton.enabled = YES;
    self.filterButton.enabled = YES;

    [displayImages addObject:[info valueForKey:UIImagePickerControllerOriginalImage]];

    [self.photoCarousel reloadData];

    [photoPicker dismissViewControllerAnimated:YES completion:NULL];

}
On line 6 above, we add the selected photo to the new model and on line 8 we force a refresh of the carousel.
Just one more change to make. Go to the action sheet's clickedButtonAtIndex: method and modify the code as follows:
#pragma mark -
#pragma mark UIActionSheetDelegate

- (void)actionSheet:(UIActionSheet *)actionSheet clickedButtonAtIndex:(NSInteger)buttonIndex
{

    if(buttonIndex == actionSheet.cancelButtonIndex)
    {
        return;
    }

    GPUImageFilter *selectedFilter;

    switch (buttonIndex) {
        case 0:
            selectedFilter = [[GPUImageGrayscaleFilter alloc] init];
            break;
        case 1:
            selectedFilter = [[GPUImageSepiaFilter alloc] init];
            break;
        case 2:
            selectedFilter = [[GPUImageSketchFilter alloc] init];
            break;
        case 3:
            selectedFilter = [[GPUImagePixellateFilter alloc] init];
            break;
        case 4:
            selectedFilter = [[GPUImageColorInvertFilter alloc] init];
            break;
        case 5:
            selectedFilter = [[GPUImageToonFilter alloc] init];
            break;
        case 6:
            selectedFilter = [[GPUImagePinchDistortionFilter alloc] init];
            break;
        case 7:
            selectedFilter = [[GPUImageFilter alloc] init];
            break;
        default:
            break;
    }

    UIImage *filteredImage = [selectedFilter imageByFilteringImage:[displayImages objectAtIndex:self.photoCarousel.currentItemIndex]];
    [displayImages replaceObjectAtIndex:self.photoCarousel.currentItemIndex withObject:filteredImage];
    [self.photoCarousel reloadData];
}
The final three lines of this method will filter the data model image that corresponds to the current carousel index, replace the carousel display with that image, and then refresh the carousel.
If all went well, you should now be able to compile and run the project! Doing so will allow you to view your images within the carousel instead of simply within an image view.
Step 6: Add a Gesture for Deleting Images
The app is looking good so far, but it would be nice if the user could remove a photo from the carousel after adding it to the display. No problem! We can select any UIGestureRecognizer subclass to make this happen. For this tutorial, I've chosen to use a two-finger double-tap. This gesture may not be immediately intuitive, but it is easy to perform and the added complexity will help prevent the removal of images accidentally.
Within the ViewController.m file, go to the carousel:viewForItemAtIndex:reusingView: method and add the following lines just before the end of method:
    // Resize the source image down to fit nicely in iCarousel
    ((UIImageView *)view).image = [[displayImages objectAtIndex:index] resizedImage:targetSize interpolationQuality:kCGInterpolationHigh];

    // Two finger double-tap will delete an image
    UITapGestureRecognizer *gesture = [[UITapGestureRecognizer alloc] initWithTarget:self action:@selector(removeImageFromCarousel:)];
    gesture.numberOfTouchesRequired = 2;
    gesture.numberOfTapsRequired = 2;
    view.gestureRecognizers = [NSArray arrayWithObject:gesture];

    return view;
Lines 4 - 8 declare a new UITapGestureRecognizer object, set the number of touches (i.e. fingers) required to trigger the gesture to 2, and set the number of taps required to 2 as well. Finally, just before passing the view back to the iCarousel object, we set the gestureRecognizers property with the newly formed recognizer.
Note that when triggered, this gesture recognizer will fire the selector removeImageFromCarousel:. Let's implement that next:
- (void)removeImageFromCarousel:(UIGestureRecognizer *)gesture
{
    [gesture removeTarget:self action:@selector(removeImageFromCarousel:)];
    [displayImages removeObjectAtIndex:self.photoCarousel.currentItemIndex];
    [self.photoCarousel reloadData];
}
Line 3 removes the gesture from the current target to prevent multiple gestures being triggered while processing. The remaining two lines are nothing new at this point.
Build and run the app again. You should now be able to dynamically remove items from the carousel!
Step 7: Create MTCameraViewController
The remainder of this tutorial will focus on using GPUImageStillCamera to build a custom camera picker control that can apply filters to the incoming video stream in real time. GPUImageStillCamera works closely with a class called GPUImageView. Camera frames generated by GPUImageStillCamera are sent to an assigned GPUImageView object for display to the user. All of this is accomplished with the underlying functionality provided by the AVFoundation framework, which provides programmatic access to camera frame data.
Because GPUImageView is a child class of UIView, we can embed the entire camera display into our own custom UIViewController class.
Add a new UIViewController subclass to the project by right clicking "PhotoFX" in the project navigator, and then selecting New File > Objective-C class. Name the class "MTCameraViewController" and enter "UIViewController" in for the "subclass of" field.
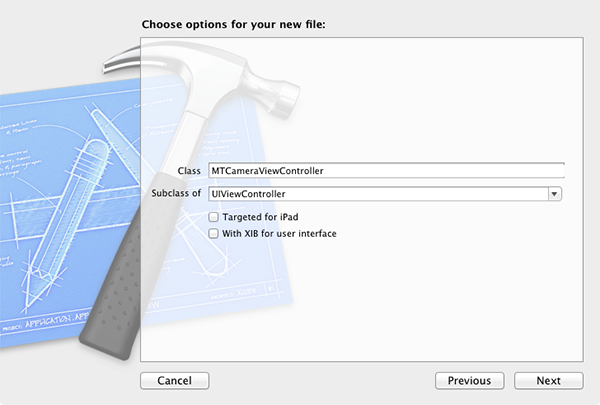
Click "Next" and then "Create" to complete the process.
Go to the MTCameraViewController.m file and import GPUImage:
#import "MTCameraViewController.h"
#import "GPUImage.h"
Next create a class extension with the necessary GPUImage data members:
@interface MTCameraViewController () <UIActionSheetDelegate>
{
    GPUImageStillCamera *stillCamera;
    GPUImageFilter *filter;
}
@end
Finally, go to the viewDidLoad: method and add the code to start up the camera capture:
- (void)viewDidLoad
{
    [super viewDidLoad];

    // Setup initial camera filter
    filter = [[GPUImageFilter alloc] init];
    [filter prepareForImageCapture];
    GPUImageView *filterView = (GPUImageView *)self.view;
    [filter addTarget:filterView];

    // Create custom GPUImage camera
    stillCamera = [[GPUImageStillCamera alloc] init];
    stillCamera.outputImageOrientation = UIInterfaceOrientationPortrait;
    [stillCamera addTarget:filter];

    // Begin showing video camera stream
    [stillCamera startCameraCapture];

}
Lines 5 - 9 create a new GPUImageView for displaying the camera feed and a default GPUImageFilter instance for applying a special effect to the view. We could have just as easily used one of the GPUImageFilter subclasses, such as GPUImageSketchFilter, but we'll instead start off with the default filter (i.e. no manipulations) and let the user dynamically select a filter later.
Lines 11 - 17 instantiate the GPU camera instance and apply the filter created previously to the camera before starting the capture.
Step 8: Add the Custom Camera in IB
Before the code from Step 8 will work, we need to add the custom MTCameraViewController class just created to the project's Storyboard.
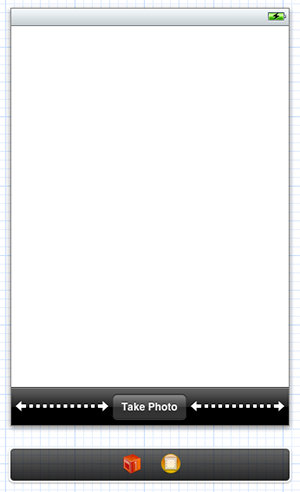
Open the MainStoryboard.storyboard file and drag out a new View Controller from the Object library. With this object selected, go to the Identity inspector tab and set the "Class" field value to "MTCameraViewController".
Next, drag a UIToolbar onto the screen and set its style property to "Black Opaque" in the Attributes inspector. Then add two flexible width bar button items to the toolbar with a "Take Photo" UIBarButtonItem in the center.
To connect this view controller to the application flow, right click the "camera" button from the main view controller and drag the triggered segues outlet to the new view controller:
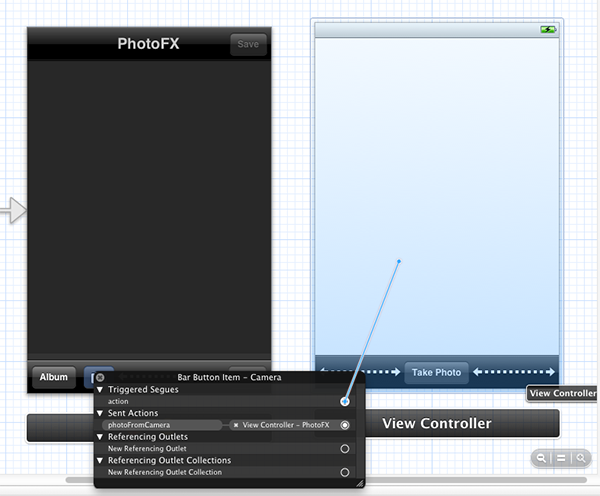
When prompted, select "Push" as the segue style.
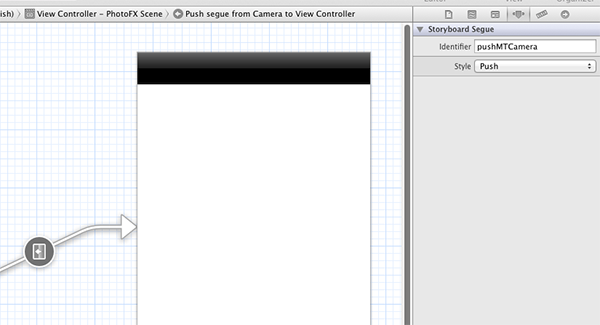
With the newly added segue object still selected, go to the "Attributes inspector" and set the identifier to "pushMTCamera". Go ahead and make sure that "Push" is selected from the "Style" drop down.
With the segue created, ensure that the UIImagePicker will no longer be displayed when the user taps the camera button on the first app screen by disconnecting the IBAction outlet from the photoFromCamera method.
Finally, select the primary view of the newly created MTCameraViewController. Go to the Identity inspector and set the class value to "GPUImageView".
While not perfect just yet, if you build and run the app now, you should be able to push MTCameraViewController onto the view hierarchy and watch GPUImageView display the frames from the camera in real-time!
Step 9: Add Realtime Filter Selection
We can now add the logic necessary to control the filter applied to the camera display. First, go to the viewDidLoad: method within the MTCameraViewController.m file and add the code that will create a "Filter" button in the top right of the view controller:
- (void)viewDidLoad
{
    [super viewDidLoad];

    // Add Filter Button to Interface
    UIBarButtonItem *filterButton = [[UIBarButtonItem alloc] initWithTitle:@"Filter" style:UIBarButtonItemStylePlain target:self action:@selector(applyImageFilter:)];
    self.navigationItem.rightBarButtonItem = filterButton;
On line 6 above, we create a custom UIBarButtonItem that will trigger applyImageFilter: when selected.
Now create the selector method:
- (IBAction)applyImageFilter:(id)sender
{
    UIActionSheet *filterActionSheet = [[UIActionSheet alloc] initWithTitle:@"Select Filter"
                                                                   delegate:self
                                                          cancelButtonTitle:@"Cancel"
                                                     destructiveButtonTitle:nil
                                                          otherButtonTitles:@"Grayscale", @"Sepia", @"Sketch", @"Pixellate", @"Color Invert", @"Toon", @"Pinch Distort", @"None", nil];

    [filterActionSheet showFromBarButtonItem:sender animated:YES];
}
After adding the above you'll see a compiler warning stating that the current view controller doesn't conform to the UIActionSheetDelegate protocol. Fix that issue now by going to MTCameraViewController.h and modifying the class declaration like so:
#import <UIKit/UIKit.h>

@interface MTCameraViewController : UIViewController <UIActionSheetDelegate>

@end
Complete the circle by going back to the MTCameraViewController.m file and adding the logic that will respond to the UIActionSheet presented:
- (void)actionSheet:(UIActionSheet *)actionSheet clickedButtonAtIndex:(NSInteger)buttonIndex
{
    // Bail if the cancel button was tapped
    if(actionSheet.cancelButtonIndex == buttonIndex)
    {
        return;
    }

    GPUImageFilter *selectedFilter;

    [stillCamera removeAllTargets];
    [filter removeAllTargets];


    switch (buttonIndex) {
        case 0:
            selectedFilter = [[GPUImageGrayscaleFilter alloc] init];
            break;
        case 1:
            selectedFilter = [[GPUImageSepiaFilter alloc] init];
            break;
        case 2:
            selectedFilter = [[GPUImageSketchFilter alloc] init];
            break;
        case 3:
            selectedFilter = [[GPUImagePixellateFilter alloc] init];
            break;
        case 4:
            selectedFilter = [[GPUImageColorInvertFilter alloc] init];
            break;
        case 5:
            selectedFilter = [[GPUImageToonFilter alloc] init];
            break;
        case 6:
            selectedFilter = [[GPUImagePinchDistortionFilter alloc] init];
            break;
        case 7:
            selectedFilter = [[GPUImageFilter alloc] init];
            break;
        default:
            break;
    }

    filter = selectedFilter;
    GPUImageView *filterView = (GPUImageView *)self.view;
    [filter addTarget:filterView];
    [stillCamera addTarget:filter];

}
Lines 11-12 are used to reset the currently selected filter.
Lines 15 - 42 above should look familiar to the logic in ViewController.m; we're just switching on the selected button to create an instance of the correlating filter.
Lines 44 - 47 take the newly created filter and apply it to the GPUImage camera.
If you build and run the project now, you should see that the newly created filter button allows the user to try out GPUImage filters in real time!
Step 10: Create a Camera Delegate Protocol
Now that we have the live feed filters working, the last major step in the tutorial is to allow the user to take snapshots with the GPUImage camera and then display them back in the main view controller's photo carousel.
In order to achieve this, we'll pass messages between view controllers using the delegation design pattern. Specifically, we'll create our own custom formal delegate protocol in MTCameraViewController and then configure the main ViewController class to conform to that protocol in order to receive delegation messages.
To get started, go to MTViewController.h and modify the code as follows:
#import <UIKit/UIKit.h>

@protocol MTCameraViewControllerDelegate

- (void)didSelectStillImage:(NSData *)image withError:(NSError *)error;

@end

@interface MTCameraViewController : UIViewController

@property(weak, nonatomic) id delegate;

@end
The above code declares a formal delegate pattern called MTCameraViewControllerDelegate on lines 3-7, and then creates a delegate object on line 11.
Next switch to MTCameraViewController.m and synthesize the delegate property:
@implementation MTCameraViewController

@synthesize delegate;
With the protocol declared, we now need to implement it in the main ViewController class. Go to ViewController.h and add the following lines:
#import <UIKit/UIKit.h>
#import "iCarousel.h"
#import "MTCameraViewController.h"

@interface ViewController : UIViewController <UINavigationControllerDelegate, UIImagePickerControllerDelegate, UIActionSheetDelegate, MTCameraViewControllerDelegate, iCarouselDataSource, iCarouselDelegate>

@end
Now open up the ViewController.m file. We want to assign the delegate property when the view controller is instantiated. Because we're using Storyboards, the proper place to do this is in the prepareForSegue:sender: method, which will be called just before the new view controller is pushed onto the screen:
- (void)prepareForSegue:(UIStoryboardSegue *)segue sender:(id)sender
{
    if([segue.identifier isEqualToString:@"pushMTCamera"])
    {
        // Set the delegate so this controller can received snapped photos
        MTCameraViewController *cameraViewController = (MTCameraViewController *) segue.destinationViewController;
        cameraViewController.delegate = self;
    }
}
Next we need to implement the didSelectStillImage:withError: method required by the MTCameraViewControllerDelegate protocol:
#pragma mark -
#pragma mark MTCameraViewController

// This delegate method is called after our custom camera class takes a photo
- (void)didSelectStillImage:(NSData *)imageData withError:(NSError *)error
{
    if(!error)
    {
        UIImage *image = [[UIImage alloc] initWithData:imageData];
        [displayImages addObject:image];
        [self.photoCarousel reloadData];

        self.filterButton.enabled = YES;
        self.saveButton.enabled = YES;

    }
    else
    {
        UIAlertView *alert = [[UIAlertView alloc] initWithTitle:@"Capture Error" message:@"Unable to capture photo." delegate:nil cancelButtonTitle:@"OK" otherButtonTitles:nil];

        [alert show];
    }
}
The above code will convert the NSData object handed to the method to a UIImage and then reload the photo carousel.
Finally, we need to wrap things up by returning to MTCameraViewController.m and adding in the appropriate delegate method call. First, setup an IBAction method that will trigger a camera snap:
    GPUImageFilter *filter;
}

- (IBAction)captureImage:(id)sender;

@end
Before continuing, connect this method to the "Take Photo" button in the MainStoryboard.storyboard file.
Finally, add the method implementation:
-(IBAction)captureImage:(id)sender
{
    // Disable to prevent multiple taps while processing
    UIButton *captureButton = (UIButton *)sender;
    captureButton.enabled = NO;

    // Snap Image from GPU camera, send back to main view controller
    [stillCamera capturePhotoAsJPEGProcessedUpToFilter:filter withCompletionHandler:^(NSData *processedJPEG, NSError *error)
     {
         if([delegate respondsToSelector:@selector(didSelectStillImage:withError:)])
         {
             [self.delegate didSelectStillImage:processedJPEG withError:error];
         }
         else
         {
             NSLog(@"Delegate did not respond to message");
         }

         runOnMainQueueWithoutDeadlocking(^{
             [self.navigationController popToRootViewControllerAnimated:YES];
         });
     }];
}
Lines 3-5 above disable the "Take Photo" button to prevent multiple presses while processing.
Lines 7 - 22 use the GPUImage method capturePhotoAsJPEGProcessedUpToFilter:withCompletionHandler: to actually save a JPEG image, check to see if a delegate has been set, and then send the image data on to the delegate if it is set.
Line 19 pops the current view controller, but does so on the main application thread.
Wrap Up
Congratulations! If you've followed the tutorial this far, then you should have a fully functional, advanced photo taking application! If you have questions or feedback, feel free to leave it in the comments section below or send them to me directly over Twitter (@markhammonds).
Thanks for reading!

Comments