This is the final part of a three part tutorial that will teach you how to build a contacts manager application in JavaScript, using CanJS and jQuery. When you're done with this tutorial, you'll have all you need to build your own JavaScript applications using CanJS!
In part two, you created the Views and Controls needed to display categories, created Model.List helpers, used routing to filter contacts and modified your EJS to take advantage of live binding.
In this part of the tutorial, you will:
- Edit and delete contacts using the
ContactControl - Create a Control and View to create contacts
- Listen to DOM and Model events using Control's templated event handlers
You'll be adding to the source files from part one and two so if you haven't done so already, catch up by reading part one and two.
Updating a Contact
In part one, contactView.ejs placed each property of a contact is in an input tag. To update a contact when these inputs change, you'll have to add some event handlers to the Contact Control. Add this code contacts.js inside the Contacts Control:
'.contact input focusout': function(el, ev) {
  this.updateContact(el);
},
'.contact input keyup': function(el, ev) {
  if(ev.keyCode == 13){
    el.trigger('blur')
  }
},
'.contact select change': function(el, ev) {
  this.updateContact(el)
},
updateContact: function(el){
  var contact = el.closest('.contact').data('contact');
  contact.attr(el.attr('name'), el.val()).save();
}
Let's go through this code line-by-line and see how it works:
'.contact input focusout': function(el, ev) {
  this.updateContact(el);
},
Calls updateContact() when any <input> loses focus.
'.contact input keyup': function(el, ev) {
  if(ev.keyCode == 13){
    el.trigger('blur')
  }
}
Triggers the blur event on an <input> if the enter key is pressed while it has focus. This will cause the input to lose focus, which is handled by the focusout event handler.
'.contact select change': function(el, ev) {
  this.updateContact(el)
},
Calls updateContact() when the value of the <select> changes.
var contact = el.closest('.contact').data('contact');
Finds the closest <li> parent tag and retrieves the model instance using $.data().
contact.attr(el.attr('name'), el.val()).save();
Updates the contact using attr(). The name of each <input> matches a property of contact, so el.attr('name') will return the name of the property that is being updated. save() is used to save the change to the Contact Model.
Deleting a Contact
There is a small link with an 'X' in the top right corner of each contact. When this is clicked, the contact should be deleted. To do this, add another event handler to the Contacts control that looks like this:
'.remove click': function(el, ev){
  el.closest('.contact').data('contact').destroy();
}
When the X is clicked, the contact instance is retrieved from the nearest <li> and destroy() is called. destroy() deletes the contact from the Model and removes it from any Model.Lists.
Live binding will automatically update your UI when a contact is deleted.
Creating a Contact
Now you'll create the Control and View needed to create a contact. First you'll need a giant "New Contact" button. Add this code to index.html right above <div id="filter">:
<a class="btn btn-large btn-primary" href="javascript://" id="new-contact">
  <i class="icon-plus icon-white"></i> New Contact
</a>
You'll also need to create a new View that will render a form for creating a contact. Save this code as createView.ejs in your views folder:
<div class="hero-unit contact span8">
  <%== can.view.render('views/contactView.ejs', {
    contact: contact, categories: categories
  }) %>
  <div class="row">
    <div class="buttons pull-right">
      <a href="javascript://" class="btn btn-primary save">Save</a>
      <a href="javascript://" class="btn cancel">Cancel</a>
    </div>
  </div>
</div>
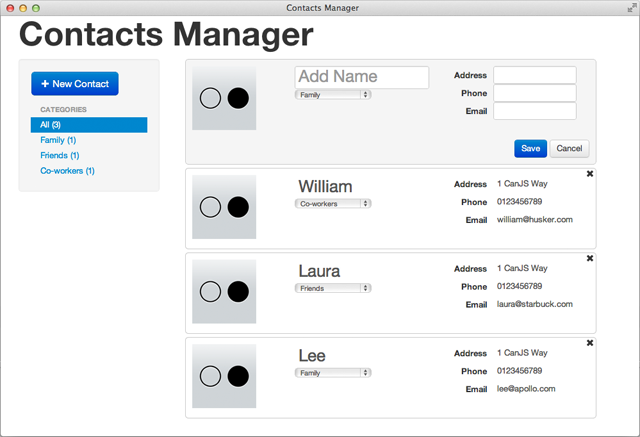
This View renders the contactView.ejs sub-template and adds "Save" and "Cancel" buttons. Here's what it looks like in the application:

Now you'll need to create a new Control named Create that will display the form and save the new contact to the Contact Model. Add this code to contacts.js:
Create = can.Control({
  show: function(){
    this.contact = new Contact();
    this.element.html(can.view('views/createView.ejs', {
      contact: this.contact,
      categories: this.options.categories
    }));
    this.element.slideDown(200);
  },
  hide: function(){
    this.element.slideUp(200);
  },
  '.contact input keyup': function(el, ev) {
    if(ev.keyCode == 13){
      this.createContact(el);
    }
  },
  '.save click' : function(el){
    this.createContact(el)
  },
  '.cancel click' : function(){
    this.hide();
  },
  createContact: function() {
    var form = this.element.find('form');
      values = can.deparam(form.serialize());

    if(values.name !== "") {
      this.contact.attr(values).save();
      this.hide();
    }
  }
});
Let's go over this Control in detail to see what's going on:
show: function(){
  this.contact = new Contact();
  this.element.html(can.view('views/createView.ejs', {
    contact: this.contact,
    categories: this.options.categories
  }));
  this.element.slideDown(200);
},
Creates a empty contact using new Contact({}) and assigns it to this.contact. The new contact is passed to can.view() along with the categories to be rendered.
hide: function(){
  this.element.slideUp(200);
},
Slides the form up out of view.
'.contact input keyup': function(el, ev) {
  if(ev.keyCode == 13){
    this.createContact(el);
  }
}
Calls createContact() if the enter key is pressed while in one of the inputs.
'.save click' : function(el){
  this.createContact(el)
},
Call createContact() when the "Save" button is clicked.
'.cancel click' : function(){
  this.hide();
},
Calls hide() when the "Cancel" button is clicked.
var form = this.element.find('form');
  values = can.deparam(form.serialize());
Finds the <form> element and uses jQuery's serialize() function to get a string representing all the form's values. Then the serialized string is converted to an object using can.deparam().
if(values.name !== "") {
  this.contact.attr(values).save();
  this.hide();
}
If the name of the contact is not empty, attr() is used to update the contact stored in this.contact. save() is called to save the changes to the model and the form is hidden by calling hide().
Using Templated Event Handlers
Controls also support templated event handlers that allow you to customize an event handler and listen to events on objects other than this.element.
You customize the handler behavior using {NAME} in the event handler. The variable inside the curly braces is looked up on the Control's this.options first, and then the window. You could create multiple instances of the same Control but customize the behavior of its event handlers in each instance.
Controls can also bind to objects other than this.element using templated event handlers. If the variable inside {NAME} is an object, Control will bind to that object to listen for events. The object does not have to be a DOM element, it can be any object like a Model. To listen to a click anywhere on a page you would use: '{document} click'. as your event handler.
These handlers will get cleaned up when the Control instance is destroyed. This is critical for avoiding memory leaks that are common in JavaScript applications.
Showing the Form
You'll need to use a templated event handler to show the form when the "New Contact" button is clicked. Add this event handler to the Create Control in contacts.js:
'{document} #new-contact click': function(){
  this.show();
}
The "New Contact" button is outside of the Create Control's element, so '{document} #new-contact' is used as the selector for the button. When it is clicked, the form will slide down into view.
Initializing the Create Control
Just like the other Controls in you application, you'll need to create a new instance of the Create Control. Update your document ready function in contacts.js to look like this:
$(document).ready(function(){
  $.when(Category.findAll(), Contact.findAll()).then(function(categoryResponse, contactResponse){
    var categories = categoryResponse[0],
      contacts = contactResponse[0];

    new Create('#create', {
      categories: categories
    });
    new Contacts('#contacts', {
      contacts: contacts,
      categories: categories
    });
    new Filter('#filter', {
      contacts: contacts,
      categories: categories
    });
  });
})
With this change, an instance of the Create Control will be created on the #create element. It will be passed the list of categories.
Reacting to a New Contact
When a new contact is created, the Model.List stored in the Contacts Control needs to be updated. You do this using templated event handlers. Add this event handler to the Contacts Control in contacts.js:
'{Contact} created' : function(list, ev, contact){
  this.options.contacts.push(contact);
}
This binds to the created event of the Contact Model. The new contact is added to the Model.List stored in the Contacts Control using push().
Live binding will update your applications UI automatically when the contact is added to
this.options.contacts.
Wrapping Up
That's all for the final part of this tutorial. In part three you:
- Used event handlers in a Control to create a new contact
- Created a View that that render a create form
- Used templated event handlers in a Control to bind to objects other than the Control's element
This is the end of the CanJS contacts manager tutorial. Here's a summary of what was covered in this three part tutorial:
- Creating Controls to manage application logic
- Render parts of an application with Views
- Representing an application's data layer using Models
- Simulating a REST service with fixtures
- Using live binding to keep an application's UI in sync with its data layer
- Listening to events with Control's event handlers
- Working with lists of model instances using Model.List
You now have everything you need to build JavaScript applications using CanJS. Go build something awesome.
For complete documentation and more example apps, visit CanJS. Thanks for reading!

Comments