Once you've developed your iOS or OS X app, it's time to submit it to Apple for release in the App Store. This process is done through iTunes Connect, which is the portal connecting developers to the world. In this tutorial, you'll learn exactly how to distribute your apps from Xcode to the App Store using iTunes Connect.
More specifically, you'll be learning about the following topics:
- what is iTunes Connect
- how to generate certificates, App IDs, and provisioning profiles
- how to distribute an application using iTunes Connect
- Apple's review process
Note that you need to be a member of one of Apple's paid developer programs to create certificates and provisioning profiles, and to access iTunes Connect.
1. What is iTunes Connect?
iTunes Connect is a suite of web-based tools for managing content sold on the iTunes Store, App Store, Mac App Store, and iBooks Store. As a member of the iOS Developer Program or Mac Developer Program, you'll use this tool to manage apps, contracts, tax and banking information, sales reports, and more. - Apple Developer Center
Once you've signed up to one of the developer programs, you'll be given access to iTunes Connect, using your Apple ID and password. While iTunes Connect can be used to manage a wide range of products, such as music, movies, and books, we'll focus on iOS and OS X apps in this tutorial.
In iTunes Connect, you can view the sales and trends of your apps, sign contracts, tax, and banking agreements, as well as manage your iOS and OS X apps. The latter is the topic of this tutorial.
2. Certificates, App IDs, and Provisioning Profiles
Before you can distribute your apps to the App Store, you'll need to create three things:
- Certificate: identifies the developer or development team
- App ID: uniquely identifies an app on the App Store
- Provisioning Profile: ties certificate, App ID, and devices together
Certificate
Step 1
To begin generating these three items, go to the Member Center, and select Certificates, Identifiers & Profiles.

Step 2
Select the item you wish to generate from its corresponding list. We'll start by generating a certificate first.

Step 3
You're now presented with a list of your existing certificates (if any). There are two types of certificates, development and distribution. Development certificates are used during testing and development while distribution certificates are used to sign your app for ad hoc or App Store distribution.

Click the plus button in the top right and select the type of certificate you'd like to generate. Choose App Store and Ad Hoc, because that's the one you need to publish your app to the App Store. Click Continue at the bottom.

Step 4
To create a certificate, you need a Certificate Signing Request (CSR), which you need to create on your development machine. This process involves creating a public/private key pair that identifies you, the developer. Let's see how this works.

Open up the Keychain Access application on your development machine and select Certificate Assistant > Request a Certificate From a Certificate Authority... from the Keychain Access menu.

Step 5
Enter your email address and set a name for the public/private key pair by filling out he Common Name field. I've named mine Sam Berson's Tuts+ Key. Leave the second email field blank and check the checkbox Saved to Disk.

Step 6
Find a safe place for the certificate signing request and save it to disk. With the certificate signing request created, it's time to upload it to the Member Center.
Step 7
Upload the certificate signing request you just created and click Generate at the bottom. Download the certificate and add it to Keychain Access by double-clicking it. Download, install, and back up your newly generated certificate.


App ID
The App ID string contains two parts separated by a period (.)—an App ID Prefix that is defined as your Team ID by default and an App ID Suffix that is defined as a Bundle ID search string. Each part of an App ID has different and important uses for your app. - Apple Developer Center
Head back to the member center and select App IDs to create a new App ID for your application. Click the plus button in the top right to get started.
Step 1
Give the App ID an easy to remember name in the App ID Description section.

Step 2
Select whether you'd like to create an Explicit or Wildcard App ID. An explicit App ID, such as com.tutsplus.testing, is tied to a particular application and is required if you, for example, would like to enable push notifications. A wildcard App ID, such as com.tutsplus.*, can be tied to several applications and always ends with an asterisk.
Step 3
Next, select the services you'd like to enable for the App ID, such as Game Center and iCloud. These services should align with your app's capabilities in Xcode.

Step 4
Finally, click the Submit button to confirm your App ID. Then, click Done.

Provisioning Profile
Generating a provisioning profile in the Member Center is similar to creating a certificate. Let me take you through the required steps to generate a provisioning profile.
Step 1
Select the type of provisioning profile you'd like to create. You'll notice that there are three types of provisioning profiles:
- iOS App Development
- App Store Distribution
- Ad Hoc Distribution
We are interested in an App Store Distribution provisioning profile.

Step 2
Select the App ID you created a moment ago from the drop-down menu.

Step 3
Next, select the distribution certificate you created earlier in this tutorial.

Step 4
Type in an easy to remember name and click Generate at the bottom.

Step 5
Finally, click the Download button to save it to your development machine, add it to Xcode by double-clicking it, and click Done.

3. iTunes Connect
Once you've created the provisioning profile and the app's assets, it's time to send it to Apple for review. Before you can do this, you need to make sure that your project is ready for submission. This means adding launch images and application icons, preparing screenshots, a description for iTunes Connect, etc.
Creating a New Application
Step 1
After signing into iTunes Connect, select My Apps from the list of items.

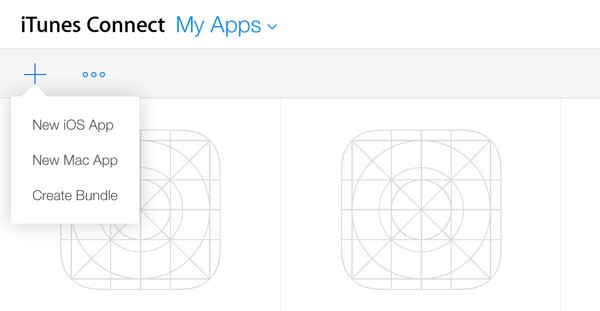
Step 2
This will show you a list of your apps. Click the plus button in the top left and select New iOS App from the menu.
Step 3
Next, you'll need to fill in some important details about your new app.
- Name: The name of your app as it will appear on the App Store. This can't be longer than 255 characters.
- Version: The version number is shown on the App Store and should match the one of your app in Xcode.
- Primary Language: If localized app information isn't available in an App Store territory, the information from your primary language will be used instead.
- SKU: A unique ID for your app that isn't visible on the App Store.
- Bundle ID: The bundle identifier must match the one you used in Xcode. It can't be changed after you submit your first build.
- Bundle ID Suffix: Your bundle identifier must match the one used in your app's info.plist.

Adding Metadata
Step 1
You'll now be presented with your application's dashboard through which you can manage your application's metadata, pricing, availability, etc.

Step 2
Before you can submit an application, you need to add your application's metadata, such as the name, description, keywords, etc.

Other Things to Do
Amongst the obvious things, you'll also need to add pricing information, Game Center details (if applicable), and various other things. Go through each of the tabs at the top of the dashboard to see what information Apple needs from your end.
4. Apple's Review Process
As someone whose apps have been approved and rejected by Apple several times, it's important to make sure your app meets all of Apple's criteria before submitting your app. Once you've made the bold move and have sent it to Apple for review, your app will be placed in a queue.
There are a few stages to the review process and the table below highlights the key stages, and details for each of these.
| Status | Description |
|---|---|
| Waiting for Review | You've submitted your app, and it's waiting in the queue. This process may take a few days. |
| In Review | Your app is currently being looked at and scrutinized by Apple's review team. This process usually takes anything from a few hours to a couple of days. |
| Processing for App Store | Your app has been approved and will be ready for sale within 24 hours. This process is usually very quick and takes less than a couple of hours. |
| Ready for Sale | Your app is now ready for sale. It will be automatically released on the date set in iTunes Connect. |
| Rejected (various types) | Your app has been rejected and needs more work. There are various reasons all of which can be found in the iTunes Connect Developer Guide. |
Once your app has been approved, take some time to consider a good release date to let your app out into the wild. Ask your friends, family, colleagues and anyone else to share your app on Twitter and Facebook, and, if you've not integrated social sharing into your first binary, why not add it as an update?
Conclusion
You should now be able to distribute an app with iTunes Connect and know more about Apple's review process. If you have any questions, feel free to leave a comment below and I'll be sure to get back to you.

Comments