Maybe you saw that tweet: "jQuery is a gateway drug. It leads to full-on JavaScript usage." Part of that addiction, I contend, is learning other JavaScript frameworks. And that's what this four-part series on the incredible Dojo Toolkit is all about: taking you to the next level of your JavaScript addiction. In this episode, we'll take a tour of Dijit, Dojo's UI library.
What is Dijit?
So, what exactly is Dijit? According to the docs, "Dijit is Dojo's UI Library." It builds on what we've seen in Dojo Core and it's very extensive: pretty much every UI widget you can think of is available. And, if you want to build your own, specialized widget, that's certainly possible. If you're following along with the Premium screencast, we'll be building a Tuts+ widget. So, if you're not a Premium member, now's a good time to sign up.
Dijit is Dojo's UI Library
For terminology's sake, remember that Dijit is the namespace under which Dojo's UI widgets live.
Here's how this is going to go down: just showing you how to use a bunch of Dijits would be akin to showing you how to use a bunch of jQuery plugins. Of course, Dijits aren't really comparable to jQuery plugins, but the point stands: once you've used one, you've used 'em all (caveats aside). So, we'll be talking about the diverse and sundry ways to create and use Dijits. Then, we'll take a brief look at some specific Dijits, just to whet your appetite.
Of course, we'll need to use some Dijits as examples while we learn. We'll keep it basic and use a plain button widget.
Why Should I Use Dijit?
After you learn how to use widgets, you might think it's a lot easier to not use many of them; after all, why not just use the <button> element, instead of the button widget? There are a couple of reasons to consider here:
- Theming: by using Dijit widgets, you'll be able to use Dojo's built-in themes. Four themes are included with the toolkit; or, you can make your own or find others online. Simply add link in the theme CSS file, add the theme name as a body class, and all your widgets are given matching uniforms. Ten-hut!
- Accessibility: All widgets (at least, the "blessed" ones, distributed with the Dojo toolkit) are made for accessibility. They've got high-contrast themes, keyboard accessibility, and are screen reader friendly.
- Internationalization: Widgets are also made to work well with any language, text-direction, and representation (think numbers and dates).
So, now that you know the benefits of using Dijit, let's learn how to use it.
How do I Use Dijit?
There are two ways to instantiate widgets: the programmatic way, and the declarative way.
Dijit widgets are actually just Dojo classes that inherit from Dijit._Widget, and often Dijit._Templated. I know we haven't discussed Dojo's object-oriented side, and we won't be able to in this session (you'll learn some in the Premium screencast), but just know that Dojo can make JavaScript classes. Of course, they aren't really classes, they're JavaScript constructor functions; however, you can flex some serious OO muscle with Dojo's methods.
So, back to widgets. There are two ways to instantiate widgets: the programmatic way, and the declarative way. If you've used UI widgets in other libraries, you're probably familiar with the programmatic method: put some widget markup up in your HTML, and interact with it from the JavaScript. Let's try it!
I'll assume you've set up a working page, loading Dojo from a CDN, as we have before. So, let's make a Dijit button.
Before we start, you'll definitely want to make sure you have a theme loaded; otherwise, your widgets will stick out like nobody's business.
<link rel="stylesheet" href="http://ajax.googleapis.com/ajax/libs/dojo/1.6/dijit/themes/claro/claro.css" />
That's the Claro theme; you can replace both instances of "claro" with "tundra," "soria," or "nihilo." to try the other bundled themes. To use the loaded theme, you'll have to add the theme's name as a class on your <body> (technically, it doesn't have to be the <body>, but some element that is a parent of any widgets that should be themed.)
Now that our theme is loaded, let's programmatically create a button. First, we'll add the button markup to our document:
<button id="btn" type="submit">Click Me!</button>
Now, let's instantiate this in our JavaScript.
dojo.require("dijit.form.Button");

dojo.ready(function () {
  var btn = new dijit.form.Button({ onClick: handleClick}, "btn");
});

function handleClick () {
  alert("clicked");
}
The
dijit.formnamespace includes any form widgets you might need.
We have to load the file containing the widget class before we can use; then, we can instantiate the button with new dijit.form.Button. Notice that the "class" (constructor function) is stored at the same "path" we required. While this isn't forced technically, it's very much the standard way to do it. The exception to that is when a single file loads multiple classes: this "dojo.form.Button" file is a great example: it loads dijit.form.Button, dijit.form.ComboButton, dijit.form.DropDownButton, and dijit.form.ToggleButton.
Let's look a little more closely at the parameters we've passed to dijit.form.Button. In this case, we've passed an object, and a string, which is the id of the widget node in our DOM; we could instead have passed a reference to the node itself, if we wanted to. Of course, any widget options can be set in that first parameter object; here, we're setting the click handler via the onClick option.
You've probably figured this out by now, but know that the dijit.form namespace includes any form widgets you might need.
Now, load up the page and you should see something like this:
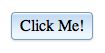
Behold, a programmatically-created, Claro-themed, Dijit button. That wasn't too hard, now, was it?
Now, open your browser console and check out the DOM; specifically, look at that <button> node. You'll see that our instantiation have removed our node and replaced it with a <span> with child <span>s, all with many attributes. This is part of how Dijit widgets work: more often than not, they replace the nodes you have with a template of their own. In fact, if we left out the second parameter (the id string or DOM node reference), the new nodes would be made, but just not injected into the DOM. Then, we could place it ourselves:
var btn = new dijit.form.Button({ label: "Hello" });
dojo.place(btn.domNode, dojo.body());
Notice that we give the button a label (otherwise, it would be blank); then, our dijit.form.Button instance has a domNode property that reference the nodes it created for itself.
So, if we can do it this way, and Dijit gets rid of our initial nodes anyway, why not always do it this way? Well, don't forget that you want your app to work without JavaScript. If you have the nodes in the DOM, you have a basic experience for people with JavaScript turned off. Then, Dojo will replace that with the better experience if it can. Of course, the other benefit is that using hard-coded DOM nodes does fill a lot of the default parameters, depending on widget class, of course. As we saw, when we didn't use a node, we have to define a label property to get text in the button.
All this seems pretty natural, right? If you've used UI widgets in other libraries, this seems pretty run-of-the-mill. However, Dojo ups the ante by allowing you to put all the properties for the widget in your HTML. This is that declarative way of which I spoke.
Here's how you do it. Remove the JavaScript we'd written previously, leaving only this:
dojo.require("dijit.form.Button");

function handleClick () {
  alert("clicked");
}
Now, fix up our <button> element so that it looks like this:
<button id="btn" type="submit" data-dojo-type="dijit.form.Button" data-dojo-props="onClick: handleClick" data-dojo-id="my.btn">Click Me!</button>
We've added HTML5 data-* attributes to our <button>: data-dojo-type and data-dojo-props. I think you're starting to see how these are related: the type is the widget class "path"; the props are the properties, in key-colon-value-comma format. What does this do? It instantiates our widget for us. Since we aren't creating it in our JS, the data-dojo-id attribute gives us a change to create a variable that points to the widget instance. Notice, it can be as a property of an object, if you want.
Not so fast though. Dojo isn't magic after all, so we do have to let it know that we want it to parse out any widgets declared in our HTML when the library loads. Of course, it will only find widgets whose class we have dojo.required. The most common way to do this is to set parseOnLoad: true in your djConfig.
Let's take a quick detour and talk about djConfig. This objects sets a few configuration options for Dojo; besides parseOnLoad, there are a number of debugging, localization, and resource-finding settings. There are three ways of settings djConfig. First, you can make a custom build of Dojo, which is beyond the scope of this session. Second, you can create a global djConfig object; if you do this, you have to be sure that it appears before the Dojo base file is loaded.
<script>djConfig = { parseOnLoad: true };</script>
<script src="http://ajax.googleapis.com/ajax/libs/dojo/1.6.1/dojo/dojo.xd.js.uncompressed.js"></script>
The other way, which is much more common, is to use the data-dojo-config property on the script node that loads Dojo Base:
<script src="http://ajax.googleapis.com/ajax/libs/dojo/1.6.1/dojo/dojo.xd.js.uncompressed.js" data-dojo-config="parseOnLoad: true"></script>
So djConfig: it's the most common way to parse declared widgets. The other way is to manually call the method that parseOnLoad calls: dojo.parser.parse(). This will parse your HTML, find the widgets and create them.
We're just about done with our general overview of how Dijit widgets are used, so I want to wrap up a few loose ends. First, note that all the HTML5 data-* goodness ain't always been so. Dojo used to use plain, non-standard attributes, and will still accept them. So, instead of data-dojo-type, you would use dojoType. Instead of data-dojo-config, you'd use djConfig. Instead of data-dojo-id, you've got jsid. And data-dojo-props was split into individual properties. So, using our button example, this:
<button id="btn" type="submit" data-dojo-type="dijit.form.Button" data-dojo-props="onClick: handleClick, iconClass: 'dijitIconCopy'" data-dojo-id="my.btn">Click Me!</button>
Would be, with old, non-standard attributes, this:
<button id="btn" type="submit" dojoType="dijit.form.Button" onClick="handleClick" iconClass="dijitIconCopy" jsid="my.btn">Click Me!</button>
Notice how onClick and iconClass are two separate properties in old-style.
Both these styles work, but I'll be sticking with the HTML5 attributes.
Second, I'll note that if you don't set a property when you create a widget, you can do so with the widget instance's set method:
var btn = new dijit.form.Button({});
btn.set("label", "Click here!");
btn.set("onClick', function () { alert("clicked!"); });
There's also a get method, so retrieve your properties; of course, this works with those read-only properties, too.
And the watch method is pretty cool: pass it the property you want to watch, and then a function: if that property is changed, your function will get called:
var btn = new dijit.form.Button({}, "btn");
btn.set("onClick", function () { this.set("label", "clicked") });
btn.watch("label", function (property, oldValue, newValue) {
  alert("Property " + property + " was changed from " + oldValue + " to " + newValue + ".");
});
I sure was caught off guard by declaratively creating widgets and I'm still not exactly sure how I feel about it.
Of course, there are other methods and properties that widgets have in common, as well as widget-specific ones; we can't cover them all here, of course, but skip to the end if you can't wait for some tips on learning about the specific widgets of your choice.
Finally, what do you think of this declarative way of creating widgets? I sure was caught off guard when I first saw it, and I'm still not exactly sure how I feel about it. With the programmatic way—the way every other library I've seen does it—you have to either match up HTML and JavaScript (which requires work in two places) or place new nodes from the JavaScript (which isn't no-JS-friendly).
The benefit of the declarative method is that all the information about a widget is in one place; the UI and the logic. However, is that what you want? I've done a bit of desktop programming, but from what I've seen on both Windows and Mac, UI and logic are separated, in different files even. So it's not like this is a throwback to anything. In any case, you've got the power to do it however you want. Choose wisely . . .
A Dijit Amuse-boche
Let's wrap this tutorial up by looking at a couple of Dijit widgets, and then talk about how you can learn to use 'em practically. Remember, however I show you the widgets, they can be created in declaratively or programmatically.
dijit.ColorPalette
Exactly what it says, this is a simple little colour picker.
<div id="colors"></div>
<p>The selected colour is <span id="selectedColor"></span>.</p>
dojo.require("dijit.ColorPalette");

dojo.ready(function () {
  var selectedColorEl = dojo.byId("selectedColor"),
      colors = new dijit.ColorPalette({
        onChange : function () {
          selectedColorEl.innerHTML = this.value;
        }
      }, "colors");
});
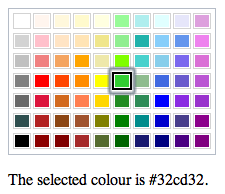
This is a good example of a widget that takes very little information from a DOM node, unless you give it the Dojo attributes. It's also a good example of how you can work with widgets that accept / set some kind of value (like a dijit.form.FilteringSelct and dijit.form.verticalSlider).
dijit.Editor
A rich text editor: this is a good example of how easy Dijit makes creating complex UI pieces a breeze.
<div id="editor" data-dojo-type="dijit.Editor" data-dojo-id="editor" data-dojo-props="
	plugins: ['bold','italic','underline','|','cut', 'copy','paste']"></div>

<button data-dojo-type="dijit.form.Button" data-dojo-id="btn" data-dojo-props="onClick: handleEditor"> Get Text </button>
dojo.require("dijit.Editor");
dojo.require("dijit.form.Button");

dojo.parser.parse();

function handleEditor () {
  dojo.create("div", { innerHTML: editor.value }, dojo.byId("main"), "last");
  editor.set("value", ""); // editor.value = "" doesn't clear the text
}
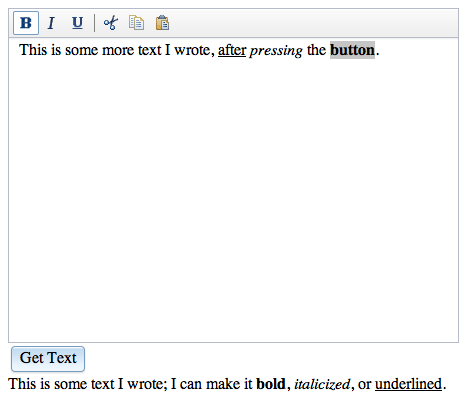
Note, I probably wouldn't ever connect an event handler via an attribute in real life; however, it's a good example of Dojo's flexibility.
dijit.ProgressBar
A handy progress bar, useful when doing lengthy AJAX stuff or heavy calculating action:
<div id="progbar"></div>
dojo.require("dijit.ProgressBar");

dojo.ready(function () {
  var progbar = new dijit.ProgressBar( { maximum: 150 }, "progbar");

  function updateProgressBar() {
    progbar.set("value", parseInt(progbar.get("value")) + 1);
    if (progbar.get("value") === 150) {
    progbar.set("label", "Complete!");
    } else {
    setTimeout(updateProgressBar, 100);
    }
  }
  updateProgressBar();
});

Learning More
For the most part, you'll learn by osmosis butwhen you're ready to dive deeper, you'll want to check out the API docs.
Of course there are a ton of Dijits; I can't teach you to use them all. So, let's close up by looking at how you can learn to use the widgets your hankering after.
For the most part, you'll learn by osmosis (isn't that the way most dev work is, though?). For example, while reading the reference guide page for dijit.ColorPalette, I learned that most widgets that set some value have an onChange event. In fact, the reference guides are the first of the two best places to get documentation for Dijits. If you head over to the Dojo documentation page, you'll see three links: Tutorials, Reference Guides, and API Documentation. The tutorials are listed on that page, and they're great, but we're interested in the reference guides and API docs.
So, click Reference Guides, and then Dijit on the right sidebar. Here's a great place to start when you're trying to figure out how to use a widget; most articles give you examples of both programmatic and declarative creation, as well as common properties.
If you're ready to dive deeper, though, you'll want to check out the API docs. This neat web app is Dojo Documentation: The Complete Series. Navigate the namespaces on the left, and you'll get all the details on the right. This can be somewhat cryptic when you're starting, though, so certainly default to the reference guides.
Of course, Googling "Dijit <widget-name> tutorial" often serves up something tasty.
Conclusion
And that's a wrap for this third episode of Dig into Dojo. If you're interested in creating a widget of your own, you'll want to check out the premium screencast that goes with this tutorial.
Otherwise, I'll see you in the final episode of Dig into Dojo, where we'll discuss Dojox.

Comments