It's no secret that my favorite browser is Google Chrome. I like it because it's fast, reliable, it doesn't crash (very often), and it looks good. There's also something else which I find even more valuable. It's the fact that you can build an extension for it using only HTML, CSS, and JavaScript. I always support such products, products that are open to the community and Chrome happens to be one of these products. If you need something and it is not yet implemented, you are free to develop it yourself.
So at the end of this article you will find a working Chrome extension which uses most of the techniques explained below. You can download the final example using the download source code button at the top of this page.
If you're looking for a quick solution, you could also download the Chrome App Maker from Envato Market, which makes it very easy to create Chrome apps and extensions.
Why You Should Write Your Own Extension
I always encourage people to use better tools to speed up their workflow. The software which we use should help us, we should not have to fight with it. Developing extensions/plugins for your favorite editor or browser helps not only you, but also other programmers, who sooner or later will be in the same situation. If something is missing, you can build it yourself and with Chrome this is really easy. Modeling your environment around your needs is key to being highly productive.
Developing & Testing Out Your Extensions
Thankfully there is a way to test your extension without having to upload it to Chrome's web store. In your browser's address bar, just type in:
chrome://extensions
Make sure that you check Developer mode and click the Load unpacked extension... button. Then simply select the folder from your hard disk which contains the extension's files.

Architecture
Here's a diagram of the architecture for a Chrome extension:
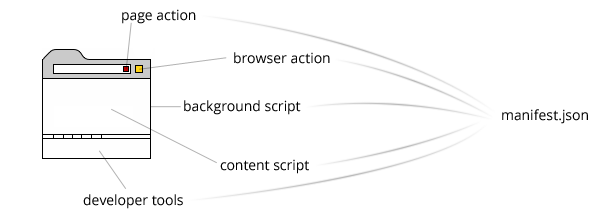
And now let's take a closer look at each element within the architecture.
Manifest
The entry point of your extension is the manifest.json file. It should contain a valid JSON object. For example:
{
    "name": "BrowserActionExtension",
    "version": "0.0.1",
    "manifest_version": 2,
    "browser_action": {
        "default_title": "That's the tool tip",
        "default_popup": "popup.html"
    }
}
The required properties are name, version, and manifest_version. The version can be anywhere from one to four, dot-separated integers. It's something which is used by Google's autoupdate system. That's how it knows when to update your extension. The value of the manifest_version should be the integer 2.
The manifest could contain other properties depending on what kind of extension you need, but I'll describe only those which I find to be more interesting.
Background Pages
Every extension has an invisible background page which is run by the browser. There are two types - persistent background pages and event pages. The first one is active, all of the time. The second is active only when it is needed. Google encourages developers to use event pages, because this saves memory and improves the overall performance of the browser. However, it's good to know that this is also where you should put your main logic and initialization. Normally the background page/script plays the role of a bridge between the other parts of the extension.
Here is how you should describe it in the manifest:
"background": {
    "scripts": ["background.js"],
    "persistent": false/true
}
As you may have guessed, if the persistent property is false then you are using event pages. Otherwise, you are working with a persistent background page.
Content Script
If you need access to the current page's DOM, then you have to use a content script. The code is run within the context of the current web page, which means that it will be executed with every refresh. To add such a script, use the following syntax.
"content_scripts": [
    {
        "matches": ["http://*/*", "https://*/*"],
        "js": ["content.js"]
    }
]
Keep in mind that the value of matches determines for which pages your script will be used. Read more about matches patterns here.
User Interface
There are several ways to build the UI of your extension. Here are the four most popular.
Browser Action
Most developers use the browser_action property to build their plugins. Once you set it, an icon representing your extension will be placed on the right side of the address bar. Users can then click the icon and open a pop-up which is actually HTML content controlled by you.
The manifest files should contain the following data:
"browser_action": {
    "default_icon": {
        "19": "icons/19x19.png",
        "38": "icons/38x38.png"
    },
    "default_title": "That's the tool tip",
    "default_popup": "popup.html"
}
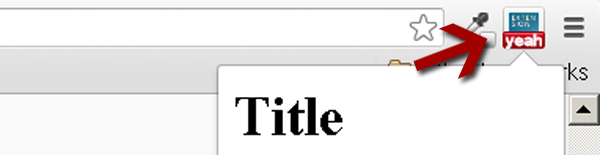
The default_title is a little tool tip which is shown when the user mouses over your icon. default_popup is actually the HTML file which is loaded inside the pop-up. There is also a badge which you can place over your icon. You can do that inside of your background script. For example:
chrome.browserAction.setBadgeText({text: "yeah"});
This was the code which I used to produce the image above.
Page Action
The page_action property is similar to the browser action, but the icon is shown inside the address bar:

The interesting thing here is that your icon is hidden initially, so you should decide when to show it. For example, in the image above, the RSS icon will be shown only if the current page contains a link to the RSS feed. If you need to see your icon all the time, it is good to use browser_action directly.
To add the page action, type the following code inside your manifest:
"page_action": {
    "default_icon": {
        "19": "images/icon19.png",
        "38": "images/icon38.png"
    },
    "default_title": "Google Mail",
    "default_popup": "popup.html"
}
Unlike the browser action's icon, the page action's icon doesn't have badges.
DeveloperTools
I use DeveloperTools a lot and it's nice that Chrome offers a method for adding new tabs to these tools. The first thing you should do is add an HTML page which will be loaded when the panel is opened:
"devtools_page": "devtools.html"
There's no need to put any HTML inside the page, except for linking in a JavaScript file, which will create the tab:
<script src="devtools.js"></script>;
And then include the following code inside the devtools.js file:
chrome.devtools.panels.create(
    "TheNameOfYourExtension",
    "img/icon16.png",
    "index.html",
    function() {

    }
);
Now the above code will add a new tab with a name of TheNameOfYourExtension and once you click on it the browser will load index.html inside the DeveloperTools.
Omnibox
The omnibox is the keyword which is shown inside Chrome's address bar. For example, if you add the following property into your manifest:
"omnibox": { "keyword" : "yeah" }
And then add the code below, inside your background script:
chrome.omnibox.onInputChanged.addListener(function(text, suggest) {
    suggest([
      {content: text + " one", description: "the first one"},
      {content: text + " number two", description: "the second entry"}
    ]);
});
chrome.omnibox.onInputEntered.addListener(function(text) {
    alert('You just typed "' + text + '"');
});
You should be able to type yeah inside the address bar. Then you should see something like this:

Pressing tab will produce the following screen:

Of course using the chrome.omnibox API, you could catch the user's input and react to that input.
APIs
There are bunch of different things which you can do in your extension. For example, you can get access to the user's bookmarks or history. You can move, create tabs or even resize the main window. I strongly recommend to check out the documentation to get a better idea of how to accomplish these tasks.
What you should know is that not all APIs are available in every part of your extension. For example, your content script can't access chrome.devtools.panels or the script in your DeveloperTools tab can't read the page's DOM. So, if you're wondering why something is not working, this could be why.
Messaging
As I mentioned above, you don't always have access to the API that you want to use. If that's the case, then you should use message passing. There are two types of messaging - one-time requests and long-lived connections.
One-Time Requests
This type of communication happens only once. I.e. you send a message and wait for an answer. For example, you could place the following code in your background script:
chrome.extension.onMessage.addListener(function(request, sender, sendResponse) {
    switch(request.type) {
        case "dom-loaded":
            alert(request.data.myProperty);
        break;
    }
    return true;
});
Then use the code from below in your content script:
window.addEventListener("load", function() {
    chrome.extension.sendMessage({
        type: "dom-loaded",
        data: {
            myProperty: "value"
        }
    });
}, true);
And this is how you can get information about the current page's DOM and use it inside your background script, which normally doesn't have access to this data.
Long-Lived Connections
Use this type of messaging if you need a persistent communication channel. Inside your content script place the following code:
var port = chrome.runtime.connect({name: "my-channel"});
port.postMessage({myProperty: "value"});
port.onMessage.addListener(function(msg) {
    // do some stuff here
});
And then in the background script, use this:
chrome.runtime.onConnect.addListener(function(port) {
    if(port.name == "my-channel"){
        port.onMessage.addListener(function(msg) {
            // do some stuff here
        });
    }
});
Override Pages
Overriding pages is a nice way to customize your browser. You're also able to substitute some of the default pages in Chrome. For example you can create your own history page. To do that, add in the following code snippet:
"chrome_url_overrides" : {
    "<page to override>;": "custom.html"
}
The possible values of <page to override> are bookmarks, history, and newtab. It's kinda cool to have a fresh new tab page.
An Example Extension
To wrap up this article I decided to include a simple example, so you can get a better understanding of the whole picture. This example extension uses most of the things that I described above to simply set a #F00 background color for all of the divs in the current page. Feel free to download the source code using the button at the top of this article.
The Manifest File
Of course I started with the manifest file:
{
    "name": "BrowserExtension",
    "version": "0.0.1",
    "manifest_version": 2,
    "description" : "Description ...",
    "icons": { "16": "icons/16x16.png", "48": "icons/48x48.png", "128": "icons/128x128.png" },
    "omnibox": { "keyword" : "yeah" },
    "browser_action": {
        "default_icon": { "19": "icons/19x19.png", "38": "icons/38x38.png" },
        "default_title": "That's the tool tip",
        "default_popup": "browseraction/popup.html"
    },
    "background": {
        "scripts": ["background.js"],
        "persistent": false
    },
    "chrome_url_overrides" : {
        "newtab": "newtab/newtab.html"
    },
    "content_scripts": [{
        "matches": ["http://*/*", "https://*/*"],
        "js": ["content.js"]
    }],
    "devtools_page": "devtools/devtools.html"
}
Keep in mind that you can organize your files into folders. Also, pay attention to the version property. You should update this property every time you want to upload your extension into the web store.
Background Script
// omnibox
chrome.omnibox.onInputChanged.addListener(function(text, suggest) {
    suggest([
      {content: "color-divs", description: "Make everything red"}
    ]);
});
chrome.omnibox.onInputEntered.addListener(function(text) {
    if(text == "color-divs") colorDivs();
});

// listening for an event / one-time requests
// coming from the popup
chrome.extension.onMessage.addListener(function(request, sender, sendResponse) {
    switch(request.type) {
        case "color-divs":
            colorDivs();
        break;
    }
    return true;
});

// listening for an event / long-lived connections
// coming from devtools
chrome.extension.onConnect.addListener(function (port) {
    port.onMessage.addListener(function (message) {
        switch(port.name) {
            case "color-divs-port":
                colorDivs();
            break;
        }
    });
});

// send a message to the content script
var colorDivs = function() {
    chrome.tabs.getSelected(null, function(tab){
        chrome.tabs.sendMessage(tab.id, {type: "colors-div", color: "#F00"});
        // setting a badge
        chrome.browserAction.setBadgeText({text: "red!"});
    });
}
The first few lines get the user's action from the omnibox. After that, I set a one-time request listener, which will accept the message from the browser action icon.
The next snippet is a long-lived connection with the devtools tab (it's not absolutely necessary to use a long-lived connection for this, I did it just for educational purposes). Using these listeners, I'm able to get the input from the user and send it to the content script, which has access to the DOM elements. The key point here was to first select the tab which I wanted to manipulate and then send a message to it. Lastly, I put a badge on the extensions icon.
Browser Action
We start with our popup.html file:
// popup.html
<script type="text/javascript" src="popup.js"></script>
<div style="width:200px">
    <button id="button">Color all the divs</button>
</div>
Then we create the popup.js file:
// popup.js
window.onload = function() {
    document.getElementById("button").onclick = function() {
        chrome.extension.sendMessage({
            type: "color-divs"
        });
    }
}
The pop-up contains a single button and once the user clicks it, it sends a message to the background script.
DeveloperTools
window.onload = function() {
    var port = chrome.extension.connect({ name: "color-divs-port" });
    document.getElementById("button").onclick = function() {
        port.postMessage({ type: "color-divs"});
    }
}
For the DeveloperTools, we're doing almost the same thing here as we did in the pop-up, the only difference is that I used a long-lived connection.
Content Script
chrome.extension.onMessage.addListener(function(message, sender, sendResponse) {
    switch(message.type) {
        case "colors-div":
            var divs = document.querySelectorAll("div");
            if(divs.length === 0) {
                alert("There are no any divs in the page.");
            } else {
                for(var i=0; i<divs.length; i++) {
                    divs[i].style.backgroundColor = message.color;
                }
            }
        break;
    }
});
The content script listens for a message, selects all the divs on the current page, and changes their background color. Pay attention to the object which I attached the listener to. In the content script that's chrome.extension.onMessage.
Customizing the New Tab Page
The last thing that this extension does is customize the new tab page. We can do that easily just by pointing the newtab property to the newtab/newtab.html file:
"chrome_url_overrides" : {
    "newtab": "newtab/newtab.html"
}
Keep in mind that you can't create a replica of the default new tab page. The idea of this feature is to add in a completely different functionality. Here is what Google says:
Don't try to emulate the default New Tab page. The APIs necessary to create a slightly modified version of the default New Tab page — with top pages, recently closed pages, tips, a theme background image, and so on — don't exist yet. Until they do, you're better off trying to make something completely different.
Debugging
Writing an extension for Google Chrome is not always an easy task and you'll likely run into some problems. The good thing is that you can still use the console to output your variables to help with debugging. Feel free to add console.log into your background or content scripts. However this will not work in scripts which are run in the context of the developer tools, in that case you might consider using the alert method, as it works everywhere.
Conclusion
In my opinion, Chrome is one of the best browsers available. The developers at Google make creating extensions relatively easy by giving us the power to create them in HTML, CSS, and JavaScript.
Yes, there are some tricky parts, but generally we're able to produce valuable plugins. Keep in mind that this article doesn't cover everything related to developing Chrome extensions. There are some other useful things like context menus, options pages, and notifications. For the topics I did not cover, please refer to the documentation for more detailed information.

Comments