Persisting data across application launches is a requirement that most iOS applications have, from storing user preferences using the user defaults system to managing large datasets in a relational database. In this article, we'll explore the most common strategies used for storing data in an iOS application. I will also talk about the file system on iOS and how application sandboxing affects data persistence.
Introduction
You've come a long way, grasshopper, and you've learned a lot. However, there's one vital aspect of iOS development that we haven't discussed yet, data persistence. Virtually every iOS application stores data for later use. The data your iOS application stores can be anything from user preferences to temporary caches or even large relational datasets.
Before discussing the most common data persistence strategies developers have on the iOS platform, I'm first going to spend a few minutes discussing the file system and the concept of application sandboxing. Did you really think you could store your application's data wherever you'd like on the file system? Think again, padawan.
File System and Application Sandboxing
Security on the iOS platform has been one of Apple's top priorities ever since the iPhone was introduced in 2007. In contrast to OS X applications, an iOS application is placed in an application sandbox. In contrast to what most people think, an application's sandbox does not only refer to an application's sandbox directory in the file system. The application sandbox also includes controlled and limited access to user data stored on the device, system services, and hardware.
With the introduction of the Mac App Store, Apple has begun to enforce application sandboxing on OS X as well. Even though the constraints put on OS X applications are not as stringent as the ones imposed on iOS applications, the general concept is similar but not identical. The application sandbox of an iOS application, for example, contains the application bundle, which is not true for OS X applications. The reasons for these differences are mainly historical.
Sandboxing and Directories
The operating system installs each iOS application in a sandbox directory, which contains the application bundle directory and three additional directories, Documents, Library, and tmp. The application's sandbox directory, often referred to as its home directory, can be accessed by calling a simple Foundation function, NSHomeDirectory().
NSLog(@"HOME > %@", NSHomeDirectory());
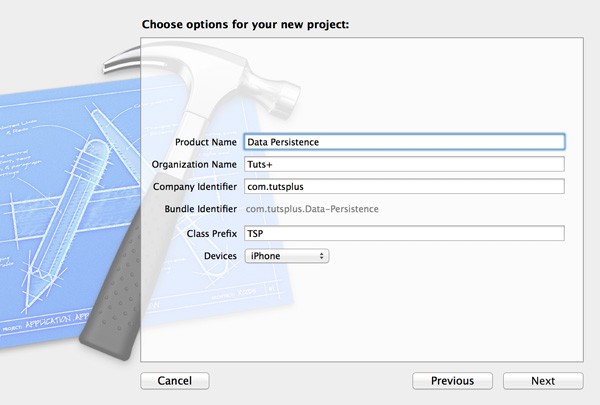
You can try this yourself. Create a new Xcode project based on the Single View Application template and name it Data Persistence.
Open TSPAppDelegate.m and add the above code snippet to application:didFinishLaunchingWithOptions:.
If you run the application in the iOS Simulator, the output in the console will look something like the output shown below.
2014-03-27 09:48:16.794 Data Persistence[1426:60b] HOME > /Users/Bart/Library/Application Support/iPhone Simulator/7.1/Applications/5024403A-C65E-44DD-BCD2-F93097FB502E
However, if you run the application on a physical device, the output looks a bit different as you can see below. The application sandbox and the limitations imposed are identical though.
2014-03-27 09:48:51.571 Data Persistence[1426:60b] HOME > /var/mobile/Applications/A4D17A73-84D7-4628-9E32-AEFEA5EE6153
Retrieving the path to the application's Documents directory requires a bit more work as you can see in the code snippet below.
NSArray *directories = NSSearchPathForDirectoriesInDomains(NSDocumentDirectory, NSUserDomainMask, YES);
NSString *documents = [directories firstObject];
NSLog(@"DOCUMENTS > %@", documents);
We use the NSSearchPathForDirectoriesInDomains() function and pass the NSDocumentDirectory constant as the first argument to indicate that we're only interested in the application's Documents directory. The second and third argument are of less importance for this discussion. The function returns an instance of NSArray containing one result, the path to the application's Documents directory.
You may be wondering why I use firstObject instead of objectAtIndex: to fetch the first and only object in the array of paths. Even though I can be pretty sure that the array returned isn't empty, if the array were to be empty and the array would receive a message of objectAtIndex: with an argument of 0, the application would crash due to an uncaught exception.
By calling firstObject on the array, however, the array returns nil if it doesn't contain any objects, which means that no exception would be thrown. Remember, the documentation is your friend.
Why Sandboxing?
What is the benefit of sandboxing? The primary reason for sandboxing applications is security. By confining applications to their own sandbox, compromised applications cannot cause damage to the operating system or other applications.
By compromised applications, I mean both applications that have been hacked, applications that are intentionally malicious, as well as applications that contain critical bugs that may inadvertently cause damage.
Even though applications are sandboxed on the iOS platform, iOS applications can request access to certain files or assets that are outside of their application sandbox through a number of system interfaces.
An example of this is the music library stored on an iOS device. Know, however, that the system frameworks are in charge of any file related operations on such occasions.
What Goes Where?
Even though you can do pretty much anything you want in your application's sandbox, Apple has provided a few guidelines with regards to what should be stored where. It's important to know about these guidelines for several reasons. When an iOS device is backed up by iTunes, not all the files in an application's sandbox are included in the backup.
The tmp directory, for example, should only be used for temporarily storing files. The operating system is free to empty this directory at any time, for example, when the device is low on disk space. The tmp directory isn't included in backups.
The Documents directory is meant for user data, whereas the Library directory is used for application data that isn't strictly tied to the user. The Caches directory in the Library directory is another directory that isn't backed up by iTunes.
Also keep in mind that your application isn't supposed to modify the contents of the application bundle directory. The application bundle directory is signed when the application is installed. By modifying the contents of the application bundle directory in any way, the aforementioned signature is altered, which means the operating system doesn't allow the application to launch again. This is another security measure put into place by Apple to protect consumers.
Data Persistence Options
There are several strategies for storing application data on disk. In this article, we take a brief look at four common approaches on iOS:
- user defaults
- property lists
- SQLite
- Core Data
The options described in this article shouldn't be considered as interchangeable. Each strategy has its benefits as well as its drawbacks. Let's start by taking a look at the user defaults system.
User Defaults
The user defaults system is something that iOS inherited from OS X. Even though it was created and designed for storing user preferences, it can be used for storing any type of data as long as it's a property list type, NSString, NSNumber, NSDate, NSArray, NSDictionary, and NSData, or any of their mutable variants.
The user defaults database is nothing more than a collection of property lists, one property list per application. The property list is stored in a folder named Preferences in the application's Library folder, which hints at the property list's purpose and function.
One of the reasons that developers like the user defaults system is because it's so easy to use. Take a look at the code fragment below to see what I mean.
NSUserDefaults *userDefaults = [NSUserDefaults standardUserDefaults];

[userDefaults setBool:YES forKey:@"Key1"];
[userDefaults setInteger:123 forKey:@"Key2"];
[userDefaults setObject:@"Some Object" forKey:@"Key3"];

[userDefaults boolForKey:@"Key1"];
[userDefaults integerForKey:@"Key2"];
[userDefaults objectForKey:@"Key3"];

[userDefaults synchronize];
By calling the standardUserDefaults class method on NSUserDefaults, a reference to the shared defaults object is returned.
In the last line, we call synchronize on the shared defaults object to write any changes to disk. It's rarely necessary to invoke synchronize, because the user defaults system saves changes when necessary. However, if you store or update a setting using the user defaults system, it can sometimes be useful or necessary to explicitly save the changes to disk.
At first glance, the user defaults system seems to be nothing more than a key-value store located at a specific location. However, the NSUserDefaults class, defined in the Foundation framework, is more than an interface for managing a key-value store. Take a look at its class reference for more information.
Before we move on, paste the above code snippet in the application delegate's application:didFinishLaunchingWithOptions: method and run the application in the iOS Simulator. Open a new Finder window and navigate to Library > Application Support > iPhone Simulator > 7.1 > Applications (replace "7.1" with the latest version of iOS).
Find the application folder that corresponds with the application by inspecting the different, cryptically named folders in the Applications folder. The cryptically named folder is actually the application sandbox directory. In the application sandbox directory, open the Preferences folder, located in the Library folder, and inspect its contents.
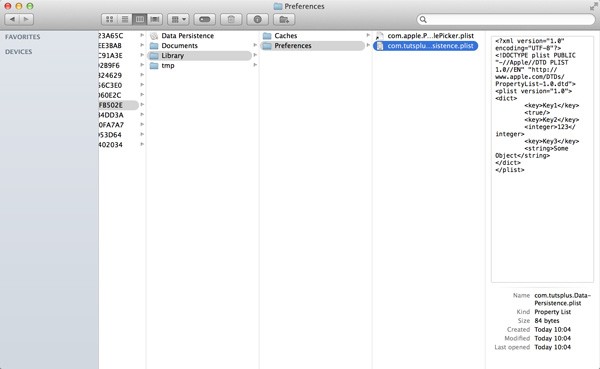
You should see a property list with a name identical to the application's bundle identifier. This is the user defaults store for your application.
If you want to make it easier to access the sandbox of an application in the iOS Simulator, then I strongly recommend that you take a look at SimPholders. It's a free utility that makes working with the iOS Simulator much easier.
Property Lists
We've already covered property lists in this series. As a matter of fact, the backing store of the user defaults database is a property list. Using property lists is a convenient strategy to store and retrieve an object graph. Property lists have been around for ages, are easy to use, and they're therefore a great option for storing data in an iOS application.
As I mentioned earlier, it's important to keep in mind that a property list can only store property list data. Does this mean that it's not possible to store custom model objects using property lists? No, it is possible. However, custom model objects need to be archived—a form of serialization—before they can be stored in a property list. Archiving an object simply means that the object needs to be converted to a data type that can be stored in a property list, such as an NSData instance.
Archiving Objects
Do you remember the NSCoding protocol defined in the Foundation framework? The NSCoding protocol defines two methods,initWithCoder: and encodeWithCoder:, which a class must implement to allow instances of the class to be encoded and decoded.
Encoding and decoding are the underlying mechanisms for object archival and distribution. How object archival works will become clear a bit later in this series. In this lesson, I only show you how to write arrays and dictionaries to disk using property lists.
Writing to File
The following code snippet should give you an idea of how easy it is to write an array or dictionary to disk. In theory, the object graph stored in a property list can be as complex or as large as you'd like. However, keep in mind that property lists are not meant to store tens or hundreds of megabytes of data, attempting to use them in that way will likely result in degraded performance.
NSArray *fruits = @[@"Apple", @"Mango", @"Pineapple", @"Plum", @"Apricot"];

NSString *filePathFruits = [documents stringByAppendingPathComponent:@"fruits.plist"];
[fruits writeToFile:filePathFruits atomically:YES];

NSDictionary *miscDictionary = @{@"anArray" : fruits, @"aNumber" : @12345, @"aBoolean" : @YES};

NSString *filePathDictionary = [documents stringByAppendingPathComponent:@"misc-dictionary.plist"];
[miscDictionary writeToFile:filePathDictionary atomically:YES];

NSArray *loadedFruits = [NSArray arrayWithContentsOfFile:filePathFruits];
NSLog(@"Fruits Array > %@", loadedFruits);

NSDictionary *loadedMiscDictionary = [NSDictionary dictionaryWithContentsOfFile:filePathDictionary];
NSLog(@"Misc Dictionary > %@", loadedMiscDictionary);
Let's take a look at the above code snippet. We start by storing a reference to an array literal in a variable named fruits. We create the file path for storing the property list that we're about to make. The file path is created by appending a string to the file path of the Documents directory, which we retrieved earlier in this lesson. The string that we append will be the name of the property list—including its extension, .plist—that we'll create in a second.
Writing the array to disk is as easy as calling writeToFile:atomically: on the array. You can ignore the atomically flag for now.
As the example illustrates, writing a dictionary to disk follows a similar pattern. The example also illustrates how to create arrays and dictionaries from a property list, but this is something that we already covered earlier in this series.
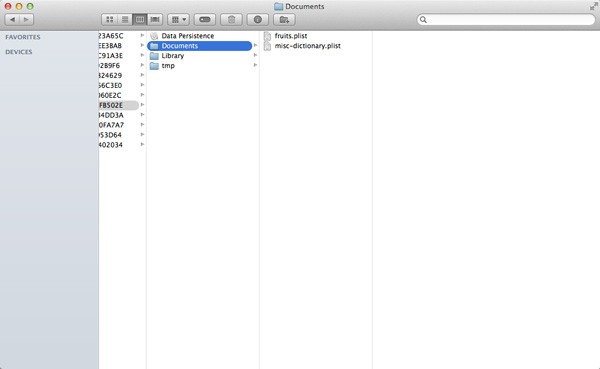
Run the application in the iOS Simulator and navigate to the application's Documents directory as we saw earlier. In this directory, you should see the two property lists we just created.
SQLite
If your application is data driven and works with large amounts of data, then you may want to look into SQLite. What is SQLite? The tagline on the SQLite website reads "Small. Fast. Reliable. Choose any three.", which sums it up nicely.
SQLite is a library that implements a lightweight embedded relational database. As its name implies, it's based on the SQL standard (Structured Query Language) just like MySQL and PostgreSQL.
The main difference with other SQL databases is that SQLite is portable, very lightweight, and that it's serverless instead of a separate process accessed from the client application. In other words, it's embedded in the application and therefore very fast.
The SQLite website claims that it's the most widely deployed SQL database. I don't know if that's still the case, but it's certainly a popular choice for client-side data storage. Aperture and iPhoto, for example, rely on SQLite for some of their data storage.
The advantage SQLite has over working directly with objects is that SQLite is orders of magnitude faster, which is largely due to how relational databases and object oriented programming languages fundamentally differ.
To bridge the gap between SQLite and Objective-C, a number of Object Relational Mapping (ORM) solutions have been created over time. The ORM that Apple has created for iOS and OS X is named Core Data, which we'll take a look at later in this lesson.
Flying Meat's FMDB
Using SQLite on iOS means working with a C-based library. If you prefer an object oriented solution, then I highly recommend Gus Mueller's (Flying Meat, Inc.) Objective-C wrapper for SQLite, FMDB.
It makes working with SQLite much easier if you prefer an object oriented interface. The library supports ARC (Automatic Reference Counting) out of the box and is very performant. I've used FMDB in the past and have been very happy with its API and the library's robustness and reliability.
Core Data
Developers new to Core Data often mistake Core Data for a database while it really is an object relational mapping solution created and maintained by Apple. Matt Gallagher has written a great post about the differences between Core Data and a database. Core Data provides a relational object oriented model that can be serialized into an XML, binary, or SQLite store. Core Data even supports an in-memory store.
Why should you use Core Data instead of SQLite? By asking this question, you wrongly assume that Core Data is a database. The advantage of using Core Data is that you work with objects instead of raw data, such as rows in a SQLite database or data stored in an XML file. Even though Core Data had some difficult years when it was first released, it has grown into a robust framework with a lot of features, such as automatic migrations, change tracking, faulting, and integrated validation.
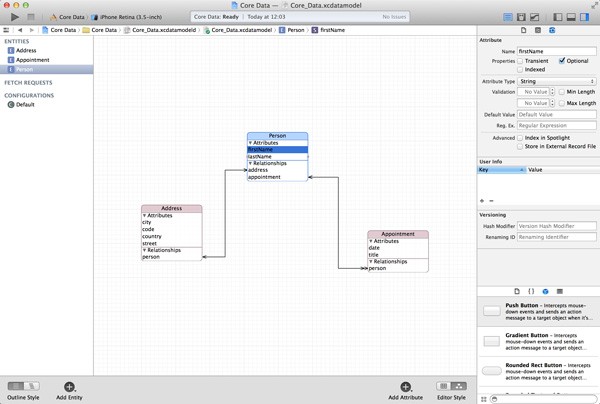
Another great feature that many developers appreciate is the Core Data model editor built into Xcode that lets developers model their data model through a graphical interface.
Whether Core Data is the right solution for your application depends on the data that you plan to manage, both in terms of the quantity as well as the underlying model. If you plan to manage extremely large datasets, then Core Data may become a performance bottleneck over time. In that case, SQLite may be a better solution.
iCloud
You've probably heard of iCloud and you may be wondering where iCloud fits into the story of data persistence. iCloud is not a form of data persistence like SQLite or Core Data are. Instead, it's a platform or service for making user data available across multiple devices and multiple instances of an application—or even a family of applications.
The iCloud platform encompasses several services or components. The component that interests us is iCloud Storage, which includes three types of storage:
- key-value storage
- document storage
- Core Data storage.
If you want to read more about iCloud Storage, I recommend reading a series about iCloud Storage that I wrote earlier this year.
Conclusion
You should now have a good idea of the options you have in terms of data persistence when developing for the iOS platform. Keep in mind that not all the strategies that we've covered are equal.
This series is slowly coming to a close. In the next two installments, we'll create another application to put what we've learned so far into practice. The best way to learn is by doing.

Comments