The WordPress login screen is well designed - it's clean and simple to interact with and it works well on all screen sizes. But what if you're building a site for a client who wants to display their own logo to users logging in? Or if you have a MultiSite installation and want your users to see your branding when they log in? Luckily, you can customise the way the login screen looks quite easily.
For this tutorial I've created a plugin to do this; the advantage of using a plugin is that you can drop it into any WordPress sites you develop and instantly give them some branding.
The steps I'm going to demonstrate in this tutorial are:
- Adding a custom logo
- Styling the login screen - the logo, links and buttons
What You Will Need to Complete This Tutorial
To complete this tutorial you will need:
- A WordPress installation
- Access to your site's plugins folder to add your plugin
- A text editor to create your plugin.
Setting Up the Plugin
At the top of my plugin I'm adding the following lines:
/*
Plugin Name: WPTutsPlus Customize the Admin Part 1 - Login Screen
Plugin URI: http://rachelmccollin.co.uk
Description: This plugin supports the tutorial in wptutsplus. It customizes the WordPress login screen.
Version: 1.0
Author: Rachel McCollin
Author URI: http://rachelmccollin.com
License: GPLv2
*/
1. Add a Custom Logo
It's easy to add your own or your client's logo to the login page and instantly make your WordPress installation look more professional.
- First, create a folder called media inside your plugin folder, and upload your logo to it.
- In the plugin file (or functions file), add the following function, attaching it to the
login_enqueue_scriptsaction hook:
// add a new logo to the login page
function wptutsplus_login_logo() { ?>
	<style type="text/css">
		.login #login h1 a {
			background-image: url( <?php echo plugins_url( 'media/cd-logo-directing-fullcol.png' , __FILE__ ); ?> );
		}
	</style>
<?php }
add_action( 'login_enqueue_scripts', 'wptutsplus_login_logo' );
?>
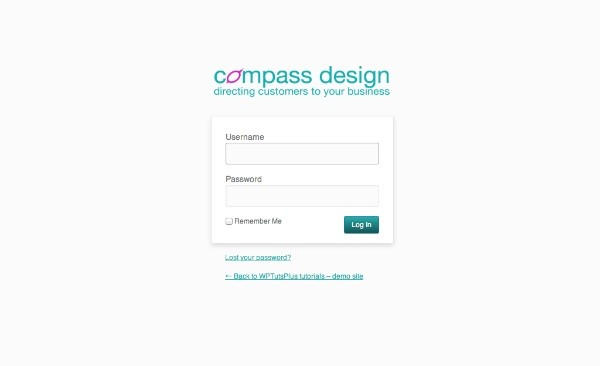
This will add your logo to the login screen, as shown the the screenshot.
2. Style the Login Screen
As well as adding a logo you can also resize it to fit and add styling for other elements in the screen.
Styling the Logo
The logo above is slightly squashed in order to fit in the default space given for it. I'm going to adjust the sizing.
Edit the code in your plugin so it reads as follows:
// add a new logo to the login page
function wptutsplus_login_logo() { ?>
	<style type="text/css">
		.login #login h1 a {
			background-image: url( <?php echo plugins_url( 'media/cd-logo-directing-fullcol.png' , __FILE__ ); ?> );
			background-size: 300px auto;
			height: 70px;
		}
	</style>
<?php }
add_action( 'login_enqueue_scripts', 'wptutsplus_login_logo' );
?>
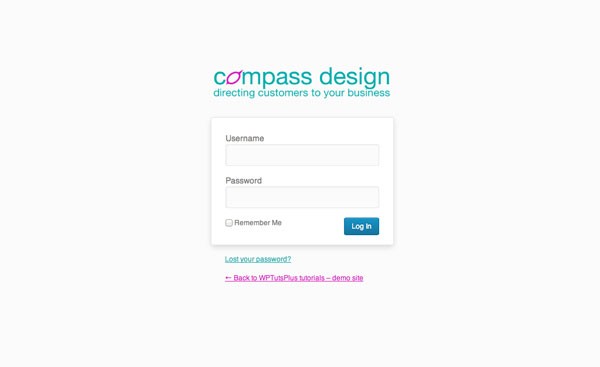
The height value you use will depend on the aspect ratio of your logo. Using 300px and auto for the background-size property ensures that your logo is as wide as the login box and that its aspect ratio is retained, and the height value will provide enough space for your logo to fit in.
Now my logo looks like this:
Much better! But sizing the logo isn't the only thing I can do with regard to styling. How about changing some colors?
Styling Links
All of the text displayed on the login page is in the form of links, so it's links you'll have to style. Edit your code again so it reads as follows:
// add a new logo to the login page
function wptutsplus_login_logo() { ?>
	<style type="text/css">
		.login #login h1 a {
			background-image: url( <?php echo plugins_url( 'media/cd-logo-directing-fullcol.png' , __FILE__ ); ?> );
			background-size: 300px auto;
			height: 70px;
		}
		.login #nav a, .login #backtoblog a {
			color: #27adab !important;
		}
		.login #nav a:hover, .login #backtoblog a:hover {
			color: #d228bc !important;
		}
	</style>
<?php }
add_action( 'login_enqueue_scripts', 'wptutsplus_login_logo' );
?>
This gives me links which are in keeping with my logo colors. The link color is cyan and the hover color is magenta.
Note: As my logo's main color is similar to blue, it works well for links. You may not want to change the color of your links if your logo is a very different color, to avoid usability problems.
Styling the Button
The final element on the screen is the 'Log In' button, which is still blue. Let's change that. Edit your code so it reads as follows:
// add a new logo to the login page
function wptutsplus_login_logo() { ?>
	<style type="text/css">
		.login #login h1 a {
			background-image: url( <?php echo plugins_url( 'media/cd-logo-directing-fullcol.png' , __FILE__ ); ?> );
			background-size: 300px auto;
			height: 70px;
		}
		.login #nav a, .login #backtoblog a {
			color: #27adab !important;
		}
		.login #nav a:hover, .login #backtoblog a:hover {
			color: #d228bc !important;
		}
		.login .button-primary {
			background: #27adab; /* Old browsers */
			background: -moz-linear-gradient(top, #27adab 0%, #135655 100%); /* FF3.6+ */
			background: -webkit-gradient(linear, left top, left bottom, color-stop(0%,#27adab), color-stop(100%,#135655)); /* Chrome,Safari4+ */
			background: -webkit-linear-gradient(top, #27adab 0%,#135655 100%); /* Chrome10+,Safari5.1+ */
			background: -o-linear-gradient(top, #27adab 0%,#135655 100%); /* Opera 11.10+ */
			background: -ms-linear-gradient(top, #27adab 0%,#135655 100%); /* IE10+ */
			background: linear-gradient(to bottom, #27adab 0%,#135655 100%); /* W3C */
		}
		.login .button-primary:hover {
			background: #85aaaa; /* Old browsers */
			background: -moz-linear-gradient(top, #85aaaa 0%, #208e8c 100%); /* FF3.6+ */
			background: -webkit-gradient(linear, left top, left bottom, color-stop(0%,#85aaaa), color-stop(100%,#208e8c)); /* Chrome,Safari4+ */
			background: -webkit-linear-gradient(top, #85aaaa 0%,#208e8c 100%); /* Chrome10+,Safari5.1+ */
			background: -o-linear-gradient(top, #85aaaa 0%,#208e8c 100%); /* Opera 11.10+ */
			background: -ms-linear-gradient(top, #85aaaa 0%,#208e8c 100%); /* IE10+ */
			background: linear-gradient(to bottom, #85aaaa 0%,#208e8c 100%); /* W3C */
		}
	</style>
<?php }
add_action( 'login_enqueue_scripts', 'wptutsplus_login_logo' );
?>
So I now have a completely customized login screen, meaning that when my clients or users log in, they see something that's consistent with my brand and makes the site look more professional.
Summary
Customizing the WordPress login screen is straightforward and can make a big difference to the impression your site gives to users and clients logging in. By tweaking the code above to meet your needs and reflect your brand you can create a very professional login screen in very little time.

Comments