Today, we'll go through the concept of controllers in OpenCart 2.x. With the release of OpenCart 2.x version, they've introduced framework changes that require an upgrade if you've made any custom modules in the earlier version—OpenCart 1.x. We'll walk through a practical example of what we'll call Guestbook in this tutorial.
Before we move ahead in this article, you could consider this as a follow-up to what I wrote earlier. In that article, I explained how to make a custom page in OpenCart 1.x, and if you've already followed that article, you could quickly skip through most of the sections today!
Of course, it's OpenCart 2.x that will be discussed today, so make sure that you follow the code closely.
If you would like to see more theory about the OpenCart framework pattern and controllers, you could go through a couple of the initial sections of that article. Having said that, there's nothing stopping you from following this article straight away, as I won't skip any essentials.
Why a Custom Controller?
Something that you may be asking in the first place—why a custom controller? Let's quickly understand what the controller is all about in OpenCart before we get into this.
In the context of OpenCart, the controller is an indispensable component of the framework that directly deals with the routing process and renders the UI. In the process, it deals with other important components like language, model and view to build the final outcome.
When you access any page in OpenCart, the OpenCart framework looks for the corresponding controller and delegates further processing to it. Being modular by nature, the OpenCart framework provides several controllers that deal with logically grouped functionalities.
For example, the account group contains controllers that deal with login, registration, profile, and similar use cases. Similarly, the checkout group of controllers handles the order creation process.
In a nutshell, when you want to create a feature that's not in the core of OpenCart and if it takes a new URL—a route in the terminology of OpenCart—you should go for a custom controller. It gives you complete control of the page creation process—which elements you want to display on your custom page.
Create a Custom Controller
Today, we'll implement a basic Guestbook functionality that demonstrates the concept of custom controllers. In the course of doing that, we'll build an interface in the front-end that allows guest users to submit their feedback by entering their name and message.
Before proceeding, make sure that you have a working installation of OpenCart 2.3.x. And that's pretty much it to start working on our Guestbook feature.
For those who are not familiar with the OpenCart structure, the place to look for the front-end controllers is catalog/controller. It's the directory that manages all the controllers by group, based on the features they provide.
In our case, we'll create a separate group called guestbook. Go ahead and create a directory catalog/controller/guestbook. Within that directory, create an entry.php file with the following contents. It's a controller file that handles the application logic and submission logic of our Guestbook functionality.
<?php
class ControllerGuestbookEntry extends Controller {
  private $error = array();

  public function index() {
    $this->load->language('guestbook/guestbook');

    $this->document->setTitle($this->language->get('heading_title'));

    if (($this->request->server['REQUEST_METHOD'] == 'POST') && $this->validate()) {
      $this->load->model('guestbook/guestbook');
      $data['subject'] = sprintf('New guestbook entry submitted by %s', $this->request->post['guest_name']);
      $data['message'] = $this->request->post['guest_message'];
      $this->model_guestbook_guestbook->processGuestbookEntry($data);
      $this->session->data['success'] = $this->language->get('text_success');
      $this->response->redirect($this->url->link('guestbook/entry', '', true));
    }

    $data['success'] = '';
    if (isset($this->session->data['success'])) {
      $data['success'] = $this->session->data['success'];
      unset($this->session->data['success']);
    }

    $data['breadcrumbs'] = array();

    $data['breadcrumbs'][] = array(
      'text' => $this->language->get('text_home'),
      'href' => $this->url->link('common/home')
    );

    $data['breadcrumbs'][] = array(
      'text' => $this->language->get('heading_title'),
      'href' => $this->url->link('guestbook/entry', '', true)
    );

    $data['heading_title'] = $this->language->get('heading_title');
    $data['entry_guest_name'] = $this->language->get('entry_guest_name');
    $data['entry_guest_message'] = $this->language->get('entry_guest_message');
    $data['entry_submit'] = $this->language->get('entry_submit');

    if (isset($this->error['guest_name'])) {
      $data['error_guest_name'] = $this->error['guest_name'];
    } else {
      $data['error_guest_name'] = '';
    }

    if (isset($this->error['guest_message'])) {
      $data['error_guest_message'] = $this->error['guest_message'];
    } else {
      $data['error_guest_message'] = '';
    }

    $data['action'] = $this->url->link('guestbook/entry', '', true);

    if (isset($this->request->post['guest_name'])) {
      $data['guest_name'] = $this->request->post['guest_name'];
    } else {
      $data['guest_name'] = '';
    }

    if (isset($this->request->post['guest_message'])) {
      $data['guest_message'] = $this->request->post['guest_message'];
    } else {
      $data['guest_message'] = '';
    }

    $data['column_left'] = $this->load->controller('common/column_left');
    $data['column_right'] = $this->load->controller('common/column_right');
    $data['content_top'] = $this->load->controller('common/content_top');
    $data['content_bottom'] = $this->load->controller('common/content_bottom');
    $data['footer'] = $this->load->controller('common/footer');
    $data['header'] = $this->load->controller('common/header');

    $this->response->setOutput($this->load->view('guestbook/entry', $data));
  }

  protected function validate() {
    if (utf8_strlen(trim($this->request->post['guest_name'])) < 1) {
      $this->error['guest_name'] = $this->language->get('error_guest_name');
    }

    if (utf8_strlen(trim($this->request->post['guest_message'])) < 1) {
      $this->error['guest_message'] = $this->language->get('error_guest_message');
    }

    return !$this->error;
  }
}
According to OpenCart naming conventions, the class name begins with the Controller keyword followed by the directory name, Guestbook in our case, in which the class file resides. Further, the name of the class file, Entry in our case, is appended at the end.
Each controller class provides a de facto index method that handles most of the logic of the controller. Next, we'll go through the code in the index method, and we'll also create other files as needed.
Most of the time, we'll start by including the language file for the specific group. It's the way OpenCart manages static language labels throughout the application. Of course, that makes implementation of multi-language sites a breeze.
$this->load->language('guestbook/guestbook');
Before moving ahead, let's create the corresponding language file so that our controller can find it. Create a catalog/language/en-gb/guestbook/guestbook.php file with the following contents.
<?php
// Heading
$_['heading_title']  = 'Guestbook';

// Entry
$_['entry_guest_name']   = 'Your Name';
$_['entry_guest_message']   = 'Message';
$_['entry_submit']   = 'Submit';
$_['text_success']   = 'Success: Your entry has been successfully submitted.';

// Error
$_['error_guest_name'] = 'Please enter Your Name!';
$_['error_guest_message'] = 'Please enter Message!';
As you can see, we're just assigning labels with their values in the language array.
Back to our controller, the next thing is to set up the HTML title tag for our page.
$this->document->setTitle($this->language->get('heading_title'));
Users with sharp eyes will have noticed that we've used the heading_title language variable defined in the language file created a moment ago.
In order to understand the next piece of code, we need to create a model file. So for a moment, I'll divert you to create the model file at catalog/model/guestbook/guestbook.php with the following contents.
<?php
class ModelGuestbookGuestbook extends Model {
  public function processGuestbookEntry($data) {
    // send email notification to store admin
    $mail = new Mail();
    $mail->protocol = $this->config->get('config_mail_protocol');
    $mail->parameter = $this->config->get('config_mail_parameter');
    $mail->smtp_hostname = $this->config->get('config_mail_smtp_hostname');
    $mail->smtp_username = $this->config->get('config_mail_smtp_username');
    $mail->smtp_password = html_entity_decode($this->config->get('config_mail_smtp_password'), ENT_QUOTES, 'UTF-8');
    $mail->smtp_port = $this->config->get('config_mail_smtp_port');
    $mail->smtp_timeout = $this->config->get('config_mail_smtp_timeout');

    $mail->setTo($this->config->get('config_email'));
    $mail->setFrom($this->config->get('config_email'));
    $mail->setSender(html_entity_decode($this->config->get('config_name'), ENT_QUOTES, 'UTF-8'));
    $mail->setSubject($data['subject']);
    $mail->setText($data['message']);
    $mail->send();
  }
}
In OpenCart, the model is responsible for handling the business logic of the application. Should you wish to implement any logic that involves a database, this is the place it should go in.
The naming convention of the model class is similar to that of the controller class. To keep things simple, we've implemented a method processGuestbookEntry that notifies the admin of the store via email when a user submits a Guestbook entry. Pretty simple, huh?
Let's get back to our controller, and examine the next piece of code in the queue.
if (($this->request->server['REQUEST_METHOD'] == 'POST') && $this->validate()) {
    $this->load->model('guestbook/guestbook');
	$data['subject'] = sprintf('New guestbook entry submitted by %s', $this->request->post['guest_name']);
	$data['message'] = $this->request->post['guest_message'];
	$this->model_guestbook_guestbook->processGuestbookEntry($data);
	$this->session->data['success'] = $this->language->get('text_success');
	$this->response->redirect($this->url->link('guestbook/entry', '', true));
}
It checks for a valid POST request and does basic validation of user-submitted data by calling the validate method.
The code $this->load->model('guestbook/guestbook') is used to load the model that we defined a moment ago. Immediately after that, we prepare the $data array based on the user input and call the processGuestbookEntry method, which notifies the store admin about the Guestbook entry. Finally, we redirect the user back to the Guestbook entry page.
Moving ahead in the controller, the following snippet sets up the success message that will be displayed upon the submission of the form.
$data['success'] = '';
if (isset($this->session->data['success'])) {
    $data['success'] = $this->session->data['success'];
	unset($this->session->data['success']);
}
Following that, there's a snippet that is used to build breadcrumb links for the page.
$data['breadcrumbs'] = array();

$data['breadcrumbs'][] = array(
    'text' => $this->language->get('text_home'),
	'href' => $this->url->link('common/home')
);

$data['breadcrumbs'][] = array(
	'text' => $this->language->get('heading_title'),
	'href' => $this->url->link('guestbook/entry', '', true)
);
The next snippet is an important one, and it's something you'll use most of the time to pass information from the controller method to the view template.
$data['heading_title'] = $this->language->get('heading_title');
$data['entry_guest_name'] = $this->language->get('entry_guest_name');
$data['entry_guest_message'] = $this->language->get('entry_guest_message');
$data['entry_submit'] = $this->language->get('entry_submit');
Similar to that of assigning variables, OpenCart initializes common elements of the page—header, footer and the like—as depicted in the following snippet.
$data['column_left'] = $this->load->controller('common/column_left');
$data['column_right'] = $this->load->controller('common/column_right');
$data['content_top'] = $this->load->controller('common/content_top');
$data['content_bottom'] = $this->load->controller('common/content_bottom');
$data['footer'] = $this->load->controller('common/footer');
$data['header'] = $this->load->controller('common/header');
Finally, it calls the view template to render the actual page!
$this->response->setOutput($this->load->view('guestbook/entry', $data));
Of course, we haven't built a view template yet. It's the perfect time to do that! Go ahead and create a catalog/view/theme/default/template/guestbook/entry.tpl file with the following contents.
<?php echo $header; ?>
<div class="container">
<ul class="breadcrumb">
<?php foreach ($breadcrumbs as $breadcrumb) { ?>
<li><a href="<?php echo $breadcrumb['href']; ?>"><?php echo $breadcrumb['text']; ?></a></li>
<?php } ?>
</ul>
<?php if ($success) { ?>
<div class="alert alert-success"><i class="fa fa-check-circle"></i> <?php echo $success; ?></div>
<?php } ?>
<div class="row"><?php echo $column_left; ?>
<?php if ($column_left && $column_right) { ?>
<?php $class = 'col-sm-6'; ?>
<?php } elseif ($column_left || $column_right) { ?>
<?php $class = 'col-sm-9'; ?>
<?php } else { ?>
<?php $class = 'col-sm-12'; ?>
<?php } ?>
<div id="content" class="<?php echo $class; ?>"><?php echo $content_top; ?>
<h1><?php echo $heading_title; ?></h1>
<form action="<?php echo $action; ?>" method="post" enctype="multipart/form-data" class="form-horizontal">
<div class="form-group required">
<label class="col-sm-2 control-label" for="input-guest-name"><?php echo $entry_guest_name; ?></label>
<div class="col-sm-10">
<input type="text" value="<?php echo $guest_name; ?>" name="guest_name" placeholder="<?php echo $entry_guest_name; ?>" id="input-guest-name" class="form-control" size="10" />
<?php if ($error_guest_name) { ?>
<div class="text-danger"><?php echo $error_guest_name; ?></div>
<?php } ?>
</div>
</div>
<div class="form-group required">
<label class="col-sm-2 control-label" for="input-guest-message"><?php echo $entry_guest_message; ?></label>
<div class="col-sm-10">
<textarea name="guest_message" placeholder="<?php echo $entry_guest_message; ?>" id="input-guest-message" class="form-control"><?php echo $guest_message; ?></textarea>
<?php if ($error_guest_message) { ?>
<div class="text-danger"><?php echo $error_guest_message; ?></div>
<?php } ?>
</div>
</div>
<div class="form-group required">
<label class="col-sm-2"> </label>
<div class="col-sm-10">
<input type="submit" value="<?php echo $entry_submit; ?>" class="btn btn-primary" />
</div>
</div>
</form>
<?php echo $content_bottom; ?></div>
<?php echo $column_right; ?></div>
</div>
<?php echo $footer; ?>
This is our main view template file that is responsible for displaying the content of our Guestbook page. In this file, we have just used the variables that were set up in the controller's index method.
It's important to note that responsiveness is something that comes built-in with the recent versions of OpenCart supported by the Bootstrap framework. Other than that, it's pretty regular HTML stuff that's quite easy to understand.
So, that's it as far as the file setup is concerned.
We have everything in place now, but how would you access that from the front-end?
In the front-end, you can access the Guestbook page by appending the route querystring variable, so the URL should be something like http://your-opencart-store-url/index.php?route=guestbook/entry.
Let's understand how OpenCart maps any URL to the specific controller file. The format of the route variable is {directory}/{filename}/{methodname}.
- The
{directory}component maps to the directory undercatalog/controller.
- The
{filename}maps to the name of the controller file undercatalog/controller/{directory}. - Finally, it'll look for the controller method named
{methodname}if it's specified in the route, otherwise it'll call the defaultindexmethod.
Here's what the final outcome looks like.
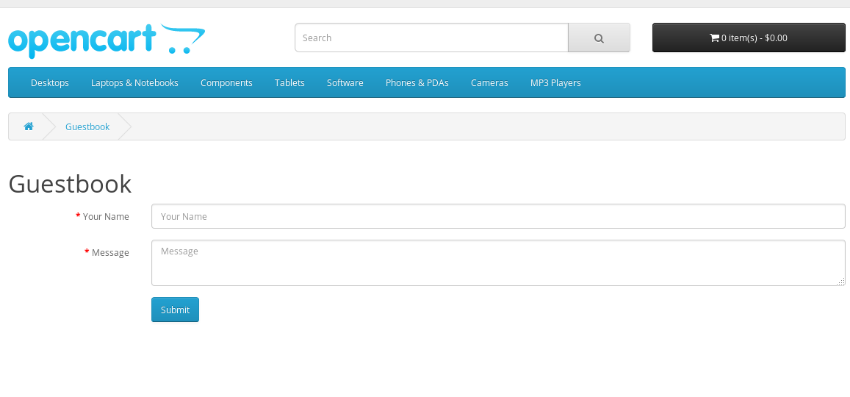
Of course, you could go ahead and test it by submitting the form, and you should receive an email notification to the email address that's registered as a store admin.
Conclusion
In any framework, it's always exciting to go ahead and implement your own custom functionality. That was exactly the subject of today's tutorial, in which we extended OpenCart and developed custom controllers by building a pretty simple yet useful functionality of Guestbook.
In the process, we realized that it's not just about the controllers—there were few other key elements that were inevitable. So we ended up introducing those as well: Model, Language, and View.
At the end, it was nice to see the working use-case of what I promised at the beginning of the article. So, that's it for today, and don't hesitate to leave your queries and comments. Also, I would love to hear from you if there is any particular topic that you would like me to come up with in my next article!
As always, if you're looking for additional OpenCart tools, utilities, extensions, and so on that you can leverage in your own projects or for your own education, don't forget to see what we have available in the marketplace.
If you've enjoyed this article, I have a few more just in case you would like to go through them!

Comments