In this tutorial, I'm going to demonstrate custom module configuration in the back-end of Magento. It's always useful to provide a set of configurable options of the module in the back-end, which allows administrators to configure module specific settings easily. We'll walk through the process of setting up the module configuration by creating a custom module in Magento.
Introduction to Custom Configuration in Magento
As a developer, during the process of custom module creation you might feel that it would be nice if you could transfer the control of certain module specific settings to the back-end. Magento allows you to achieve this using an XML file based configuration system. You just need to set up the files as per the conventions of Magento, and they'll be picked up auto-magically! Most of the time, you'll need to deal with plenty of configurable settings provided by core modules while setting up the basic front-end store.
I assume that you're familiar with the basic module creation process in Magento. Here's a nice article, if you would like to learn more about custom modules in Magento. Having said that, Magento follows the convention over configuration paradigm, which should make things easier to understand if you're a newbie to the custom module development process.
Create a Custom Module to Provide Custom Configuration
For the course of this tutorial, I'll create a basic custom module named "CustomConfig" which provides the back-end configuration under the System > Configuration menu. Here's the list of files required for the desired setup:
-
app/etc/modules/Envato_All.xml: It's a file used to enable our custom module. -
app/code/local/Envato/CustomConfig/etc/config.xml: It's a module configuration file. -
app/code/local/Envato/CustomConfig/etc/system.xml: It's a file which declares the configuration options for our module. -
app/code/local/Envato/CustomConfig/Model/Options.php: It's a model file which provides the options for certain form elements of configuration. -
app/code/local/Envato/CustomConfig/Helper/Data.php: It's a file used by the Magento translation system.
Files Setup
To start with, we'll create a module enabler file. Create a file "app/etc/modules/Envato_All.xml" and paste the following contents in that file. We've used "Envato" as our module namespace and "CustomConfig" as our module name. It'll enable our "CustomConfig" module by default.
<?xml version="1.0"?>
<config>
  <modules>
    <Envato_CustomConfig>
      <active>true</active>
      <codePool>local</codePool>
    </Envato_CustomConfig>
  </modules>
</config>
Next, we need to create a module configuration file. Create "app/code/local/Envato/CustomConfig/etc/config.xml" and paste the following contents in that file.
<?xml version="1.0"?>
<config>
    <modules>
        <Envato_CustomConfig>
            <version>0.0.1</version>
        </Envato_CustomConfig>
    </modules>
    <global>
        <helpers>
            <customconfig>
                <class>Envato_CustomConfig_Helper</class>
            </customconfig>
        </helpers>
        <models>
             <customconfig>
                <class>Envato_CustomConfig_Model</class>
             </customconfig>
        </models>
    </global>
    <adminhtml>
        <acl>
            <resources>
                <admin>
                    <children>
                        <system>
                            <children>
                                <config>
                                    <children>
                                        <customconfig_options>
                                            <title>Custom Configuration Section</title>
                                        </customconfig_options>
                                    </children>
                                </config>
                            </children>
                        </system>
                    </children>
                </admin>
            </resources>
        </acl>
    </adminhtml>
</config>
You should be familiar with the model and helper class declaration as per the Magento conventions. Of course, the <adminhtml> tag is new for you, which is something we're concerned with in the context of this tutorial. Let's go through each tag in detail to understand what it stands for.
The <adminhtml> tag is used to define the resources of the admin side. In our example, the configuration page for our module is a resource. Further, we've used the <acl> tag to wrap a <resources> tag, which means it'll be accessible to authenticated users only.
The next couple of tags are used to define the path of our back-end configuration page. So the path to our configuration page looks like "admin/system/config/customconfig_options". Of course, the last tag <customconfig_options> should be unique so it doesn't conflict with other extensions.
Moving ahead, let's define the most important file, "system.xml". Create "app/code/local/Envato/CustomConfig/etc/system.xml" and paste the following contents in that file.
<?xml version="1.0"?>
<config>
    <tabs>
        <customconfig translate="label" module="customconfig">
            <label>Custom Configuration Tab</label>
            <sort_order>1</sort_order>
        </customconfig>
    </tabs>

    <sections>
        <customconfig_options translate="label" module="customconfig">
            <label>Custom Configuration Settings</label>
            <tab>customconfig</tab>
            <frontend_type>text</frontend_type>
            <sort_order>1</sort_order>
            <show_in_default>1</show_in_default>
            <show_in_website>1</show_in_website>
            <show_in_store>1</show_in_store>
            <groups>
                <section_one translate="label">
                    <label>Section One</label>
                    <frontend_type>text</frontend_type>
                    <sort_order>1</sort_order>
                    <show_in_default>1</show_in_default>
                    <show_in_website>1</show_in_website>
                    <show_in_store>1</show_in_store>
                    <fields>
                        <custom_field_one>
                            <label>Custom Text Field</label>
                            <frontend_type>text</frontend_type>
                            <sort_order>1</sort_order>
                            <show_in_default>1</show_in_default>
                            <show_in_website>1</show_in_website>
                            <show_in_store>1</show_in_store>
                            <comment>Example of text field.</comment>
                        </custom_field_one>
                    </fields>
                </section_one>
                <section_two translate="label">
                    <label>Section Two</label>
                    <frontend_type>text</frontend_type>
                    <sort_order>2</sort_order>
                    <show_in_default>1</show_in_default>
                    <show_in_website>1</show_in_website>
                    <show_in_store>1</show_in_store>
                    <fields>
                        <custom_field_two>
                            <label>Custom Select Field</label>
                            <frontend_type>select</frontend_type>
                            <source_model>customconfig/options</source_model>
                            <sort_order>1</sort_order>
                            <show_in_default>1</show_in_default>
                            <show_in_website>1</show_in_website>
                            <show_in_store>1</show_in_store>
                            <comment>Example of select field.</comment>
                        </custom_field_two>
                        <custom_field_three>
                            <label>Custom Radio Field</label>
                            <frontend_type>radios</frontend_type>
                            <source_model>customconfig/options</source_model>
                            <sort_order>2</sort_order>
                            <show_in_default>1</show_in_default>
                            <show_in_website>1</show_in_website>
                            <show_in_store>1</show_in_store>
                            <comment>Example of radios field.</comment>
                        </custom_field_three>
                        <custom_field_four>
                            <label>Custom Multiselect Field</label>
                            <frontend_type>multiselect</frontend_type>
                            <source_model>customconfig/options</source_model>
                            <sort_order>3</sort_order>
                            <show_in_default>1</show_in_default>
                            <show_in_website>1</show_in_website>
                            <show_in_store>1</show_in_store>
                            <comment>Example of multiselect field.</comment>
                        </custom_field_four>
                    </fields>
                </section_two>
            </groups>
        </customconfig_options>
    </sections>
</config>
As you may have guessed, this file is responsible for displaying a configuration page of our module in the back-end. Let's have a closer look at some of the important tags in that file.
The <tabs> tag is used to define tabs which will be displayed on the left hand side of the configuration page. And the <sections> tag is used to define sections under each tab.
Let's try to understand it through an example. Go to System > Configuration in the back-end of Magento. You'll notice that there are different tabs like General, Catalog, Customers, etc.
Under each tab, you'll see different sections as well. For example, under the Advanced tag, there are Admin, System, Advanced and Developer sections. In our case, we'll have a Custom Configuration Settings section under the Custom Configuration Tab.
Next, we use the <groups> tag to group similar configuration fields together. For example, you would like to display image related fields and email related fields under different sections. For that, we've defined <section_one> and <section_two> tags.
Finally, we wrap the fields of each section with the <fields> tag. In our example, we've provided a text field under the "Section One" field-set, while other fields like select box, radio button and multi-select are available under the "Section Two" field-set. So that's it for the "system.xml" file.
Next, let's create a model file "app/code/local/Envato/CustomConfig/Model/Options.php".
<?php
class Envato_CustomConfig_Model_Options
{
  /**
   * Provide available options as a value/label array
   *
   * @return array
   */
  public function toOptionArray()
  {
    return array(
      array('value'=>1, 'label'=>'One'),
      array('value'=>2, 'label'=>'Two'),
      array('value'=>3, 'label'=>'Three'),
      array('value'=>4, 'label'=>'Four')
    );
  }
}
Nothing fancy here—it's just used to feed options to a radio form field and select the form field in the configuration form.
Finally, we'll need to create the "app/code/local/Envato/CustomConfig/Helper/Data.php" file just to make sure the translation system of Magento works properly. It's almost an empty file, but should be there as per the conventions!
<?php
/**
 * Sample Widget Helper
 */
class Envato_CustomConfig_Helper_Data extends Mage_Core_Helper_Abstract
{
}
We've done with the files setup. In the next section, we'll check how it looks in the back-end of Magento.
Walk Through the Back-End to Test Custom Configuration
Head over to the back-end of Magento and clear all caches. It can be reached by going to System > Cache Management.
Now, go to System > Configuration to open the configuration page. You should notice CUSTOM CONFIGURATION TAB on the left hand side of page. Under that, the Custom Configuration Settings link is available, and clicking on that will open a configuration page for our module. If you can't see it, try logging out of the admin section and logging in again.
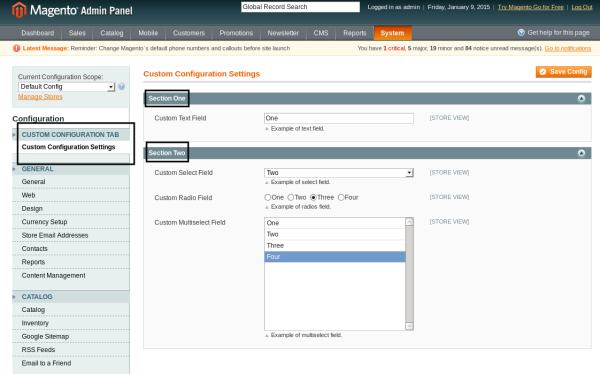
It's a nice-looking interface working out of the box, isn't it? You can play around a bit, fill in the form and click on the Save Config button to commit the changes, and Magento will handle the rest.
To access the values of the configuration parameters in the code, you can use the getStoreConfig static method. For example, you can retrieve the value of the custom_field_one parameter using the following syntax:
Mage::getStoreConfig('customconfig_options/section_one/custom_field_one');
The syntax is fairly simple—you need to use the "section_name/group_name/field_name" pattern as defined in the system.XML file.
Conclusion
Admin system configuration is one of the strongest and most useful parts of Magento. Magento allows you to plug in custom configuration parameters very easily, thanks to the extendability of one of the most powerful e-commerce systems! Share your thoughts using the feed below!

Comments