By this stage you should already have a plan for your knowledge base's structure and any post types and taxonomies you'll need to use to store your data.
The next step is to create the structure for your data.
In this tutorial I'll take you through:
- registering taxonomies for your data
- removing taxonomies you don't need
What You'll Need
To follow this tutorial, you'll need
- a development installation of WordPress
- a text editor
- a starting theme
1. Creating a Starting Theme
As my starting theme I'm going to use a theme I developed for an earlier tutorial on building a WordPress theme. The theme is included in the code bundle for this tutorial. If you prefer you can use your own theme or one that you've downloaded from the theme repository.
Before you get started, if you're using a theme you've downloaded, you'll need to rename its folder and edit the stylesheet to reflect the new use of the theme.
So my stylesheet now has the following at the beginning:
/*
Theme Name: Creating a Knowledge Base in WordPress - starting theme
Theme URI: http://rachelmccollin.co.uk
Author: Rachel McCollin
Author URI: http://rachelmccollin.co.uk
Description: The theme to accompany the wptutsplus series on creating a knowledge base using WordPress. This is the starting theme.
Version: 1.0
License: GNU General Public License v2 or later
License URI: http://www.gnu.org/licenses/gpl-2.0.html
*/
2. Registering Post Types and Taxonomies
If your knowledge base makes use of custom post types, then you'll need to register those. You do this by adding the register_post_type() function to your theme's functions.php file.
My knowledge base will just be using posts with custom taxonomies, so I need to use the register_taxonomy() function.
Open your functions.php file. If you're using my starter theme, it already has some functions in it, which add theme support for featured images and register some widgets. Below the last function, add the following to register the Content Type taxonomy:
function tutsplus_taxonomies() {
    // Content type taxonomy
	$labels = array(
		'name'              => __( 'Content Types', 'tutsplus' ),
		'singular_name'     => __( 'Content Type', 'tutsplus' ),
		'search_items'      => __( 'Search Content Types', 'tutsplus' ),
		'all_items'         => __( 'All Content Types', 'tutsplus' ),
		'edit_item'         => __( 'Edit Content Type', 'tutsplus' ),
		'update_item'       => __( 'Update Content Type', 'tutsplus' ),
		'add_new_item'      => __( 'Add New Content Type', 'tutsplus' ),
		'new_item_name'     => __( 'New Content Type Name', 'tutsplus' ),
		'menu_name'         => __( 'Content Types', 'tutsplus' ),
	);

	$args = array(
		'hierarchical'      => true,
		'labels'            => $labels,
		'show_ui'           => true,
		'show_admin_column' => true,
		'query_var'         => true,
		'rewrite'           => array( 'slug' => 'content-types' ),
	);

	register_taxonomy( 'contenttype', array( 'post' ), $args );

}

add_action( 'init', 'tutsplus_taxonomies' );
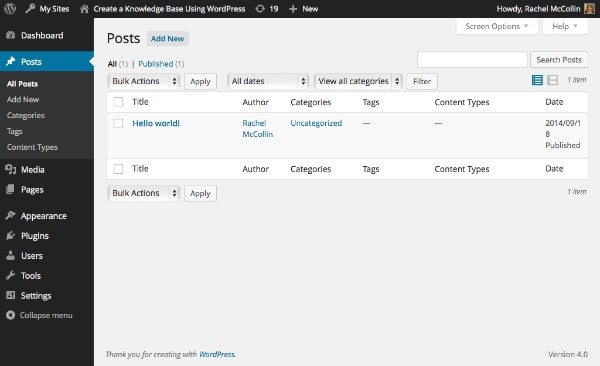
You'll now have an extra taxonomy showing up in the admin for posts:
Next, you need to add any additional taxonomies. I'm using two more: User Topics and Developer Topics. Inside the tutsplus_taxonomies() function you already created, register each of these using register_taxonomy(). Your entire function will now look like this:
function tutsplus_taxonomies() {
    // Content type taxonomy
	$labels = array(
		'name'              => __( 'Content Types', 'tutsplus' ),
		'singular_name'     => __( 'Content Type', 'tutsplus' ),
		'search_items'      => __( 'Search Content Types', 'tutsplus' ),
		'all_items'         => __( 'All Content Types', 'tutsplus' ),
		'edit_item'         => __( 'Edit Content Type', 'tutsplus' ),
		'update_item'       => __( 'Update Content Type', 'tutsplus' ),
		'add_new_item'      => __( 'Add New Content Type', 'tutsplus' ),
		'new_item_name'     => __( 'New Content Type Name', 'tutsplus' ),
		'menu_name'         => __( 'Content Types', 'tutsplus' ),
	);

	$args = array(
		'hierarchical'      => true,
		'labels'            => $labels,
		'show_ui'           => true,
		'show_admin_column' => true,
		'query_var'         => true,
		'rewrite'           => array( 'slug' => 'content-types' ),
	);

	register_taxonomy( 'contenttype', array( 'post' ), $args );

	// User topic taxonomy
	$labels = array(
		'name'              => __( 'User Topics', 'tutsplus' ),
		'singular_name'     => __( 'User Topic', 'tutsplus' ),
		'search_items'      => __( 'Search User Topics', 'tutsplus' ),
		'all_items'         => __( 'All User Topics', 'tutsplus' ),
		'edit_item'         => __( 'Edit User Topic', 'tutsplus' ),
		'update_item'       => __( 'Update User Topic', 'tutsplus' ),
		'add_new_item'      => __( 'Add New User Topic', 'tutsplus' ),
		'new_item_name'     => __( 'New User Topic Name', 'tutsplus' ),
		'menu_name'         => __( 'User Topics', 'tutsplus' ),
	);

	$args = array(
		'hierarchical'      => true,
		'labels'            => $labels,
		'show_ui'           => true,
		'show_admin_column' => true,
		'query_var'         => true,
		'rewrite'           => array( 'slug' => 'user-topics' ),
	);

	register_taxonomy( 'usertopic', array( 'post' ), $args );

	// Developer topic taxonomy
	$labels = array(
		'name'              => __( 'Developer Topics', 'tutsplus' ),
		'singular_name'     => __( 'Developer Topic', 'tutsplus' ),
		'search_items'      => __( 'Search Developer Topics', 'tutsplus' ),
		'all_items'         => __( 'All Developer Topics', 'tutsplus' ),
		'edit_item'         => __( 'Edit Developer Topic', 'tutsplus' ),
		'update_item'       => __( 'Update Developer Topic', 'tutsplus' ),
		'add_new_item'      => __( 'Add New Developer Topic', 'tutsplus' ),
		'new_item_name'     => __( 'New Developer Topic Name', 'tutsplus' ),
		'menu_name'         => __( 'Developer Topics', 'tutsplus' ),
	);

	$args = array(
		'hierarchical'      => true,
		'labels'            => $labels,
		'show_ui'           => true,
		'show_admin_column' => true,
		'query_var'         => true,
		'rewrite'           => array( 'slug' => 'developer-topics' ),
	);

	register_taxonomy( 'developertopic', array( 'post' ), $args );

}

add_action( 'init', 'tutsplus_taxonomies' );
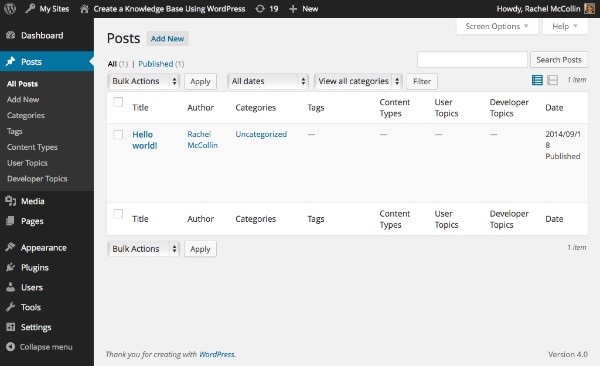
You now have three taxonomies for use with posts:
3. Removing Unwanted Taxonomies
As my knowledge base won't be using categories, I want to remove those from the admin so that people inputting data don't accidentally use them when they should be using my taxonomies.
The way you do this is a little counterintuitive, as there isn't a function for deregistering taxonomies. Instead, you run the register_taxonomy() function with no parameters except the taxonomy name.
To remove categories, add the following to your functions.php file:
function tutsplus_remove_taxonomies() {

    register_taxonomy( 'category', '' );

}
add_action( 'init', 'tutsplus_remove_taxonomies', 0 );
When firing this via the init hook, using a priority of 0 ensures that this function runs after the core WordPress function setting up categories in the first place.
If you wanted to remove tags as well, you'd just add the following inside the tutsplus_rremove_taxonomies() function:
register_taxonomy( 'post_tag', '' );
You'll now see that just tags and my custom taxonomies are available in the dashboard:

Summary
You now have the structure in place to be able to start adding data to your knowledge base. The next stage is to create the front-end, which I'll cover in the next tutorial. In that tutorial I'll show you how to create any custom template files, add hooks, and create the context-specific sidebars.

Comments