Universal Windows apps enable you to target every Windows device in one solution. You develop once, share most of your code, and deploy on Windows, Windows Phone, or Xbox.
The goal is to maximize the reuse of code. You can share code, user controls, styles, strings, and other assets between the Windows Phone and Windows 8 projects in Visual Studio. This reduces the effort needed in building and maintaining an app for each type of device.
Introduction
From a developer's perspective, a universal Windows app is not a single binary that runs on multiple platforms. Rather, it takes the form of a Visual Studio solution containing multiple projects, one project for each targeted platform in addition to a shared project containing code and resources shared between platforms. A lot of code can be shared between the projects as Windows Phone 8.1 implements the majority of the WinRT APIs that Windows 8.1 implements.
You can create a Windows Phone application using the Silverlight runtime (version 8.0 or 8.1) or the WinRT runtime (the one from universal windows apps). The WinRT runtime enables you to create one application that will run on Windows, Windows Phone, and even Xbox One.
We are using the XAML framework to develop an app for multiple platforms. In the current version there is an API convergence of 90%, but there still is a small set not converged yet. Windows Phone features only available in the Silverlight framework are:
- Lenses support
- VoIP support
- Camera capture task
- Clipboard APIs
- Lock screen wallpaper API
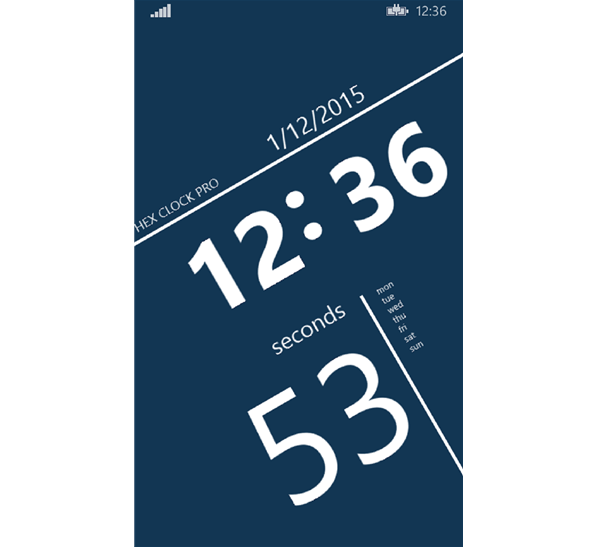
In this tutorial, I will use a universal Windows app template to create a Hex Clock app, a precise hexadecimal color clock. It goes through the whole 24 hours color range, from #000000 to #235959. With every tick of the clock, the app's background changes to the color corresponding to the current time converted to hexadecimal. It uses the same implementation as Hex Color JS Clock to generate the hex code of the current time.
The design was inspired by a Windows Phone 7 clock app tutorial on Tuts+. While the clock app only targets Windows Phone, we will use its design to make a similar app for Windows Phone 8.1 and Windows 8.1. The below screenshot shows what we are going to build.

In this tutorial, I will discuss the following topics which are relevant to developing universal Windows apps:
- the structure of universal Windows apps
- switching startup projects in Visual Studio
- context switcher for universal Windows apps in the Visual Studio editor
- how to write cross-platform code in the shared project
- how to add support for Windows or Windows Phone to an existing project
- building a universal Windows app from scratch
1. Structure of Universal Windows Apps
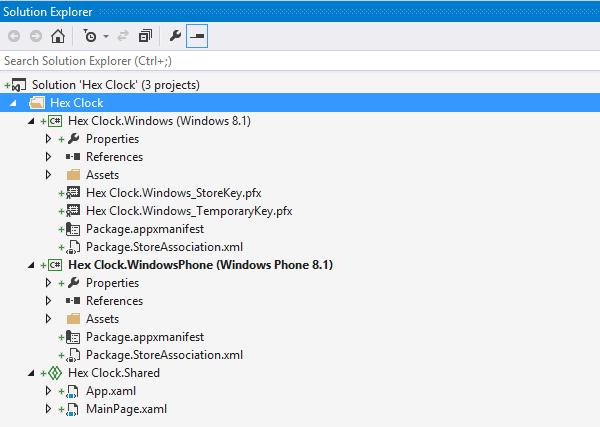
A universal Windows app is a collection of three projects enclosed in an optional solution folder. The Windows and Windows Phone projects are platform projects and are responsible for creating the application packages (.appx), targeting the respective platforms. These projects contain assets that are specific to the platform being targeted.
The shared project is a container for code that runs on both platforms. They don’t have a binary output, but their contents are imported by the platform projects and used as part of the build process to generate the app packages (.appx).
The screenshot below shows the solution that Visual Studio creates when you choose the project template for a Blank App (Universal Apps).
Visual Studio 2013 Update 2 introduces the new feature that is universal Windows apps. Download and install this update before you start building universal Windows apps.
2. Switching Startup Projects
When you run the solution, the project that runs is the one that's selected as the startup project. To set the startup project, right-click on the project node in the Solution Explorer and choose the option Set as Startup Project. You can quickly switch the startup project from the Debug target drop-down that now enumerates all the possible projects in the solution.
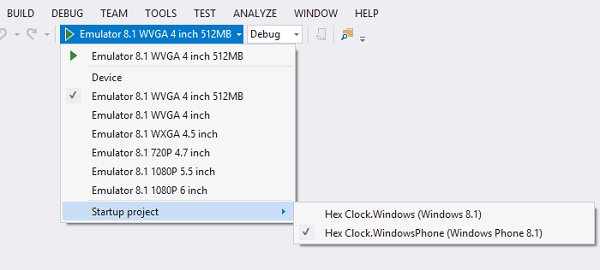
The project that you choose is shown in bold in the Solution Explorer. The available debug targets change when switching startup projects.
- When the Windows project is the startup project, the Debug target drop-down displays options for the Windows Simulator or Local Machine.
- When the Windows Phone project is the startup project, the drop-down displays options for Device as well as various emulators.
3. Context Switcher in Code Editor
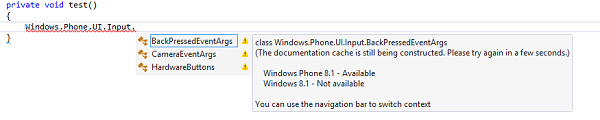
When writing code in a shared project, you can use the project context switcher in the navigation bar to select the platform you are actively targeting, which in turn customizes the IntelliSense experience in the code editor.

If you use an API in shared code that is not supported on both platforms, an error message will identify this API when you build the project. You don't have to build the project to confirm that you’re using cross-platform APIs.
The following screenshot shows an example of the warning icons and IntelliSense for a type that is supported only in Windows Phone apps.
4. Cross-Platform Code in Shared Project
In the shared project, you typically write code that is common to both platforms. To isolate sections of code that are platform-specific, use the #ifdef directive. The constants WINDOWS_APP and WINDOWS_PHONE_APP are predefined for you.
The following are the conditional compilation constants that you can use to write platform-specific code:
| C# | WINDOWS_APP |
WINDOWS_PHONE_APP |
| C++ |
WINAPI_FAMILY_PC_APP |
WINAPI_FAMILY_PHONE_APP |
When you're writing code in the shared project, the Visual Studio code editor uses a context that targets one platform or the other. In C#, the IntelliSense that you see as you write code is specific to the context of the code editor, that is, specific to Windows or to Windows Phone.
5. Adding Support for Windows/Windows Phone
If you already have an existing Windows 8.1 application, you can use the Add Windows Phone 8.1 command to add a new Windows Phone 8.1 project and a shared project to the solution. A similar option is also available if you have a Windows Phone 8.1 application and you want to add support for Windows 8.1.
To add support for one type of device or another, in the Solution Explorer, right-click on the project and choose Add Windows Phone 8.1 or Add Windows 8.1.

Here, Visual Studio adds a new Windows Phone or Windows project to the solution. A shared project is also automatically created for you.
The following screenshot shows a solution after adding a Windows Phone project to an existing Windows project. The shared project that is added to the solution is initially empty.

Note that if you create an app using a universal Windows app template, the shared project already contains the App.xaml file.
Step 1: Move Files To the Shared Project
You can move any code that you want to share between apps to the shared project. For example, you can move the Common, DataModel, and Strings folders to the shared project. You can even move App.xaml to the shared project.
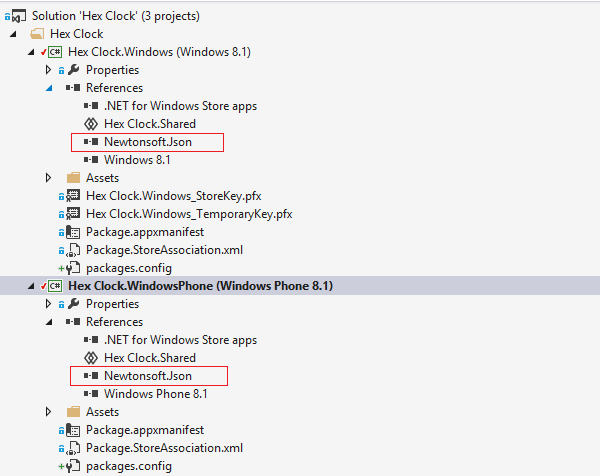
You may however receive some compiler errors about the code that you move into the shared project. You can resolve these errors by configuring your new app project to have the same set of references as your initial project.
The following screenshot shows the same assembly reference added to both projects.
If your shared code uses APIs that are specific to Windows, use the #ifdef directive with the WINDOWS_APP constant to isolate that section of code. Use the WINDOWS_PHONE_APP constant to isolate sections of code specific to Windows Phone 8.1.
Step 2: Share App.xaml
When you create a new solution for a universal Windows app, Visual Studio places App.xaml in the shared project. If you convert an existing project to a universal Windows app, you can move App.xaml to the shared project manually. You will have to set the build action property of the page to ApplicationDefinition after moving the file. Here are the steps involved:
- In the Solution Explorer, in the shared project, select the App.xaml file.
- Select the View > Properties window.
- In the Properties window, in the Build Action drop-down list, select ApplicationDefinition.
You also have to decide how you want to open the first page of your app. If you share the App.xaml file and want to use a different start page for each app, you have to add #ifdef directives as shown below.
#if WINDOWS_APP
if (!rootFrame.Navigate(typeof(HubPage)))
#endif
#if WINDOWS_PHONE_APP
if (!rootFrame.Navigate(typeof(WindowsPhoneStartPage)))
#endif
{
    throw new Exception("Failed to create initial page");
}
6. Get Started Writing a Universal Windows App
Step 1: Project Setup
Firstly, pick a project template for a universal Windows app in the New Project dialog box. The following screenshot shows the universal Windows app project templates that are currently available for C#.
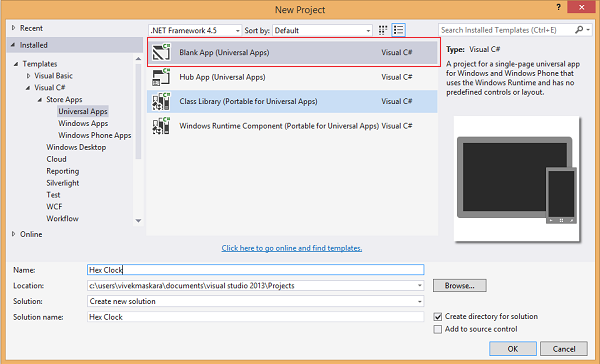
Give the project a name. I will use Hex Clock Pro for my project.
Step 2: Building the User Interface
For the most part, the user interface work takes place in the platform-specific projects, allowing you to craft a user interface that look great on PC, tablets, and phones, but that share common data, resources, components, and even view-models.
Instead of building separate user interfaces for the Windows Phone 8.1 and Windows 8.1 versions of Hex Clock Pro, I define a common design in the shared project. I just have to make a few changes in the XAML of the clock app on Tuts+ to make it work for both platforms.
<Canvas x:Name="ContentPanel" Margin="12,0,620,0" HorizontalAlignment="Center" Grid.Row="1" RenderTransformOrigin="0.5,0.5">
    <Canvas.RenderTransform>
        <CompositeTransform Rotation="-30"/>
    </Canvas.RenderTransform>
    <Canvas x:Name="TimeText" Height="315" Canvas.Left="-18" Canvas.Top="288" Width="496" RenderTransformOrigin="0.5,0.5" Opacity="0">
        <Canvas.RenderTransform>
            <CompositeTransform/>
        </Canvas.RenderTransform>
        <TextBlock x:Name="TimeHours" TextWrapping="Wrap" Text="12" Canvas.Top="24" Style="{StaticResource TimeTextStyle}" Canvas.Left="-67" Width="267" TextAlignment="Right"/>
        <TextBlock x:Name="TimeDots" Canvas.Left="204" TextWrapping="Wrap" Text=":" Style="{StaticResource TimeTextStyle}"/>
        <TextBlock x:Name="TimeMinutes" Canvas.Left="263" TextWrapping="Wrap" Text="59" Canvas.Top="24" Style="{StaticResource TimeTextStyle}" Width="257"/>
    </Canvas>
    <Rectangle x:Name="HorizontalSeparator" Height="4" Canvas.Left="-400" Canvas.Top="295" Width="1020" Fill="White"/>
    <Rectangle x:Name="VerticalSeparator" Fill="White" Height="469" Canvas.Left="213" Canvas.Top="489" Width="4"/>
    <TextBlock x:Name="ApplicationTitle" TextWrapping="Wrap" Text="HEX CLOCK PRO" Canvas.Top="271" Foreground="White" FontSize="16" Canvas.Left="18"/>
    <TextBlock x:Name="SecondsLabel" Height="36" Canvas.Left="23" TextWrapping="Wrap" Text="seconds" Canvas.Top="475" Width="166" TextAlignment="Right" Style="{StaticResource SmallTextStyle}" Margin="0"/>
    <TextBlock x:Name="TimeSeconds" Height="205" Canvas.Left="3" TextWrapping="Wrap" Text="59" Canvas.Top="505" Width="210" FontSize="186.667" RenderTransformOrigin="0.5,0.5" Opacity="0">
        <TextBlock.RenderTransform>
            <CompositeTransform/>
        </TextBlock.RenderTransform>
    </TextBlock>
    <TextBlock x:Name="DateText" Height="39" Canvas.Left="208" TextWrapping="Wrap" Text="2012/12/31" Canvas.Top="258" Width="143" FontSize="29.333" Opacity="0"/>
</Canvas>
Step 3: Sharing Code
As discussed earlier, code which is common to both platforms can be put in the shared project. Code that uses platform-specific APIs needs to be placed in one of the platform-specific projects. You can even use #ifdef directives to include platform-specific code in a shared file.
As the Hex Clock Pro app doesn't use any APIs that are platform-specific, I can put all the code in the shared project.
Hiding the Status Bar
In MainPage.xaml.cs in the shared project, we have used the #ifdef directive to isolate code specific to Windows Phone. The code enclosed within #ifdef hides the status bar on Windows Phone.
public MainPage()
{
    this.InitializeComponent();
    #if WINDOWS_PHONE_APP
    ApplicationView.GetForCurrentView().SetDesiredBoundsMode(ApplicationViewBoundsMode.UseCoreWindow);
    #endif
}
Displaying the Current Time
I have used the DispatcherTimer class to call an initial tick when the LayoutRoot grid is loaded. The timer object calls the timer_Tick function on every tick of the clock.
try
{
    DispatcherTimer timer = new DispatcherTimer();
    timer.Tick += timer_Tick;
    timer.Interval = new TimeSpan(0, 0, 0, 1);
    timer.Start();
    timer_Tick(null, null);             //Call an initial tick
}
catch { }
The timer_Tick function updates the displayed time in the app and, at the same time, it updates the background color.
Updating the Background Color
The background color is set to a hexadecimal color that corresponds to the current time.
HexColour color = new HexColour(hexTime);
SolidColorBrush bgBrush = new SolidColorBrush(Color.FromArgb(color.A, color.R, color.G, color.B));
LayoutRoot.Background = bgBrush;
An object of the HexColour class is initialized with the current time, returning the corresponding RGB values. The constructor of the HexColour class sets the A, R, G, B values for the specified color.
public HexColour(string hexCode)
{
    if (hexCode == null)
    {
        throw new ArgumentNullException("hexCode");
    }

    if (!Regex.IsMatch(hexCode, HEX_PATTERN))
    {
        throw new ArgumentException("Format must be #000000 or #FF000000 (no extra whitespace)", "hexCode");
    }

    // shave off '#' symbol
    hexCode = hexCode.TrimStart('#');

    // if no alpha value specified, assume no transparency (0xFF)
    if (hexCode.Length != LENGTH_WITH_ALPHA)
        hexCode = String.Format("FF{0}", hexCode);

    _color = new Color();
    _color.A = byte.Parse(hexCode.Substring(0, 2), NumberStyles.AllowHexSpecifier);
    if (_color.A < 50)
        _color.A = 50;
    _color.R = byte.Parse(hexCode.Substring(2, 2), NumberStyles.AllowHexSpecifier);
    _color.G = byte.Parse(hexCode.Substring(4, 2), NumberStyles.AllowHexSpecifier);
    _color.B = byte.Parse(hexCode.Substring(6, 2), NumberStyles.AllowHexSpecifier);
}
Adding Animations and Effects
I have imitated the initial animation used in the previous clock app on Tuts+ and it is initialized when the LayoutRoot is loaded.
Storyboard sb = (Storyboard)this.Resources["IntialAnimation"];
sb.BeginTime = TimeSpan.FromSeconds(0.1);
sb.Begin();
This is all we need to build the Hex Clock Pro app. The app uses 100% shared code. You just need to generate separate app packages for both platforms. The app looks very similar on Windows Phone and uses the same XAML code for its user interface.
Note that I have added all XAML and C# code in the shared project, but when I deploy either the Windows app or the Windows Phone app, the code in the shared project is merged internally with the platform-specific projects.
Conclusion
Most of the code for the Windows app and the Windows Phone app is shared, and while the user interfaces are separate, they are similar enough that building both is less work than building two user interfaces from scratch.
If I had built a Windows Phone version of Hex Clock Pro for Windows Phone 7 or 8, it would have been a lot more work since Windows Phone 7 contains no WinRT APIs and Windows Phone 8 contains only a small subset.
With Windows 10, we will see more convergence, which means one API—the WinRT API—for multiple platforms, and a high degree of fidelity between user interface elements for each platform that doesn't prevent developers from using platform-specific elements to present the best possible experience on every device. Feel free to download the tutorial's source files to use as reference. Hex Clock Pro is also available in the marketplace for Windows Phone 8.1 and Windows 8.1.

Comments