Introduction
CocoaPods is a great tool to help with dependency management when building iOS or OS X applications. Having been around and well supported for years, CocoaPods' maturity is evident. While it's very common to use CocoaPods in your iOS or OS X software projects, it's less common to actually create a pod others to use. This tutorial will walk you through creating your first pod and it will give you some tips on what characterizes a great pod.
1. Install CocoaPods
Obviously, to create a pod, you need to install CocoaPods. It’s available as a Ruby gem from RubyGems. To install CocoaPods, execute the following commands from the command line:
gem install cocoapods
This tutorial was written against CocoaPods 0.37.2.
2. Step by Step Overview
From a high level, there are five steps involved to create your first pod:
- Determine the idea for your first pod.
- Use the
pod libcommand to create the skeleton directory structure and associated files for your pod. - Update the metadata of your pod, such as its license and version information.
- Add the code for your pod. This includes both the code for the pod itself as well as any code that would be needed for an example project.
- Make the pod publicly available.
3. Podstorming
Podstorming isn’t actually a word, but it’s time to brainstorm the functionality for your first pod. There are over 10,000 publicly available pods indexed in the official Specs repository. People have found all sorts of things to make available as a pod. Here are some suggestions to help you start podstorming, err, I mean brainstorming:
-
Utility Code: Do you have a unique take on how to perform certain string manipulations? Do you have a favorite subclass that you wrote for performing a slick animation on a
UIView? Specific utility code like this is a great example of what can be turned into a pod. It’s often already well-factored and decoupled from other existing code bases. - Third Party Packages: Have you created a wrapper around another third party API? Do you have an app for which you’d like to provide hooks for other apps to integrate with, such as for authentication? Does your company provide a web API for web based resources that would be useful for other iOS apps to easily integrate with? If so, then a pod makes sense since it’s an easy way for other iOS applications to easily integrate with these packages.
- UI Components: Did you create a buttery-smooth UI widget that you’d like other applications to be able to use? These are my favorite pods. It’s great to be able to add a complicated and delightful UI component to an application by simply including a pod dependency.
- Anything that you’d like others to be able to use. Did you create something that you think others would find useful? If so, turn it into a pod so others can easily use it.
This tutorial will walk you through creating a pod that allows you to create a UILabel that blinks. We'll call it BlinkingLabel.
4. Create the Project
Time to dig in. Now that you know the functionality that your pod is going to provide, it’s time to create it. The pod lib command is an important tool that we'll use for two purposes during the creation process.
-
pod lib lintwill validate that everything is okay with your pod and that it’s ready to use by CocoaPods. -
pod lib createwill actually help give you a jump start by providing a standard directory structure with a bunch of boilerplate files necessary for a high quality pod.pod lib createisn't the only way to create your pod, but it is the easiest.
Open a Terminal window, navigate to a working directory, and execute the following command:
pod lib create BlinkingLabel
- When you're asked what language you want to use, answer Swift.
- When asked if you’d like to include a demo application, answer Yes.
- When determining whether to create a sample project or not, the CocoaPods team suggests asking yourself "Should this Pod include a screenshot?" If so, then it’s a good idea to include a sample project.
- When asked which testing framework to use, answer None.
- Answer No to the prompt regarding view based testing.
Testing is outside the scope of this tutorial, but don’t let it stop you from investigating this further after this tutorial. The ratio of tests to lines of code is a factor that is considered by the CocoaPods Quality Index.
When the scaffolding for your pod is set up, Xcode will open your brand new project ready for you to work on your pod.
5. Updating Your Pod's Metadata
There are three main pieces of metadata that need to be included with your pod:
- .podspec: This file describes information about this specific version of your pod. Your pod's, version number, homepage, and author names are some examples of what’s included. Check the official reference page for more information.
-
README: If you’ve used GitHub before, you know how important a README is. A project’s README, written in Markdown, is displayed on the homepage of a project on GitHub. A proper README can be the difference between someone using your project or not. Additionally, it’s a factor contributing to a high CocoaPods Quality Index as well.
-
LICENSE: To have your pod accepted in the Spec repository, your pod needs to include a license. The
pod lib createcommand automatically populates the LICENSE file with the MIT License and that's what we're going to use for this tutorial.
To get the .podspec in shape, open it in Xcode. You’ll find it under BlinkingLabel/Podspec Metadata/BlinkingLabel.podspec. Luckily, CocoaPods has created a well populated template for us when we executed the pod lib create command. You’re about to love that tool even more. The pod lib lint command will automatically validate the .podspec file to ensure it complies with best practices. Or, if you’re lazy, you can also use it figure out the bare minimum you need to do to create a proper .podspec file.
From the command line, in the root of the BlinkingLabel project, execute the following command:
pod lib lint BlinkingLabel.podspec
This should output the following:
> pod lib lint BlinkingLabel.podspec

 -> BlinkingLabel (0.1.0)
    - WARN  | The summary is not meaningful.
    - WARN  | The description is not meaningful.
    - WARN  | There was a problem validating the URL https://github.com/<GITHUB_USERNAME>/BlinkingLabel.

[!] BlinkingLabel did not pass validation.
You can use the `--no-clean` option to inspect any issue.
The tool tells you that there are three things that need to be fixed in the .podspec file:
- add more information to the summary
- add a proper description
- specify a URL for the pod's homepage
Here are some suggested values for these fields:
-
s.summary: A subclass on
UILabelthat provides a blink. -
s.description: This CocoaPod provides the ability to use a
UILabelthat may be started and stopped blinking. - s.homepage: https://github.com/obuseme/BlinkingLabel (replace obuseme with your GitHub username)
But wait, if you’ve been following the instructions step by step, technically there isn’t a project at that URL yet. It’s time to push your project to a public repository on GitHub. While there are other options for hosting your pods, GitHub is by far the most common.
To push your project to GitHub, browse to GitHub, login or create an account, and create a New Repository called BlinkingLabel. Then, from the command line, execute the following commands:
git add .
git commit -m “Initial Commit"
git remote add origin https://github.com/<GITHUB_USERNAME>/BlinkingLabel.git // replace <GITHUB_USERNAME> with your github.com username
git push -u origin master
At this point, if you’ve done everything correctly and lint the .podspec file again, it should pass validation.
> pod lib lint BlinkingLabel.podspec

 -> BlinkingLabel (0.1.0)

BlinkingLabel passed validation.
6. Adding Code
You now have the basic shell of a pod, but it doesn’t do anything. It’s time to add some functionality. The nifty thing about the sample project that CocoaPods created for you is that you can simultaneously write code for both the pod and the example project.
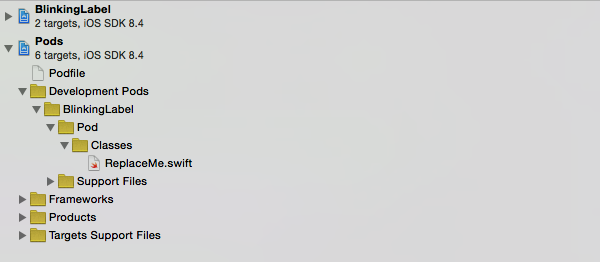
First, find the file ReplaceMe.swift under Pods/Development Pods/BlinkingLabel/Pod/Classes/ and delete it.
Next, create a new Swift file in the same directory and name it BlinkingLabel.swift. Replace the contents of the new file with the following:
public class BlinkingLabel : UILabel {
    public func startBlinking() {
        let options : UIViewAnimationOptions = .Repeat | .Autoreverse
        UIView.animateWithDuration(0.25, delay:0.0, options:options, animations: {
            self.alpha = 0
            }, completion: nil)
    }

    public func stopBlinking() {
        alpha = 1
        layer.removeAllAnimations()
    }
}
You just added functionality to your first pod, a subclass on UILabel. The subclass provides a method to make the label blink and another method to stop it from blinking.
To ensure it’s easy for other developers to understand how to use BlinkingLabel, add some sample code to the example project. Open BlinkingLabel/Example for BlinkingLabel/ViewController.swift and make it look like this:
import UIKit
import BlinkingLabel

class ViewController: UIViewController {

    var isBlinking = false
    let blinkingLabel = BlinkingLabel(frame: CGRectMake(10, 20, 200, 30))

    override func viewDidLoad() {
        super.viewDidLoad()

        // Setup the BlinkingLabel
        blinkingLabel.text = "I blink!"
        blinkingLabel.font = UIFont.systemFontOfSize(20)
        view.addSubview(blinkingLabel)
        blinkingLabel.startBlinking()
        isBlinking = true

        // Create a UIButton to toggle the blinking
        let toggleButton = UIButton(frame: CGRectMake(10, 60, 125, 30))
        toggleButton.setTitle("Toggle Blinking", forState: .Normal)
        toggleButton.setTitleColor(UIColor.redColor(), forState: .Normal)
        toggleButton.addTarget(self, action: "toggleBlinking", forControlEvents: .TouchUpInside)
        view.addSubview(toggleButton)
    }

    func toggleBlinking() {
        if (isBlinking) {
            blinkingLabel.stopBlinking()
        } else {
            blinkingLabel.startBlinking()
        }
        isBlinking = !isBlinking
    }

}
At this point, you'll see Xcode complaining with a lot of errors in ViewController.swift. This is because the pod for BlinkingLabel isn't installed on the example project yet. To do that, switch to the command line and from the root of the BlinkingLabel directory execute the following command:
> cd Example
> pod install
Analyzing dependencies
Fetching podspec for `BlinkingLabel` from `../`
Downloading dependencies
Installing BlinkingLabel 0.1.0 (was 0.1.0)
Generating Pods project
Integrating client project
Next, switch back to Xcode and select the BlinkingLabel-Example target and click the Run button.

You should see something like this:
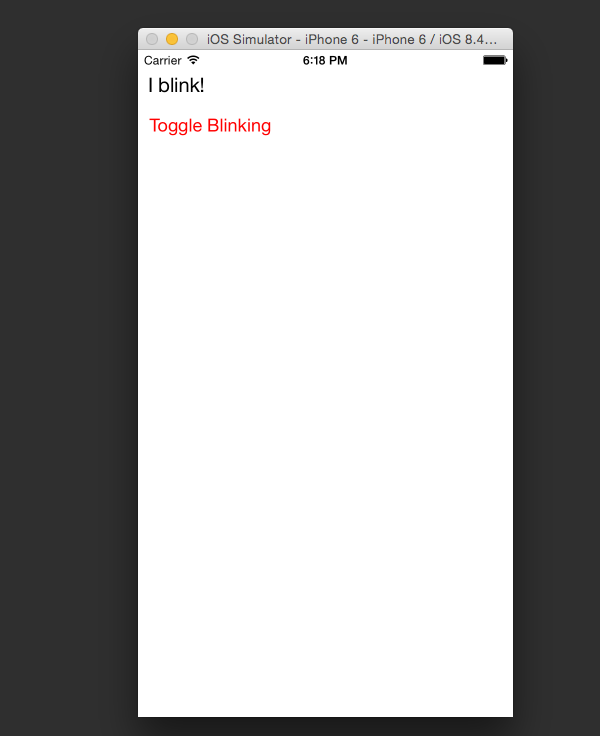
Tap Toggle Blinking to try out your new pod. The final step in creating your pod is to update the README.md. In Xcode, open README.md under BlinkingLabel/Podspec Metadata/README.md. You’ll see that CocoaPods added some default documentation for you. Don’t stop there, you can make it better. Add some documentation about the pod and include a screenshot. Remember that a README is often the first thing that someone will see when looking at your pod. It’s important that it is of high quality. Take a look at mine for some inspiration.
7. Making Your Pod Available
Now that you have a fully functional pod running on your local machine, it’s time to make BlinkingLabel available to others for inclusion in their projects. At a high level, this is accomplished by getting your new pod into the public Specs repository.
The Specs repository is the public place on GitHub where all public pods are indexed. You actually aren’t forced to use GitHub to host your pod's source code. You can also use BitBucket for example. Your pod's spec will be stored in the Specs repository on GitHub though.
It’s very simple to have your pod added to the Specs repository. There are three steps involved for submitting your pod. Don’t try these steps as I’ve already made BlinkingLabel public. They are only here to serve as a reference.
As a prerequisite, make sure your local changes to the BlinkingLabel project directory are added to git and pushed to the remote.
Step 1: Tagging
Tag your most recent commit and push it to the remote.
> git tag 0.1.0
> git push origin 0.1.0
Total 0 (delta 0), reused 0 (delta 0)
To https://github.com/obuseme/BlinkingLabel.git
 * [new tag]         0.1.0 -> 0.1.0
This step indicates that you are marking this commit as a specific release of your pod. The name of the tag should match s.version in your .podspec file. The next step will validate this.
Step 2: Validation
Next, run the following command from the command line to verify that everything is configured correctly between where your source code is stored and your .podspec file:
pod spec lint BlinkingLabel.podspec
This should output the following:
> pod spec lint BlinkingLabel.podspec
 -> BlinkingLabel (0.1.0)
Analyzed 1 podspec.
BlinkingLabel.podspec passed validation.
Step 3: Pushing to Specs Repository
Finally, push the spec to the Specs repository by executing the following command:
pod trunk push BlinkingLabel.podspec
This should output the following:
> pod trunk push BlinkingLabel.podspec
Updating spec repo `master`

Validating podspec
 -> BlinkingLabel (0.1.0)

Updating spec repo `master`

  - Data URL: https://raw.githubusercontent.com/CocoaPods/Specs/f7fb546c4b0f80cab93513fc228b274be6459ad2/Specs/BlinkingLabel/0.1.0/BlinkingLabel.podspec.json
  - Log messages:
    - June 29th, 20:40: Push for `BlinkingLabel 0.1.0' initiated.
    - June 29th, 20:40: Push for `BlinkingLabel 0.1.0' has been pushed (1.701885099 s).
8. What Makes a Great Pod?
There are literally thousands of pods available in the Specs repository. When browsing for a pod, it’s not easy to determine a pod's quality. When bringing in third party code into your project, you want to have a high level of confidence in the code that you will be shipping to customers. Historically, a developer had to make their own interpretation of the quality of a random pod that they found.
As of June 2015, CocoaPods has provided a tool called the Quality Index that provides a summarized judgement on the quality of a given pod based on certain metrics. The comprehensive and most up to date metrics can be found on GitHub.
In summary, here are things that can help improve the Quality Index of your pod:
- project popularity as measured by stars, forks, subscribers, and contributors
- code documentation
- high quality README
- written in Swift
- use of the GPL license
- not many open issues
- code quality ensured through automated tests
- lean install size by minimizing included assets
- smaller, well composed, classes
The Quality Index of a pod may either go up or down based on how well a given project conforms to these metrics.
Conclusion
Creating pods for others to use is fun and a good way to contribute back to the community. This tutorial has shown you what pieces of code make for good pods, how to create your first pod, how to make it publicly available, and what techniques can make for a great pod.
You now have the knowledge to create your first pod. I’d love to hear what pods you have in mind to build. Please come back and drop a link to your pod once it’s created.

Comments