Right now, one the most common design patterns - if not the most common design pattern - employed in web development is that of MVC (or Model/View/Controller), but as popular as it is, it's not the only way that frameworks, foundations, and other libraries for are built.
Case in point: WordPress uses the event-driven design pattern to power its hook system. And although design patterns are not mutually exclusive, you're more likely to recognize that particular pattern because it's what makes WordPress as flexible as it is.
To be clear, this doesn't mean that other patterns aren't in use throughout its codebase (or any other application's codebase), they just may not be as easily recognizable.
On top of that, one of the things that professional developers strive for is writing maintainable code. But as a codebase ages and more and more people get their work into the codebase, it becomes increasingly difficult to keep the same level of organization, clarity, and maintainability consistent as a project ages.
All of the above ideas apply to WordPress whether you're working on themes, plugins, extensions, or some other type of project. The thing is, it's important to make sure that you're following the coding standards and conventions set forth for creating these projects.
Let's say that you're working on a plugin that introduces a custom meta box; however, it's not enough to introduce a meta box. Instead, there are going to be creating groups of related options.
This is where it starts to get a bit more challenging. Throughout this series, we're going to take at one way that we can write maintainable code in WordPress through an example plugin that introduces meta boxes, various options, and tabbed navigation in the WordPress dashboard.
Organizing Meta Boxes
When you're in the process of planning out how to plan the options for your meta boxes, you have a couple of options that are available:
- Introduce a single meta box per option
- Introduce a single meta box with tabs that logically group each options
For those who have used WordPress for an extensive amount of time, then you're likely familiar with seeing tabbed navigation in the dashboard at least in some capacity. For those who are curious as how how to implement this not only programmatically, but in a maintainable manner, we're going to be looking at how to do this through out this series.
Specifically, we're going to be writing a small WordPress plugin that introduces a few fields, related options that are grouped by tabs, and then we're going to introduce a few more elements to show how to properly and secure save, sanitize, and retrieve the data.
Where We're Headed
As with the majority of the posts in series that I write, I like to try to outline what we're going to do at a high-level before we actually jump into code. This helps to provide a conceptual foundation of where we are headed and helps to outline the upcoming series of articles as well as what we're going to be doing at the code level.
If nothing else, it provides a place to refer to as we continue to progress throughout the series.
Before looking at the outline, the thing I want to mention is that the most important takeaway of this specific article is going to be noticing the separation of concerns as well as why we've opted to do things the way that we've done so we understand how it helps with maintainability.
To that end, here's what we're looking at over the next few articles:
- Laying the groundwork for the plugin
- Defining all of the options and organizing them into tabs
- Cleanly implementing each of the options and tabs along with security measures
- Seeing it all in action
As with anything in development, breaking things down into more smaller components is absolutely key so for the remainder of this post we're going to look at the steps that are needed in order for us to begin working on a plugin that introduces a meta box into the standard 'Post' post type.
The Plugin's Skeleton
Before going any further, let's setup our plugin's directory. This should include the following:
- A file to bootstrap the plugin
- The main plugin class
- Understanding of how the initial files are organized
- A blank
README
And, obviously, we should make sure that the directories are well organized and that the code is clear.
In order to make this at least somewhat practical, we're going to be calling this plugin "Author's Commentary" which allows us to share a few candid notes about what we thought, used, and jotted down while writing the post.
We can opt to make it public in a future post based on your feedback, but for now we'll plan just to leave it in the backend.
With that said, let's get started.
Getting Started with Author's Commentary
Prepare The Directory
The thing that that we need to do is to stub out the directory structure that we'll be using for the project. You'll see a screenshot for this below after which I'll describe the purpose of each directory.
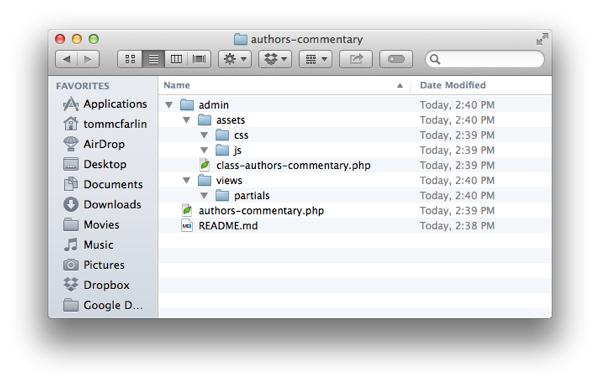
The root of the directory includes two files:
-
README.mdwhich is the standardREADMEthat comes with a WordPress plugin. -
authors-commentary.phpwhich is responsible for actually starting the plugin. This is the bootstrap file.
Next, we have the admin directory. This directory includes:
-
assetswhich includes subdirectories for both our JavaScript and CSS files (we'll be using vanilla CSS throughout this series. -
class-authors-commentary.phpwhich is going to be the primarily class than encapsulates much of our functionality. -
viewswhich includes a subdirectory namedpartials. Theviewsdirectory will be responsible for rendering the tabs and including all of the content for each tab based on the partial. That is, thepartialsdirectory include the content for each tab.
Note that we may be adding additional directories for the plugin as the series progresses. That is, this structure is subject to change in that we'll likely be adding or even moving a little bit of content based on how the plugin progresses, but this is the basic structure that we need to get started.
Create The Files
Since we've got the basic directory structure laid out and the necessary files in place, we're ready to begin stubbing out some of the code. Note that although the plugin will be functional from an activation point of view, it won't actually be doing anything until we begin adding code in the next set of articles.
With that said, we'll go ahead and populate the files that are necessary to get the plugin up and running in the WordPress dashboard.
The first thing that we need to do is populate the header of the plugin so that it includes the necessary documentation block for WordPress to display the plugin in the dashboard:
<?php
/**
 * The plugin bootstrap file
 *
 * This file is responsible for starting the plugin using the main plugin
 * class file.
 *
 * @link              http://.tutsplus.com/tutorials/creating-maintainable-wordpress-meta-boxes--cms-22189
 * @since             0.1.0
 * @package           Author_Commentary
 *
 * @wordpress-plugin
 * Plugin Name:       Author Commentary
 * Plugin URI:        http://.tutsplus.com/tutorials/creating-maintainable-wordpress-meta-boxes--cms-22189
 * Description:       Allows authors to keep notes and track information and resources when drafting posts.
 * Version:           0.1.0
 * Author:            Tom McFarlin
 * Author URI:        http://tommcfarlin.com
 * License:           GPL-2.0+
 * License URI:       http://www.gnu.org/licenses/gpl-2.0.txt
 * Text Domain:       author-commentary
 */

// If this file is called directly, abort.
if ( ! defined( 'WPINC' ) ) {
    die;
}
The final conditional makes sure that if anyone tries to access the file directly, that the script will abort execution.
Next, we need to make sure that the core plugin file that we started above is aware of the primary class that we created in the previous step. To do this, we just need a simple require_once statement.
But before we call require_once, we need a file to include, right? To that end, let's hop into the admin subdirectory and in the class-author-commentary.php class, we'll add the following code.
The comments are self-explanatory, but I'll make sure to outline everything that's going on after the block of code has been completed:
<?php

/**
 * The dashboard-specific functionality of the plugin.
 *
 * @link       http://tutsplus.com/tutorials/creating-maintainable-wordpress-meta-boxes--cms-22189
 * @since      1.0.0
 *
 * @package    Author_Commentary
 * @subpackage Author_Commentary/admin
 */

/**
 * The dashboard-specific functionality of the plugin.
 *
 * Defines the plugin name, version, and two examples hooks for how to
 * enqueue the dashboard-specific stylesheet and JavaScript.
 *
 * @package    Author_Commentary
 * @subpackage Author_Commentary/admin
 * @author     Tom McFarlin <[email protected]>
 */
class Author_Commentary_Admin {

    /**
	 * The ID of this plugin.
	 *
	 * @since    0.1.0
	 * @access   private
	 * @var      string    $name    The ID of this plugin.
	 */
	private $name;

	/**
	 * The version of this plugin.
	 *
	 * @since    0.1.0
	 * @access   private
	 * @var      string    $version    The current version of this plugin.
	 */
	private $version;

	/**
	 * Initialize the class and set its properties.
	 *
	 * @since    0.1.0
	 * @var      string    $name       The name of this plugin.
	 * @var      string    $version    The version of this plugin.
	 */
	public function __construct( $name, $version ) {

		$this->name = $name;
		$this->version = $version;

	}

}
Notice that in the code above, all we've really done - aside from provide documentation for our class, properties, and constructor - is setup a constructor that accepts a $name and a $version parameter.
These will be useful later when we're importing JavaScript dependencies and stylesheets. For now, however, this is all we need to get started.
With that done, we can return to authors-commentary.php and write the code for starting up the plugin.
First, we'll use require_once to import the class that we've just created:
<?php

/**
 * The core plugin class that is used to define the meta boxes, their tabs,
 * the views, and the partial content for each of the tabs.
 */
require_once plugin_dir_path( __FILE__ ) . 'admin/class-authors-commentary.php';
Then we'll setup a simple function and a function call to kick off the process:
<?php

/**
 * Begins execution of the plugin.
 *
 * Everything for this particular plugin will be done so from within the
 * Author_Commentary/admin subpackage. This means that there is no reason to setup
 * any hooks until we're in the context of the Author_Commentary_Admin class.
 *
 * @since    0.1.0
 */
function run_author_commentary() {
    $author_commentary = new Author_Commentary_Admin( 'acme-plugin-name', '0.1.0' );
}
run_author_commentary();
Notice that we don't define any hooks in this file. Everything is eventually going to reside in the subpackage - this helps us separate our concerns more effectively thus making the code more maintainable, and it allows for us to keep our code an object-oriented as possible.
Notice that this defines a simple function that, when called as soon as the plugin is activated, creates an instance of the Author_Commentary_Admin class after passing in the necessary $name and $version parameters.
Laying The Groundwork
At this point, all of the groundwork has been laid that will help us to move forward with working on our plugin. You should be able to download the file from GitHub, install it in WordPress, and activate it.
Again, this won't actually display anything, but it prepares the code base for the work that we'll be beginning in the next article.
If you have any questions above the code above or where the series is headed, don't hesitate to leave a comment; otherwise, I look forward to seeing you in the next installment.

Comments