When building complex applications, you'll often want to reuse the same group of views in various places of the application. One way to solve this problem is by creating a view that encapsulates the logic and layout of a group of views so you can reuse them without duplicating code in various places of the project. In this tutorial, you'll learn how to use compound views to create custom views that are easily reusable.
1. Introduction
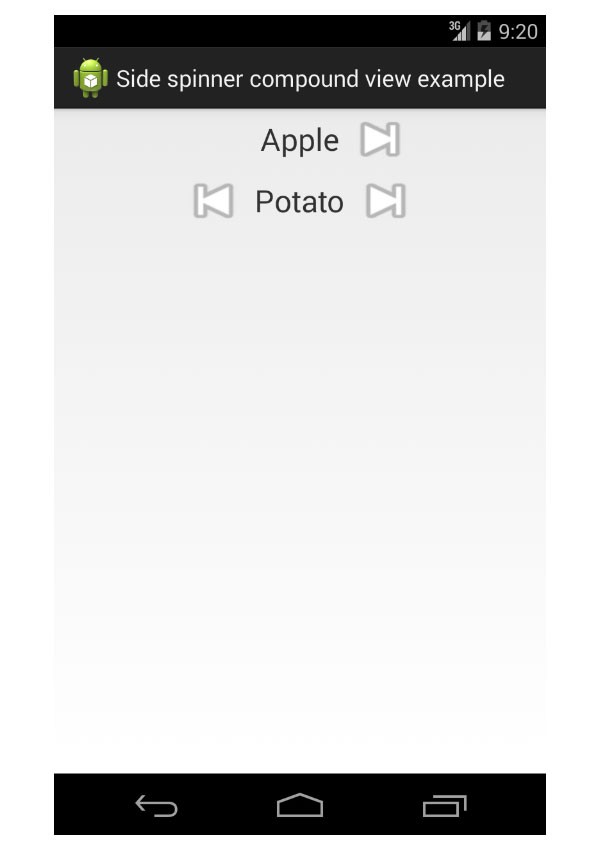
On Android, a view composed of a group of views is called a compound view or a compound component. In this tutorial, you'll build a control to select a value from a list that scrolls from side to side. We'll name the compound a side spinner since the default view of the Android SDK to pick a value from a list is called a spinner. The following screenshot illustrates what we'll be creating in this tutorial.
2. Project Setup
To get started, you must create a new Android project with Android 4.0 as the minimum required SDK level. This project should only contain a blank activity called MainActivity. The Activity does nothing more than initializing the layout as you can see in the following code snippet.
public class MainActivity extends Activity {
   @Override
   protected void onCreate(Bundle savedInstanceState) {
      super.onCreate(savedInstanceState);
      setContentView(R.layout.activity_main);
   }
}
The layout for MainActivity is located in the /res/layout/activity_main.xml file and it should only only contain an empty RelativeLayout in which the compound view will be displayed later.
<RelativeLayout
    xmlns:android="http://schemas.android.com/apk/res/android"
    xmlns:tools="http://schemas.android.com/tools"
    android:layout_width="match_parent"
    android:layout_height="match_parent"
    tools:context=".MainActivity">
</RelativeLayout>
3. Create a Compound View
To create a compound view, you must create a new class that manages the views in the compound view. For the side spinner, you need two Button views for the arrows and a TextView view to display the selected value.
To get started, create the /res/layout/sidespinner_view.xml layout file that we'll use for the side spinner class, making sure to wrap the three views in a <merge> tag.
<merge xmlns:android="http://schemas.android.com/apk/res/android">
    <Button
        android:id="@+id/sidespinner_view_previous"
        android:layout_width="wrap_content"
        android:layout_height="wrap_content"
        android:layout_toLeftOf="@+id/sidespinner_view_value"/>
   <TextView
        android:id="@+id/sidespinner_view_current_value"
        android:layout_width="wrap_content"
        android:layout_height="wrap_content"
        android:textSize="24sp" />
   <Button
        android:id="@+id/sidespinner_view_next"
        android:layout_width="wrap_content"
        android:layout_height="wrap_content" />
</merge>
Next, we need to create the SideSpinner class that inflates this layout and sets the arrows as the background images for the buttons. At this point, the compound view doesn't do anything since there is nothing to show yet.
public class SideSpinner extends LinearLayout {

   private Button mPreviousButton;
   private Button mNextButton;

   public SideSpinner(Context context) {
      super(context);
      initializeViews(context);
   }

   public SideSpinner(Context context, AttributeSet attrs) {
      super(context, attrs);
      initializeViews(context);
   }

   public SideSpinner(Context context,
                      AttributeSet attrs,
                      int defStyle) {
      super(context, attrs, defStyle);
      initializeViews(context);
   }

   /**
    * Inflates the views in the layout.
    *
    * @param context
    *           the current context for the view.
    */
   private void initializeViews(Context context) {
      LayoutInflater inflater = (LayoutInflater) context
            .getSystemService(Context.LAYOUT_INFLATER_SERVICE);
      inflater.inflate(R.layout.sidespinner_view, this);
   }

   @Override
   protected void onFinishInflate() {
      super.onFinishInflate();

      // Sets the images for the previous and next buttons. Uses
      // built-in images so you don't need to add images, but in
      // a real application your images should be in the
      // application package so they are always available.
      mPreviousButton = (Button) this
        .findViewById(R.id.sidespinner_view_previous);
      mPreviousButton
        .setBackgroundResource(android.R.drawable.ic_media_previous);

      mNextButton = (Button)this
                       .findViewById(R.id.sidespinner_view_next);
      mNextButton
        .setBackgroundResource(android.R.drawable.ic_media_next);
   }
}
You'll notice that the compound view extends the LinearLayout view group. This means that any layout using the compound view has access to the attributes of the linear layout. As a result, the layout for the compound view is a bit different than usual, the root tag is a <merge> tag instead of the tag for a view group like <LinearLayout> or <RelativeLayout>.
When you add the compound view to the layout of MainActivity, the tag for the compound view will act as a <LinearLayout> tag. A compound view class can derive from any class deriving from ViewGroup, but in this case the linear layout is the most appropriate since the views are laid out horizontally.
4. Add the Compound View to a Layout
At this point, the project compiles but nothing is visible since the compound view is not in the layout of MainActivity. The side spinner view must be added to the layout of the activity like any other view. The name of the tag is the full name of the SideSpinner class, including the namespace.
To add the side spinner to MainActivity, add the following to the relative layout in the /res/layout/activity_main.xml file.
<com.cindypotvin.sidespinnerexample.SideSpinner
   android:id="@+id/sidespinner_fruits"
   android:layout_width="match_parent"
   android:layout_height="wrap_content"
   android:orientation="horizontal"
   android:gravity="center"/>
The attributes available in the <SideSpinner> tag are attributes of the linear layout since the SideSpinner class we created extends the LinearLayout class. If you launch the project, the side spinner should be visible, but it doesn't contain any values yet.
5. Add Methods to the Compound View
There are still a few things missing if we want to actually use the side spinner. We should be able to add new values to the spinner, select a value, and get the selected value.
The easiest way to add new behaviors to a compound view is to add new public methods to the SideSpinner class. These methods can be used by any Activity that has a reference to the view.
private CharSequence[] mSpinnerValues = null;
private int mSelectedIndex = -1;

/**
 * Sets the list of value in the spinner, selecting the first value
 * by default.
 *
 * @param values
 *           the values to set in the spinner.
 */
public void setValues(CharSequence[] values) {
   mSpinnerValues = values;

   // Select the first item of the string array by default since
   // the list of value has changed.
   setSelectedIndex(0);
}

/**
 * Sets the selected index of the spinner.
 *
 * @param index
 *           the index of the value to select.
 */
public void setSelectedIndex(int index) {
   // If no values are set for the spinner, do nothing.
   if (mSpinnerValues == null || mSpinnerValues.length == 0)
      return;

   // If the index value is invalid, do nothing.
   if (index < 0 || index >= mSpinnerValues.length)
      return;

   // Set the current index and display the value.
   mSelectedIndex = index;
   TextView currentValue;
   currentValue = (TextView)this
                  .findViewById(R.id.sidespinner_view_current_value);
   currentValue.setText(mSpinnerValues[index]);

   // If the first value is shown, hide the previous button.
   if (mSelectedIndex == 0)
      mPreviousButton.setVisibility(INVISIBLE);
   else
      mPreviousButton.setVisibility(VISIBLE);

   // If the last value is shown, hide the next button.
   if (mSelectedIndex == mSpinnerValues.length - 1)
      mNextButton.setVisibility(INVISIBLE);
   else
      mNextButton.setVisibility(VISIBLE);
}

/**
 * Gets the selected value of the spinner, or null if no valid
 * selected index is set yet.
 *
 * @return the selected value of the spinner.
 */
public CharSequence getSelectedValue() {
   // If no values are set for the spinner, return an empty string.
   if (mSpinnerValues == null || mSpinnerValues.length == 0)
      return "";

   // If the current index is invalid, return an empty string.
   if (mSelectedIndex < 0 || mSelectedIndex >= mSpinnerValues.length)
      return "";

   return mSpinnerValues[mSelectedIndex];
}

/**
 * Gets the selected index of the spinner.
 *
 * @return the selected index of the spinner.
 */
public int getSelectedIndex() {
   return mSelectedIndex;
}
The onFinishInflate method of the compound view is called when all the views in the layout are inflated and ready to use. This is the place to add your code if you need to modify views in the compound view.
With the methods you just added to the SideSpinner class, behavior for the buttons selecting the previous and next value can now be added. Replace the existing code in the onFinishInflate method with the following:
@Override
protected void onFinishInflate() {

   // When the controls in the layout are doing being inflated, set
   // the callbacks for the side arrows.
   super.onFinishInflate();

   // When the previous button is pressed, select the previous value
   // in the list.
   mPreviousButton = (Button) this
      .findViewById(R.id.sidespinner_view_previous);
   mPreviousButton
      .setBackgroundResource(android.R.drawable.ic_media_previous);

   mPreviousButton.setOnClickListener(new OnClickListener() {
      public void onClick(View view) {
         if (mSelectedIndex > 0) {
            int newSelectedIndex = mSelectedIndex - 1;
            setSelectedIndex(newSelectedIndex);
         }
      }
   });

   // When the next button is pressed, select the next item in the
   // list.
   mNextButton = (Button)this
                    .findViewById(R.id.sidespinner_view_next);
   mNextButton
      .setBackgroundResource(android.R.drawable.ic_media_next);
   mNextButton.setOnClickListener(new OnClickListener() {
      public void onClick(View view) {
         if (mSpinnerValues != null
               && mSelectedIndex < mSpinnerValues.length - 1) {
            int newSelectedIndex = mSelectedIndex + 1;
            setSelectedIndex(newSelectedIndex);
         }
      }
   });

   // Select the first value by default.
   setSelectedIndex(0);
}
With the newly created setValues and setSelectedIndex methods, we can now initialize the side spinner from our code. As with any other view, you need to find the side spinner view in the layout with the findViewById method. We can then call any public method on the view from the object returned, including the ones we just created.
The following code snippet shows how to update the onCreate method of the MainActivity class to show a list of values in the side spinner, using the setValues method. We can also select the second value in the list by default by invoking the setSelectedIndex method.
public class MainActivity extends Activity {

   @Override
   protected void onCreate(Bundle savedInstanceState) {
      super.onCreate(savedInstanceState);
      setContentView(R.layout.activity_main);

      // Initializes the side spinner from code.
      SideSpinner fruitsSpinner;
      fruitsSpinner = (SideSpinner)this
                         .findViewById(R.id.sidespinner_fruits);

      CharSequence fruitList[] = { "Apple",
                                   "Orange",
                                   "Pear",
                                   "Grapes" };
      fruitsSpinner.setValues(fruitList);
      fruitsSpinner.setSelectedIndex(1);
   }
}
If you launch the application the side spinner should work as expected. The list of values is shown and the value Orange is selected by default.
6. Add Layout Attributes to the Compound View
The views available in the Android SDK can be modified through code, but some attributes can also be set directly in the corresponding layout. Let's add an attribute to the side spinner that sets the values the side spinner needs to display.
To create a custom attribute for the compound view, we first need to define the attribute in the /res/values/attr.xml file. Every attribute of the compound view should be grouped in a styleable with a <declare-styleable> tag. For the side spinner, the name of the class is used as shown below.
<resources>
  <declare-styleable name="SideSpinner">
    <attr name="values" format="reference" />
  </declare-styleable>
</resources>
In the <attr> tag, the name attribute contains the identifier used to refer to the new attribute in the layout and the format attribute contains the type of the new attribute.
For the list of values, the reference type is used since the attribute will refer to a list of strings defined as a resource. The value types that are normally used in layouts can be used for your custom attributes, including boolean, color, dimension, enum, integer, float and string.
Here is how to define the resource for a list of strings that the values attribute of the side spinner will refer to. It must be added to the /res/values/strings.xml file as shown below.
<resources>
    <string-array name="vegetable_array">
        <item>Cucumber</item>
        <item>Potato</item>
        <item>Tomato</item>
        <item>Onion</item>
        <item>Squash</item>
    </string-array>
</resources>
To test the new values attribute, create a side spinner view in the MainActivity layout below the existing side spinner. The attribute must be prefixed with a namespace added to the RelativeLayout, such as xmlns:sidespinner="http://schemas.android.com/apk/res-auto". This is what the final layout in /res/layout/activity_main.xml should look like.
<RelativeLayout
    xmlns:android="http://schemas.android.com/apk/res/android"
    xmlns:tools="http://schemas.android.com/tools"
    xmlns:sidespinner="http://schemas.android.com/apk/res-auto"
    android:layout_width="match_parent"
    android:layout_height="match_parent"
    tools:context=".MainActivity">
    <com.cindypotvin.sidespinnerexample.SideSpinner
      android:id="@+id/sidespinner_fruits"
      android:layout_width="match_parent"
      android:layout_height="wrap_content"
      android:orientation="horizontal"
      android:gravity="center"/>

     <com.cindypotvin.sidespinnerexample.SideSpinner
      android:id="@+id/sidespinner_vegetables"
      android:layout_width="match_parent"
      android:layout_height="wrap_content"
      android:orientation="horizontal"
      android:gravity="center"
      android:layout_below="@id/sidespinner_fruits"
      sidespinner:values="@array/vegetable_array" />
</RelativeLayout>
Finally, the SideSpinner class need to be modified to read the values attribute. The value of every attribute of the view is available in the AttributeSet object that is passed in as a parameter of the view's constructor.
To get the value of your custom values attribute, we first call the obtainStyledAttributes method of the AttributeSet object with the name of the styleable containing the attribute. This returns the list of attributes for that styleable as a TypedArray object.
We then call the getter method of the TypedArray object that has the right type for the attribute you want, passing the identifier of the attribute as a parameter. The following code block shows how to modify the constructor of the side spinner to get the list of values and set them in the side spinner.
public SideSpinner(Context context) {
   super(context);

   initializeViews(context);
}

public SideSpinner(Context context, AttributeSet attrs) {
   super(context, attrs);

   TypedArray typedArray;
   typedArray = context
             .obtainStyledAttributes(attrs, R.styleable.SideSpinner);
   mSpinnerValues = typedArray
                       .getTextArray(R.styleable.SideSpinner_values);
   typedArray.recycle();

   initializeViews(context);
}

public SideSpinner(Context context,
                   AttributeSet attrs,
                   int defStyle) {
   super(context, attrs, defStyle);

   TypedArray typedArray;
   typedArray = context
             .obtainStyledAttributes(attrs, R.styleable.SideSpinner);
   mSpinnerValues = typedArray
                       .getTextArray(R.styleable.SideSpinner_values);
   typedArray.recycle();

   initializeViews(context);
}
If you launch the application, you should see two side spinners that work independently from one another.
7. Save and Restore State
The last step we need to complete is saving and restoring the state of the compound view. When an activity is destroyed and recreated, for example, when the device is rotated, the values of native views with a unique identifier are automatically saved and restored. This currently isn't true for the side spinner.
The state of the views isn't saved. The identifiers of the views in the SideSpinner class are not unique since it can be reused many times. This means that we are responsible for saving and restoring the values of the views in the compound view. We do this by implementing the onSaveInstanceState, onRestoreInstanceState, and dispatchSaveInstanceState methods. The following code block shows how to do this for the side spinner.
/**
 * Identifier for the state to save the selected index of
 * the side spinner.
 */
private static String STATE_SELECTED_INDEX = "SelectedIndex";

/**
 * Identifier for the state of the super class.
 */
private static String STATE_SUPER_CLASS = "SuperClass";

@Override
protected Parcelable onSaveInstanceState() {
   Bundle bundle = new Bundle();

    bundle.putParcelable(STATE_SUPER_CLASS,
                         super.onSaveInstanceState());
    bundle.putInt(STATE_SELECTED_INDEX, mSelectedIndex);

    return bundle;
}

@Override
protected void onRestoreInstanceState(Parcelable state) {
    if (state instanceof Bundle) {
        Bundle bundle = (Bundle)state;

        super.onRestoreInstanceState(bundle
                                 .getParcelable(STATE_SUPER_CLASS));
        setSelectedIndex(bundle.getInt(STATE_SELECTED_INDEX));
    }
    else
       super.onRestoreInstanceState(state);
}

@Override
protected void dispatchSaveInstanceState(SparseArray<Parcelable> container) {
    // Makes sure that the state of the child views in the side
    // spinner are not saved since we handle the state in the
    // onSaveInstanceState.
    super.dispatchFreezeSelfOnly(container);
}

@Override
protected void dispatchRestoreInstanceState(SparseArray<Parcelable> container) {
    // Makes sure that the state of the child views in the side
    // spinner are not restored since we handle the state in the
    // onSaveInstanceState.
    super.dispatchThawSelfOnly(container);
}
Conclusion
The side spinner is now complete. Both side spinners work as expected and their values are restored if the activity is destroyed and recreated. You can now apply what you've learned to reuse any group of views in an Android application by using compound views.

Comments