A little while ago I wrote about the recent updates to the Brackets editor. Brackets is an open source project focused on web standards and built with web technologies. It has a narrow focus and therefore may not have a particular feature you've come to depend upon. Luckily, Brackets ships with a powerful extension API that lets you add any number of new features. In this article, I'm going to discuss this API and demonstrate how you can build your own extensions.
It is crucial that you remember that Brackets is in active development. This article is being written in December of 2013. It is certainly possible that the code demonstrated below is now out of date. Keep that in mind and be sure to check the wiki for the latest updates to the extension API.
Getting Started
I'm going to assume you read my last article and are already familiar with the extension manager. This provides a simple, one click method of installing extensions. One of the best ways you can learn to write extensions is by looking at the work done by others (that's how I learned). I'd recommend grabbing a few extensions (there's almost 200 available now) and tearing apart their code. Don't be afraid to break a few while you're at it.
Brackets puts all installed extensions within one main folder. To find that folder, go to the Help menu and select "Show Extensions Folder". For my OS X install, this was located at /Users/ray/Library/Application Support/Brackets/extensions/user. If you go up from that folder, you'll notice a disabled folder as well. Brackets will make a valiant effort to load no matter what, but if you ever find yourself in a situation where Brackets has completely crapped the bed and simply will not work, consider moving potentially bad extensions into the disabled folder. Later on in the article, I'll discuss how you can monitor and debug extensions to help prevent such problems in the first place.
Begin by going to your user folder and creating a new folder, helloworld1. Yes, even though it is completely lame, we're going to build a HelloWorld extension. Don't hate me, I like simple. Inside that folder create a new file called main.js. Listing one shows what the contents of this file should be. Note that in this article I'll go through a couple of different iterations of the helloworld extension. Each one will be named with a progressively higher number. So our first example is from helloworld1, the next helloworld2, and so on. It would make sense for you to simply copy the code into one folder, helloworld, instead of copying each one by themselves. If you do, you'll have multiple related extensions running at once and that can definitely confuse things.
Listing 1: helloworld1/main.js
define(function(require, exports, module) {

    function log(s) {
            console.log("[helloworld] "+s);
    }

    log("Hello from HelloWorld.");
});
The first line defines our extension as a module that will be picked up by Brackets automatically on application load. The rest of the extension is a custom log message (you will see why in a second) and a call to that logger. Once you have this file saved, go back to Brackets, select the Debug menu, and hit Reload. (You can also use Command/Control+R to reload as well.)
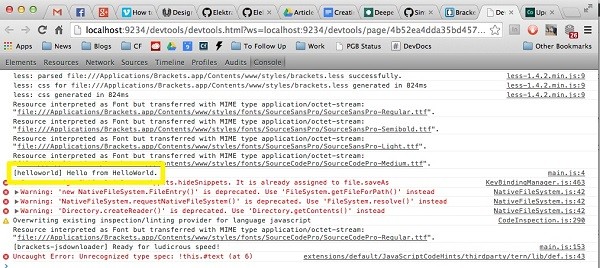
Brackets will reload and ... nothing else will happen. The extension we built didn't actually do anything that we could see, but it did log to the console. But where is that console? Brackets provides an easy way to view the console. Simply go back to the Debug menu and select Show Developer Tools. This will open a new tab in Chrome with a familiar Dev Tools UI. In the screen shot below I've highlighted our log. Other extensions, and Brackets itself, will also log messages to this screen. By prefixing my log messages with [helloworld], I can make my own stuff a bit easier to find.
Note that the full Chrome console.api works here. You can do stuff like this to format your console messages:
function log(s) {
    console.log("%c[helloworld] "+s,"color:blue;font-size:large");
}
Go crazy, but try to remove these messages before you share your code with the rest of the world. In case you're curious, you can't use dev tools in another browser, like Firefox, at this time.
Integration Points
Now that you know the (very) basics, let's talk about what Brackets extensions can do to the editor:
- They can create keyboard shortcuts, allowing them to respond to custom keystrokes.
- They can add to the top level menu.
- They can add context menus (and to a specific area, like the file listing or the editor window).
- They can create UI items. This can be a modal dialog or even a panel. (Currently the panel is locked to the bottom of the screen).
- They can create a linting provider (essentially they can register themselves as a code checker for a file type).
- They can create their own inline editors (a major feature of Brackets).
- They can register as a documentation provider (for example, adding MDN support for docs).
- They can integrate with Quick Find and Quick Open.
- They can add custom code hints and syntax colors.
- They can read the current file open in the editor as well as modify it. (They can also see the current selected text, if any.)
That describes how extensions can modify Brackets, but what can extensions actually do in terms of code? Keeping in mind that you're writing extensions in pure web standards (HTML, JavaScript, and CSS), you actually have quite a bit of power. The only real limits relate to binary data. There is a File system API that gives you control over files but is limited to text data only. Luckily, you have a way out.
Any Brackets extension can integrate with Node.js. If you've got an existing Node.js package your extension can make calls to it and do, well, whatever Node.js can do, which is essentially anything.
Let's update our extension to integrate with the editor a bit better. I'll start by simply adding a menu item for the extension.
Listing 2: helloworld2/main.js
/*
Based - in part - on the HelloWorld sample extension on the Brackets wiki:
https://github.com/adobe/brackets/wiki/Simple-%22Hello-World%22-extension
*/
define(function(require, exports, module) {

    var CommandManager = brackets.getModule("command/CommandManager"),
            Menus = brackets.getModule("command/Menus"),
            AppInit = brackets.getModule("utils/AppInit");


    function log(s) {
            console.log("[helloworld2] "+s);
    }


    function handleHelloWorld() {
            alert("You ran me, thanks!");
    }


    AppInit.appReady(function () {

            log("Hello from HelloWorld2.");

            var HELLOWORLD_EXECUTE = "helloworld.execute";

            CommandManager.register("Run HelloWorld", HELLOWORLD_EXECUTE, handleHelloWorld);

            var menu = Menus.getMenu(Menus.AppMenuBar.VIEW_MENU);
            menu.addMenuItem(HELLOWORLD_EXECUTE);

    });

});
We've got a few changes here so let's tackle them one by one. You'll notice that the extension begins with three calls to brackets.getModule. All extensions have access to a brackets object that provides an API where we can load in core functionality from the editor. In this case the extension has loaded two libraries we'll need for the menu (CommandManager and Menus) and one which will be used to help initialize the extension (AppInit).
Lets talk about AppInit. You can see that most of the extension is now loaded with a appReady callback. This callback is fired when Brackets has completed loading and is generally considered "best practice" for extensions to make use of.
Registering a menu item takes a few steps. I begin by defining a "command ID", a unique identifier for the item I'll be adding to the UI. The typical way to do this is with the format extensionname.someaction. In my case, I used helloworld.execute. I can then register this command along with the function (handleHelloWorld) that should be called when the command is fired.
The final step is to add this command to the menu. You can probably guess that my menu item will be added under the View menu based on this value: Menus.AppMenuBar.VIEW_MENU. How did I know that value? Simple, I saw other extensions do it. Seriously though, there is no specific list of items like this yet. Don't forget that Brackets is open source. I can easily pop over to the GitHub repo and check it out. In this case, the file is Menus.js, located on Github. In there I can see where the various different core menus are defined:
/**
  * Brackets Application Menu Constants
  * @enum {string}
*/
var AppMenuBar = {
     FILE_MENU       : "file-menu",
     EDIT_MENU       : "edit-menu",
     VIEW_MENU       : "view-menu",
     NAVIGATE_MENU   : "navigate-menu",
     HELP_MENU       : "help-menu"
};
As a general rule of thumb, it makes sense to have at least a cursory understanding of what's available in Brackets itself. Your extensions will, from time to time, make use of multiple different features so it's definitely in your best interest to at least know the lay of the land.
After reloading Brackets, you'll now see the menu item in the View menu. Exactly where it is may be a bit random as you may have other extensions installed.

You can actually be a bit more specific about your position. Again, this is where the source code will help you. The same file I linked to above also contains the addMenuItem definition.
Put Some Lipstick on That Pig
Now that you've seen a simple example of how an extension can integrate into Brackets, let's look at how we update the UI. In the previous version of our code, an alert was used to send a message. While this works, it isn't very pretty. Your code can access the Brackets editor just like any other DOM modification code. While you can do anything you want, there are a few standard ways extensions update the UI in Brackets. (As a warning, in general you do not want to touch the DOM of the main editor UI. You can, but with future updates, your code may break. Also, users may not be happy if your extension changes something core to Brackets.)
The first method we'll look at uses modal dialogs. Brackets already uses this and has an API available for extensions to call. As a simple example, let's just update the HelloWorld extension to use a modal instead.
Listing 3: helloworld3/main.js
/*
Based - in part - on the HelloWorld sample extension on the Brackets wiki:
https://github.com/adobe/brackets/wiki/Simple-%22Hello-World%22-extension
*/
define(function(require, exports, module) {

    var CommandManager = brackets.getModule("command/CommandManager"),
        Menus = brackets.getModule("command/Menus"),
        Dialogs = brackets.getModule("widgets/Dialogs"),
        DefaultDialogs = brackets.getModule("widgets/DefaultDialogs"),
        AppInit = brackets.getModule("utils/AppInit");

    function log(s) {
            console.log("[helloworld3] "+s);
    }

    function handleHelloWorld() {
        Dialogs.showModalDialog(DefaultDialogs.DIALOG_ID_INFO, "Hello World", "Same Important Message");
    }

    AppInit.appReady(function () {

        log("Hello from HelloWorld3.");

        var HELLOWORLD_EXECUTE = "helloworld.execute";

        CommandManager.register("Run HelloWorld", HELLOWORLD_EXECUTE, handleHelloWorld);

        var menu = Menus.getMenu(Menus.AppMenuBar.VIEW_MENU);
        menu.addMenuItem(HELLOWORLD_EXECUTE);

    });

});
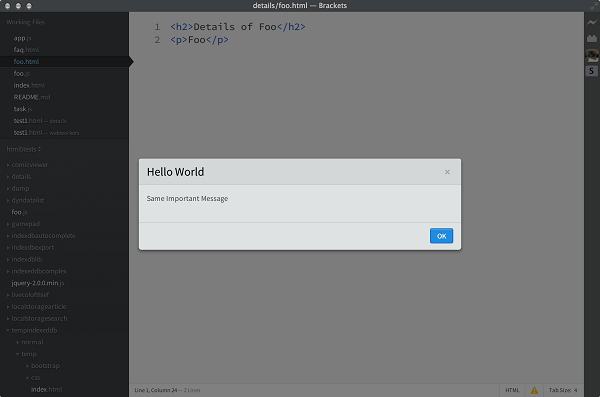
Note the addition of two additional Brackets modules: Dialogs and DefaultDialogs. The next change is in handleHelloWorld. One of the methods in the Dialog library is the ability to show a dialog (no surprise there, I suppose). The method wants a class, a title, and a body, and that's it. There's more you can do with dialogs, but for now, this demonstrates the feature. Now when we run the command, we get a much prettier UI. (Along with default buttons and behaviours to handle closing the dialog.)
That's one example, now lets look at another: creating a bottom panel. As with dialogs, we've got support from Brackets to make it easier. Let's look at an example and then I'll explain the changes.
Listing 4: helloworld4/main.js
/*
Based - in part - on the HelloWorld sample extension on the Brackets wiki:
https://github.com/adobe/brackets/wiki/Simple-%22Hello-World%22-extension
*/
define(function(require, exports, module) {

    var CommandManager = brackets.getModule("command/CommandManager"),
    Menus = brackets.getModule("command/Menus"),
    PanelManager = brackets.getModule("view/PanelManager"),
    AppInit = brackets.getModule("utils/AppInit");

    var HELLOWORLD_EXECUTE = "helloworld.execute";
    var panel;

    function log(s) {
            console.log("[helloworld4] "+s);
    }

    function handleHelloWorld() {
        if(panel.isVisible()) {
            panel.hide();
            CommandManager.get(HELLOWORLD_EXECUTE).setChecked(false);
        } else {
            panel.show();
            CommandManager.get(HELLOWORLD_EXECUTE).setChecked(true);
        }
    }

    AppInit.appReady(function () {

            log("Hello from HelloWorld4.");

            CommandManager.register("Run HelloWorld", HELLOWORLD_EXECUTE, handleHelloWorld);

            var menu = Menus.getMenu(Menus.AppMenuBar.VIEW_MENU);
            menu.addMenuItem(HELLOWORLD_EXECUTE);

            panel = PanelManager.createBottomPanel(HELLOWORLD_EXECUTE, $("<div class='bottom-panel'>HTML for my panel</div>"),200);

    });

});
Let's focus on the changes. First, I dropped the Dialog modules as I'm no longer using them. Instead, we load up the PanelManager. Down in the appReady block I've defined a new panel using the PanelManager API method createBottomPanel. Like the menu command this takes in a unique ID so I just reuse HELLOWORLD_EXECUTE. The second argument is a jQuery-wrapped block of HTML (and in case you're wondering, yes we can do this nicer), and finally, a minimum size. This sets up the panel but doesn't actually execute it.
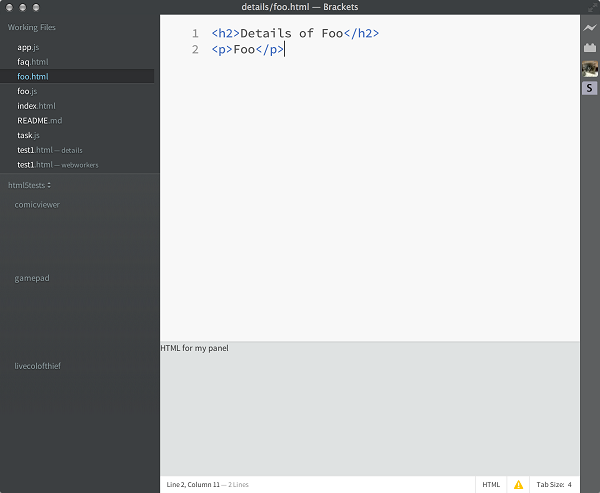
In the event handler, we have tied to the menu, we can ask the panel if it is visible and then either hide or show it. That part should be pretty trivial. For fun I've added in a bit more complexity. Notice that CommandManager lets us get a menu item and set a checked property. This may be unnecessary as the user can see the panel easily enough themselves, but adding the check just makes things a little bit more obvious. In the screen shot below you can see the panel in its visible state.
Right away you may be wondering about the panel HTML. Is there a better way to provide the HTML? Anyway to style it? Yep, lets look at a more advanced version.
Listing 5: helloworld5/main.js
/*
Based - in part - on the HelloWorld sample extension on the Brackets wiki:
https://github.com/adobe/brackets/wiki/Simple-%22Hello-World%22-extension
*/
define(function(require, exports, module) {


    var CommandManager = brackets.getModule("command/CommandManager"),
    Menus = brackets.getModule("command/Menus"),
    PanelManager = brackets.getModule("view/PanelManager"),
    ExtensionUtils          = brackets.getModule("utils/ExtensionUtils"),
    AppInit = brackets.getModule("utils/AppInit");

    var HELLOWORLD_EXECUTE = "helloworld.execute";
    var panel;
    var panelHtml     = require("text!panel.html");

    function log(s) {
            console.log("[helloworld5] "+s);
    }

    function handleHelloWorld() {
        if(panel.isVisible()) {
            panel.hide();
            CommandManager.get(HELLOWORLD_EXECUTE).setChecked(false);
        } else {
            panel.show();
            CommandManager.get(HELLOWORLD_EXECUTE).setChecked(true);
        }
    }

    AppInit.appReady(function () {

        log("Hello from HelloWorld5.");
        ExtensionUtils.loadStyleSheet(module, "helloworld.css");
        CommandManager.register("Run HelloWorld", HELLOWORLD_EXECUTE, handleHelloWorld);

        var menu = Menus.getMenu(Menus.AppMenuBar.VIEW_MENU);
        menu.addMenuItem(HELLOWORLD_EXECUTE);

        panel = PanelManager.createBottomPanel(HELLOWORLD_EXECUTE, $(panelHtml),200);

    });

});
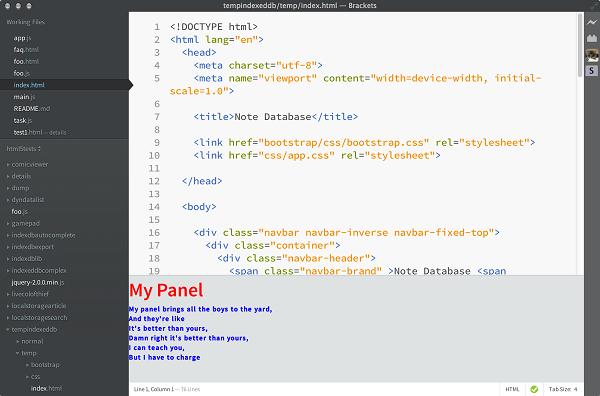
As before, I'm going to focus on the changes. First note that I've included a variable called panelHtml that is loaded via require. This lets me define my HTML outside of my JavaScript code. (You can also use templating engines. Brackets ships with Mustache.) The HTML behind the panel is rather simple.
Listing 6: helloworld5/panel.html
<div class="bottom-panel helloworld-panel" id="helloworldPanel">
<h1>My Panel</h1>

<p>
My panel brings all the boys to the yard,<br/>
And they're like<br/>
It's better than yours,<br/>
Damn right it's better than yours,<br/>
I can teach you,<br/>
But I have to charge
</p>
</div>
Returning to main.js, I've demonstrated another feature, loadStyleSheet. This lets you load an extension specific style sheet. I created a file, helloworld.css, with some simple (but tasteful) CSS styles.
Listing 7: helloworld5/helloworld.css
.helloworld-panel h1 {
        color: red;
}

.helloworld-panel p {
        color: blue;
        font-weight: bold;
}
Note that I prefixed my styles with a unique name. This helps ensure my classes don't conflict with anything built into Brackets. With these simple changes my panel now looks much better, and you can see why I'm known world wide for my superior design skills.
Packaging and Sharing Your Kick Butt Extension
Of course, just creating the coolest Brackets extension isn't quite enough. You probably (hopefully!) want to share it with others. One option is to just zip up the directory and put it on your website. Folks can download the zip, extract it, and copy it to their Brackets extensions folder.
But that's not cool. You want to be cool, right? In order to share your extension and make it available via the Brackets Extension manager, you simply need to add a package.json file to your extension. If you've ever used Node.js, then this will seem familiar. Here is a sample one for our extension.
Listing 8: helloworld6/package.json
{
    "name": "camden.helloworld",
    "title": "HelloWorld",
    "description": "Adds HelloWorld support to Brackets.",
    "homepage": "https://github.com/cfjedimaster/something real here",
    "version": "1.0.0",
    "author": "Raymond Camden <[email protected]> (http://www.raymondcamden.com)",
    "license": "MIT",
    "engines": {
        "brackets": "<=0.34.0"
    }
}
Most of this is self-explanatory, but the real crucial portion is the engines block. Brackets updates itself pretty rapidly. If Brackets added a particular feature at some point that your extension relies on, you can add a simple conditional here to ensure folks don't try to install your extension on an incompatible version. (You can find a full listing of the possible settings on the Wiki.)
Once you've done this, the next part is to upload it to the Brackets Registry. You will need to log in via your GitHub account, but once you've done that, you can then simply upload your zip. Your extension will then be available to anyone using Brackets. Even better, if you update your extension, the Extension Manager will actually be able to flag this to the user so they know an update is available.
What Else?
Hopefully, you've seen how easy it is to extend Brackets. There's more we didn't cover, like the Linting API and NodeJS integration, but this article should be more than enough to get you started. As a reminder, do not forget there is a large collection of extensions available for you to start playing with right now. Good luck!

Comments