This article is a continuation of Introduction to the MEAN Stack. The previous post covered the installation of the MEAN stack and also presented what we ended up with in terms of its directory structure, after installation. Now it's time for some actual coding!
What We'll Be Building
We will be building an RSS feed reader using the MEAN stack. The application will allow its user to manage their list of feeds by adding a new feed, deleting an existing one, modifying an existing one and, of course, seeing a list of all the feeds in which the user is interested in.
The user has to authenticate in order to have access to the application, so that the feeds of one user are not visible to others and most importantly, to users that are not logged in. As we saw in the previous article, the stack comes with a full authentication mechanism already implemented, so we can use it without further modifications.
The feed's URLs are stored in a Mongo database on the server so that they are available even after logging off, or after closing the browser.
The last feeds are displayed to the user on the main page and they will show the article's title, an excerpt and allow the user to click on the title to read the entire post.
The user will also have the possibility to filter the feeds on various criteria.
In this first part, we will discuss the implementation of the server part of our application (the backend). We will implement a REST API to respond to the user's requests for viewing, creating, deleting and modifying feeds.
Luckily for us, the MEAN stack gives us such an API for handling the articles that can be created. We will modify this API to respond to our need of handling the feed URLs. After all, this is why we are using boilerplate code, to modify and adapt it to the needs of our application. So let's do that!
The Routes
Let's spend a minute and think about what routes our app should to respond to. The picture below shows what we expect to have:

Now, let's open the file app/routes/articles.js. If we look at its contents, we see that this is what we want to have, but applied to the articles. So, we have to modify it a little to fit our needs. First, change its name from articles.js to feeds.js. Then modify it as shown below:
    // app/routes/feeds.js
    'use strict';

    var feeds = require('../controllers/feeds');
    var authorization = require('./middlewares/authorization');

    // Feeds authorization helpers
    var hasAuthorization = function(req, res, next) {
        if (req.feed.user.id !== req.user.id) {
            return res.send(401, 'User is not authorized');
        }
        next();
    };

    module.exports = function(app) {
        app.get('/feeds', feeds.all);
        app.post('/feeds', authorization.requiresLogin, feeds.create);
        app.get('/feeds/:feedId', feeds.show);
        app.put('/feeds/:feedId', authorization.requiresLogin, hasAuthorization, feeds.update);
        app.del('/feeds/:feedId', authorization.requiresLogin, hasAuthorization, feeds.destroy);

        // Finish with setting up the feedId param
        app.param('feedId', feeds.feed);
    };
For those familiar with the Express framework, this shouldn't be anything new, but just in case, let's go over it real quickly. We start by requiring the feeds controller (which we'll see in a moment) and the authorization middleware (which the MEAN stack gives us).
Then we have the hasAuthorization() function, which compares the id of the user who wants to manipulate the feed with the id of the logged in user and returns an error if they are not the same. The next() function is a callback which allows the next layer in the middleware stack to be processed.
In the last part, our code exports the routes as described in the table above, implementing the security requirements.
The Models
Creating the application's model using mongoose is a breeze. Rename the app\models\article.js to app\models\feed.js and perform the following modifications:
    'use strict';

    /**
     * Module dependencies.
     */
    var mongoose = require('mongoose'),
        Schema = mongoose.Schema;

    /**
     * Feeds Schema.
     */
    var FeedsSchema = new Schema ({
        feedUrl: {
            type: String,
            default: '',
            trim: true
        },

        user: {
            type: Schema.ObjectId,
            ref: 'User'
        }
    });

    /**
     * Statics
     */
    FeedsSchema.statics.load = function(id, cb) {
        this.findOne({
            _id: id
        }).populate('user', 'name username').exec(cb);
    };

    mongoose.model('Feeds', FeedsSchema);
We define our database structure here as follows: we will have a feeds table containing a feedUrl string type field and a reference to a user which will store the id of the current logged in user. Notice that we don't handle the creation of an id for our documents here, since this is taken care of for us by the MongoDB system.
Finally, we define a load() function that filters the documents in the database based on the id of the current logged in user.
The Controller
The controller is responsible for implementing the functions called by the router, when a specific route is requested. All the necessary functions for the CRUD operations we perform are implemented in the controller. Let's take a look at them one by one and see the implementation details.
You should be noticing a pattern by this point. First, don't forget to rename the app/controllers/articles.js file to app/controllers/feeds.js.
Creating a Feed
In order to create a feed we implement the create() function:
    /**
     * Create a feed
     */
    exports.create = function(req, res) {
        var feed = new Feeds(req.body);
        feed.user = req.user;

        feed.save(function(err) {
            if (err) {
                return res.send('users/signup', {
                    errors: err.errors,
                    feed: feed
                });
            } else {
                res.jsonp(feed);
            }
        });
    };
First, we create a feed variable based on the Feeds model. Then we add to this variable the reference to the current logged in user to be stored. Finally, we call the model's save method to store the document in the database. Upon error, we return to the signup form since most likely the user is not logged in. If the document is created successfully, we return the new document to the caller.
Modifying a Feed
    /**
     * Update a feed
     */
    exports.update = function(req, res) {
        var feed = req.feed;

        feed = _.extend(feed, req.body);

        feed.save(function(err) {
            if (err) {
                return res.send('users/signup', {
                    errors: err.errors,
                    feed: feed
                });
            } else {
                res.jsonp(feed);
            }
        });
    };
We call Lodash's extend method in order to modify the feed's properties with the ones that came from the user. Then the save method of the model stores the modified data in to the database.
Deleting a Feed
    /**
     * Delete a feed
     */
    exports.destroy = function(req, res) {
        var feed = req.feed;

        feed.remove(function(err) {
            if (err) {
                return res.send('users/signup', {
                    errors: err.errors,
                    feed: feed
                });
            } else {
                res.jsonp(feed);
            }
        });
    };
Quite simple, isn't it? The model has a remove method which solved our problem quite easily.
Showing Feeds
Showing all feeds will be the task of the client part of our application. The server will only return the necessary data:
    /**
     * List of Feeds
     */
    exports.all = function(req, res) {
        Feeds.find().sort('-created').populate('user', 'feedUrl').exec(function(err, feeds) {
            if (err) {
                res.render('error', {
                    status: 500
                });
            } else {
                res.jsonp(feeds);
            }
        });
    };
The code performs a find in the database returning the user and the feedUrl. If find fails, a server error is returned, otherwise all the found feeds will be returned.
A single feed is displayed by using the following:
    /**
     * Show a feed
     */
    exports.show = function(req, res) {
        res.jsonp(req.feed);
    };
... which then uses a helper function:
    exports.feed = function (req, res, next, id) {
        Feeds.load(id, function (err, feed) {
            if (err) return next(err);

            if (!feed) return next(new Error('Failed to load feed ' + id));

            req.feed = feed;

            next();
        });
    };
... that loads a specific feed based on its id (which will come packaged in the URL).
The complete code should like this:
    // app/controllers/feeds.js
    'use strict';

    var mongoose = require('mongoose'),
        Feeds = mongoose.model('Feeds'),
        _ = require('lodash');

    exports.feed = function (req, res, next, id) {
        Feeds.load(id, function (err, feed) {
            if (err) return next(err);

            if (!feed) return next(new Error('Failed to load feed ' + id));

            req.feed = feed;

            next();
        });
    };

    /**
     * Show a feed
     */
    exports.show = function(req, res) {
        res.jsonp(req.feed);
    };

    /**
     * List of Feeds
     */
    exports.all = function(req, res) {
        Feeds.find().sort('-created').populate('user', 'feedUrl').exec(function(err, feeds) {
            if (err) {
                res.render('error', {
                    status: 500
                });
            } else {
                res.jsonp(feeds);
            }
        });
    };

    /**
     * Create a feed
     */
    exports.create = function(req, res) {
        var feed = new Feeds(req.body);
        feed.user = req.user;

        feed.save(function(err) {
            if (err) {
                return res.send('users/signup', {
                    errors: err.errors,
                    feed: feed
                });
            } else {
                res.jsonp(feed);
            }
        });
    };

    /**
     * Update a feed
     */
    exports.update = function(req, res) {
        var feed = req.feed;

        feed = _.extend(feed, req.body);

        feed.save(function(err) {
            if (err) {
                return res.send('users/signup', {
                    errors: err.errors,
                    feed: feed
                });
            } else {
                res.jsonp(feed);
            }
        });
    };

    /**
     * Delete a feed
     */
    exports.destroy = function(req, res) {
        var feed = req.feed;

        feed.remove(function(err) {
            if (err) {
                return res.send('users/signup', {
                    errors: err.errors,
                    feed: feed
                });
            } else {
                res.jsonp(feed);
            }
        });
    };
Is the REST API Complete?
Well, almost. At this point we do not have the client part of the application implemented in order to prove that the code is working. I didn't present the unit tests for the code either, since it's not so complicated and I wanted to leave it up to you as an exercise.
We can test the code using the Postman - REST Client application available on Google Chrome.
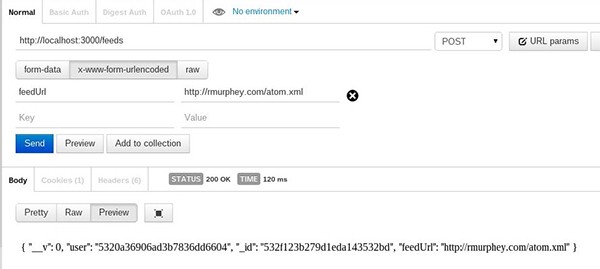
Creating a Feed
Install Postman if you don't have it already and configure it as follows:
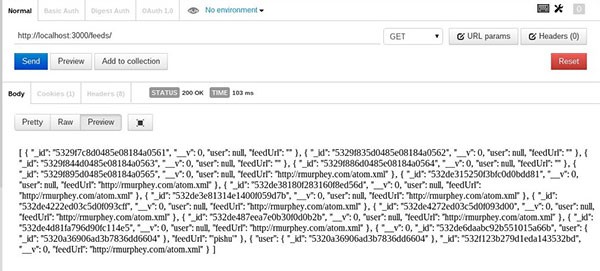
Viewing All Feeds
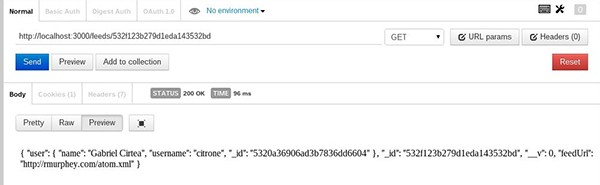
Viewing a Single Feed
The remaining parts of the code are easy to verify, so please have some fun with Postman and your new application.
Conclusion
Using a framework or boilerplate code can, in some situations, be useful and make you very productive. As you've seen in this article, implementing the REST API needed for our application was reduced to performing minor modifications to the boilerplate code. Of course for more complex applications, it may be necessary to do more than that, but still, having a starting point can be useful.
In the next tutorial, we will take a look at the client part of the application for displaying the data we will request from the server, showing forms for entering new feed URLs, handling events and so on.

Comments