One of the features that makes Android so special is the ability to customize every aspect of the user experience. When Android Wear first launched at Google I/O 2014, many developers and users found out that this wasn't exactly true for smart watches, as the official API for creating watch faces was noticeably missing. Given that the ability to make custom watch faces was one of the key wants from users, it's not surprising that developers discovered a way to create their own watch faces with an undocumented hack in Android Wear.
Luckily, Google quickly let everyone know that an official API was on its way and in December of 2014 that API was finally released to the development community. In this article, you're going to learn about the official Watch Faces API for Android Wear and implement a simple digital watch face that you will be able to expand on for your own needs. Implementing watch faces can be a bit verbose, but you can find the sample application for this article on GitHub.
1. Setting Up Your IDE
The first thing you're going to need to do to make your own watch face is get your project set up in Android Studio. When creating your project, select Phone and Tablet with a Minimum SDK of API 18 as Android 4.3 is the lowest version of the operating system to support bundled Android Wear applications. You will also need to check the Wear box with a Minimum SDK of API 21 selected. You can see an example of what your Target Android Devices screen should look like.

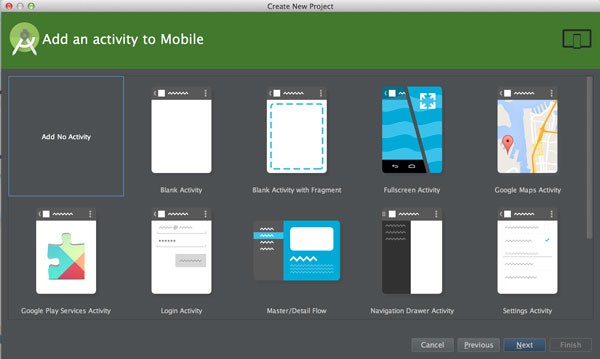
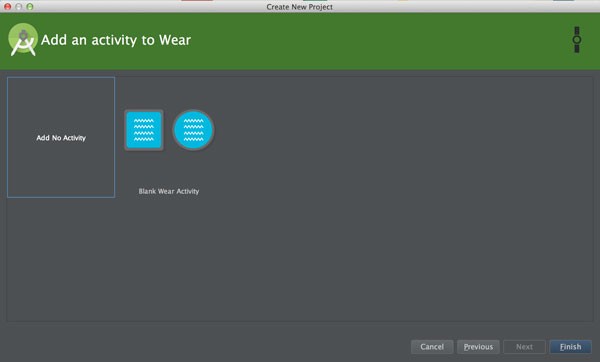
When you get to the two Add an Activity screens, select Add No Activity for both screens.
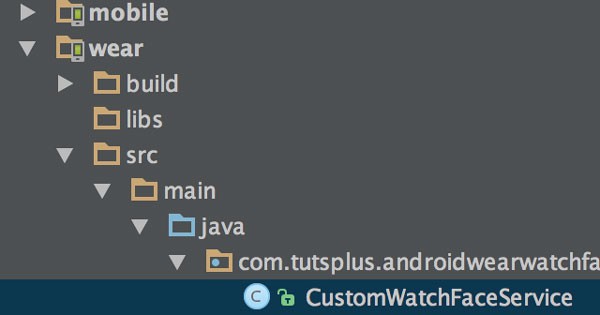
Once you click Finish, your project environment should build and have a module for mobile and another one for wear.
2. Building the Wear Watch Service
Android Wear implements watch faces through the use of WatchFaceService. In this article, you're going create an extension of the CanvasWatchFaceService class, which is an implementation of WatchFaceService that also provides a Canvas for drawing out your watch face. Start by creating a new Java class under the wear module in Android Studio that extends CanvasWatchFaceService.
public class WatchFaceService extends CanvasWatchFaceService
Once you have your class, you're going to need to create an inner class, WatchFaceEngine in the source files of this article, that extends Engine. This is the watch face engine that handles system events, such as the screen turning off or going into ambient mode.
private class WatchFaceEngine extends Engine
When your stub code for WatchFaceEngine is in, go back to the outer class and override the onCreateEngine method to return your new inner class. This will associate your watch face service with the code that will drive the display.
@Override
public Engine onCreateEngine() {
    return new WatchFaceEngine();
}
Once you have the bare bones service put together, you can move on to the general housekeeping tasks of updating your AndroidManifest files so that your service will be discoverable by Android Wear. Keep in mind that your current code won't do anything yet. We will come back to this class and flesh out the engine after doing some project housekeeping.
3. Updating the AndroidManifest Files
Open the AndroidManifest.xml file in the wear module. Near the top you should already see a line that says:
<uses-feature android:name="android.hardware.type.watch" />
Below that line, we need to add in the two required permissions for a watch face. These requirement are:
<uses-permission android:name="com.google.android.permission.PROVIDE_BACKGROUND" />
<uses-permission android:name="android.permission.WAKE_LOCK" />
Once your permissions are set, you will need to add a node for your service in the application node with permission to BIND_WALLPAPER, a few sets of meta-data containing reference images of your watch face for the selection screen (in this example we're just using the launcher icon), and an intent-filter to let the system know that your service is meant for displaying a watch face.
<service android:name=".service.CustomWatchFaceService"
    android:label="Tuts+ Wear Watch Face"
    android:permission="android.permission.BIND_WALLPAPER">

    <meta-data
        android:name="android.service.wallpaper"
        android:resource="@xml/watch_face" />
    <meta-data
        android:name="com.google.android.wearable.watchface.preview"
        android:resource="@mipmap/ic_launcher" />
    <meta-data
        android:name="com.google.android.wearable.watchface.preview_circular"
        android:resource="@mipmap/ic_launcher" />
    <intent-filter>
        <action android:name="android.service.wallpaper.WallpaperService" />
        <category android:name="com.google.android.wearable.watchface.category.WATCH_FACE" />
    </intent-filter>

</service>
Once your wear manifest is complete, you will need to open the AndroidManifest.xml file in the mobile module and add in the two permissions we used in the wear module for PROVIDE_BACKGROUND and WAKE_LOCK, because Android Wear requires that both the wear and mobile modules request the same permissions for the wear APK to be installed on a user's watch. Once both manifest files are filled in, you can return to CustomWatchFaceService.java to start implementing the engine.
4. Start Your Engine
The Engine object associated with your service is what drives your watch face. It handles timers, displaying your user interface, moving in and out of ambient mode, and getting information about the physical watch display. In short, this is where the magic happens.
Step 1: Defining Necessary Values and Variables
The first thing you're going to want to do is implement a set of member variables in your engine to keep track of device states, timer intervals, and attributes for your display.
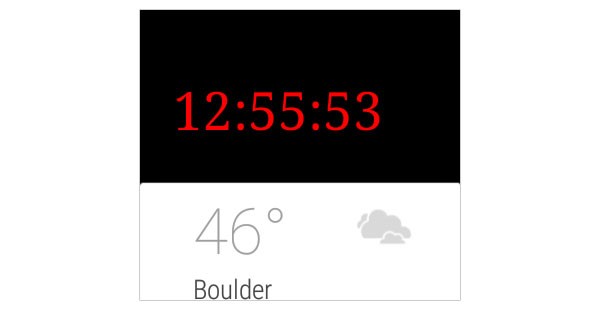
//Member variables
private Typeface WATCH_TEXT_TYPEFACE = Typeface.create( Typeface.SERIF, Typeface.NORMAL );

private static final int MSG_UPDATE_TIME_ID = 42;
private long mUpdateRateMs = 1000;

private Time mDisplayTime;

private Paint mBackgroundColorPaint;
private Paint mTextColorPaint;

private boolean mHasTimeZoneReceiverBeenRegistered = false;
private boolean mIsInMuteMode;
private boolean mIsLowBitAmbient;

private float mXOffset;
private float mYOffset;

private int mBackgroundColor = Color.parseColor( "black" );
private int mTextColor = Color.parseColor( "red" );
As you can see, we define the TypeFace that we will use for our digital watch text as well as the watch face background color and text color. The Time object is used for, you guessed it, keeping track of the current device time. mUpdateRateMs is used to control a timer that we will need to implement to update our watch face every second (hence the 1000 milliseconds value for mUpdateRateMs), because the standard WatchFaceService only keeps track of time in one minute increments. mXOffset and mYOffset are defined once the engine knows the physical shape of the watch so that our watch face can be drawn without being too close to the top or left of the screen, or being cut off by a rounded corner. The three boolean values are used to keep track of different device and application states.
The next object you will need to define is a broadcast receiver that handles the situation where a user may be traveling and change time zones. This receiver simply clears out the saved time zone and resets the display time.
final BroadcastReceiver mTimeZoneBroadcastReceiver = new BroadcastReceiver() {
    @Override
    public void onReceive(Context context, Intent intent) {
        mDisplayTime.clear( intent.getStringExtra( "time-zone" ) );
        mDisplayTime.setToNow();
    }
};
After your receiver is defined, the final object you will need to create at the top of your engine is a Handler to takes care of updating your watch face every second. This is necessary because of the limitations of WatchFaceService discussed above. If your own watch face only needs to be updated every minute, then you can safely ignore this section.
private final Handler mTimeHandler = new Handler() {
    @Override
    public void handleMessage(Message msg) {
        switch( msg.what ) {
            case MSG_UPDATE_TIME_ID: {
                invalidate();
                if( isVisible() && !isInAmbientMode() ) {
                    long currentTimeMillis = System.currentTimeMillis();
                    long delay = mUpdateRateMs - ( currentTimeMillis % mUpdateRateMs );
                    mTimeHandler.sendEmptyMessageDelayed( MSG_UPDATE_TIME_ID, delay );
                }
                break;
            }
        }
    }
};
The implementation of the Handler is pretty straightforward. It first checks the message ID. If matches MSG_UPDATE_TIME_ID, it continues to invalidate the current view for redrawing. After the view has been invalidated, the Handler checks to see if the screen is visible and not in ambient mode. If it is visible, it sends a repeat request a second later. The reason we're only repeating the action in the Handler when the watch face is visible and not in ambient mode is that it can be a little battery intensive to keep updating every second. If the user isn't looking at the screen, we simply fall back on the WatchFaceService implementation that updates every minute.
Step 2: Initializing the Engine
Now that your variables and objects are declared, it's time to start initializing the watch face. Engine has an onCreate method that should be used for creating objects and other tasks that can take a significant amount of time and battery. You will also want to set a few flags for the WatchFaceStyle here to control how the system interacts with the user when your watch face is active.
@Override
public void onCreate(SurfaceHolder holder) {
    super.onCreate(holder);

    setWatchFaceStyle( new WatchFaceStyle.Builder( CustomWatchFaceService.this )
                    .setBackgroundVisibility( WatchFaceStyle.BACKGROUND_VISIBILITY_INTERRUPTIVE )
                    .setCardPeekMode( WatchFaceStyle.PEEK_MODE_VARIABLE )
                    .setShowSystemUiTime( false )
                    .build()
    );

    mDisplayTime = new Time();

    initBackground();
    initDisplayText();
}
For the sample app, you'll use setWatchFaceStyle to set the background of your notification cards to briefly show if the card type is set as interruptive. You'll also set the peek mode so that notification cards only take up as much room as necessary.
Finally, you'll want to tell the system to not show the default time since you will be displaying it yourself. While these are only a few of the options available, you can find even more information in the official documentation for the WatchFaceStyle.Builder object.
After your WatchFaceStyle has been set, you can initialize mDisplayTime as a new Time object.
initBackground and initDisplayText allocate the two Paint objects that you defined at the top of the engine. The background and text then have their color set and the text has its typeface and font size set, while also turning on anti-aliasing.
private void initBackground() {
    mBackgroundColorPaint = new Paint();
    mBackgroundColorPaint.setColor( mBackgroundColor );
}

private void initDisplayText() {
    mTextColorPaint = new Paint();
    mTextColorPaint.setColor( mTextColor );
    mTextColorPaint.setTypeface( WATCH_TEXT_TYPEFACE );
    mTextColorPaint.setAntiAlias( true );
    mTextColorPaint.setTextSize( getResources().getDimension( R.dimen.text_size ) );
}
Step 3: Handling Device State
Next, you need to implement various methods from the Engine class that are triggered by changes to the device state. We'll start by going over the onVisibilityChanged method, which is called when the user hides or shows the watch face.
@Override
public void onVisibilityChanged( boolean visible ) {
    super.onVisibilityChanged(visible);

    if( visible ) {
        if( !mHasTimeZoneReceiverBeenRegistered ) {

            IntentFilter filter = new IntentFilter( Intent.ACTION_TIMEZONE_CHANGED );
            CustomWatchFaceService.this.registerReceiver( mTimeZoneBroadcastReceiver, filter );

            mHasTimeZoneReceiverBeenRegistered = true;
        }

        mDisplayTime.clear( TimeZone.getDefault().getID() );
        mDisplayTime.setToNow();
    } else {
        if( mHasTimeZoneReceiverBeenRegistered ) {
            CustomWatchFaceService.this.unregisterReceiver( mTimeZoneBroadcastReceiver );
            mHasTimeZoneReceiverBeenRegistered = false;
        }
    }

    updateTimer();
}
When this method is called, it checks to see whether the watch face is visible or not. If the watch face is visible, it looks to see if the BroadcastReceiver that you defined at the top of the Engine is registered. If it isn't, the method creates an IntentFilter for the ACTION_TIMEZONE_CHANGED action and registers the BroadcastReceiver to listen for it.
If the watch face is not visible, this method will check to see if the BroadcastReceiver can be unregistered. Once the BroadcastReceiver has been handled, updateTimer is called to trigger invalidating the watch face and redraw the watch face. updateTimer stops any Handler actions that are pending and checks to see if another should be sent.
private void updateTimer() {
    mTimeHandler.removeMessages( MSG_UPDATE_TIME_ID );
    if( isVisible() && !isInAmbientMode() ) {
        mTimeHandler.sendEmptyMessage( MSG_UPDATE_TIME_ID );
    }
}
Step 4: Cooperating With the Wearable Hardware
When your service is associated with Android Wear, onApplyWindowInsets is called. This is used to determine if the device your watch face is running on is rounded or squared. This lets you change your watch face to match up with the hardware.
When this method is called in the sample application, this method simply checks the device shape and changes the x offset used for drawing the watch face to make sure your watch face is visible on the device.
@Override
public void onApplyWindowInsets(WindowInsets insets) {
    super.onApplyWindowInsets(insets);

    mYOffset = getResources().getDimension( R.dimen.y_offset );

    if( insets.isRound() ) {
        mXOffset = getResources().getDimension( R.dimen.x_offset_round );
    } else {
        mXOffset = getResources().getDimension( R.dimen.x_offset_square );
    }
}
The next method that you will need to override is onPropertiesChanged. This method is called when the hardware properties for the Wear device are determined, for example, if the device supports burn-in protection or low bit ambient mode.
In this method, you check if those attributes apply to the device running your watch face and save them in a member variable defined at the top of your Engine.
@Override
public void onPropertiesChanged( Bundle properties ) {
    super.onPropertiesChanged( properties );

    if( properties.getBoolean( PROPERTY_BURN_IN_PROTECTION, false ) ) {
        mIsLowBitAmbient = properties.getBoolean( PROPERTY_LOW_BIT_AMBIENT, false );
    }
}
Step 5: Conserving Battery in Ambient and Muted Modes
After you handle the initial device states, you will want to implement onAmbientModeChanged and onInterruptionFilterChanged. As the name implies, onAmbientModeChanged is called when the device moves in or out of ambient mode.
If the device is in ambient mode, you will want to change the color of your watch face to be black and white to be mindful of the user's battery. When the device is returning from ambient mode, you can reset your watch face's colors. You will also want to be mindful of anti-aliasing for devices that request low bit ambient support. After all of the flag variables are set, you can cause the watch face to invalidate and redraw, and then check if the one second timer should start.
@Override
public void onAmbientModeChanged(boolean inAmbientMode) {
    super.onAmbientModeChanged(inAmbientMode);

    if( inAmbientMode ) {
        mTextColorPaint.setColor( Color.parseColor( "white" ) );
    } else {
        mTextColorPaint.setColor( Color.parseColor( "red" ) );
    }

    if( mIsLowBitAmbient ) {
        mTextColorPaint.setAntiAlias( !inAmbientMode );
    }

    invalidate();
    updateTimer();
}
onInterruptionFilterChanged is called when the user manually changes the interruption settings on their wearable. When this happens, you will need to check if the device is muted and then alter the user interface accordingly. In this situation, you will change the transparency of your watch face, set your Handler to only update every minute if the device is muted, and then redraw your watch face.
@Override
public void onInterruptionFilterChanged(int interruptionFilter) {
    super.onInterruptionFilterChanged(interruptionFilter);

    boolean isDeviceMuted = ( interruptionFilter == android.support.wearable.watchface.WatchFaceService.INTERRUPTION_FILTER_NONE );
    if( isDeviceMuted ) {
        mUpdateRateMs = TimeUnit.MINUTES.toMillis( 1 );
    } else {
        mUpdateRateMs = DEFAULT_UPDATE_RATE_MS;
    }

    if( mIsInMuteMode != isDeviceMuted ) {
        mIsInMuteMode = isDeviceMuted;
        int alpha = ( isDeviceMuted ) ? 100 : 255;
        mTextColorPaint.setAlpha( alpha );
        invalidate();
        updateTimer();
    }
}
When your device is in ambient mode, the Handler timer will be disabled. Your watch face can still update with the current time every minute through using the built-in onTimeTick method to invalidate the Canvas.
@Override
public void onTimeTick() {
    super.onTimeTick();

    invalidate();
}
Step 6: Drawing the Watch Face
Once all of your contingencies are covered, it's time to finally draw out your watch face. CanvasWatchFaceService uses a standard Canvas object, so you will need to add onDraw to your Engine and manually draw out your watch face.
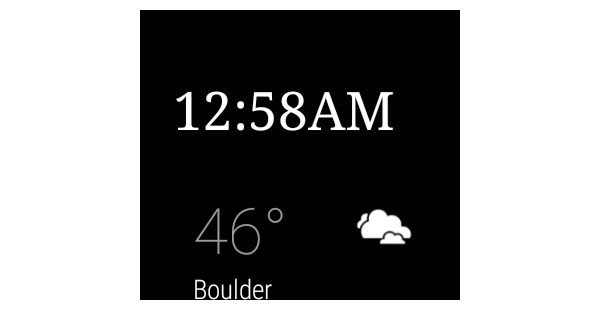
In this tutorial we're simply going to draw a text representation of the time, though you could change your onDraw to easily support an analog watch face. In this method, you will want to verify that you are displaying the correct time by updating your Time object and then you can start applying your watch face.
@Override
public void onDraw(Canvas canvas, Rect bounds) {
    super.onDraw(canvas, bounds);

    mDisplayTime.setToNow();

    drawBackground( canvas, bounds );
    drawTimeText( canvas );
}
drawBackground applies a solid color to the background of the Wear device.
private void drawBackground( Canvas canvas, Rect bounds ) {
    canvas.drawRect( 0, 0, bounds.width(), bounds.height(), mBackgroundColorPaint );
}
drawTimeText, however, creates the time text that will be displayed with the help of a couple helper methods and then applies it to the canvas at the x and y offset points that you defined in onApplyWindowInsets.
private void drawTimeText( Canvas canvas ) {
    String timeText = getHourString() + ":" + String.format( "%02d", mDisplayTime.minute );
    if( isInAmbientMode() || mIsInMuteMode ) {
        timeText += ( mDisplayTime.hour < 12 ) ? "AM" : "PM";
    } else {
        timeText += String.format( ":%02d", mDisplayTime.second);
    }
    canvas.drawText( timeText, mXOffset, mYOffset, mTextColorPaint );
}

private String getHourString() {
    if( mDisplayTime.hour % 12 == 0 )
        return "12";
    else if( mDisplayTime.hour <= 12 )
        return String.valueOf( mDisplayTime.hour );
    else
        return String.valueOf( mDisplayTime.hour - 12 );
}
Conclusion
Once you've implemented the methods for drawing your watch face, you should be all set with the basic knowledge needed to go out and make your own watch faces. The nice thing about Android Wear watch faces is that this is just scratching the surface of what's possible.
You can add companion configuration activities on the watch or on the phone, replace the Canvas based watch face with an OpenGL implementation, or derive your own class from WatchFaceService to meet your needs.
Add to it that you can access other APIs or information from the user's phone and the possibilities seem endless. Get creative with your watch faces and enjoy.

Comments