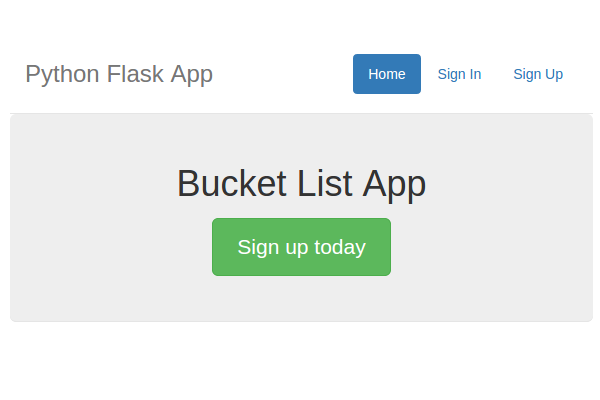
In the previous part of this tutorial series, we implemented the sign-in and logout functionality for our Bucket List application. In this part of the series, we'll implement the back end and front end required for a user to add and display bucket list items.
Getting Started
Let's start by cloning the previous part for the tutorial from GitHub.
git clone https://github.com/jay3dec/PythonFlaskMySQLApp_Part2.git
Once the source code has been cloned, navigate to the project directory and start the web server.
cd PythonFlaskMySQLApp_Part2
python app.py
Point your browser to http://localhost:5002/ and you should have the application running.
Add Bucket List Items
Step 1: Create an Interface to Add Items
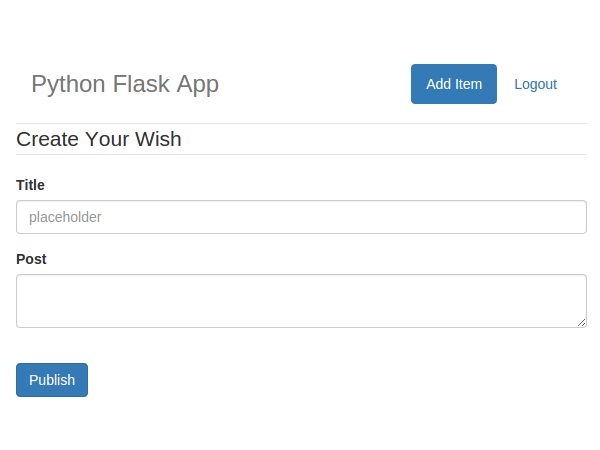
We'll start by creating an interface for the logged-in user to add bucket list items. Navigate to the templates folder inside the project directory, and create a file called addWish.html. Open addWish.html and add the following HTML code:
<!DOCTYPE html>
<html lang="en">
<head>
<title>Python Flask Bucket List App</title>
<link href="http://getbootstrap.com/dist/css/bootstrap.min.css" rel="stylesheet">
<link href="http://getbootstrap.com/examples/jumbotron-narrow/jumbotron-narrow.css" rel="stylesheet">
<script src="../static/js/jquery-1.11.2.js"></script>
</head>
<body>
<div class="container">
<div class="header">
<nav>
<ul class="nav nav-pills pull-right">
<li role="presentation" class="active"><a href="#">Add Item</a>
</li>
<li role="presentation"><a href="/logout">Logout</a>
</li>
</ul>
</nav>
<h3 class="text-muted">Python Flask App</h3>
</div>
<section>
<form class="form-horizontal" method="post" action="/addWish">
<fieldset>
<!-- Form Name -->
<legend>Create Your Wish</legend>
<!-- Text input-->
<div class="form-group">
<label class="col-md-4 control-label" for="txtTitle">Title</label>
<div class="col-md-4">
<input id="txtTitle" name="inputTitle" type="text" placeholder="placeholder" class="form-control input-md">
</div>
</div>
<!-- Textarea -->
<div class="form-group">
<label class="col-md-4 control-label" for="txtPost">Post</label>
<div class="col-md-4">
<textarea class="form-control" id="txtPost" name="inputDescription"></textarea>
</div>
</div>
<!-- Button -->
<div class="form-group">
<label class="col-md-4 control-label" for="singlebutton"></label>
<div class="col-md-4">
<input id="singlebutton" name="singlebutton" class="btn btn-primary" type="submit" value="Publish" />
</div>
</div>
</fieldset>
</form>
</section>
<footer class="footer">
<p>© Company 2015</p>
</footer>
</div>
</body>
</html>
Open app.py and add a new route and method to display the Add Wish page.
@app.route('/showAddWish')
def showAddWish():
    return render_template('addWish.html')
Open userHome.html and add a new menu item to link to the Add Wish page.
<li role="presentation"><a href="/showAddWish">Add Wish</a></li>
Save the changes and restart the server. Point your browser to http://localhost:5002 and sign in using a valid email address and password. Once logged in, click on the Add Wish link and you should have the Add Wish page displayed.
Step 2: Database Implementation
To add items to the bucket list, we need to create a table called tbl_wish.
CREATE TABLE `tbl_wish` (
  `wish_id` int(11) NOT NULL AUTO_INCREMENT,
  `wish_title` varchar(45) DEFAULT NULL,
  `wish_description` varchar(5000) DEFAULT NULL,
  `wish_user_id` int(11) DEFAULT NULL,
  `wish_date` datetime DEFAULT NULL,
  PRIMARY KEY (`wish_id`)
) ENGINE=InnoDB AUTO_INCREMENT=3 DEFAULT CHARSET=latin1;
tbl_wish will have title, description and the ID of the user who created the wish.
Next, we need to create a MySQL stored procedure to add items to the tbl_wish table.
USE `BucketList`;
DROP procedure IF EXISTS `BucketList`.`sp_addWish`;

DELIMITER $$
USE `BucketList`$$
CREATE DEFINER=`root`@`localhost` PROCEDURE `sp_addWish`(
    IN p_title varchar(45),
	IN p_description varchar(1000),
	IN p_user_id bigint
)
BEGIN
	insert into tbl_wish(
		wish_title,
		wish_description,
		wish_user_id,
		wish_date
	)
	values
	(
		p_title,
		p_description,
		p_user_id,
		NOW()
	);
END$$

DELIMITER ;
;
Step 3: Create a Python Method to call the MySQL Stored Procedure
Create a method called addWish in app.py.
@app.route('/addWish',methods=['POST'])
def addWish():
    # Code will be here
Since we'll be posting data to this method, we have explicitly declared it in the defined route.
When a call is made to the addWish method, we need to validate if it's an authentic call by checking if the session variable user exists. Once we have validated the session, we'll read the posted title and description.
_title = request.form['inputTitle']
_description = request.form['inputDescription']
_user = session.get('user')
Once we have the required input values, we'll open a MySQL connection and call the stored procedure sp_addWish.
conn = mysql.connect()
cursor = conn.cursor()
cursor.callproc('sp_addWish',(_title,_description,_user))
data = cursor.fetchall()
After we have executed the stored procedure, we need to commit the changes to the database.
if len(data) is 0:
    conn.commit()
    return redirect('/userHome')
else:
    return render_template('error.html',error = 'An error occurred!')
Here is the complete addWish method.
@app.route('/addWish',methods=['POST'])
def addWish():
    try:
        if session.get('user'):
            _title = request.form['inputTitle']
            _description = request.form['inputDescription']
            _user = session.get('user')

            conn = mysql.connect()
            cursor = conn.cursor()
            cursor.callproc('sp_addWish',(_title,_description,_user))
            data = cursor.fetchall()

            if len(data) is 0:
                conn.commit()
                return redirect('/userHome')
            else:
                return render_template('error.html',error = 'An error occurred!')

        else:
            return render_template('error.html',error = 'Unauthorized Access')
    except Exception as e:
        return render_template('error.html',error = str(e))
    finally:
        cursor.close()
        conn.close()
Save all the source code and restart the server. Point your browser to http://localhost:5002 and sign in using a valid email address and password. Once signed in, click on the Add Wish link. Enter the title and description for your wish and click Publish. On successfully adding the wish, it should redirect to the user home page. Log in to the MySQL database and you should have the wish in your tbl_wish table.
Display a Bucket List Item
Step 1: Create a Stored Procedure to Retrieve a Wish
Let's create a MySQL stored procedure which will get the wishes created by a user. It will take the user ID as a parameter and return a data set of wishes created by the particular user ID.
USE `BucketList`;
DROP procedure IF EXISTS `sp_GetWishByUser`;

DELIMITER $$
USE `BucketList`$$
CREATE PROCEDURE `sp_GetWishByUser` (
IN p_user_id bigint
)
BEGIN
    select * from tbl_wish where wish_user_id = p_user_id;
END$$

DELIMITER ;
Step 2: Create a Python Method for Retrieving Data
Next, let's create a Python method which will call the sp_GetWishByUser stored procedure to get the wishes created by a user. Add a method called getWish in app.py.
@app.route('/getWish')
def getWish():
    try:
        if session.get('user'):
            _user = session.get('user')
        else:
            return render_template('error.html', error = 'Unauthorized Access')
    except Exception as e:
        return render_template('error.html', error = str(e))
As seen in the above code, this method can only be called with valid user session. Once we have validated for a valid user session, we'll create a connection to the MySQL database and call the stored procedure sp_GetWishByUser.
 _user = session.get('user')

# Connect to MySQL and fetch data
con = mysql.connect()
cursor = con.cursor()
cursor.callproc('sp_GetWishByUser',(_user,))
wishes = cursor.fetchall()
Once we have fetched data from MySQL, we'll parse the data and convert it into a dictionary so that it's easy to return as JSON.
wishes_dict = []
for wish in wishes:
    wish_dict = {
        'Id': wish[0],
        'Title': wish[1],
        'Description': wish[2],
        'Date': wish[4]}
wishes_dict.append(wish_dict)
After converting the data into a dictionary we'll convert the data into JSON and return.
return json.dumps(wishes_dict)
Here is the full getWish method.
@app.route('/getWish')
def getWish():
    try:
        if session.get('user'):
            _user = session.get('user')

            con = mysql.connect()
            cursor = con.cursor()
            cursor.callproc('sp_GetWishByUser',(_user,))
            wishes = cursor.fetchall()

            wishes_dict = []
            for wish in wishes:
                wish_dict = {
                        'Id': wish[0],
                        'Title': wish[1],
                        'Description': wish[2],
                        'Date': wish[4]}
                wishes_dict.append(wish_dict)

            return json.dumps(wishes_dict)
        else:
            return render_template('error.html', error = 'Unauthorized Access')
    except Exception as e:
        return render_template('error.html', error = str(e))
Step 3: Binding JSON Data to HTML
When the user home page is loaded, we'll call the getWish method using jQuery AJAX and bind the received data into our HTML. In userHome.html add the following jQuery AJAX script:
<script>
    $(function() {
        $.ajax({
            url: '/getWish',
            type: 'GET',
            success: function(res) {
                console.log(res);
            },
            error: function(error) {
                console.log(error);
            }
        });
    });
</script>
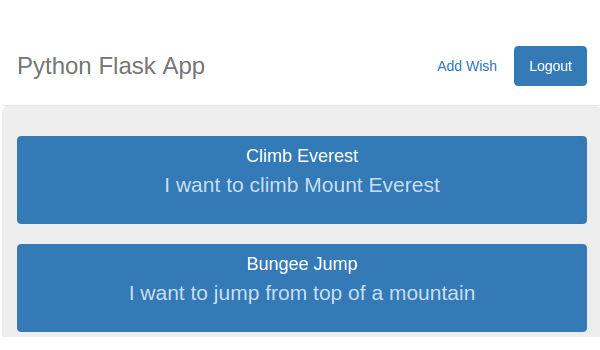
Save the above changes and restart the server. Once logged in with a valid email address and password, check your browser console and you should have the wish list retrieved from the database as shown:
[{
    "Date": "Fri, 23 Jan 2015 23:26:05 GMT",
    "Description": "I want to climb Mount Everest",
    "Id": 1,
    "Title": "Climb Everest"
}, {
    "Date": "Fri, 23 Jan 2015 23:27:05 GMT",
    "Description": "I want to jump from top of a mountain",
    "Id": 2,
    "Title": "Bungee Jump"
}]
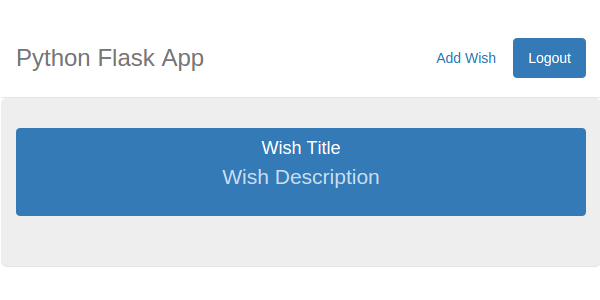
Now, we need to iterate over the JSON data and bind it into the HTML. We'll be using bootstrap list-group to display our wish list items. Here is the basic template for list-group:
<div class="list-group">
  <a href="#" class="list-group-item active">
    <h4 class="list-group-item-heading">Wish Title</h4>
    <p class="list-group-item-text">Wish Description</p>
  </a>
</div>
Add the above HTML code to the jumbotron div in userHome.html. Here is how it looks:
Now, what we'll do is create the above shown list-group div dynamically for each wish list entry and append it to the jumbotron div. Inside the success callback of the getWish function call, create a div as shown:
var div = $('<div>')
    .attr('class', 'list-group')
    .append($('<a>')
        .attr('class', 'list-group-item active')
        .append($('<h4>')
            .attr('class', 'list-group-item-heading'),
            $('<p>')
            .attr('class', 'list-group-item-text')));
We'll be cloning the above div to create the list-group div for each wish list item. Next, parse the returned JSON string into a JavaScript object.
var wishObj = JSON.parse(res);
Now, iterate over wishObj and for each wish item, clone a new div and append it to the jumbotron div.
var wish = '';

$.each(wishObj, function(index, value) {
    wish = $(div).clone();
    $(wish).find('h4').text(value.Title);
    $(wish).find('p').text(value.Description);
    $('.jumbotron').append(wish);
});
Save the above changes and restart the server. Log in using a valid email address and password and you should be able to see the list of wishes created by the particular user.
Conclusion
In this tutorial, we implemented an interface for a logged-in user to create a wish. We also implemented the required methods and database stored procedure to fetch and display the created wishes in the user home page.
In the next part of this series, we'll see how to implement the Edit and Delete functionality for the wish list shown in the user home page.
Source code from this tutorial is available on GitHub.
Do let us know your thoughts in the comments below!

Comments