OAuth can be a tricky concept to wrap your head around at first, but with the Twitter API now requiring its use, it is something you need to understand before creating a Twitter application. This tutorial will introduce you to OAuth, and walk you through the process of creating a basic application.
Introduction
In this tutorial, we will be building a simple app that allows users to apply different effects to their Twitter avatar. In order to work with the Twitter API, we must use OAuth to authorize our app to make requests on the user's behalf.
Our application flow will be something like this:
- The user is asked to connect with Twitter.
- The user is presented a list of preview avatars to select from.
- Upon selection, the user is presented a confirmation screen showing the original and new avatar for comparison. The user is also offered an option to send a tweet.
- After the user confirms, the app creates and uploads the modified avatar to Twitter and a success page is displayed.
Setup
To start, we should set up our source directory. We need a lib directory for our PHP library (class) files, a tmp directory to keep temporary files (this needs to writable by the server), a css directory for our style sheet, and an img directory for any images.
Here's what your directory tree should look like:
- tutorial
- css
- img
- lib
- tmp (writable)
Register Your Application
In order to use OAuth, you'll need what is called a consumer key and secret to identify your app. To obtain these, you must register an application with Twitter by following these steps.
Go to the registration page, logging in if necessary. You'll be greeted by the form pictured below:
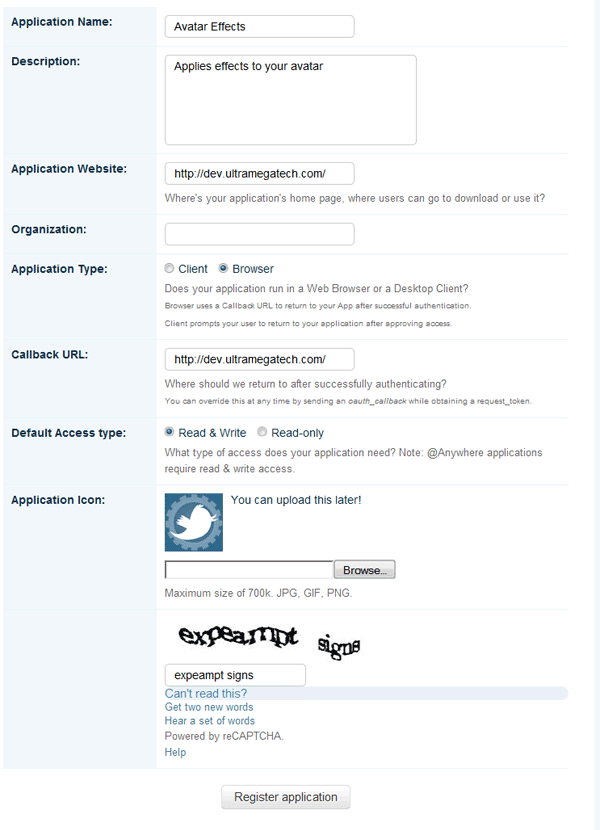
Fill out the form with details pertaining to your app. In our case, the Application Type is Browser and we need to set a default Callback URL. This URL can be anything as long as it is a valid format. We will be overriding the callback within our code, so it isn't critical that it is a real URL. The Default Access type should be Read & Write for convenience.
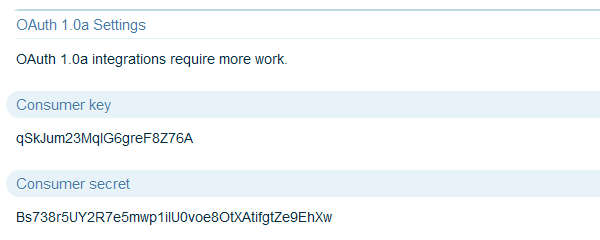
Once you register and accept the terms, you'll be presented with information on your new application. The important details we need are the Consumer key and Consumer secret, which should look something like this:
Download the tmhOAuth Library
We will be making use of a library to handle all the details behind making OAuth requests. In this tutorial, we will be using @themattharris' tmhOAuth library, which supports file uploading.
- Download tmhOAuth from GitHub
- Extract tmhOAuth.php to the lib directory we created earlier
Authentication
Authentication with OAuth is basically a three step process. For a more in depth explanation, see this page on authentication at Twitter, but here is a summary:
- App obtains a request token: The first step is for our app to identify itself to Twitter (using its consumer key) and obtain a request token. We'll need to save this request token for later.
- User authorizes app on Twitter: The user now needs to be sent to Twitter in order to grant our app access to their account. After that, the user is sent back to the callback URL specified by the app.
- App exchanges request token for access token: Now that our app has been approved, it can exchange the request token from step 1 for an access token. Once we have the access token, our app is free to interact with the Twitter API on the user's behalf.
So let's get started with some code. We'll handle all authentication tasks in a class called TwitterApp. Start with the following code in a new file called lib/TwitterApp.php:
<?php
class TwitterApp {
    /**
     * This variable holds the tmhOAuth object used throughout the class
     *
     * @var tmhOAuth An object of the tmhOAuth class
     */
    public $tmhOAuth;

    /**
     * User's Twitter account data
     *
     * @var array Information on the current authenticated user
     */
    public $userdata;

    /**
     * Authentication state
     *
     * Values:
     *  - 0: not authed
     *  - 1: Request token obtained
     *  - 2: Access token obtained (authed)
     *
     * @var int The current state of authentication
     */
    protected $state;

    /**
     * Initialize a new TwitterApp object
     *
     * @param tmhOAuth $tmhOAuth A tmhOAuth object with consumer key and secret
     */
    public function  __construct(tmhOAuth $tmhOAuth) {

        // save the tmhOAuth object
        $this->tmhOAuth = $tmhOAuth;
    }
}
Here we've created three properties and a simple constructor. The $tmhOAuth property will be a tmhOAuth object, which will be used throughout the class. The $userdata property will hold an object containing info on the user such as their Twitter user name and status. The $state property keeps track of the current state of authentication.
The constructor simply accepts a tmhOAuth object and assigns it to the $tmhOAuth property.
Step 1: Get a Request Token
Here is the method to obtain a request token:
/**
 * Obtain a request token from Twitter
 *
 * @return bool False if request failed
 */
private function getRequestToken() {

    // send request for a request token
    $this->tmhOAuth->request("POST", $this->tmhOAuth->url("oauth/request_token", ""), array(
        // pass a variable to set the callback
        'oauth_callback'    => $this->tmhOAuth->php_self()
    ));

    if($this->tmhOAuth->response["code"] == 200) {

        // get and store the request token
        $response = $this->tmhOAuth->extract_params($this->tmhOAuth->response["response"]);
        $_SESSION["authtoken"] = $response["oauth_token"];
        $_SESSION["authsecret"] = $response["oauth_token_secret"];

        // state is now 1
        $_SESSION["authstate"] = 1;

        // redirect the user to Twitter to authorize
        $url = $this->tmhOAuth->url("oauth/authorize", "") . '?oauth_token=' . $response["oauth_token"];
        header("Location: ' . $url);
        exit;
    }
    return false;
}
To understand the first part, you need to know about the tmhOAuth::request() method. This method allows us to make an OAuth enabled HTTP request, and it has the following usage:
tmhOAuth::request($method, $url[, $params[, $useauth[, $multipart]]])
-
string $method- The request method to use (GET, POST, etc.) -
string $url- The URL to access -
array $params(optional) - Associative array of parameters to include in the request -
bool $useauth(optional, default true) - Is authentication required? -
bool $multipart(optional, default false) - Set to true for file uploads
For the $url parameter, we make use of the tmhOAuth::url() method to craft a URL based on the API method we are calling:
tmhOAuth::url($request[, $format])
-
string $request- The api method (without extension) -
string $format(optional, default 'json") - The desired response format (JSON, XML, etc.)
Now that you are familiar with those methods, we must make a POST request to the oauth/request_token API method. This will return OAuth data in a special format, so we need to set the format to blank when we use the tmhOAuth::url() method. We also need to pass a variable called oauth_callback, which is where the user will return after authorizing at Twitter. We will use the tmhOAuth::php_self() method to refer to the current page. Here is that code again:
// send request for a request token
$this->tmhOAuth->request("POST", $this->tmhOAuth->url("oauth/request_token", ""), array(
    // pass a variable to set the callback
    'oauth_callback'    => $this->tmhOAuth->php_self()
));
Once we make the request, the response is stored as an array in the tmhOAuth::response property, with the following key pieces of data:
-
code- The HTTP response code -
response- The actual data returned -
headers- The response headers
So the next part of our code checks the response code (200 means success), and then places the oauth_token and oauth_token_secret that we received into session variables since we'll need them later. These are extracted from the response data using the tmhOAuth::extract_params() method, which returns an array of data contained in the response. We also set an authstate session variable to signal that we are on the next stage of authentication. Here is the code:
if($this->tmhOAuth->response["code"] == 200) {

    // get and store the request token
    $response = $this->tmhOAuth->extract_params($this->tmhOAuth->response["response"]);
    $_SESSION["authtoken"] = $response["oauth_token"];
    $_SESSION["authsecret"] = $response["oauth_token_secret"];

    // state is now 1
    $_SESSION["authstate"] = 1;
}
After that is done, we must now redirect the user to the oauth/authorize URL, including the oauth_token in a GET parameter. Here is that code again:
// redirect the user to Twitter to authorize
$url = $this->tmhOAuth->url("oauth/authorize", "") . '?oauth_token=' . $response["oauth_token"];
header("Location: ' . $url);
exit;
Step 2: Get an Access Token
Here is the method to exchange our request token for an access token:
/**
 * Obtain an access token from Twitter
 *
 * @return bool False if request failed
 */
private function getAccessToken() {

    // set the request token and secret we have stored
    $this->tmhOAuth->config["user_token"] = $_SESSION["authtoken"];
    $this->tmhOAuth->config["user_secret"] = $_SESSION["authsecret"];

    // send request for an access token
    $this->tmhOAuth->request("POST", $this->tmhOAuth->url("oauth/access_token", ""), array(
        // pass the oauth_verifier received from Twitter
        'oauth_verifier'    => $_GET["oauth_verifier"]
    ));

    if($this->tmhOAuth->response["code"] == 200) {

        // get the access token and store it in a cookie
        $response = $this->tmhOAuth->extract_params($this->tmhOAuth->response["response"]);
        setcookie("access_token", $response["oauth_token"], time()+3600*24*30);
        setcookie("access_token_secret", $response["oauth_token_secret"], time()+3600*24*30);

        // state is now 2
        $_SESSION["authstate"] = 2;

        // redirect user to clear leftover GET variables
        header("Location: ' . $this->tmhOAuth->php_self());
        exit;
    }
    return false;
}
The first thing we do is set the user_token and user_secret in the tmhOAuth::config array to the request token we obtained earlier.
// set the request token and secret we have stored
$this->tmhOAuth->config["user_token"] = $_SESSION["authtoken"];
$this->tmhOAuth->config["user_secret"] = $_SESSION["authsecret"];
The next part is where we make a POST request to oauth/access_token. We pass the oauth_verifier we received in a GET variable as a parameter in this request.
// send request for an access token
$this->tmhOAuth->request("POST", $this->tmhOAuth->url("oauth/access_token", ""), array(
    // pass the oauth_verifier received from Twitter
    'oauth_verifier'    => $_GET["oauth_verifier"]
));
Twitter will respond with an access token and secret, which we'll need to save for any future requests. So the next chunk of code takes these and saves each in a cookie, then sets the state to 2.
if($this->tmhOAuth->response["code"] == 200) {

    // get the access token and store it in a cookie
    $response = $this->tmhOAuth->extract_params($this->tmhOAuth->response["response"]);
    setcookie("access_token", $response["oauth_token"], time()+3600*24*30);
    setcookie("access_token_secret", $response["oauth_token_secret"], time()+3600*24*30);

    // state is now 2
    $_SESSION["authstate"] = 2;

    // redirect user to clear leftover GET variables
    header("Location: ' . $this->tmhOAuth->php_self());
    exit;
}
The redirect at the end is there to clear the URL parameters left by Twitter, and allows the cookies to take effect.
Step 3: Verify the Access Token
With our access token obtained, we should check to make sure it is valid. Here is the method to do that:
/**
 * Verify the validity of our access token
 *
 * @return bool Access token verified
 */
private function verifyAccessToken() {
    $this->tmhOAuth->config["user_token"] = $_COOKIE["access_token"];
    $this->tmhOAuth->config["user_secret"] = $_COOKIE["access_token_secret"];

    // send verification request to test access key
    $this->tmhOAuth->request("GET", $this->tmhOAuth->url("1/account/verify_credentials"));

    // store the user data returned from the API
    $this->userdata = json_decode($this->tmhOAuth->response["response"]);

    // HTTP 200 means we were successful
    return ($this->tmhOAuth->response["code"] == 200);
}
This code should look pretty familiar by now. All we do here is set the user_token and user_secret and make a GET request to 1/account/verify_credentials. If Twitter responds with a 200 code, then the access token is valid.
Another detail to note is that this is where we populate the $userdata property with the data returned by this Twitter request. The data is in the JSON format, so we use json_decode() to convert it to a PHP object. Here's that line again:
// store the user data returned from the API
$this->userdata = json_decode($this->tmhOAuth->response["response"]);
Step 4: Tie Everything Together
With our OAuth components in place, it is time to tie everything together. We need a public facing method to allow our client code to start the authentication process, and here it is:
/**
 * Authenticate user with Twitter
 *
 * @return bool Authentication successful
 */
public function auth() {

    // state 1 requires a GET variable to exist
    if($this->state == 1 && !isset($_GET["oauth_verifier"])) {
        $this->state = 0;
    }

    // Step 1: Get a request token
    if($this->state == 0) {
        return $this->getRequestToken();
    }
    // Step 2: Get an access token
    elseif($this->state == 1) {
        return $this->getAccessToken();
    }

    // Step 3: Verify the access token
    return $this->verifyAccessToken();
}
Most of the auth() method should be self-explanatory. Based on the state, it executes the appropriate method for that stage of authentication. If the state is 1, an oauth_verifier GET variable should exists, so the method also checks that.
We should now create a public method to find out if we are authenticated. This isAuthed() method returns true if the state is 2:
/**
 * Check the current state of authentication
 *
 * @return bool True if state is 2 (authenticated)
 */
public function isAuthed() {
    return $this->state == 2;
}
We can also use a method to remove the user's authentication. This endSession() method sets the state to 0 and removes the cookies containing the access token:
/**
 * Remove user's access token cookies
 */
public function endSession() {
    $this->state = 0;
    $_SESSION["authstate"] = 0;
    setcookie("access_token", "", 0);
    setcookie("access_token_secret", "", 0);
}
Initialization
Now we need to add some things to our __construct() method to figure out which authentication state the application is in upon initialization. Also, since our code uses session variables, we should make sure the session is started with this code:
// start a session if one does not exist
if(!session_id()) {
    session_start();
}
This next part is where we determine the state. State starts at 0; if there are cookies set containing an access token, state is assumed to be 2; failing that, the state is set to the authstate session variable if it exists. Here is the code:
// determine the authentication status
// default to 0
$this->state = 0;
// 2 (authenticated) if the cookies are set
if(isset($_COOKIE["access_token"], $_COOKIE["access_token_secret"])) {
    $this->state = 2;
}
// otherwise use value stored in session
elseif(isset($_SESSION["authstate"])) {
    $this->state = (int)$_SESSION["authstate"];
}
If the state is 1, that means we are in the process of authentication. So we can go ahead and continue the process at this point:
// if we are in the process of authentication we continue
if($this->state == 1) {
    $this->auth();
}
If the state is 2, we should verify the access token. If authentication fails, this code clears the cookies and resets the state:
// verify authentication, clearing cookies if it fails
elseif($this->state == 2 && !$this->auth()) {
    $this->endSession();
}
Here is the new constructor with these changes made:
/**
 * Initialize a new TwitterApp object
 *
 * @param tmhOAuth $tmhOAuth A tmhOAuth object with consumer key and secret
 */
public function  __construct(tmhOAuth $tmhOAuth) {

    // save the tmhOAuth object
    $this->tmhOAuth = $tmhOAuth;

    // start a session if one does not exist
    if(!session_id()) {
        session_start();
    }

    // determine the authentication status
    // default to 0
    $this->state = 0;
    // 2 (authenticated) if the cookies are set
    if(isset($_COOKIE["access_token"], $_COOKIE["access_token_secret"])) {
        $this->state = 2;
    }
    // otherwise use value stored in session
    elseif(isset($_SESSION["authstate"])) {
    $this->state = (int)$_SESSION["authstate"];
    }

    // if we are in the process of authentication we continue
    if($this->state == 1) {
        $this->auth();
    }
    // verify authentication, clearing cookies if it fails
    elseif($this->state == 2 && !$this->auth()) {
        $this->endSession();
    }
}
Sending a Tweet
Now that all the authorization code is complete, we can add some common functionality to our class. Here is a method to send a tweet through the Twitter API:
/**
 * Send a tweet on the user's behalf
 *
 * @param string $text Text to tweet
 * @return bool Tweet successfully sent
 */
public function sendTweet($text) {

    // limit the string to 140 characters
    $text = substr($text, 0, 140);

    // POST the text to the statuses/update method
    $this->tmhOAuth->request("POST", $this->tmhOAuth->url("1/statuses/update"), array(
        'status' => $text
    ));

    return ($this->tmhOAuth->response["code"] == 200);
}
The sendTweet() method accepts a string, limits it to 140 characters, and then sends it in a POST request to 1/statuses/update. This pattern should be pretty familiar by now.
The Complete TwitterApp Class
<?php
class TwitterApp {

    /**
     * This variable holds the tmhOAuth object used throughout the class
     *
     * @var tmhOAuth An object of the tmhOAuth class
     */
    public $tmhOAuth;

    /**
     * User's Twitter account data
     *
     * @var array Information on the current authenticated user
     */
    public $userdata;

    /**
     * Authentication state
     *
     * Values:
     *  - 0: not authed
     *  - 1: Request token obtained
     *  - 2: Access token obtained (authed)
     *
     * @var int The current state of authentication
     */
    protected $state;

    /**
     * Initialize a new TwitterApp object
     *
     * @param tmhOAuth $tmhOAuth A tmhOAuth object with consumer key and secret
     */
    public function  __construct(tmhOAuth $tmhOAuth) {

        // save the tmhOAuth object
        $this->tmhOAuth = $tmhOAuth;

        // start a session if one does not exist
        if(!session_id()) {
            session_start();
        }

        // determine the authentication status
        // default to 0
        $this->state = 0;
        // 2 (authenticated) if the cookies are set
        if(isset($_COOKIE["access_token"], $_COOKIE["access_token_secret"])) {
            $this->state = 2;
        }
        // otherwise use value stored in session
        elseif(isset($_SESSION["authstate"])) {
            $this->state = (int)$_SESSION["authstate"];
        }

        // if we are in the process of authentication we continue
        if($this->state == 1) {
            $this->auth();
        }
        // verify authentication, clearing cookies if it fails
        elseif($this->state == 2 && !$this->auth()) {
            $this->endSession();
        }
    }

    /**
     * Authenticate user with Twitter
     *
     * @return bool Authentication successful
     */
    public function auth() {

        // state 1 requires a GET variable to exist
        if($this->state == 1 && !isset($_GET["oauth_verifier"])) {
            $this->state = 0;
        }

        // Step 1: Get a request token
        if($this->state == 0) {
            return $this->getRequestToken();
        }
        // Step 2: Get an access token

        elseif($this->state == 1) {
            return $this->getAccessToken();
        }

        // Step 3: Verify the access token
        return $this->verifyAccessToken();
    }

    /**
     * Obtain a request token from Twitter
     *
     * @return bool False if request failed
     */
    private function getRequestToken() {

        // send request for a request token
        $this->tmhOAuth->request("POST", $this->tmhOAuth->url("oauth/request_token", ""), array(
            // pass a variable to set the callback
            'oauth_callback'    => $this->tmhOAuth->php_self()
        ));

        if($this->tmhOAuth->response["code"] == 200) {

            // get and store the request token
            $response = $this->tmhOAuth->extract_params($this->tmhOAuth->response["response"]);
            $_SESSION["authtoken"] = $response["oauth_token"];
            $_SESSION["authsecret"] = $response["oauth_token_secret"];

            // state is now 1
            $_SESSION["authstate"] = 1;

            // redirect the user to Twitter to authorize
            $url = $this->tmhOAuth->url("oauth/authorize", "") . '?oauth_token=' . $response["oauth_token"];
            header("Location: ' . $url);
            exit;
        }
        return false;
    }

    /**
     * Obtain an access token from Twitter
     *
     * @return bool False if request failed
     */
    private function getAccessToken() {

        // set the request token and secret we have stored
        $this->tmhOAuth->config["user_token"] = $_SESSION["authtoken"];
        $this->tmhOAuth->config["user_secret"] = $_SESSION["authsecret"];

        // send request for an access token
        $this->tmhOAuth->request("POST", $this->tmhOAuth->url("oauth/access_token", ""), array(
            // pass the oauth_verifier received from Twitter
            'oauth_verifier'    => $_GET["oauth_verifier"]
        ));

        if($this->tmhOAuth->response["code"] == 200) {

            // get the access token and store it in a cookie
            $response = $this->tmhOAuth->extract_params($this->tmhOAuth->response["response"]);
            setcookie("access_token", $response["oauth_token"], time()+3600*24*30);
            setcookie("access_token_secret", $response["oauth_token_secret"], time()+3600*24*30);

            // state is now 2
            $_SESSION["authstate"] = 2;

            // redirect user to clear leftover GET variables
            header("Location: ' . $this->tmhOAuth->php_self());
            exit;
        }
        return false;
    }

    /**
     * Verify the validity of our access token
     *
     * @return bool Access token verified
     */
    private function verifyAccessToken() {
        $this->tmhOAuth->config["user_token"] = $_COOKIE["access_token"];
        $this->tmhOAuth->config["user_secret"] = $_COOKIE["access_token_secret"];

        // send verification request to test access key
        $this->tmhOAuth->request("GET", $this->tmhOAuth->url("1/account/verify_credentials"));

        // store the user data returned from the API
        $this->userdata = json_decode($this->tmhOAuth->response["response"]);

        // HTTP 200 means we were successful
        return ($this->tmhOAuth->response["code"] == 200);
    }

    /**
     * Check the current state of authentication
     *
     * @return bool True if state is 2 (authenticated)
     */
    public function isAuthed() {
        return $this->state == 2;
    }

    /**
     * Remove user's access token cookies
     */
    public function endSession() {
        $this->state = 0;
        $_SESSION["authstate"] = 0;
        setcookie("access_token", "", 0);
        setcookie("access_token_secret", "", 0);
    }

    /**
     * Send a tweet on the user's behalf
     *
     * @param string $text Text to tweet
     * @return bool Tweet successfully sent
     */
    public function sendTweet($text) {

        // limit the string to 140 characters
        $text = substr($text, 0, 140);

        // POST the text to the statuses/update method
        $this->tmhOAuth->request("POST", $this->tmhOAuth->url("1/statuses/update"), array(
            'status' => $text
        ));

        return ($this->tmhOAuth->response["code"] == 200);
    }
}
Our Application
Now that we have a class that handles all the OAuth tasks, we can now extend it with functionality specific to our application. This includes the ability to get, alter, and set the user's avatar.
We will be extending the TwitterApp class with a TwitterAvatars class. Start with the following code in a new file called lib/TwitterAvatars.php:
<?php
class TwitterAvatars extends TwitterApp {

    /**
     * The path to our temporary files directory
     *
     * @var string Path to store image files
     */
    public $path;

    /**
     * These are all the GD image filters available in this class
     *
     * @var array Associative array of image filters
     */
    protected $filters = array(
        'grayscale'     => IMG_FILTER_GRAYSCALE,
        'negative'      => IMG_FILTER_NEGATE,
        'edgedetect'    => IMG_FILTER_EDGEDETECT,
        'embossed'      => IMG_FILTER_EMBOSS,
        'blurry'        => IMG_FILTER_GAUSSIAN_BLUR,
        'sketchy'       => IMG_FILTER_MEAN_REMOVAL
    );

    /**
     * Initialize a new TwitterAvatars object
     *
     * @param tmhOAuth $tmhOAuth A tmhOAuth object with consumer key and secret
     * @param string $path Path to store image files (default 'tmp")
     */
    public function  __construct(tmhOAuth $tmhOAuth, $path = 'tmp") {

        // call the parent class' constructor
        parent::__construct($tmhOAuth);

        // save the path variable
        $this->path = $path;
    }
}
As you can see, the extended class includes a $path property to point to where temporary image files will go, a $filters property holding an array of image filters, and an extended constructor with a parameter to set the path. Since we are overriding the original constructor, we have to explicitly call the parent's constructor with parent::__construct().
Now we can start adding our methods.
Downloading
Obviously, we'll need the ability to download images in order to manipulate them. Here is a generic download() method that accepts a URL and returns the data at that location. The method makes a basic cURL request.
/**
 * Download data from specified URL
 *
 * @param string $url URL to download
 * @return string Downloaded data
 */
protected function download($url) {
    $ch = curl_init();
    curl_setopt($ch, CURLOPT_URL, $url);
    curl_setopt($ch, CURLOPT_RETURNTRANSFER, true);

    $ret = curl_exec($ch);
    curl_close($ch);

    return $ret;
}
Finding URLs
Now that we can download files, we need to find the location of the files we need. There are two different images we are interested in, the standard sized thumbnail and the original full-sized image. So, we'll create a method to get each URL.
To get the standard sized thumbnail, we'll call the users/profile_image/:screen_name API method which responds with a 302 redirect to the specified user's avatar image. This means the URL will be found in the Location header. Here is that method:
/**
 * Get the URL to the standard sized avatar
 *
 * @return string The URL to the image file
 */
protected function getImageURL() {

    // request user's 'bigger' profile image
    $this->tmhOAuth->request("GET", $this->tmhOAuth->url("1/users/profile_image/" . $this->userdata->screen_name), array(
        'screen_name'   => $this->userdata->screen_name,
        'size'          => 'bigger'
    ));

    if($this->tmhOAuth->response["code"] == 302) {

        // the direct URL is in the Location header
        return $this->tmhOAuth->response["headers"]["location"];
    }
    throw new Exception("Error locating image");
}
Note that we are making a GET request with tmhOAuth, passing screen_name and size parameters, then returning the contents of the Location header.
There is no API method to get the full sized image, so for our next method we'll cheat a little and edit the URL. The user data contains a profile_image_url field that points to something like avatar_normal.jpg, and the original image can be found at avatar.jpg without the suffix. So this method gets the URL, removes the size suffix and returns the modified URL:
/**
 * Get the URL to the full sized avatar
 *
 * @return string The URL to the image file
 */
protected function getOriginalImageURL() {

    // get the regular sized avatar
    $url = $this->userdata->profile_image_url;

    // save the extension for later
    $ext = strrchr($url, '.");

    // strip the "_normal' suffix and add back the extension
    return substr($url, 0, strrpos($url, "_")) . $ext;
}
Reading Images
Now that we can locate and download images, we need a way to read them. We'll be using the GD library to manipulate images, so this method will convert the raw image data into a GD image resource.
/**
 * Convert raw image data to a GD resource
 *
 * @param string $data Binary image data to parse
 * @return resource A GD image resource identifier
 */
protected function readImage($data) {

    // read in the original image
    $src = imagecreatefromstring($data);

    if(!$src) {
        throw new Exception("Error reading image");
    }

    // get the dimensions
    $width = imagesx($src);
    $height = imagesy($src);

    // create a blank true color image of the same size
    $img = imagecreatetruecolor($width, $height);

    // copy the original image to this new canvas
    imagecopy($img, $src, 0, 0, 0, 0, $width, $height);

    // discard the source image
    imagedestroy($src);

    return $img;
}
To describe what's happening above:
- The image data is converted to a GD resource using the
imagecreatefromstring()function. - The image dimensions are recorded using
imagesx()andimagesy(). - A new blank true color image with the same dimensions is created using
imagecreatetruecolor(). - The original image is copied into the new image using the
imagecopy()function. This results in a true color version of the original image regardless of the original color mode. - The original image resource is destroyed using
imagedestroy()and the handle to the new image is returned.
Saving Images
Now that we can download images and create a GD resource, we need a method to save the images to the file system. Here is the method that saves the supplied image as a PNG file with the specified name using imagepng():
/**
 * Save a GD image resource to a PNG file
 *
 * @param resource $img GD image resource identifier
 * @param string $name Name of the image
 * @return string Path to the saved image
 */
protected function saveImage($img, $name) {
    $path = $this->path . "/' . $name . '.png';
    imagepng($img, $path);
    imagedestroy($img);
    return $path;
}
Generating Previews
Now that we have all the pieces that power our app, we can start putting them together. In our application flow, we will give the user a selection of previews to choose from. Here is the method to generate these previews:
/**
 * Generate previews for each image filter
 *
 * @return array Associative array of image previews
 */
public function generatePreviews() {

    // we need valid user info to know whose avatar to handle
    if(!$this->isAuthed()) {
        throw new Exception("Requires oauth authorization");
    }
    $username = $this->userdata->screen_name;

    // cache the raw data to use
    $data = $this->download($this->getImageURL());

    // copy the original image
    $img = $this->readImage($data);
    $this->saveImage($img, $username . "_orig");

    // array to hold the list of previews
    $images = array();

    // loop through each filter to generate previews
    foreach($this->filters as $filter_name => $filter) {
        $img = $this->readImage($data);
        imagefilter($img, $filter);
        $images[$filter_name] = $this->saveImage($img, $username . "_' . $filter_name);
    }

    return $images;
}
The first thing we do is check that the user is authenticated and then grab the user name to use later in file names.
// we need valid user info to know whose avatar to handle
if(!$this->isAuthed()) {
    throw new Exception("Requires oauth authorization");
}
$username = $this->userdata->screen_name;
Then we download the user's image using the getImageURL() and download() methods we have created. This data will be used repeatedly for each preview so we save it in the $data variable.
// cache the raw data to use
$data = $this->download($this->getImageURL());
Next, we save an unmodified copy with the _orig suffix. This is for visual comparison later.
// copy the original image
$img = $this->readImage($data);
$this->saveImage($img, $username . "_orig");
The last part of the method is where we loop through the image filters listed in the $filters property, generating an image for each filter. In each iteration, we're creating an image and applying the imagefilter() function, which accepts one of the constants we have listed in the $filters array. Then for each image we save, we add its path to an associative array (using the filter name as the key) which this method returns at the end.
// array to hold the list of previews
$images = array();

// loop through each filter to generate previews
foreach($this->filters as $filter_name => $filter) {
    $img = $this->readImage($data);
    imagefilter($img, $filter);
    $images[$filter_name] = $this->saveImage($img, $username . "_' . $filter_name);
}

return $images;
The next part of our application flow asks the user to confirm their choice, so we need a way to find a specific preview. Here is the simple method to get the path to an image based on the option passed as a parameter, defaulting to the original image:
/**
 * Get the path to a previously generated preview
 *
 * @param string $filter The image filter to get the preview for
 * @return string The path to the preview file or null if not found
 */
public function getPreview($filter = 'orig") {
    if(!$this->isAuthed()) {
        throw new Exception("Requires oauth authorization");
    }
    $path = $this->path . "/' . $this->userdata->screen_name . "_' . $filter . '.png';
    if(file_exists($path)) {
        return $path;
    }
    return null;
}
Changing The Avatar
The final stage of our application flow is to actually change the user's avatar. First we need a method to get the full sized image and apply a specific filter to it. Here it is:
/**
 * Process the user's full avatar using one of the filters
 *
 * @param string $filter The filter to apply to the image
 * @return string Path to the output file
 */
protected function processImage($filter = "grayscale") {

    // make sure the filter exists
    $filter = strtolower($filter);
    if(!array_key_exists($filter, $this->filters)) {
        throw new Exception("Unsupported image filter");
    }

    $username = $this->userdata->screen_name;

    // get the full sized avatar
    $data = $this->download($this->getOriginalImageURL());
    $img = $this->readImage($data);

    // apply the filter to the image
    imagefilter($img, $this->filters[$filter]);

    // save the image and return the path
    return $this->saveImage($img, $username . "_' . $filter . "_full");
}
That should be easy to follow since it is very similar to the generatePreviews() method. It accepts a parameter to specify an image filter and checks that it exists. Then it downloads the original image and applies the filter to it, passing back the path to the generated image as the return value.
Now we need the method that actually sends the generated image to Twitter, updating the user's avatar. This method calls the processImage() method to create the image and uploads it to Twitter via the 1/account/update_profile_image API method:
/**
 * Update user's avatar with a filtered version
 *
 * @param string $filter The filter to use
 * @return bool Operation successful
 */
public function commitAvatar($filter) {
    if(!$this->isAuthed()) {
        throw new Exception("Requires oauth authorization");
    }

    // generate the image and get the path
    $path = $this->processImage($filter);
    if(file_exists($path)) {

        // send a multipart POST request with the image file data
        $this->tmhOAuth->request("POST", $this->tmhOAuth->url("1/account/update_profile_image"), array(
            // format: @local/path.png;type=mime/type;filename=file_name.png
            'image' => '@' . $path . ';type=image/png;filename=' . basename($path)
        ), true, true);

        return ($this->tmhOAuth->response["code"] == 200);
    }

    return false;
}
The tricky part here is the actual tmhOAuth POST request, which is a multipart request containing the raw image data. In order to do this, we must set the last parameter of the tmhOAuth::request() method to true, and pass the image variable in a special format:
@[path_to_image];type=[mime_type];filename=[file_name]
For example, if we want to upload tmp/username_grayscale_full.png, the value would be @tmp/username_grayscale_full.png;type=image/png;filename=username_grayscale_full.png.
Here is that part of the code again:
// send a multipart POST request with the image file data
$this->tmhOAuth->request("POST", $this->tmhOAuth->url("1/account/update_profile_image"), array(
    // format: @local/path.png;type=mime/type;filename=file_name.png
    'image' => '@' . $path . ';type=image/png;filename=' . basename($path)
), true, true);
Cleaning Up
A side effect of all this file manipulation is a lot of temporary files being left behind. Here is a method to clean up the temporary directory:
/**
 * Delete leftover image files
 */
public function cleanupFiles() {

    // file to track when we last checked
    $flag = $this->path . "/.last_check';

    $time = time();

    // have we checked within the last hour?
    if(!file_exists($flag) || $time - filemtime($flag) > 3600) {

        // get an array of PNG files in the directory
        $files = glob($this->path . "/*.png");

        // loop through files, deleting old files (12+ hours)
        foreach($files as $file) {
            if($time - filemtime($file) > 60*60*12) {
                unlink($file);
            }
        }

        // update the timestamp of our flag file
        touch($flag);
    }
}
This simply loops through the PNG files, deleting those more than 12 hours old. It also checks how long it has been since we checked using the timestamp on a .last_check file, allowing us to limit the check to one per hour. This way we can call this method on every request without wasting resources.
Note: We are making use of the glob() function in PHP, which is an easy way to get an array of files matching a pattern.
The Complete TwitterAvatars Class
&?php
class TwitterAvatars extends TwitterApp {

    /**
     * The path to our temporary files directory
     *
     * @var string Path to store image files
     */
    public $path;

    /**
     * These are all the GD image filters available in this class
     *
     * @var array Associative array of image filters
     */
    protected $filters = array(
        'grayscale'     => IMG_FILTER_GRAYSCALE,
        'negative'      => IMG_FILTER_NEGATE,
        'edgedetect'    => IMG_FILTER_EDGEDETECT,
        'embossed'      => IMG_FILTER_EMBOSS,
        'blurry'        => IMG_FILTER_GAUSSIAN_BLUR,
        'sketchy'       => IMG_FILTER_MEAN_REMOVAL
    );

    /**
     * Initialize a new TwitterAvatars object
     *
     * @param tmhOAuth $tmhOAuth A tmhOAuth object with consumer key and secret
     * @param string $path Path to store image files (default 'tmp")
     */
    public function  __construct(tmhOAuth $tmhOAuth, $path = 'tmp") {

        // call the parent class' constructor
        parent::__construct($tmhOAuth);

        // save the path variable
        $this->path = $path;
    }

    /**
     * Download data from specified URL
     *
     * @param string $url URL to download
     * @return string Downloaded data
     */
    protected function download($url) {
        $ch = curl_init();
        curl_setopt($ch, CURLOPT_URL, $url);
        curl_setopt($ch, CURLOPT_RETURNTRANSFER, true);

        $ret = curl_exec($ch);
        curl_close($ch);

        return $ret;
    }

    /**
     * Get the URL to the standard sized avatar
     *
     * @return string The URL to the image file
     */
    protected function getImageURL() {

        // request user's 'bigger' profile image
        $this->tmhOAuth->request("GET", $this->tmhOAuth->url("1/users/profile_image/' . $this->userdata->screen_name), array(
            'screen_name'   => $this->userdata->screen_name,
            'size'          => 'bigger'
        ));

        if($this->tmhOAuth->response["code"] == 302) {

            // the direct URL is in the Location header
            return $this->tmhOAuth->response["headers"]["location"];
        }
        throw new Exception("Error locating image");
    }

    /**
     * Get the URL to the full sized avatar
     *
     * @return string The URL to the image file

     */
    protected function getOriginalImageURL() {

        // get the regular sized avatar
        $url = $this->userdata->profile_image_url;

        // save the extension for later
        $ext = strrchr($url, '.");

        // strip the "_normal' suffix and add back the extension
        return substr($url, 0, strrpos($url, "_")) . $ext;
    }

    /**
     * Convert raw image data to a GD resource
     *
     * @param string $data Binary image data to parse
     * @return resource A GD image resource identifier
     */
    protected function readImage($data) {

        // read in the original image
        $src = imagecreatefromstring($data);

        if(!$src) {
            throw new Exception("Error reading image");
        }

        // get the dimensions
        $width = imagesx($src);
        $height = imagesy($src);

        // create a blank true color image of the same size
        $img = imagecreatetruecolor($width, $height);

        // copy the original image to this new canvas
        imagecopy($img, $src, 0, 0, 0, 0, $width, $height);

        // discard the source image
        imagedestroy($src);

        return $img;
    }

    /**
     * Save a GD image resource to a PNG file
     *
     * @param resource $img GD image resource identifier
     * @param string $name Name of the image
     * @return string Path to the saved image
     */
    protected function saveImage($img, $name) {
        $path = $this->path . "/' . $name . '.png';
        imagepng($img, $path);
        imagedestroy($img);
        return $path;
    }

    /**
     * Generate previews for each image filter
     *
     * @return array Associative array of image previews
     */
    public function generatePreviews() {

        // we need valid user info to know whose avatar to handle
        if(!$this->isAuthed()) {
            throw new Exception("Requires oauth authorization");
        }
        $username = $this->userdata->screen_name;

        // cache the raw data to use
        $data = $this->download($this->getImageURL());

        // copy the original image
        $img = $this->readImage($data);
        $this->saveImage($img, $username . "_orig");

        // array to hold the list of previews
        $images = array();

        // loop through each filter to generate previews
        foreach($this->filters as $filter_name => $filter) {
            $img = $this->readImage($data);
            imagefilter($img, $filter);
            $images[$filter_name] = $this->saveImage($img, $username . "_' . $filter_name);
        }

        return $images;
    }

    /**
     * Get the path to a previously generated preview
     *
     * @param string $filter The image filter to get the preview for
     * @return string The path to the preview file or null if not found
     */
    public function getPreview($filter = 'orig") {
        if(!$this->isAuthed()) {
            throw new Exception("Requires oauth authorization");
        }
        $path = $this->path . "/' . $this->userdata->screen_name . "_' . $filter . '.png';
        if(file_exists($path)) {
            return $path;
        }
        return null;
    }

    /**
     * Process the user's full avatar using one of the filters
     *
     * @param string $filter The filter to apply to the image
     * @return string Path to the output file
     */
    protected function processImage($filter = 'grayscale") {

        // make sure the filter exists
        $filter = strtolower($filter);
        if(!array_key_exists($filter, $this->filters)) {
            throw new Exception("Unsupported image filter");
        }

        $username = $this->userdata->screen_name;

        // get the full sized avatar
        $data = $this->download($this->getOriginalImageURL());
        $img = $this->readImage($data);

        // apply the filter to the image
        imagefilter($img, $this->filters[$filter]);

        // save the image and return the path
        return $this->saveImage($img, $username . "_' . $filter . "_full");
    }

    /**
     * Update user's avatar with a filtered version
     *
     * @param string $filter The filter to use
     * @return bool Operation successful
     */
    public function commitAvatar($filter) {
        if(!$this->isAuthed()) {
            throw new Exception("Requires oauth authorization");
        }

        // generate the image and get the path
        $path = $this->processImage($filter);
        if(file_exists($path)) {

            // send a multipart POST request with the image file data
            $this->tmhOAuth->request("POST", $this->tmhOAuth->url("1/account/update_profile_image"), array(
                // format: @local/path.png;type=mime/type;filename=file_name.png
                'image' => '@' . $path . ';type=image/png;filename=' . basename($path)
            ), true, true);

            return ($this->tmhOAuth->response["code"] == 200);
        }

        return false;
    }

    /**
     * Delete leftover image files
     */
    public function cleanupFiles() {

        // file to track when we last checked
        $flag = $this->path . "/.last_check';

        $time = time();

        // have we checked within the last hour?
        if(!file_exists($flag) || $time - filemtime($flag) > 3600) {

            // get an array of PNG files in the directory
            $files = glob($this->path . "/*.png");

            // loop through files, deleting old files (12+ hours)
            foreach($files as $file) {
                if($time - filemtime($file) > 60*60*12) {
                    unlink($file);
                }
            }

            // update the timestamp of our flag file
            touch($flag);
        }
    }
}
The Front End
We have all the application's components together, so now all we need is the user interface. All the code here will go into the index.php file in the root directory. We'll start by including the libraries and setting the configuration:
<?php

// include our libraries
include 'lib/tmhOAuth.php';
include 'lib/TwitterApp.php';
include 'lib/TwitterAvatars.php';

// set the consumer key and secret
define("CONSUMER_KEY",      'qSkJum23MqlG6greF8Z76A");
define("CONSUMER_SECRET",   'Bs738r5UY2R7e5mwp1ilU0voe8OtXAtifgtZe9EhXw");
?>
Note: Be sure to replace the CONSUMER_KEY and CONSUMER_SECRET with your own.
We're going to place our code in a try-catch block so we can gracefully handle any errors, assigning their message to an $error variable.
try {

} catch(Exception $e) {

    // catch any errors that may occur
    $error = $e;
}
Within the try block we can begin writing our code, starting by initializing a TwitterAvatars object called $ta with a configured tmhOAuth object:
    // our tmhOAuth settings
    $config = array(
        'consumer_key'      => CONSUMER_KEY,
        'consumer_secret'   => CONSUMER_SECRET
    );

    // create a new TwitterAvatars object
    $ta = new TwitterAvatars(new tmhOAuth($config));
We can clear out any old temporary files at this point:
    // check for stale files
    $ta->cleanupFiles();
Next we check if the user is authenticated or, failing that, if the user has requested authentication, in which case we start the process by calling the auth() method:
    // check our authentication status
    if($ta->isAuthed()) {

    }
    // did the user request authorization?
    elseif(isset($_POST["auth"])) {

        // start authentication process
        $ta->auth();
    }
If the user is authenticated, we need to check if an option has been selected, otherwise we will generate previews:
    // check our authentication status
    if($ta->isAuthed()) {

        // has the user selected an option?
        if(isset($_POST["filter"])) {

        }
        // generate previews if the user has not chosen
        else {

            // $previews will be a list of images
            $previews = $ta->generatePreviews();
        }
    }
If an option was selected, we need to get the paths to the old and new images for display:
        // has the user selected an option?
        if(isset($_POST["filter"])) {

            // get the image paths for display
            $original = $ta->getPreview();
            $newimage = $ta->getPreview($_POST["filter"]);
        }
Finally, we check if the user has confirmed their choice and apply the change. We also send a tweet if requested and set a $success variable to true:
        // has the user selected an option?
        if(isset($_POST["filter"])) {

            // is the user sure?
            if(isset($_POST["confirm"])) {

                // change the user's avatar
                $ta->commitAvatar($_POST["filter"]);

                // tweet if the user chose to
                if(isset($_POST["tweet"])) {
                    $ta->sendTweet("I just updated my avatar using Avatar Effects...");
                }

                $success = true;
            }

            // get the image paths for display
            $original = $ta->getPreview();
            $newimage = $ta->getPreview($_POST["filter"]);
        }
Here is what we have so far:
<?php

// include our libraries
include 'lib/tmhOAuth.php';
include 'lib/TwitterApp.php';
include 'lib/TwitterAvatars.php';

// set the consumer key and secret
define("CONSUMER_KEY",      'qSkJum23MqlG6greF8Z76A");
define("CONSUMER_SECRET",   'Bs738r5UY2R7e5mwp1ilU0voe8OtXAtifgtZe9EhXw");

try {

    // our tmhOAuth settings
    $config = array(
        'consumer_key'      => CONSUMER_KEY,
        'consumer_secret'   => CONSUMER_SECRET
    );

    // create a new TwitterAvatars object
    $ta = new TwitterAvatars(new tmhOAuth($config));

    // check for stale files
    $ta->cleanupFiles();

    // check our authentication status
    if($ta->isAuthed()) {

        // has the user selected an option?
        if(isset($_POST["filter"])) {

            // is the user sure?
            if(isset($_POST["confirm"])) {

                // change the user's avatar
                $ta->commitAvatar($_POST["filter"]);

                // tweet if the user chose to
                if(isset($_POST["tweet"])) {
                    $ta->sendTweet("I just updated my avatar using Avatar Effects...");
                }

                $success = true;
            }

            // get the image paths for display
            $original = $ta->getPreview();
            $newimage = $ta->getPreview($_POST["filter"]);
        }
        // generate previews if the user has not chosen
        else {

            // $previews will be a list of images
            $previews = $ta->generatePreviews();
        }
    }
    // did the user request authorization?
    elseif(isset($_POST["auth"])) {

        // start authentication process
        $ta->auth();
    }
} catch(Exception $e) {

    // catch any errors that may occur
    $error = $e;
}
?>
The HTML
After the PHP code we will output the appropriate HTML, starting with this template, which sets the title and main heading:
<!DOCTYPE html>
<html>
  <head>
    <meta charset="UTF-8">
    <title>Twitter Avatar Effects</title>
    <link rel="stylesheet" href="css/style.css">
  </head>
  <body>
      <h1>Twitter Avatar Effects</h1>
  </body>
</html>
Here's where we display a form with image inputs for each preview:
  <?php if(isset($previews)): ?>
      <h2>Choose your weapon...</h2>
      <form action="index.php" method="post">
      <?php foreach($previews as $filter => $path): ?>
          <input type="image" src="<?php echo $path; ?>"
                 alt="<?php echo ucfirst($filter); ?>"
                  width="73" height="73"
                 name="filter" value="<?php echo $filter; ?>">
      <?php endforeach; ?>
      </form>
      <p>Select one of the images above to change your Twitter avatar.</p>
Here is the success page:
  <?php elseif(isset($success)): ?>
      <h2>Success! Your Twitter avatar is now:</h2>
      <img src="<?php echo $newimage; ?>" alt="Your Avatar" width="73" height="73">
      <p><a href="http://twitter.com/<?php echo $ta->userdata->screen_name; ?>">Go see it</a></p>
Here is the confirmation page, where we show the comparison and offer the chance to cancel:
<?php elseif(isset($newimage)): ?>
<h2>Are you sure?</h2>
<img src="<?php echo $original; ?>" alt="Original" width="73" height="73">
<span class="arrow">⇒</span>
<img src="<?php echo $newimage; ?>" alt="<?php echo ucfirst($_POST["filter"]); ?>">
<form action="index.php" method="post">
<input type="hidden" name="filter" value="<?php echo $_POST["filter"]; ?>">
<input type="submit" name="confirm" value="Confirm">
<a href="index.php">Cancel</a>
<p><label>Tweet about your new avatar?
<input type="checkbox" name="tweet" value="true"></label></p>
</form>
Note that the confirmation form includes the selected filter in a hidden field.
If there is an error, we show this:
  <?php elseif(isset($error)): ?>
      <p>Error. <a href="index.php">Try again?</a></p>
The default display is the "Connect to Twitter" button as an image input (download one of the images from the bottom of this page to the img directory):
  <?php else: ?>
      <form action="index.php" method="post">
          <input type="image" src="img/sign-in-with-twitter-l.png"
                 alt="Connect to Twitter" name="auth" value="1">
      </form>
      <p>Connect to Twitter to use this app.</p>
  <?php endif; ?>
Here's the complete HTML section:
<!DOCTYPE html>
<html>
<head>
<meta charset="UTF-8">
<title>Twitter Avatar Effects</title>
<link rel="stylesheet" href="css/style.css">
</head>
<body>
<h1>Twitter Avatar Effects</h1>
<?php if(isset($previews)): ?>
<h2>Choose your weapon...</h2>
<form action="index.php" method="post">
<?php foreach($previews as $filter => $path): ?>
<input type="image" src="<?php echo $path; ?>"
alt="<?php echo ucfirst($filter); ?>"
width="73" height="73"
name="filter" value="<?php echo $filter; ?>">
<?php endforeach; ?>
</form>
<p>Select one of the images above to change your Twitter avatar.</p>
<?php elseif(isset($success)): ?>
<h2>Success! Your Twitter avatar is now:</h2>
<img src="<?php echo $newimage; ?>" alt="Your Avatar" width="73" height="73">
<p><a href="http://twitter.com/<?php echo $ta->userdata->screen_name; ?>">Go see it</a></p>
<?php elseif(isset($newimage)): ?>
<h2>Are you sure?</h2>
<img src="<?php echo $original; ?>" alt="Original" width="73" height="73">
<span class="arrow">⇒</span>
<img src="<?php echo $newimage; ?>" alt="<?php echo ucfirst($_POST["filter"]); ?>">
<form action="index.php" method="post">
<input type="hidden" name="filter" value="<?php echo $_POST["filter"]; ?>">
<input type="submit" name="confirm" value="Confirm">
<a href="index.php">Cancel</a>
<p><label>Tweet about your new avatar?
<input type="checkbox" name="tweet" value="true"></label></p>
</form>
<?php elseif(isset($error)): ?>
<p>Error. <a href="index.php">Try again?</a></p>
<?php else: ?>
<form action="index.php" method="post">
<input type="image" src="img/sign-in-with-twitter-l.png"
alt="Connect to Twitter" name="auth" value="1">
</form>
<p>Connect to Twitter to use this app.</p>
<?php endif; ?>
</body>
</html>
The CSS
Here is some basic CSS to make the interface look nice, saved in css/style.css:
html {
    background-color: #eee;
    text-align: center;
    font-family: "Lucida Grande",Verdana, sans-serif;
    font-size: 16px;
    color: #224;
}
body {
    width: 700px;
    margin: 30px auto;
    background-color: #acf;
    padding: 10px;
    border-radius: 10px;
    -moz-border-radius: 10px;
    -webkit-border-radius: 10px;
}
p {
    font-size: 1em;
}
h1 {
    font-size: 2em;
}
h2 {
    font-size: 1.6em;
}
.arrow {
    font-size: 4em;
    font-weight: bold;
}
Results
Here is a video which details how our completed application should look:
Conclusion
If you've followed this tutorial all the way through, you should have a pretty good understanding of OAuth and what it takes to create a simple Twitter web application. Using the Twitter API is easy once you understand the basic concepts - especially if you use a library like tmhOAuth to handle the minor details.
The simple example we created in this tutorial can easily be modified or extended to do anything. So if you have a great idea for a cool new Twitter app, feel free to use this as the foundation.
Thanks for reading. If you have any questions or comments about this tutorial, please post!

Comments