Dating apps have become one of the more popular genres in the App Store recently. Due to their nature, however, developing a fully featured dating app can be challenging. In the second part of this series, we'll look at how we can leverage the Sinch platform in an iOS app to implement voice calls and messaging. These are two cornerstone features for dating apps and they are surprisingly easy to implement with Sinch.
1. Overview
Before we begin coding, let's review the app we are making. Our dating app will have a few core features that we'll focus on in this tutorial. For accounts, users will be able to sign in using Facebook. After signing in, they'll be able to see other users of the app that are nearby.
The users are stored on the server that we communicate with from the restful API created in the first part of this tutorial. Once we get the user's information from Facebook, a new user is posted to the server and a session created. After that, a list of registered users will be retrieved to select from.
When the user finds someone they want to talk to, they will be able to either message them or initiate a voice call. This is where Sinch will come into play. We'll utilize their SDK to do all of the hard work of handling voice calls and messaging.
Now that we know what we are developing, it's time to get started.
2. Starter Project
Start by downloading the starter project from GitHub. The app is targeted at iPhone and it contains the user interface, Facebook authentication, and communication with the RESTful API already in place. This will allow us to focus on integrating with Sinch.
Before we continue, though, I'd like to discuss the basic architecture of the app and how it communicates with the server. The code that communicates with the rest API lives in the UsersAPIClient class. It uses the popular AFNetworking library to simplify the networking logic. If you've used AFNetworking before, this will look very familiar to you. If you haven't, our tutorial about AFNetworking is an excellent place to start.
In the header file, you'll see some methods to communicate with various endpoints of the RESTful API, such as creating a user, starting a session, deleting a user, and more.
- (void)createUser:(User *)user completion:(void (^)())action;
- (void)beginUserSession:(User *)user completion:(void (^)())action;
- (void)deleteUser:(User *)user completion:(void (^)())action;
- (void)getRegisteredUsersWithMeters:(double)meters completion:(void (^)(NSArray *users))action;
When a response comes back from the server, the JSON is parsed and used to initialize a model.
Speaking of models, there is one model used in the project, User. It contains basic information about a user, such as name, location, id, etc. The user id is especially important since we'll need it to uniquely identify who we are communicating with when we integrate with Sinch.
Take a few moments to browse the project to get a better understanding of its structure. Just like with third party libraries, it's tremendously helpful to browse documentation and source code before you actually use it.
3. Build and Run
If you build and run the demo project, you should be prompted to log in via Facebook.
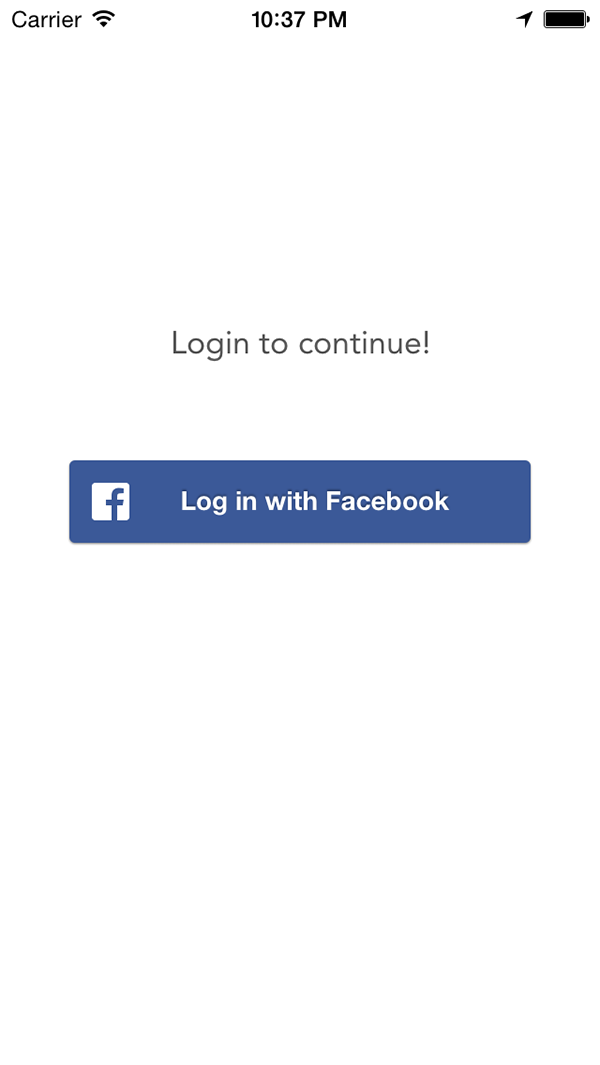
Go ahead and check if you can log in with Facebook. After logging in, the demo app does three things:
- It creates a user record on the backend if one isn't present.
- It starts a user session and creates an access token for the session.
- It retrieves a list of users in the system.
Later on, when you've made a few test accounts, you can find users within a certain range. By default, every user in the system is returned since it's unlikely any other users are nearby while you're testing.
4. Create a Sinch Account
To use the Sinch SDK, you'll first need to create a developer account. Head over to the Sinch website and click Get Started For Free in the top right to sign up.
Enter your email address and password, and accept the terms and conditions. Sinch will automatically start a setup process after you sign up. At this point, all you need to do is name your app and add a short description. You can skip the rest of the start guide for now.
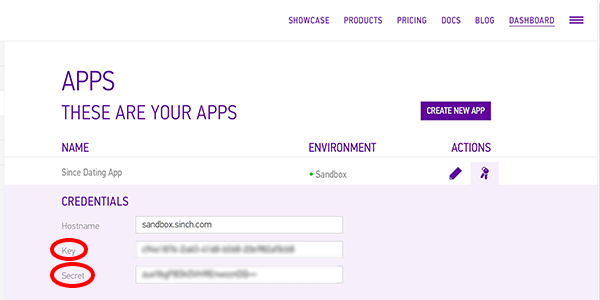
Next, visit the dashboard to retrieve your app's API key and secret. You should see Dashboard at the top of Sinch's website after you've signed in with your new account. Select Apps on the left, select the app you created, and click the keys icon on the right to show the key and secret. You'll want to keep track of these values to later initialize the Sinch client.
5. Add Sinch SDK
There are two ways to add the Sinch SDK to your project. The easiest approach by far is through CocoaPods. Add the following line to your Podfile:
pod 'SinchService', '~> 1.0'
Next, run the following command to integrate the Sinch SDK into your workspace:
pod update
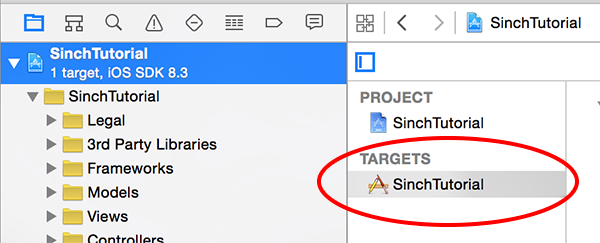
In this tutorial, however, I'll show you how to add the SDK if you're not using CocoaPods. Start by downloading the Sinch SDK for iOS. Visit the downloads section of the Sinch website and download the SDK for iOS. The Sinch SDK depends on three frameworks so we'll need to link our project against those first. In the Project Navigator, choose SinchTutorial and select the SinceTutorial target.
Select Build Phases > Link Binary With Libraries and click the plus button at the bottom.

Add the following frameworks to the list of frameworks to link with:
- Security
- AudioToolbox
- AVFoundation
We also need to add three linker flags. In the target's Build Settings, search for Other Linker Flags.
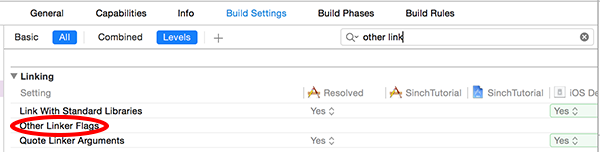
Add the following linker flags under Debug:
-ObjC -Xlinker -lc++
Finally, drag the Sinch framework that you downloaded earlier into the Frameworks folder in the Project Navigator. Build your project to make sure there are no errors. You're now ready to start using the Sinch SDK.
6. Setting Up the Sinch Client
The Sinch client is the driving force responsible for communicating with the Sinch platform. Before we can use the messaging or calling features, we'll need to initialize an instance of the Sinch client. To do this, we need the key and secret that we retrieved earlier after creating our Sinch account.
Open AppDelegate.h and import the Sinch framework as shown below.
#import <Sinch/Sinch.h>
Next, we need to create a property for the Sinch client and a method prototype for initializing it. Add the following code snippet below the window property.
@property (strong, nonatomic) id<SINClient> client;

- (void)sinchClientWithUserId:(NSString *)userId;
We'll use this reference to the Sinch client to easily get calls and messaging going. The SINClientDelegate protocol will inform us whether connecting with the Sinch backend was successful.
Conform the AppDelegate class to the SINClientDelegate protocol as shown below.
//Conform to SINClientDelegate
@interface AppDelegate : UIResponder <UIApplicationDelegate, SINClientDelegate>
Switch to the implementation file of the AppDelegate class and implement the sinchClientWithUserId: method as shown below.
#pragma mark - Sinch
- (void)sinchClientWithUserId:(NSString *)userId
{
    if (!_client)
    {
        _client = [Sinch clientWithApplicationKey:@"<YOUR_APP_KEY>"
                                applicationSecret:@"<YOUR_APP_SECRET>"
                                  environmentHost:@"sandbox.sinch.com"
                                           userId:userId];
        _client.delegate = self;

        [_client setSupportCalling:YES];
        [_client setSupportMessaging:YES];
        [_client start];
        [_client startListeningOnActiveConnection];
    }
}
We'll use this method later to communicate with the Sinch backend after the user has logged in. Remember to enter the application key and secret. Otherwise you'll be unable to connect to the Sinch backend.
After initializing the client, we tell Sinch that we'll be using the messaging and calling features. We then start the client and establish a connection with the Sinch services to receive incoming calls.
Next, implement the following delegate methods of the SINClientDelegate protocol in the AppDelegate class:
- (void)clientDidStart:(id<SINClient>)client
{
    NSLog(@"Sinch client started successfully (version: %@)", [Sinch version]);
}

- (void)clientDidFail:(id<SINClient>)client error:(NSError *)error
{
    NSLog(@"Sinch client error: %@", [error localizedDescription]);
}

- (void)client:(id<SINClient>)client logMessage:(NSString *)message area:(NSString *)area severity:(SINLogSeverity)severity timestamp:(NSDate *)timestamp
{
    if (severity == SINLogSeverityCritical)
    {
        NSLog(@"%@", message);
    }
}
These delegate methods will log errors to the Xcode console should any occur and they also inform us when we've successfully connected with Sinch.
7. Initializing the Sinch Client
Open FindUsersViewController.m and scroll to the beginUserSession method. In this method, if a session was started without errors the completion block is executed. This is a good time to initialize the Sinch client. Replace the //TODO comment with the following code block:
//Init sinch client
AppDelegate *delegate = (AppDelegate *)[[UIApplication sharedApplication] delegate];
[delegate sinchClientWithUserId:self.curUser.userID];
This calls the method to start the Sinch client and allows us to start using its features. Build and run the app. After you've retrieved a list of users, confirm that connecting with the Sinch backend was successful by checking the logs in the Xcode console.
8. Implement Messaging
We're now getting to the fun part, adding a messaging component with very little code using the Sinch SDK. Start by opening MessagingViewController.m and import the Sinch framework.
#import <Sinch/Sinch.h>
Much like the SINClientDelegate protocol provides helpful methods that help us keep track of the client's status, the SINMessageClientDelegate protocol keeps us informed about incoming and outgoing messages, their status, and more.
Start by conforming the MessagingViewController class to this protocol by updating the interface of the class.
@interface MessagingViewController () <UITableViewDataSource, UITableViewDataSource, UITextFieldDelegate, SINMessageClientDelegate>
To implement messaging, we'll also need a SINMessageClient instance to handle the responsibilities of messaging. Add a property for the SINMessageClient instance.
@property (strong, nonatomic) id<SINMessageClient> sinchMessageClient;
We can create an instance of a messaging client from the Sinch client we already have in the app delegate. When the view controller loads, we need to initialize one and set the view controller as its delegate. Add the following code block to the view controller's viewDidLoad method:
//Setup Sinch message client
self.sinchMessageClient = [((AppDelegate *)[[UIApplication sharedApplication] delegate]).client messageClient];
self.sinchMessageClient.delegate = self;
Now that we've got an object to send and receive messages, and a delegate to handle them, let's add code to compose a message. Find the sendMessage: method at the bottom of the view controller and add the following implementation:
[self dismissKeyboard];
SINOutgoingMessage *outgoingMessage = [SINOutgoingMessage messageWithRecipient:self.selectedUser.userID text:self.messageTextField.text];
[self.sinchMessageClient sendMessage:outgoingMessage];
A SINOutgoingMessage instance will contact Sinch and move the message over to the recipient. We designate the recipient by providing their user id from the user's model. Sinch will know where to go with the message by routing it through their API using a combination of your application key, secret, and the unique user id passed to it.
Since a message could either be incoming or outgoing, add an enum at the top of the view controller to account for either scenario. Add it below the import statements.
typedef NS_ENUM(int, MessageDirection)
{
    Incoming,
    Outgoing
};
Finally, we'll need the messaging client to actually process and send the message. In this view controller, we'll need to handle both sending and receiving messages. Add the following code snippet to receive a message:
#pragma mark SINMessageClient
// Receiving an incoming message.
- (void)messageClient:(id<SINMessageClient>)messageClient didReceiveIncomingMessage:(id<SINMessage>)message
{
    NSLog(@"Received a message");
    [self.messages addObject:@[message, @(Incoming)]];
    [self.tableView reloadData];
}
Whenever we receive a message, we'll add it to the messages array and reload the table view to display it. It's important to note that the SINMessage object is composed of two elements, the message object itself and its direction (incoming or outgoing).
Now that we can send and receive messages, we need to know when a message has finished sending if we are the author so that we can update the data source and reload the table view. To accomplish this, we implement the messageSent:recipientId: as shown below.
// Finish sending a message
- (void)messageSent:(id<SINMessage>)message recipientId:(NSString *)recipientId
{
    NSLog(@"Finished sending a message");
    self.messageTextField.text = @"";
    [self.messages addObject:@[message, @(Outgoing)]];
    [self.tableView reloadData];
}
We can also implement some of the remaining delegate methods to help us troubleshoot the messaging process if something were to go wrong. Add the following delegate methods below the messageSent:recipientId: method.
// Failed to send a message
- (void)messageFailed:(id<SINMessage>)message info:(id<SINMessageFailureInfo>)messageFailureInfo
{
    NSLog(@"Failed to send a message:%@", messageFailureInfo.error.localizedDescription);
}

-(void)messageDelivered:(id<SINMessageDeliveryInfo>)info
{
    NSLog(@"Message was delivered");
}

- (void)message:(id<SINMessage>)message shouldSendPushNotifications:(NSArray *)pushPairs
{
    NSLog(@"Recipient not online.\nShould notify recipient using push (not implemented in this tutorial).\nPlease refer to the documentation.");
}
At this point, messaging with Sinch is ready to use. The last thing we'll need to do is edit the tableView:cellForRowAtIndexPath: method to display the messages. This is what the implementation should look like:
- (UITableViewCell *)tableView:(UITableView *)tableView cellForRowAtIndexPath:(NSIndexPath *)indexPath
{
    UITableViewCell *cell;
    id<SINMessage> message = [self.messages[indexPath.row] firstObject];
    MessageDirection direction = (MessageDirection)[[self.messages[indexPath.row] lastObject] intValue];

    if (direction == Incoming)
    {
        cell = [self.tableView dequeueReusableCellWithIdentifier:CELL_ID_RECIPIENT];
        ((RecipientTableViewCell *)cell).message.text = message.text;
    }
    else
    {
        cell = [self.tableView dequeueReusableCellWithIdentifier:CELL_ID_USER];
        ((UsersTableViewCell *)cell).message.text = message.text;
    }

    return cell;
}
9. Test Messaging
Build and run the app to ensure that there are no errors. You're ready to test out the messaging feature. To try it out, you'll need access to another Facebook account.
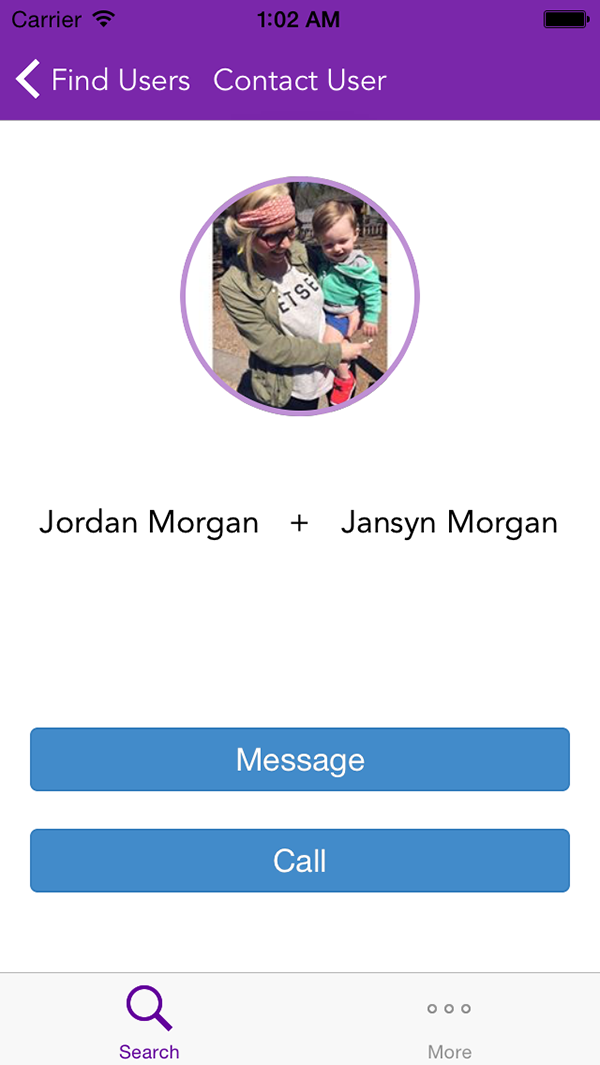
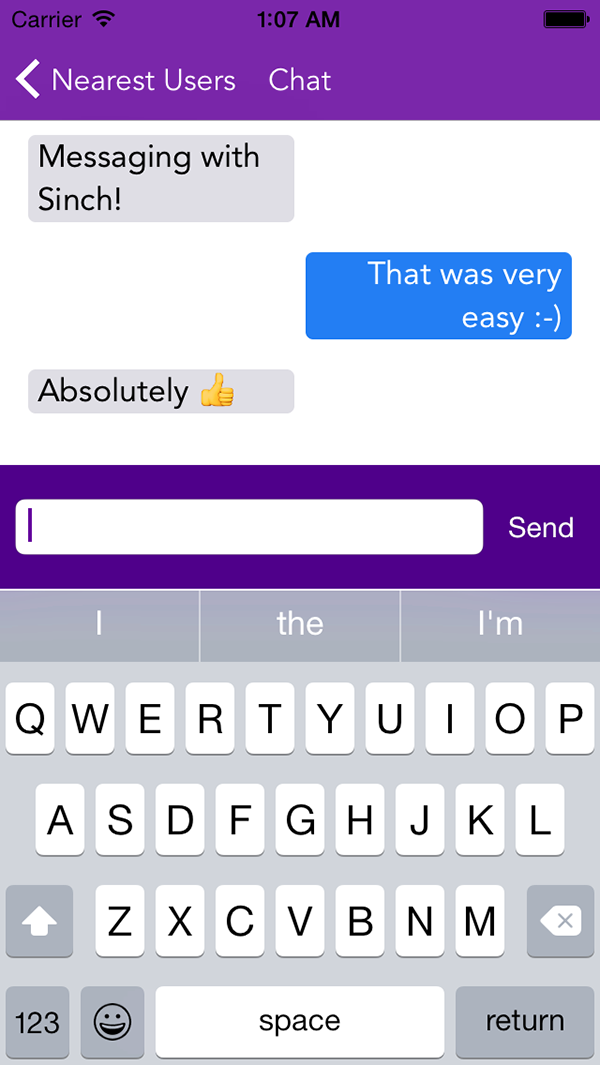
On your iOS device, build and run the app and log in with the first account. On the iOS Simulator, run another instance of the app and log in with the second account. Navigate to each other's profile on each device and tap Message.
At this point, you can enter a message and press Send. It will arrive on the recipient's device almost instantly. You're finished implementing a working messaging client for your dating app using the Sinch platform.
If the user isn't online, the client will try to send the message, but it won't arrive at the other user. In this case, you may want to implement push notifications to let the recipient know they've received a message.
10. VoIP Calling
The last feature we will utilize Sinch for is VoIP (Voice over IP) calling. Open CallingViewController.m and import the Sinch framework one last time.
#import <Sinch/Sinch.h>
Like before, we'll make use of some protocols to handle calling. The SINCallClientDelegate and SINCallDelegate protocols provide us methods to initiate and receive a call, and be updated of the status of a call. Update the interface of the CallingViewController class to conform it to both protocols.
@interface CallingViewController () <SINCallClientDelegate, SINCallDelegate>
To implement VoIP calling, we'll need access to the Sinch client as well as a SINCall object. Add a property for the SINCall instance as shown below.
@property (strong, nonatomic) id<SINCall> sinchCall;
In viewDidLoad, set the view controller as the delegate of the Sinch call client.
//Assign this VC as Sinch's call delegate
self.delegate = (AppDelegate *)[[UIApplication sharedApplication] delegate];
self.delegate.client.callClient.delegate = self;
To better understand the next section, it helps to go through the scenarios users will face when using the call feature. A user could be:
- receiving a call
- making a call
- hanging up an existing call
- rejecting an incoming call
Let's address making and receiving a call first. Add the following code to the makeOrAcceptCallFromSelectedUser: method:
#pragma mark - Initiate or Accept Call
- (IBAction)makeOAccepetCallFromSelectedUser:(UIButton *)sender
{
    if ([sender.titleLabel.text isEqualToString:@"Call"])
    {
        self.sinchCall = [self.delegate.client.callClient callUserWithId:self.selectedUser.userID];
        self.sinchCall.delegate = self;
        self.lblCallStatus.text = [NSString stringWithFormat:@"- calling %@ -", self.selectedUser.userName];
        self.btnDeny.hidden = NO;
        [self.btnDeny setTitle:@"Hang Up" forState:UIControlStateNormal];
    }
    else
    {
        [self.sinchCall answer];
        self.lblCallStatus.text = [NSString stringWithFormat:@"- talking to %@ -", self.selectedUser.userName];
    }
}
We check to see if we're making a call or have one coming in. If we are initiating the call, callUserWithId: will start the calling process and initialize the sinchCall property.
If we are answering a call, the sinchCall property will already be initialized and we simply begin the call by calling answer on it.
Next, we'll implement rejecting and hanging up a call. Add the following code to the rejectOrHangUpCallFromSelectedUser: method:
#pragma mark - Deny or Hang Up Call
- (IBAction)rejectOrHangUpCallFromSelectedUser:(UIButton *)sender
{
    [self.sinchCall hangup];
    self.lblCallStatus.text = [NSString stringWithFormat:@"- call with %@ ended -", self.selectedUser.userName];
}
This code is easier to digest, because, no matter the situation, it's handled by calling hangup on the sinchCall property.
All that's left for us to do is implement the required delegate methods. This will be quite a bit of code, but it's simple to understand and the method names are very descriptive.
#pragma mark - SINCall/Client
- (void)client:(id<SINCallClient>)client didReceiveIncomingCall:(id<SINCall>)call
{
    self.sinchCall = call;
    self.sinchCall.delegate = self;
    self.lblCallStatus.text = [NSString stringWithFormat:@"- incoming call from %@ -", self.selectedUser.userName];
    [self.btnAcceptOrCall setTitle:@"Accept Call" forState:UIControlStateNormal];
    self.btnDeny.hidden = NO;
}

- (void)callDidEstablish:(id<SINCall>)call
{
    NSLog(@"Call connected.");
    self.btnDeny.hidden = NO;
    [self.btnDeny setTitle:@"Hang Up" forState:UIControlStateNormal];
    self.lblCallStatus.text = @"- call connected -";
    self.btnAcceptOrCall.hidden = YES;
}

- (void)callDidEnd:(id<SINCall>)call
{
    NSLog(@"Call finished");
    self.sinchCall = nil;
    self.lblCallStatus.text = @"- call ended -";
    self.btnDeny.hidden = YES;

    dispatch_after(dispatch_time(DISPATCH_TIME_NOW, (int64_t)(1 * NSEC_PER_SEC)), dispatch_get_main_queue(), ^{
        [self.navigationController popViewControllerAnimated:YES];
    });
}

- (void)callDidProgress:(id<SINCall>)call
{
    // In this method you can play ringing tone and update ui to display progress of call.
}
The first method, didReceiveIncomingCall:, handles receiving a call and setting up the sinchCall property. We'll also know when the call starts and ends from callDidEstablish: and callDidEnd:.
The last method, callDidProgress:, is empty at the moment, but it would be useful for updating the user interface with helpful information, such as the duration of the call. You could use SINCallDetail and its establishedTime property to easily make that calculation.
11. Test Calling
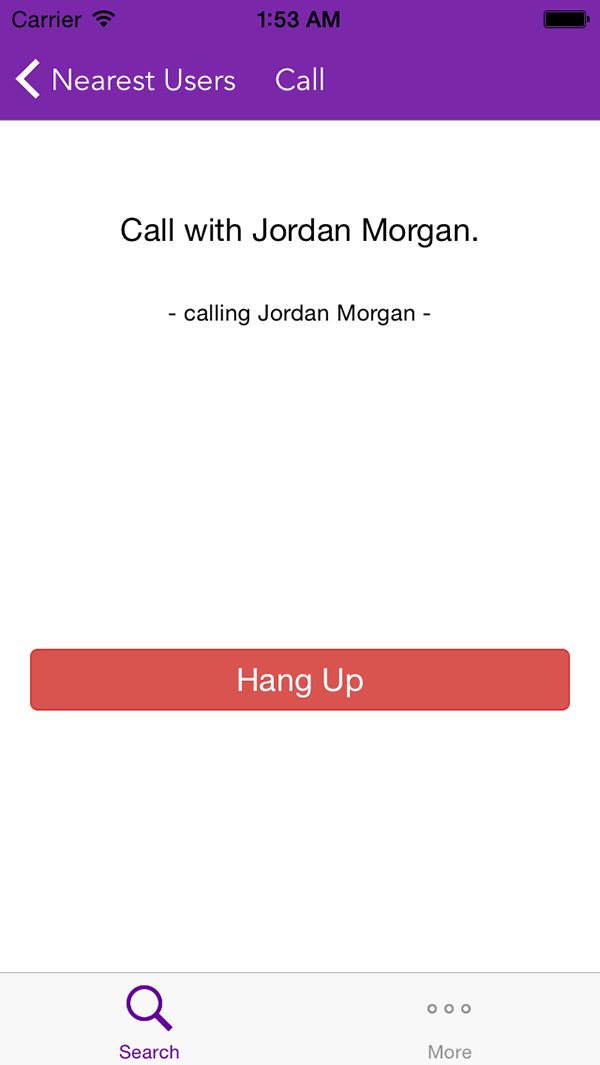
Run two instances of the app using two Facebook accounts as you did before. Navigate to each other's profile and tap Call.
Hit the green Call button on your device or in the iOS Simulator. Once the call is sent to Sinch, the user interface will update to let the user know the call is in progress.
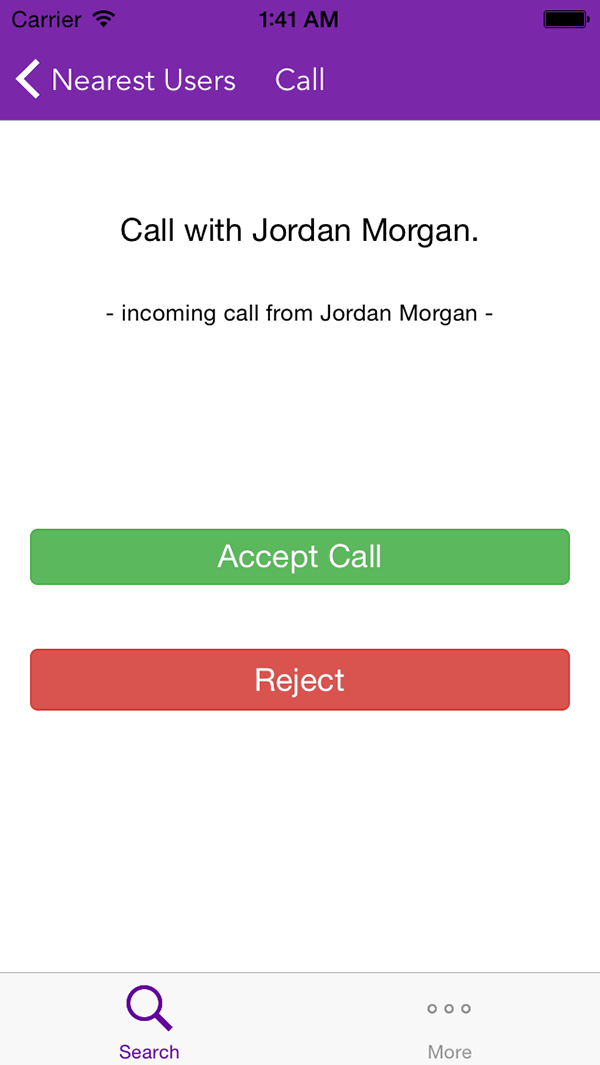
Similarly, if one of the users is receiving a call, the user interface will look like this:
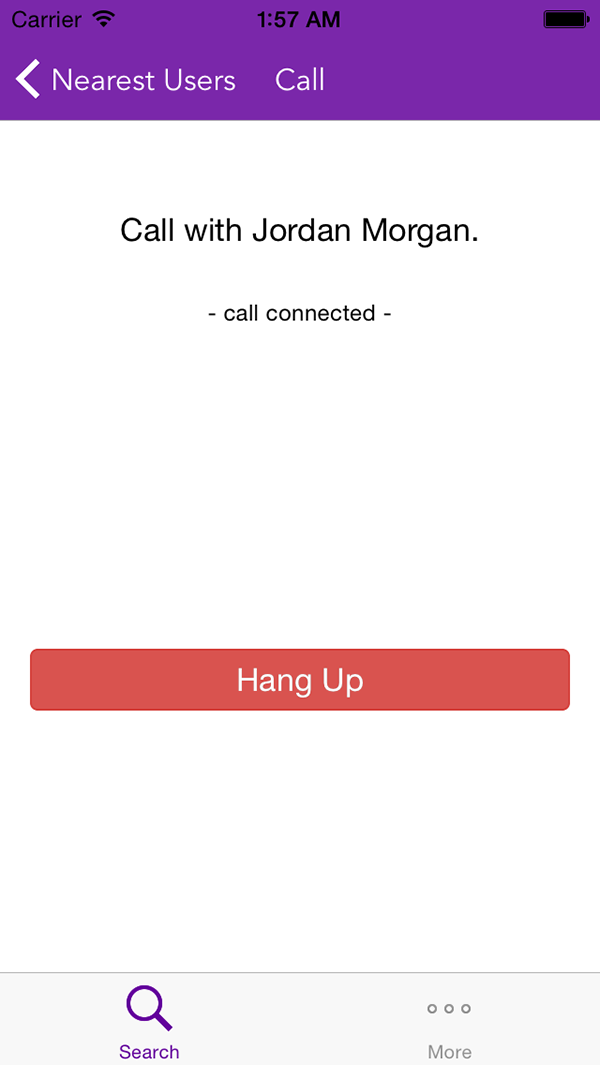
Finally, when the call is in progress, the user interface will reflect the state of the call. A button labeled Hang Up will be visible to end the call.
Similar to messaging, attempting to call a user that isn't online is not supported by the app. As with messaging, you could solve this by using push notifications to notify the user that someone has tried to call you.
12. Where To Go Next
There are several parts of the app that can be improved. The most notable is the integration of push notifications. Sinch recently added native support for push notifications to their iOS SDK, taking the burden off developers. With push notifications, you could notify users that aren't currently using the app that they have received a call or a message.
Another useful addition would be to store messages and conversations on a remote backend. This way, users could go back in time and view past conversations they've had. It also makes the messaging experience more fluid since they could pick up a conversation where they left off.
These are just a few ideas. I'm sure you can think of a few more that would make the app more complete and engaging.
Conclusion
Sinch's powerful SDK makes two intimidating tasks approachable, easy, and affordable. As you've seen in this tutorial, Sinch allows developers to integrate messaging and calling in their apps in a matter of minutes. The Sinch SDK isn't limited to iOS. If your dating app has a website component, for example, then you could use their JavaScript API to implement the same features.
If you got stuck along the way, don't worry, you can find the finished project on GitHub. You can now take what you've learned in this tutorial and go create the next Tinder.

Comments