You just published an amazing post on your WordPress blog and would like to tell everybody about that. Do you have a Twitter account? Then let's develop a plugin which whenever you save a new post on WordPress automatically tweets, letting all your followers know that they can find something new on your blog. Let's get started!
Why Create a Twitter Plugin From Scratch?
While there are lots of great free Twitter plugins out there, it's this authors opinion that there's really no replacement for knowing how to do this stuff yourself. In a lot of cases, if you have something very specific in mind, it can also be a lot easier just to write your own plugin from scratch anyways... so if you're frustrated with trying to hack/style/configure an existing plugin to work on your site, this might be the solution to your headaches!
Requirements
In order to follow up this tutorial you need the following:
- a WordPress site installation
- Abraham Williams' twitteroauth class to manipulate twitter actions. For the moment just download it and store it locally.
- a test Twitter account. (If you do not want to spam all your followers with the testing messages we will send).
The TwitterOAuth Class
The process of getting and posting data to Twitter requires the following steps:
- registering an application
- authorize your application
- obtaining by data querying the Twitter API
The above steps 2 and 3 can be tedious and can be a subject for a complete tutorial. Therefore I recommend using a library which handles those steps. The one I like most was developed by Abraham Williams. It is quite easy to use, the code is clear and easy to understand and is available on github.
Using this plugin we can get rid of the details of connecting to Twitter and getting data from it since this tasks are done by the TwitterOAuth class.
Register a Twitter Application
As we already discussed, the first step for implementing our plugin is to register a new Twitter application. With this application we will get access keys that allow us to get the required twitter data. Navigate in your browser to Twitter developers page and login with your test user account. Then click on the "Create an app" link. Fill in the form with the required information (you can put a placeholder for the web site).
It's very important to fill in also the callback URL field since leaving it blank will restrict the application from using callbacks. Anyway, we won't use the value entered in this filed, but one configured in the WordPress plugin.
Agree the developer rules and fill in the captcha information then press the "Create your Twitter application" button. You will be redirect to the page in the screenshot below:
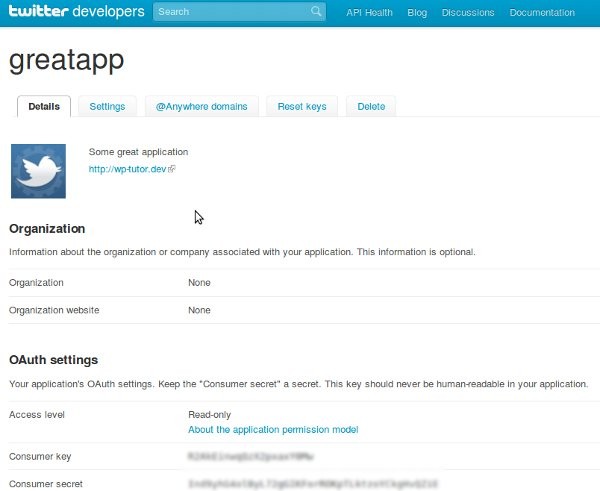
Scroll down to the "Your access token" section and press the "Create my accesss token" button. This action will generate an access token and an access token secret which together with the consumer key and the consumer secret are used to login to Twitter and get authorized for performing operations on the Twitter data.
Step 0 Mocking Up our Application
I know you are anxious to get your hands dirty with writing the WordPress plugin. But before let's take a look on how we can use the TwitterOAuth class. Take your time to study it's documentation file and code on github. After that we will develop together a small mockup application to see if we are able to use it successfully.
The most important files from Abraham's library are the ones in the twitteroauth folder. In fact those are the only files containing the implementation of the library. The rest of the files are just an example on how to use the class itself.
Folder Structure
Prepare a folder structure like below:
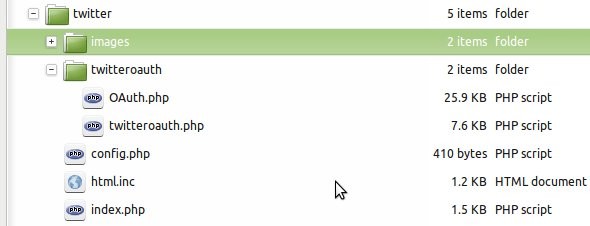
As you can see, for our mocking up application we took over the structure of the whole project from github. We will modify it a bit since we do not need all the actions from the demo app Abraham Williams implemented.
The Code for the Mocking Application
Let's check what we have modified taking the files one by one.
index.php
/* Load required lib files. */
require_once('twitteroauth/twitteroauth.php');
require_once('config.php');

/* Create a TwitterOauth object with consumer/user tokens. */
$connection = new TwitterOAuth(CONSUMER_KEY, CONSUMER_SECRET, ACCESS_TOKEN, ACCESS_TOKEN_SECRET);

/* If method is set change API call made. Test is called by default. */
$content = $connection->get('account/verify_credentials');
$connection->post('statuses/update', array('status' => 'Text of status here'));

/* Include HTML to display on the page */
include('html.inc');
The index.php file is the entry point of our application. When you visit your site in the browser this code gets executed. The comments inside make it pretty self explanatory. The parameters of the TwitterOAuth class constructor are taken from the config.php file which we will visit shortly. After getting a connection to twitter we have to authorize ourselves by performing a get request with 'account/verify_credentials' parameters.
The result of the get request is stored in the $content variable and will be displayed to the user by the html.inc file, so that also a feedback of the operation is provided. To post something to Twitter we perform a post request with the 'statuses/update' parameter and the text that should be posted.
config.php
/**
 * @file
 * A single location to store configuration.
 */

define('CONSUMER_KEY', 'store_here_the_consumer_key');
define('CONSUMER_SECRET', 'store_here_the_consumer_secret');
define('ACCESS_TOKEN', 'store_here_the_access_token');
define('ACCESS_TOKEN_SECRET', 'store_here_the_access_token_secret');
define('OAUTH_CALLBACK', 'http://twitter.dev/callback.php');
Note that the OAuth callback URL is based on http://twitter.dev site. This is the way I defined my virtual host in apache on my machine. You can define yourself with other name.
In this file we define our constants. The first four are parameters in the TwitterOAuth constructor (see above) and the last one replaces the callback URL we entered when defined the application. You get the first four constants from the Twitter application.
html.inc
I won't list the code here since is quite simple, you can get it from the Downloads section. It creates a header for the page and in the content area just displays the $content variable. Our purpose is to get a tweet on Twitter, so this file is only to get a feedback about our requests.
Checkpoint
Great, our mock up application is finished. It's time to see what we've done so far. So visit your site in your browser and then check your test twitter account. You should have a tweet there with the text: "Text of status here".
Step 1 Prepare the Folder Structure
Now that we understand how to use the library we can start developing our WordPress plugin.
We have to follow some rules in order to integrate our plugin in WordPress. So step into your WordPress installation folder and the go to wp-content/plugins folder and create a directory structure like the one in the picture below:

Abraham Williams library code will be stored in the lib folder and the class we develop in the includes folder. In the index.php file in the root of our subfolder we will store the code that triggers WordPress action.
Step 2 Create the Plugin's Code
Finally we are there. We will start writing our plugin's code. Some design considerations: we can store all of our code in the index.php file and this can be a good option for a simple plugin. But I decided to store the code in a separate file in a class (stored in the includes folder), because of two reasons. The main one is that if we do things like this extending the functionality of the plugin later becomes easier compared to having all the code store in a single file. Second, I want to show you how the plugin code can be written in a class.
Let WordPress Know about our Plugin
WordPress has to know that we developed a plugin and would like to integrate it with the main system. This is done via several lines of comments in the main file of the pugin (in our case index.php). Open index.php in your favorite editor and enter the following code:
/*
 Plugin Name: myTweet
 Plugin URI:  http://www.google.com/
 Description: This plugin will tweet to the author's Twitter account whenever a new post is placed on WordPress. The tweet will inform the followers about the new post's title.
 Author:      Gabriel Cirtea
 Version:     1.0
 Author URI:  http://www.google.com/
*/
WordPress expects this information to be present in the main file of the plugin. Here we defined the plugin's name, it's URI (which for the moment points to Google since we didn't develop a site for our plugin). Also a plugin description, author and version is given. This is the only information required to develop a plugin. Of course, such a plugin won't do anything, but will be present in the plugins list of your WordPress site.
Go ahead and check this... Save your file, login to your site and go to the plugins page. You should see something like in the picture below:

Step 3 Our Worker Class
Our worker class will have two tasks. One will be to initialize the TwitterOAuth class and to login to the application and the second will be to perform the tweet that announces the world about our new post on WordPress.
We will store in the class as constants the keys we got from our Twitter application. Also we will have a protected variable storing the connection to Twitter. This declaration part of our class looks like:
// constants defined for accessing the TwitterOAuth class
const CONSUMER_KEY = 'your_consumer_key_here';
const CONSUMER_SECRET = 'your_consumer_secret_here';
const ACCESS_TOKEN = 'your_access_token_here';
const ACCESS_TOKEN_SECRET = 'your_access_token_secret_here';

// class variables
protected static $connection;
The init function
The init function is responsible for creating an instance of the TwitterOAurh class and storing the return of the constructor in the $connection variable. The code is the following:
public static function init() {
  self::$connection = new TwitterOAuth(self::CONSUMER_KEY, self::CONSUMER_SECRET,
  self::ACCESS_TOKEN, self::ACCESS_TOKEN_SECRET);
}
The tweet function
The tweet function is hooked to WordPress save_post action and receives as a parameter the post id. With that post id it gets the post content as an array. We use this array to get the post title which then we use for tweeting based on the $connection variable stored in the class.
public static function tweet($postID) {
  // get post data
  $post = get_post($postID);
  // send a tweet request
  self::$connection->post('statuses/update', array(
      'status' => $post->post_title
    ));
}
The complete code of our worker class looks like following:
/**
 * class TwitterCommands
 *
 * This class is intended to be a interface between our Twitter plugin
 * and the twitteroauth class created by Abraham Williams.
 *
 * It will create an instance of TwitterOAuth class and send to it the
 * required commands needed to place a tweet when a new post is added to
 * the WordPress site.
 */
class TwitterCommands
 {
  // constants defined for accessing the TwitterOAuth class
  const CONSUMER_KEY = 'your_consumer_key_here';
  const CONSUMER_SECRET = 'your_consumer_secret_here';
  const ACCESS_TOKEN = 'your_access_token_here';
  const ACCESS_TOKEN_SECRET = 'your_access_token_secret_here';

  // class variables
  protected static $connection;

  public static function init() {
    self::$connection = new TwitterOAuth(self::CONSUMER_KEY, self::CONSUMER_SECRET,
      self::ACCESS_TOKEN, self::ACCESS_TOKEN_SECRET);
  }

  public static function tweet($postID) {
    $post = get_post($postID);
    self::$connection->post('statuses/update', array(
        'status' => $post->post_title
      ));
  }
}
Hook in to WordPress
Hooking in to WordPress means making WordPress to call your functions when a specific event occur. It can be done in two different modes: by using filters and by using actions. The function you use to hook in is either add_action or add_filter. Which one you should use is specified in the WordPress documentation. If the event you want to hook to is an action, then use add_action otherwise use add filter.
For our Twitter plugin we hook in to two events: the init action and the save_post action. The init action is called when the page is loaded and we will use this action to connect to Twitter. The save_post action is called whenever the user creates and updates a post so we will use it to Tweet. The code is listed below:
/*
 Plugin Name: Tweet
 Plugin URI:  http://www.tipsfor.us/
 Description: This plugin will tweet to the author's Twitter account whenever a new post is placed on WordPress. he tweet will inform the followers about the new post's title.
 Author:      Gabriel Cirtea
 Version:     1.0
 Author URI:  http://www.tipsfor.us/
*/
// include() or require() any necessary files here...
require_once ('lib/twitteroauth/twitteroauth.php');
require_once ('includes/TwitterCommands.php');

// settings and/or configuration details go here...

// tie into WordPress hooks and any functions that should run on load
add_action ('init', 'TwitterCommands::init');
add_action ('save_post', 'TwitterCommands::tweet');

// private internal functions named with a leading underscore

// functions called by the filters or actions
The code above has a small bug left intentionally inside to create an exercise for you. As I specified, the save_post action is called when the user creates or updates a post. Therefore it will be called twice when the user created a post and the post has no content and when the post is saved. This will lead to tweeting twice one with a post title given by WordPress by default and second with the title given by the user. You have to fix this bug using any method you find appropriate, maybe even post your solution in the comments.
That's it!
Well, it wasn't so hard was it? Writing this plugin was quite easy and we also learned how to reuse other people's code. You can extend this example with other things that you want to do, for instance you can try to send a direct message to somebody.
Don't forget to check the WordPress and Twitter documentation:
- http://codex.wordpress.org
- https://dev.twitter.com/
- WordPress 3 Plugin Development Essentials - an extremely interesting and useful book to learn WordPress plugin programming.

Comments