This tutorial will teach you how to create an eye-catching iOS menu using the AwesomeMenu open-source project. Read on!
Project Preview
The following is a short demo of AwesomeMenu in action:
Note that all the icons provided by AwesomeMenu are completely customizable. The default star/plus icons above are used solely for demonstration purposes.
Step 1: Create a New Xcode Project
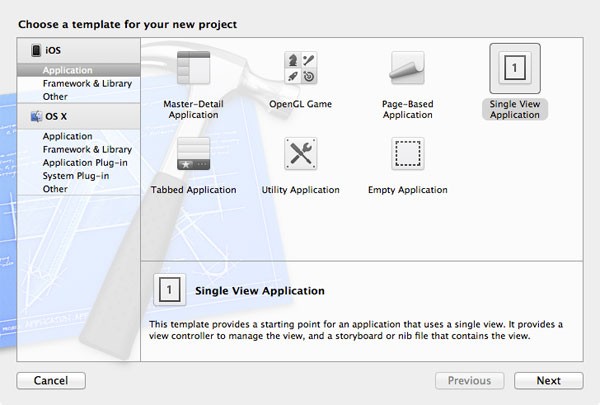
Open Xcode and create a new iOS project. Select "Single View Application" and then click "Next".
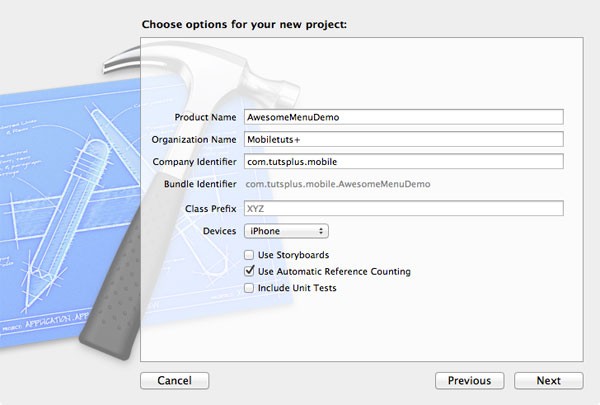
Name the application AwesomeMenuDemo and enter appropriate values for the remaining text input fields. Select "iPhone" from the devices drop-down and make sure "Use Automatic Reference Counting" is selected. Do not select "Use Storyboards" or "Include Unit Tests".
Step 2: Add Project Resources
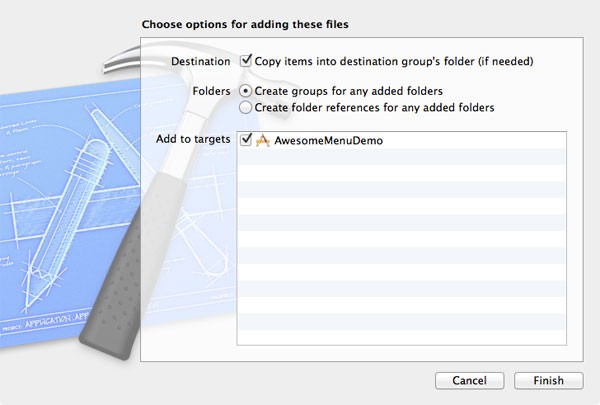
The next step is to download the AwesomeMenu code from the official project GitHub page. After you have access to the files, you'll need to drag two folders into your own project: the "AwesomeMenu" folder containing the AwesomeMenu and AwesomeMenuItem classes, and the "Images" folder containing the star and plus sign images.
When you drag the image into Xcode, be sure to check the "Copy items into destination group's folder" checkbox, select the "Create groups for any added folders" radio button, and check the box next to "AwesomeMenuDemo" in the Add to targets table.
Step 3: Add the QuartzCore Framework
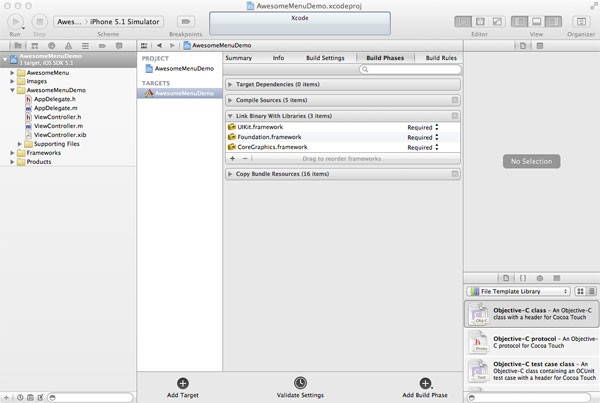
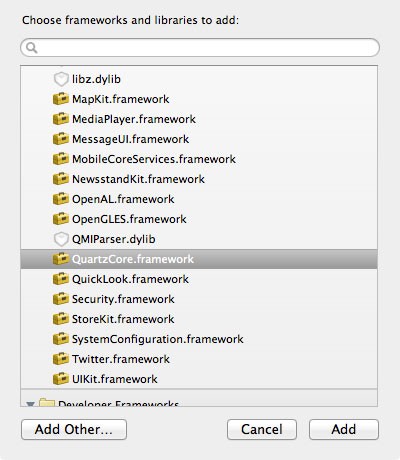
The animation's provided by AwesomeMenu are dependent on the QuartzCore framework. To add this framework, select the AwesomeMenuDemo project in the Project Navigator pane, and then click the "Build Phases" tab. Next expand the "Link Binary with Libraries" drop-down and click the "plus" icon to add a new framework.
Select QuartzCore from the list to add the framework to your project.
If you've completed the above successfully, you should now see the "QuartzCore" framework in the Project Navigator to the left. You can either leave it where it is or drag it into the "Frameworks" folder to keep things organized.
Step 4: Import AwesomeMenu Headers
Now jump on over to the ViewController.h file. You'll need to import the AwesomeMenu classes into the ViewController with the following code:
#import <UIKit/UIKit.h>
#import "AwesomeMenu.h"
This will allow the project's main view controller to use the AwesomeMenu functionality.
Step 5: Disable ARC for AwesomeMenu
If you followed the instructions from step 1, the project you created is using Automatic Reference Counting (ARC) for memory management. ARC is a phenomenal method of managing application memory, but AwesomeMenu was written with Manual Reference Counting (MRC), and consequently cannot be compiled inside of an ARC project without some modification.
While you could try to convert the AwesomeMenu project from MRC to ARC manually, I wouldn't recommend doing so. Instead, you can simply set the -fno-objc-arc compiler flag on each of the AwesomeMenu source code files to tell the compiler not to apply ARC on those files. Cool, huh?
Fortunately, doing this is easy. Go to the "Build Phases" tab for your project and expand the "Compile Sources" drop-down. Double-click the AwesomeMenu.m file and a popup box with a textfield will appear. Enter "-fno-objc-arc" in this box to apply the compiler flag and then click "Done".
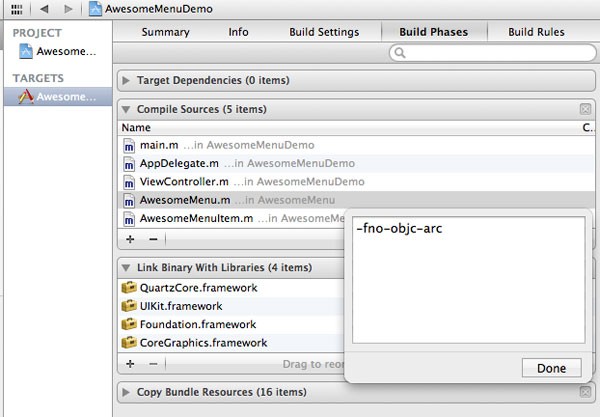
Next, do the same thing for the AwesomeMenuItem.m file.
With these flags in place, the compiler knows to apply ARC to all source code files in your project except for the two non-arc files related to AwesomeMenu.
Step 6: Create the Menu
First, let's create an instance of AwesomeMenu and place it in the center of the view controller:
- (void)viewDidLoad
{
    [super viewDidLoad];
	// Do any additional setup after loading the view, typically from a nib.

    AwesomeMenu *menu = [[AwesomeMenu alloc] initWithFrame:self.view.frame
                                                     menus:nil];

    [self.view addSubview:menu];

}
For now, the menus parameter was set to nil, but in the next step we will replace this with an array of AwesomeMenuItem objects. Go ahead and run the project and you should see a plus sign in the center of the screen. Toggling the icon will work, but no menu options are displayed yet.

Step 7: Add Menu Items
Each menu item provided by AwesomeMenu can have three different images associated with it: a background image, a highlighted background image, and a content image. By default, AwesomeMenu includes the following images for these roles:

Go ahead and create a UIImage object to refer to each of these files:
- (void)viewDidLoad
{
    [super viewDidLoad];
	// Do any additional setup after loading the view, typically from a nib.

    UIImage *storyMenuItemImage = [UIImage imageNamed:@"bg-menuitem.png"];
    UIImage *storyMenuItemImagePressed = [UIImage imageNamed:@"bg-menuitem-highlighted.png"];
    UIImage *starImage = [UIImage imageNamed:@"icon-star.png"];

    AwesomeMenu *menu = [[AwesomeMenu alloc] initWithFrame:self.view.frame
                                                     menus:nil];
Now create your first two menu options, place them in an NSArray, and assign that array to the menu object's menus parameter:
    UIImage *storyMenuItemImage = [UIImage imageNamed:@"bg-menuitem.png"];
    UIImage *storyMenuItemImagePressed = [UIImage imageNamed:@"bg-menuitem-highlighted.png"];
    UIImage *starImage = [UIImage imageNamed:@"icon-star.png"];


    AwesomeMenuItem *starMenuItem1 = [[AwesomeMenuItem alloc] initWithImage:storyMenuItemImage
                                                           highlightedImage:storyMenuItemImagePressed
                                                               ContentImage:starImage
                                                    highlightedContentImage:nil];
    AwesomeMenuItem *starMenuItem2 = [[AwesomeMenuItem alloc] initWithImage:storyMenuItemImage
                                                           highlightedImage:storyMenuItemImagePressed
                                                               ContentImage:starImage
                                                    highlightedContentImage:nil];


    NSArray *menuOptions = [NSArray arrayWithObjects:starMenuItem1, starMenuItem2, nil];

    AwesomeMenu *menu = [[AwesomeMenu alloc] initWithFrame:self.view.frame
                                                     menus:menuOptions];

    [self.view addSubview:menu];
Build and run the project now, and should see a screen similar to the following:
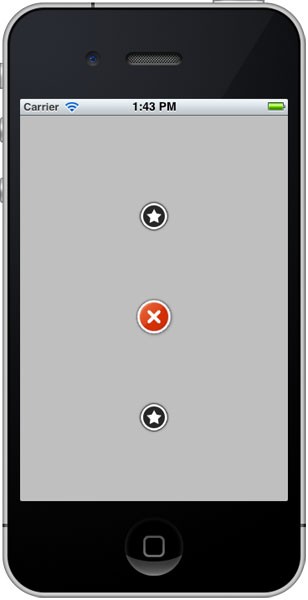
As you add additional menu items, AwesomeMenu will automatically place them within a predefined angle. By default, the angle is equal to a full circle, with the center being the "plus" sign.
Add three more menu items to see this effect in action:
AwesomeMenuItem *starMenuItem1 = [[AwesomeMenuItem alloc] initWithImage:storyMenuItemImage
highlightedImage:storyMenuItemImagePressed
ContentImage:starImage
highlightedContentImage:nil];
AwesomeMenuItem *starMenuItem2 = [[AwesomeMenuItem alloc] initWithImage:storyMenuItemImage
highlightedImage:storyMenuItemImagePressed
ContentImage:starImage
highlightedContentImage:nil];
AwesomeMenuItem *starMenuItem3 = [[AwesomeMenuItem alloc] initWithImage:storyMenuItemImage
highlightedImage:storyMenuItemImagePressed
ContentImage:starImage
highlightedContentImage:nil];
AwesomeMenuItem *starMenuItem4 = [[AwesomeMenuItem alloc] initWithImage:storyMenuItemImage
highlightedImage:storyMenuItemImagePressed
ContentImage:starImage
highlightedContentImage:nil];
AwesomeMenuItem *starMenuItem5 = [[AwesomeMenuItem alloc] initWithImage:storyMenuItemImage
highlightedImage:storyMenuItemImagePressed
ContentImage:starImage
highlightedContentImage:nil];
NSArray *menuOptions = [NSArray arrayWithObjects:starMenuItem1, starMenuItem2, starMenuItem3, starMenuItem4, starMenuItem5, nil];
AwesomeMenu *menu = [[AwesomeMenu alloc] initWithFrame:self.view.frame
menus:menuOptions];
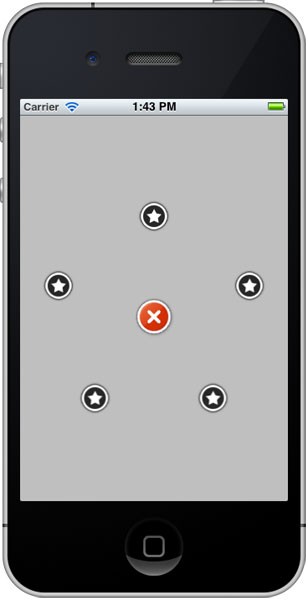
[self.view addSubview:menu];
Your menu should now look like the following:
Step 8: Customize Explosion Angles
The current effect will cause menu options to explode out in a 360 degree circle around the menu button. This works great when the menu is in the center of the screen, but you're likely to want to reposition the menu start point to the top, bottom, or corner of the device.
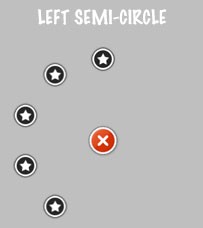
Two menu properties work together to allow you to control this: menuWholeAngle and rotateAngle. The mathematical principles involved are beyond the scope of this tutorial, but the following screenshots illustrate the most useful combinations:

rotateAngle: M_PI / 180 * -90

rotateAngle: M_PI / 180 * 90

rotateAngle: M_PI / 180 * -90

rotateAngle: M_PI / 180 * 90

As an example, to implement the lower-right quadrant values specified above, modify the project code like so:
    AwesomeMenu *menu = [[AwesomeMenu alloc] initWithFrame:self.view.frame

                                                     menus:menuOptions];

    // Lower-right Quadrant
    menu.menuWholeAngle = M_PI / 180 * 90;
    menu.rotateAngle = M_PI / 180 * 90;

    [self.view addSubview:menu];
In addition to controlling the menu option placement angles, you can also control the menu options' distance from center with the endRadius property. Play around with this value to see how it works.
Step 9: Customize Menu Placement
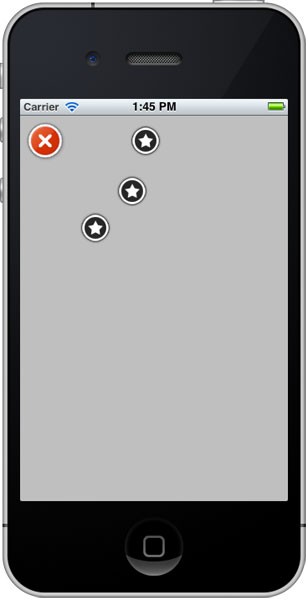
Now that you know how to control the angle and distance of the menu option placement, you are far more likely to want to place the menu in one of the four corners of the screen. In order to do so, you need to customize the starting point for the menu button. You can do this with the startPoint property, like so:
    // Lower-right Quadrant
    menu.menuWholeAngle = M_PI / 180 * 90;
    menu.rotateAngle = M_PI / 180 * 90;

    menu.startPoint = CGPointMake(30.0f, 30.0f);

    [self.view addSubview:menu];
The line added above will place the menu at point (30, 30) on the iPhone screen. In other words, it will now appear in the top left corner, and should look like this:
As you can see, repositioning the menu start point is easy. Just be sure to only display as many menu options as you can reasonably fit within the angle constraint set.
Step 9: Respond to Menu Selection
Now that you know how to create a customized menu, you're ready to implement each option. Whenever a user taps on one of the menu option butons, a message is sent to the AwesomeMenu delegate with the index number of the option selected. In order to access that index value, you'll need to implement the AwesomeMenuDelegate.
First, open ViewController.h and specify that it will conform to the delegate protocol:
#import <UIKit/UIKit.h>
#import "AwesomeMenu.h"

@interface ViewController : UIViewController <AwesomeMenuDelegate>
Next, switch to ViewController.m and add the delegate implementation:
- (void)AwesomeMenu:(AwesomeMenu *)menu didSelectIndex:(NSInteger)idx
{
    NSLog(@"Select the index : %d",idx);
}
You'll also need to specify that the view controller is the delegate for the menu, like so:
    NSArray *menuOptions = [NSArray arrayWithObjects:starMenuItem1, starMenuItem2, starMenuItem3, nil];

    AwesomeMenu *menu = [[AwesomeMenu alloc] initWithFrame:self.view.frame
                                                     menus:menuOptions];

    menu.delegate = self;
At this point you can figure out which menu option was selected by mapping the index clicked to the menuOptions array. To complete the menu navigation, you could add a new view controller to the screen or simply modify the existing view controller as necessary. Because the exact implementation will be specific to your own applications, doing so will be left as an exercise for the reader.
Conclusion
AwesomeMenu is an eye-catching and exciting open-source project for customizing your app's navigation controls. I hope you've enjoyed this tutorial, and feel free to leave comments or questions below. You can also reach me via Twitter by sending a message to @markhammonds.

Comments