There are a lot of popular third party YouTube clients on Google Play, such as Viral Popup and PlayTube, that manage to offer some unique and additional functionality that the official YouTube app doesn't. If you want to build one such app yourself, this tutorial is for you.
In this tutorial, we create our own YouTube client that cannot only search for videos on YouTube, but also play them. Doing so, we will learn how to make use of the YouTube Android Player API and the YouTube Data API client library for Java.
Prerequisites
Ensure that you have the latest Eclipse ADT Bundle set up. You can download it at the Android Developer website.
You must also have a developer key to use the YouTube API. Follow the steps on Google's YouTube Developer website to get one.
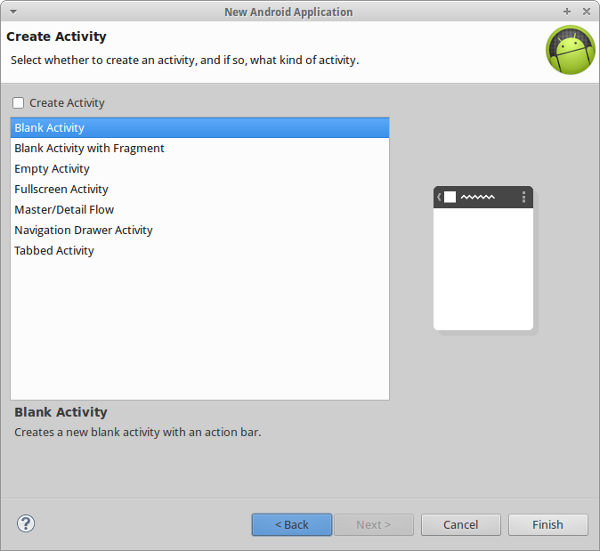
1. Create a New Project
Fire up Eclipse and create a new Android application. Name the application, SimplePlayer. Choose a unique package name, and set the minimum required SDK to Android 2.2 and the target SDK to Android 4.X (L Preview).

We're going to create the Activity ourselves so deselect Create Activity and click Finish.
2. Adding Libraries
Step 1: Download Libraries
You will need the following libraries for this project:
- YouTube Android Player API: This library lets your app embed and control YouTube videos seamlessly. At the time of writing, the latest version of this library is 1.0.0. You can download it from the Google Developers website.
- YouTube Data API v3 Client Library for Java: This library lets your app query information on YouTube. We are going to use it to enable our app to search for videos on YouTube. This is also available on the Google Developers website.
- Picasso: This library makes it easy to fetch and display remote images. We are going to use it to fetch thumbnails of YouTube videos. The latest version currently is 2.4.0 and you can download it directly from the Maven repository.
Step 2: Add Libraries
To add the YouTube Android Player API, unzip YouTubeAndroidPlayerApi-1.0.0.zip and copy the file YouTubeAndroidPlayerApi.jar to the libs folder of your project.
To add the YouTube Data API v3 library and its dependencies, unzip google-api-services-youtube-v3-rev124-java-1.19.0.zip and copy the following files to the libs folder of your project:
- google-api-services-youtube-v3-rev124-1.19.0.jar
- google-api-client-1.19.0.jar
- google-oauth-client-1.19.0.jar
- google-http-client-1.19.0.jar
- jsr305-1.3.9.jar
- google-http-client-jackson2-1.19.0.jar
- jackson-core-2.1.3.jar
- google-api-client-android-1.19.0.jar
- google-http-client-android-1.19.0.jar
Finally, to add Picasso, copy picasso-2.4.0.jar to the libs folder of your project.
3. Edit the Manifest
The only permission our app needs is android.permission.INTERNET to access YouTube's servers. Add the following to AndroidManifest.xml:
<uses-permission android:name="android.permission.INTERNET"/>
Our app has two activities, one to search for videos and one to play them. To avoid having to handle orientation changes in this tutorial, we force both the activities to only use landscape mode. Declare the activities in the manifest by adding the following code to it:
<activity android:name=".SearchActivity"
    android:screenOrientation="landscape">
    <intent-filter>
        <action android:name="android.intent.action.MAIN"/>
        <category android:name="android.intent.category.LAUNCHER"/>
    </intent-filter>
</activity>

<activity android:name=".PlayerActivity"
    android:screenOrientation="landscape" />
4. Edit strings.xml
The res/values/strings.xml file contains the strings that our app uses. Update its contents as shown below:
<resources>
    <string name="app_name">SimplePlayer</string>
    <string name="search">Search</string>
    <string name="failed">Failed to initialize Youtube Player</string>
</resources>
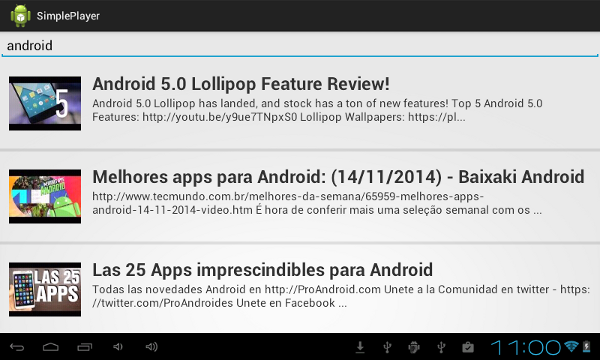
5. Create Layout for SearchActivity
Step 1: Create Layout
SearchActivity needs the following views:
-
EditText: to allow the user to type in the search keywords -
ListView: to display the search results -
LinearLayout: this view serves as the parent view of the aforementioned views
Create a new file named layout/activity_search.xml and add the following code to it:
<?xml version="1.0" encoding="utf-8"?>
<LinearLayout xmlns:android="http://schemas.android.com/apk/res/android"
    android:layout_width="match_parent"
    android:layout_height="match_parent"
    android:orientation="vertical" >

    <EditText
        android:layout_width="match_parent"
        android:layout_height="wrap_content"
        android:hint="@string/search"
        android:id="@+id/search_input"
        android:singleLine="true"
        />

    <ListView
        android:id="@+id/videos_found"
        android:layout_width="match_parent"
        android:layout_height="match_parent"
        android:dividerHeight="5dp"
        />

</LinearLayout>
Step 2: Layout Out Search Results
Each search result refers to a video on YouTube and we need a layout to display information about that video. Therefore, each item of the ListView needs to contain the following views:
-
ImageView: to display the thumbnail of the video -
TextView: to display the title of the video -
TextView: to display the description of the video -
RelativeLayout: this view acts as the parent view of the other views
Create a file named layout/video_item.xml and add the following code to it:
<?xml version="1.0" encoding="utf-8"?>
<RelativeLayout xmlns:android="http://schemas.android.com/apk/res/android"
    android:layout_width="match_parent"
    android:layout_height="match_parent"
    android:padding="16dp"
    >

    <ImageView
        android:id="@+id/video_thumbnail"
        android:layout_width="128dp"
        android:layout_height="128dp"
        android:layout_alignParentLeft="true"
        android:layout_alignParentTop="true"
        android:layout_marginRight="20dp"
        />

    <TextView android:id="@+id/video_title"
        android:layout_width="wrap_content"
        android:layout_height="wrap_content"
        android:layout_toRightOf="@+id/video_thumbnail"
        android:layout_alignParentTop="true"
        android:layout_marginTop="5dp"
        android:textSize="25sp"
        android:textStyle="bold"
        />

    <TextView android:id="@+id/video_description"
        android:layout_width="wrap_content"
        android:layout_height="wrap_content"
        android:layout_toRightOf="@+id/video_thumbnail"
        android:layout_below="@+id/video_title"
        android:textSize="15sp"
        />

</RelativeLayout>
6. Create Layout for PlayerActivity
Step 1: Create Layout
PlayerActivity needs the following views:
-
YouTubePlayerView: to play YouTube videos -
LinearLayout: this view is the parent view ofYouTubePlayerView
Create a new file named layout/activity_player.xml and add the following code to it:
<?xml version="1.0" encoding="utf-8"?>
<LinearLayout xmlns:android="http://schemas.android.com/apk/res/android"
    android:layout_width="match_parent"
    android:layout_height="match_parent"
    android:orientation="vertical" >

    <com.google.android.youtube.player.YouTubePlayerView
        android:id="@+id/player_view"
        android:layout_width="match_parent"
        android:layout_height="wrap_content"/>

</LinearLayout>
7. Create VideoItem
Create a new Java class named VideoItem.java. We use this class to store the following information about a YouTube video:
- YouTube ID
- title
- description
- thumbnail URL
All of the above are stored as strings. After adding the getters and setters for each of them, VideoItem.java file should have the following contents:
package com.hathi.simpleplayer;

public class VideoItem {
    private String title;
	private String description;
	private String thumbnailURL;
	private String id;

	public String getId() {
		return id;
	}

	public void setId(String id) {
		this.id = id;
	}

	public String getTitle() {
		return title;
	}

	public void setTitle(String title) {
		this.title = title;
	}

	public String getDescription() {
		return description;
	}

	public void setDescription(String description) {
		this.description = description;
	}

	public String getThumbnailURL() {
		return thumbnailURL;
	}

	public void setThumbnailURL(String thumbnail) {
		this.thumbnailURL = thumbnail;
	}

}
8. Create a Helper Class
To avoid having to deal with the YouTube Data API directly in our Activity, create a new Java class and name it YoutubeConnector.java. This class has the following member variables:
- an instance of the
YouTubeclass that will be used for communicating with the YouTube API - an instance of
YouTube.Search.Listto represent a search query - the YouTube API key as a static
String
We initialize the above variables in the constructor. To initialize the instance of YouTube, the YouTube.Builder class has to be used. The classes that will be responsible for the network connection and the JSON processing are passed to the builder.
Once initialized, its search method is used to create a search request. The list method is then used to mention the details we want in the search results. For this tutorial, we are going to need an id and snippet for each search result. From those, we extract the following fields:
id/videoIdsnippet/titlesnippet/description-
snippet/thumbnails/default/url
The developer's API key needs to be sent with every search request. The setKey method is used for this purpose. We also use the setType method to restrict the search results to videos only. At this point, the class should look something like this:
package com.hathi.simpleplayer;

public class YoutubeConnector {
    private YouTube youtube;
	private YouTube.Search.List query;

	// Your developer key goes here
	public static final String KEY
		= "AIzaSQZZQWQQWMGziK9H_qRxz8g-V6eDL3QW_Us";

	public YoutubeConnector(Context context) {
		youtube = new YouTube.Builder(new NetHttpTransport(),
				new JacksonFactory(), new HttpRequestInitializer() {
			@Override
			public void initialize(HttpRequest hr) throws IOException {}
		}).setApplicationName(content.getString(R.string.app_name)).build();

		try{
			query = youtube.search().list("id,snippet");
			query.setKey(KEY);
			query.setType("video");
			query.setFields("items(id/videoId,snippet/title,snippet/description,snippet/thumbnails/default/url)");
		}catch(IOException e){
			Log.d("YC", "Could not initialize: "+e);
		}
	}
}
Next, we create a method named search to perform the search based on the user's keywords. This method accepts the keywords as a String parameter. The query variable's setQ method is used to set the keywords.
We then run the query using its execute method. The results are returned in the form of a SearchListResponse instance. We iterate through the result items and create a new List of VideoItem objects, which will be the return value of this method. After adding appropriate error handling, the search method should look like this:
public List<VideoItem> search(String keywords){
    query.setQ(keywords);
	try{
		SearchListResponse response = query.execute();
		List<SearchResult> results = response.getItems();

		List<VideoItem> items = new ArrayList<VideoItem>();
		for(SearchResult result:results){
			VideoItem item = new VideoItem();
			item.setTitle(result.getSnippet().getTitle());
			item.setDescription(result.getSnippet().getDescription());
			item.setThumbnailURL(result.getSnippet().getThumbnails().getDefault().getUrl());
			item.setId(result.getId().getVideoId());
			items.add(item);
		}
		return items;
	}catch(IOException e){
		Log.d("YC", "Could not search: "+e);
		return null;
	}
}
9. Create SearchActivity
Create a new class named SearchActivity.java. This class has fields that represent the views we mentioned in activity_search.xml. It also has a Handler to make updates on the user interface thread.
In the onCreate method, we initialize the views and add an OnEditorActionListener to the EditText to know when the user has finished entering keywords.
public class SearchActivity extends Activity {

    private EditText searchInput;
	private ListView videosFound;

	private Handler handler;

	@Override
	protected void onCreate(Bundle savedInstanceState) {
		super.onCreate(savedInstanceState);
		setContentView(R.layout.activity_search);

		searchInput = (EditText)findViewById(R.id.search_input);
		videosFound = (ListView)findViewById(R.id.videos_found);

		handler = new Handler();

		searchInput.setOnEditorActionListener(new TextView.OnEditorActionListener() {
			@Override
			public boolean onEditorAction(TextView v, int actionId, KeyEvent event) {
				if(actionId == EditorInfo.IME_ACTION_DONE){
					searchOnYoutube(v.getText().toString());
					return false;
				}
				return true;
			}
		});

	}
}
You must have noticed the call to the searchOnYoutube method. Let's define the method now. In this method, we create a new Thread to initialize a YoutubeConnector instance and run its search method. A new thread is necessary, because network operations cannot be performed on the the main user interface thread. If you forget to do this, you will face a runtime exception. Once the results are available, the handler is used to update the user interface.
private List<VideoItem> searchResults;

private void searchOnYoutube(final String keywords){
    	new Thread(){
			public void run(){
				YoutubeConnector yc = new YoutubeConnector(SearchActivity.this);
				searchResults = yc.search(keywords);
				handler.post(new Runnable(){
					public void run(){
						updateVideosFound();
					}
				});
			}
		}.start();
	}
In the updateVideosFound method, we generate an ArrayAdapter and pass it on to the ListView to display the search results. In the getView method of the adapter, we inflate the video_item.xml layout and update its views to display information about the search result.
The Picasso library's load method is used to fetch the thumbnail of the video and the into method is used to pass it to the ImageView.
private void updateVideosFound(){
	ArrayAdapter<VideoItem> adapter = new ArrayAdapter<VideoItem>(getApplicationContext(), R.layout.video_item, searchResults){
		@Override
		public View getView(int position, View convertView, ViewGroup parent) {
			if(convertView == null){
				convertView = getLayoutInflater().inflate(R.layout.video_item, parent, false);
			}
			ImageView thumbnail = (ImageView)convertView.findViewById(R.id.video_thumbnail);
			TextView title = (TextView)convertView.findViewById(R.id.video_title);
			TextView description = (TextView)convertView.findViewById(R.id.video_description);

			VideoItem searchResult = searchResults.get(position);

			Picasso.with(getApplicationContext()).load(searchResult.getThumbnailURL()).into(thumbnail);
			title.setText(searchResult.getTitle());
			description.setText(searchResult.getDescription());
			return convertView;
		}
	};

	videosFound.setAdapter(adapter);
}
Finally, we need a method that sets the OnItemClickListener of the ListView so that the user can click on a search result and watch the corresponding video. Let's name this method addClickListener and call it at the end of the onCreate method.
When an item in the list is tapped, we create a new Intent for the PlayerActivity and pass in the ID of the video. Once the Intent is created, the startActivity method is used to launch the PlayerActivity.
private void addClickListener(){
    videosFound.setOnItemClickListener(new AdapterView.OnItemClickListener() {

		@Override
		public void onItemClick(AdapterView<?> av, View v, int pos,
				long id) {
			Intent intent = new Intent(getApplicationContext(), PlayerActivity.class);
			intent.putExtra("VIDEO_ID", searchResults.get(pos).getId());
			startActivity(intent);
		}

	});
}
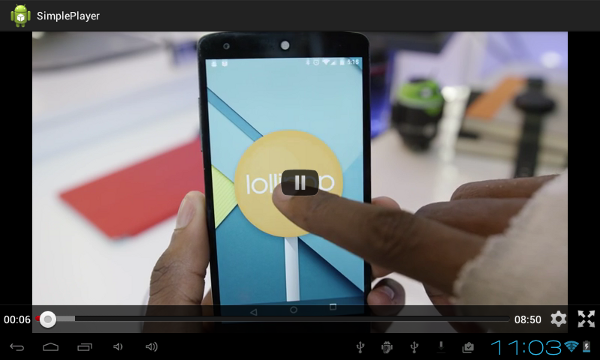
10. Create PlayerActivity
Create a new Java class named PlayerActivity.java that inherits from YouTubeBaseActivity. This is important, because only subclasses of the YouTubeBaseActivity can make use of the YouTubePlayerView.
This class has a single member variable that represents the YouTubePlayerView we mentioned in the activity_player.xml layout file. This is initialized in the onCreate method by invoking the initialize method of the YouTubePlayerView class, passing in the developer API key.
Next, our class needs to implement the OnInitializedListener interface to know when the initialization is complete. The interface has two methods, named onInitializationFailure and onInitializationSuccess.
In case of success, the cueVideo method is used to display the YouTube video. In case of failure, a Toast is shown that tells the user that the initialization failed.
This is what the PlayerActivity class should look like:
public class PlayerActivity extends YouTubeBaseActivity implements OnInitializedListener {

	private YouTubePlayerView playerView;

	@Override
	protected void onCreate(Bundle bundle) {
		super.onCreate(bundle);

		setContentView(R.layout.activity_player);

	    playerView = (YouTubePlayerView)findViewById(R.id.player_view);
	    playerView.initialize(YoutubeConnector.KEY, this);
	}

	@Override
	public void onInitializationFailure(Provider provider,
			YouTubeInitializationResult result) {
		Toast.makeText(this, getString(R.string.failed), Toast.LENGTH_LONG).show();
	}

	@Override
	public void onInitializationSuccess(Provider provider, YouTubePlayer player,
			boolean restored) {
		if(!restored){
			player.cueVideo(getIntent().getStringExtra("VIDEO_ID"));
		}
	}
}
11. Compile and Run
Our YouTube client is now ready to be deployed to an Android device. Almost all popular Android devices have it installed, but make sure the YouTube app is installed—and up to date—on the device, because our app depends on it.
Once deployed, you should be able to type in a query to search for videos on YouTube and then click on a result to start playing the corresponding video.
Conclusion
You now know how to embed YouTube videos in your Android app. You have also learned how to use the Google API client library and interact with YouTube. The Android Player API provides a lot of methods to control the playback of the videos and you can use them to come up with very creative apps. Refer to the complete reference guide to learn more about the API.

Comments