Have you ever wanted to create an interactive user interface for your application, but didn't know how to? In this tutorial, we'll create a Windows-like interface quickly and easily, by getting down and dirty with jQuery UI, a user interface library built on top of jQuery.
What Exactly is jQuery UI?

jQuery UI provides abstractions for low-level interaction and animation, advanced effects and high-level, themeable widgets.
jQuery UI has always been a great tool in any front-end developer's kit. It has a lot of different widgets and effects that have been beautifully made to work with most browsers. Want a fast way to create a tabbed interface? jQuery UI has got 'em! Want to create a modal dialog box? It has them too!
In this tutorial, we'll be learning how to utilize jQuery UI to create a highly-functional user interface without using anything else. By the end, you should be familiar with jQuery UI, some of its components, and basic understanding of jQuery UI customization. Ultimately, we'll be building a user interface akin to windows, with dialog boxes that are draggable, resizable, minimizable and maximizable.
Note: If you really want to customize every nook-and-cranny of the jQuery UI's theme, you should check out this tutorial entitled “A Massive Guide to Custom Theming jQuery UI Widgets”. It's a Premium-only tutorial, but I guarantee it's well-worth the purchase.!
Our Goal: To create draggable, resizable, minimizable and maximizable windows-like dialog boxes that we can implement for different kinds of applications

Step 1: Setting Up
To begin, download the jQuery UI library from their site, http://jqueryui.com. Once you visit the site, you'll see multiple options to “customize” your jQuery UI download.
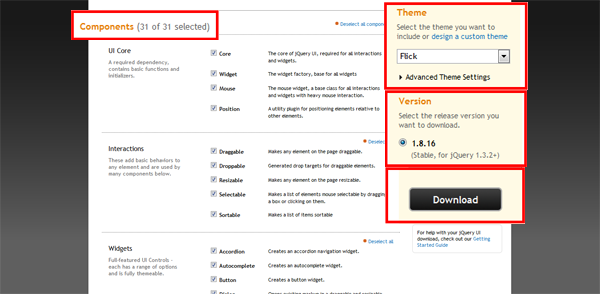
The jQuery UI Download Page
For the purposes of our tutorial, make sure that all the components are selected. For the theme, select the Flick theme. Double check that you also select the 1.8.16 version, as jQuery UI's download page provides a legacy version for older jQuery releases.
The jQuery UI download should come with the 1.6.2 version of the jQuery library as well. If you're using a more current version of jQuery, you should use that instead. This is just the minimum version of jQuery that's needed by jQuery UI.
Extract the download into your project's public folder. The download suggests a structure for your site resources:
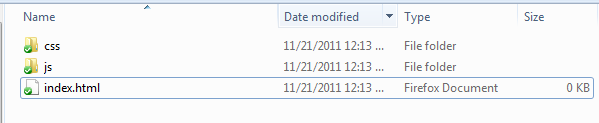
Suggested file-structure for your site resources
- a
jsfolder for your JavaScript files (jQuery UI and jQuery) - a
cssfodler for your CSS files (jQuery UI theme CSS)
Feel free to change this to suit your needs, though in my experience, this is a great way to organize your site's resources.
After extracting your files, create an index.html file which will contain our page's HTML. The content of the HTML file should be as follows:
<!DOCTYPE html>
<html>
	<head>
               <meta charset="utf-8">
		<title>Creating a windows-like interface with jQuery UI</title>
		<!-- Load the jQuery UI CSS -->
		<link rel="stylesheet" href="css/flick/jquery-ui-1.8.16.custom.css" type="text/css" />

		<!-- Load jQuery first before jQuery UI! -->
		<script src="js/jquery-1.6.2.min.js"></script>
		<script src="js/jquery-ui-1.8.16.custom.min.js"></script>
	</head>
	<body>
	</body>
</html>
Step 2: Create the HTML for Our Dialog Windows
Now, let's begin by creating the HTML for our Dialog windows. According to the Dialog documentation page on jQuery UI's site, a Dialog box's HTML is simply a <div>. Any other HTML inside the <div> becomes the content of the dialog box. Knowing that, create a simple Dialog box window and open it using jQuery UI.
Copy the following code over to the <body> of the HTML file:
<div id="dialog_window_1" class="dialog_window" title="This is our first dialog window">
	<p>Hello World!</p>
</div>
Then, initiate the Dialog box by executing this JavaScript. Copy the following code inside the <head> of the HTML file:
<script>
	$(document).ready(function() {
		$('#dialog_window_1').dialog();
	});
</script>
Once you refresh the page, you should see something like this:
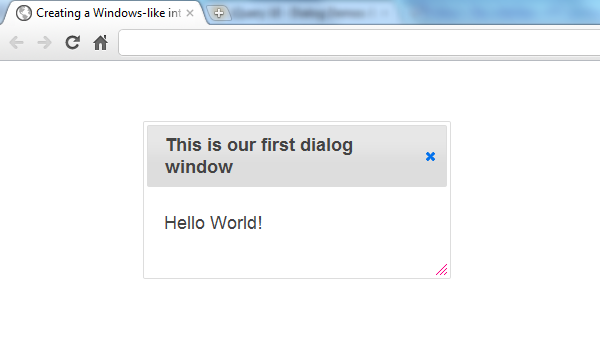
Hello World!
Initializing a Dialog box can be done by simply calling the $(element_id).dialog() function! And as you can see, our content inside the <div> will be converted into content for the dialog box.
Now, create a simple form to create new Dialog boxes inside the Dialog Box. Replace the Hello World! code inside our initial Dialog box with the following:
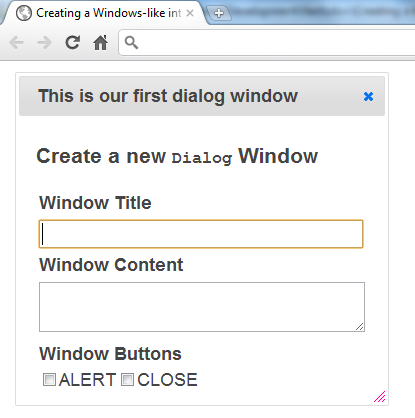
<h3>Create a new <code>Dialog</code> Window</h3>
<table class="dialog_form">
	<tr>
		<th>window Title</th>
	</tr>
	<tr>
		<td><input type="text" id="new_window_title" /></td>
	</tr>
	<tr>
		<th>
			window Content
		</th>
	</tr>
	<tr>
		<td>
			<textarea id="new_window_content"></textarea>
		</td>
	</tr>
	<tr>
		<th>
			window Buttons
		</th>
	</tr>
	<tr>
		<td id="buttonlist">
			<input type="checkbox" id="alertbutton" /><label for="alertbutton">ALERT</label>
			<input type="checkbox" id="closebutton" /><label for="closebutton">CLOSE</label>
			<input type="checkbox" id="clonebutton" /><label for="clonebutton">CLONE</label>
		</td>
	</tr>
</table>
When you refresh the page, it should look something like this:
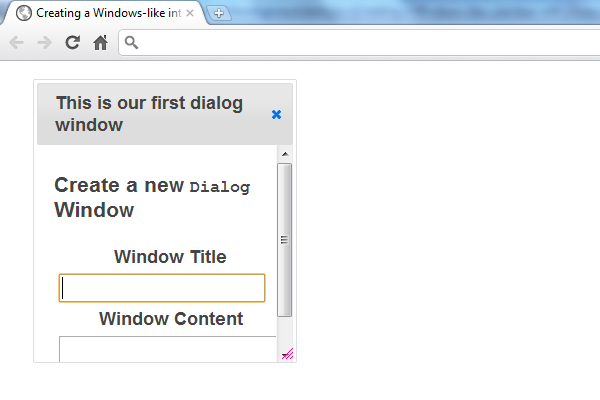
It looks a tad ugly right now, but don't worry, we'll be adding some customizations to the Dialog window to make it look better
Step 3: Customizing our Dialog Windows via Dialog Options and CSS
Our Dialog box currently doesn't look very good, but we'll be able to customize it by providing some initialization options to our Dialog initialization code, and of course, some CSS.
Let's replace our initialization code with the following:
$('#dialog_window_1').dialog({
	width: 'auto',
	height: 'auto'
});
Let's also add some CSS in the <head> of our HTML:
<style>
.dialog_form th {
	text-align: left;
}

.dialog_form textarea, .dialog_form input[type=text] {
	width: 320px;
}
</style>
Much better!
Let's break down some of the options that we used on our initialization code:
-
width- this option lets you set a specific width for yourDialogbox. You can also set it to'auto'to let jQuery UI set the width dyanmically -
height- does virtually the same thing as thewidthoption, but does it for the height of theDialogbox instead of width
There are a lot more options for the Dialog box, but most of them deal with the behaviour of the Dialog box. We'll go into some of these in the later steps of the tutorial.
Now that we have a nice-looking Dialog box with a form inside, let's add some Buttons to our Dialog box to make it do something!
Step 4: Adding a Button to Open our Dialog Window
One of the great things about jQuery UI is its modularity. For example, the Dialog box also uses other jQuery UI components, like Draggable, Resizable, and most importantly, the Button component.

Button example from jQuery UI's documentation
The Button component allows us to create buttons with customized functions upon clicking. And at the same time, it corresponds with the theme we installed with jQuery UI, so changing the theme will also change the look of the button, therefore keeping the design uniform throughout the site.
For starters, create a Button to open and close our Dialog box. Add this to the <body> of the HTML:
<button id="create_button">Create a new window</button>
And initialize it by adding this to the $(document).ready() function:
$('#create_button').button();
Cool button bro
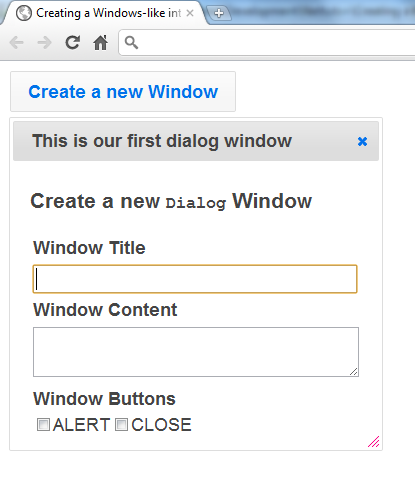
Since we're doing stuff with buttons, let's convert our checkboxes to buttons as well so they'll look better. jQuery UI's Button component also lets you recreate a set of checkboxes or radio buttons into a Buttonset. To do so, just copy the following code code in the JavaScript block:
$('#buttonlist').buttonset();
Now, refresh the page to see the new pretty-fied checkboxes:
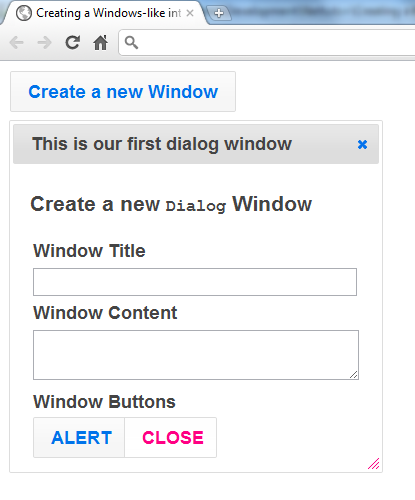
Now that the Dialog box and Button are rendering well, we can change their behaviour so that the Button opens and closes the Dialog. To do so, update the JavaScript block so it'll look like this:
$(document).ready(function() {
	//initialize the button and add a click function to our button so that it"ll open the window
	$("#create_button").button().click(function() {
		var create_dialog = $("#dialog_window_1");
		var create_button = $(this);

		//if the window is already open, then close it and replace the label of the button
		if( create_dialog.dialog("isOpen") ) {
			create_button.button("option", "label", "Create a new window");
			create_dialog.dialog("close");
		} else {
			//otherwise, open the window and replace the label again
			create_button.button("option", "label", "Close window");
			create_dialog.dialog("open");
		}
	});

	//open our dialog window, but set autoOpen to false so it doesn"t automatically open when initialized
	$("#dialog_window_1").dialog({
		width: "auto",
		height: "auto",
		autoOpen : false
	});

	//initialize our buttonset so our checkboxes are changed
	$("#buttonlist").buttonset();
});
Let's go through the code line-by-line:
- We've added a
clickfunction to ourButtonthat opens theDialogbox whenever we click on it. - Additionally, we use the
$(dialog_id).dialog('isOpen')method, which returnstrueif ourDialogis already open, andfalseif not. - If the
Dialogis closed, we open theDialogwindow by calling the$(dialog_id).dialog('open')method, and change thelabelof theButtonto “Close window” using the$(button_id).button('option')method. - If it's already open, we do the reverse using the same
optionmethod onButtonand the$(dialog_id).dialog('close')method to close theDialogbox. - We've also taken advantage of another
Dialogoption, which is calledautoOpen. When set to true, it allows theDialogwindow to open automatically when initialized. If not, then theDialogwindow can only be opened by calling the$(dialog_id).dialog('open')method, which is what the button does.
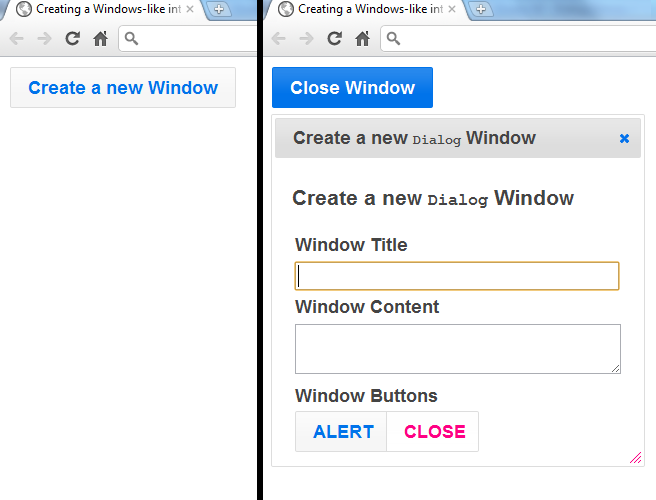
Functional buttons and checkboxes bro
Step 5: Adding Functionality to our Dialog Window
Now that the Dialog window is up and running, let's add the functionality to it to create new Dialog windows. First off, add some buttons to our Dialog. Thankfully, jQuery UI has the functionality to add buttons to any Dialog box and customize what they do when clicked. To do so, modify the initialization code by adding a buttons parameter to it:
$('#dialog_window_1').dialog({
	width: 'auto',
	height: 'auto',
	autoOpen : false,
	buttons: [
		{
			text: 'Create',
			click: function() {
				alert('Yay, clicked the button!');
			}
		}
	]
});
As you can see from the sample code, we added the “Create” button by simply adding a buttons option to the initialization code. The button option is an array of JSON objects in the following format:
{
	text: 'Name of your button',
	click: function () {
		//Add stuff here to do when the button is clicked
	}
}
To add more buttons, you can merely add more JSON objects in the same format to the buttons array. When you refresh the page, it should look something like so:
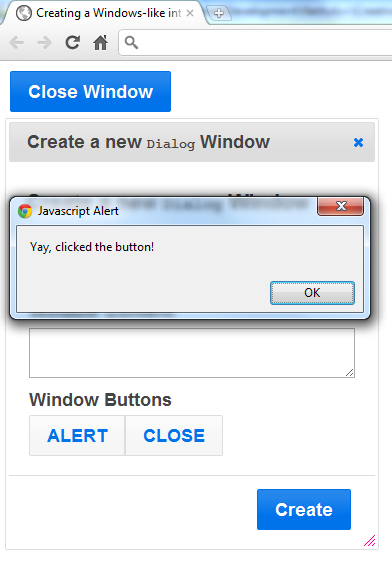
Yay, clicked the button!
Now we'll add some functionality to our button. Remove the alert('Yay, clicked the button!'); line and replace it with the following:
//get the total number of existing dialog windows plus one (1)
var div_count = $('.dialog_window').length + 1;

//generate a unique id based on the total number
var div_id = 'dialog_window_' + div_count;

//get the title of the new window from our form, as well as the content
var div_title = $('#new_window_title').val();
var div_content = $('#new_window_content').val();

//generate a buttons array based on which ones of our checkboxes are checked
var buttons = new Array();
if( $('#alertbutton').is(':checked') ) {
	buttons.push({
		text: 'ALERT',
		click: function() {
			alert('ALERTING from Dialog Widnow: ' + div_title);
		}
	});
}

if( $('#closebutton').is(':checked') ) {
	buttons.push({
		text: 'CLOSE',
		click: function() {
			$('#' + div_id).dialog('close');
		}
	});
}

//append the dialog window HTML to the body
$('body').append('<div class="dialog_window" id="' + div_id + '">' + div_content + '</div>');

//initialize our new dialog
var dialog = $('#' + div_id).dialog({
	width: 'auto',
	height: 'auto',
	title : div_title,
	autoOpen : true,
	buttons: buttons
});
Here's a step-by-step of the code we just added above:
- First, get the total number of
Dialogwindows on the site. - From this, generate a new unique id that will be used for the new
Dialogwindow. - Get the
window Titleandwindow Contentvalues from the “Create a newDialogwindow” form. - Check whether the
ALERTandCLOSEcheckboxes are checked. If they are, create a JSON object, following thebuttonformat from above, and push it into abuttonsarray. - Generate and append the
Dialogwindow's HTML inside the page's<body>tag - Lastly, initialize the new
Dialogwindow using the initialization code like the one used on the originalDialogwindow.
Play around with it and try different combinations for the buttons. Here's a screenshot with all the possible combinations:
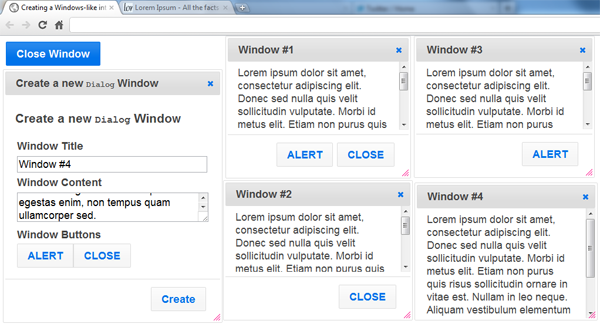
Lorem ipsum dolor sit amet
Now that we're able to create mutiple windows, let's add some minimize-maximize functionality!
Step 6: Making the Dialog Windows “Minimizable” and “Maximizable”
Unfortunately, jQuery UI doesn't have built-in minimize and maximize methods, but we can easily add it by overriding some stuff on the initialization process of the jQuery UI Dialog prototype. Essentially, we're going to add some post-initialization code which will automatically create a “minimized state”, add a minimize icon for the Dialog windows, as well as add a function that “maximizes” the minimized window when the minimized state is clicked.
Let's start off by adding the CSS to style the buttons and the minimized state:
#dialog_window_minimized_container {
	position: fixed;
	bottom: 0px;
	left: 0px;
}

.dialog_window_minimized {
	float: left;
	padding: 5px 10px;
	font-size: 12px;
	cursor: pointer;
	margin-right: 2px;
	display: none;
}

.dialog_window_minimized .ui-icon {
	display: inline-block !important;
	position: relative;
	top: 3px;
	cursor: pointer;
}

.ui-dialog .ui-dialog-titlebar-minimize {
	height: 18px;
	width: 19px;
	padding: 1px;
	position: absolute;
	right: 23px;
	top: 9px;
}

.ui-dialog .ui-dialog-titlebar-minimize .ui-icon {
	display: block;
	margin: 1px;
}

.ui-dialog .ui-dialog-titlebar-minimize:hover, .ui-dialog .ui-dialog-titlebar-minimize:focus {
	padding: 0;
}
We'll also need to add a “minimized state” container, where we'll append all the minimized windows. Add this inside the <body> tag:
<div id="dialog_window_minimized_container"></div>
Now, add this JavaScript codeblock after the place where the jQuery UI library is loaded. This is important as it won't work if it's before the library is loaded.
<script>
var _init = $.ui.dialog.prototype._init;
$.ui.dialog.prototype._init = function() {
	//Run the original initialization code
	_init.apply(this, arguments);

	//set some variables for use later
	var dialog_element = this;
	var dialog_id = this.uiDialogTitlebar.next().attr('id');

	//append our minimize icon
	this.uiDialogTitlebar.append('<a href="#" id="' + dialog_id +
	'-minbutton" class="ui-dialog-titlebar-minimize ui-corner-all">'+
	'<span class="ui-icon ui-icon-minusthick"></span></a>');

	//append our minimized state
	$('#dialog_window_minimized_container').append(
		'<div class="dialog_window_minimized ui-widget ui-state-default ui-corner-all" id="' +
		dialog_id + '_minimized">' + this.uiDialogTitlebar.find('.ui-dialog-title').text() +
		'<span class="ui-icon ui-icon-newwin"></div>');

	//create a hover event for the minimize button so that it looks good
	$('#' + dialog_id + '-minbutton').hover(function() {
		$(this).addClass('ui-state-hover');
	}, function() {
		$(this).removeClass('ui-state-hover');
	}).click(function() {
		//add a click event as well to do our "minimalization" of the window
		dialog_element.close();
		$('#' + dialog_id + '_minimized').show();
	});

	//create another click event that maximizes our minimized window
	$('#' + dialog_id + '_minimized').click(function() {
		$(this).hide();
		dialog_element.open();
	});
};
</script>
Here's what this code does:
- Let the original jQuery UI
Dialoginitialization code run via_init.apply(this, arguments); -
Appendthe minimize icon to theDialogBox's Title Bar -
Appendthe minimized state HTML inside the#dialog_window_minimized_container <div> - Add a
hoverevent to the minimize icon so that it'll get theui-state-hoverclass when the mouse is hovered over it, which will add the “background-color changing” effect that we see. - Create a click event for it that closes the
Dialogwindow and shows the minimized state - Finally, create another click event for the minimized state that hides itself and re-opens the
Dialogwindow
And now, our windows-like interface is complete!
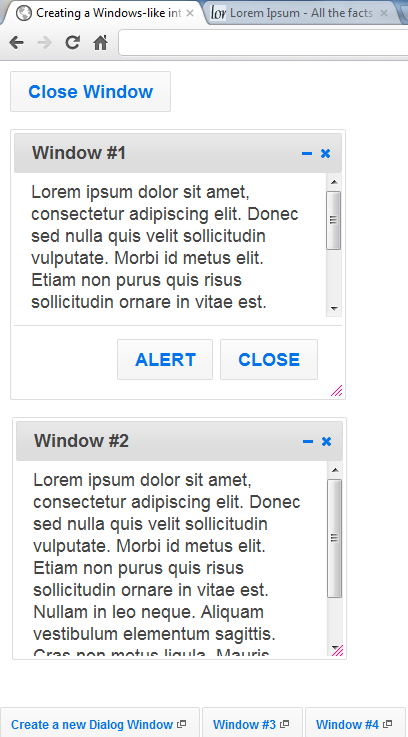
windows-like interface, hurrah!
Conclusion
In this article, we've demonstrated how easy it is to create a beautiful and highly-functional user interface using nothing but jQuery and jQuery UI. By now, you should already know how to:
- Download and setup the jQuery UI library for your project
- Use jQuery UI's
Dialog,ButtonandButtonsetcomponent. - Create
Dialogboxes both statically and dynamically using information from any source - Dynamically create different
Dialog Buttonswith each newDialogbox. - Adding custom functionality to jQuery UI's
Dialoge.g. minimize and maximize functionality. - Customize jQuery UI's initialization process
It's worth taking note that there are a whole lot more components that you can leverage through jQuery UI. It's definitely a great way to build incredible user interfaces quickly and easily. Hopefully this article has proven to you that jQuery UI is an essential tool in any developer's toolkit.
Have you used jQuery UI in the past or planning to use it for a future project? Let us know in the comments below and thank you so much for reading!

Comments