In the first article of this series, we laid the foundation of the project by setting up the project and creating the application's structure. In this article, we leverage the AFNetworking library to interact with the Forecast API.
Introduction
In the first installment of this series, we laid the foundation of our weather application. Users can add their current location and switch between locations. In this tutorial, we will use the AFNetworking library to ask the Forecast API for the weather data of the currently selected location.
If you want to follow along, you will need a Forecast API key. You can obtain an API key by registering as a developer at Forecast. Registration is free, so I encourage you to try out the Forecast weather service. You can find your API key at the bottom of your dashboard (figure 1).

1. Subclassing AFHTTPClient
As I wrote earlier in this article, we will be using the AFNetworking library for communicating with the Forecast API. There are several options when working with AFNetworking, but to make our application future proof, we will opt for the AFHTTPClient class. This class is designed for consuming web services, such as the Forecast API. Even though we will only access one API endpoint, it is still useful to make use of the AFHTTPClient as you will learn in a few moments.
It is recommended to create an AFHTTPClient subclass for each web service. Because we already added AFNetworking to our project in the previous tutorial, we can immediately start subclassing AFHTTPClient.
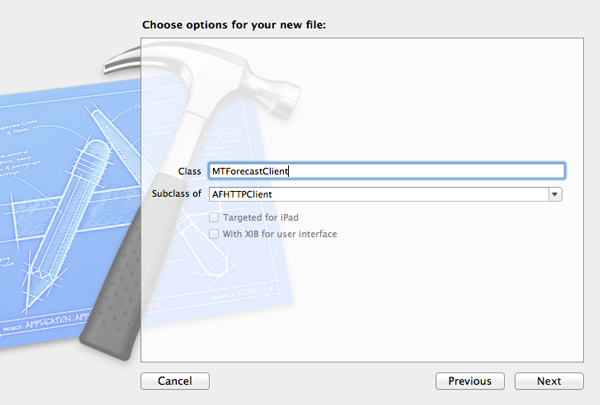
Step 1: Create the Class
Create a new Objective-C class, name it MTForecastClient, and make it a subclass of AFHTTPClient (figure 2).
Step 2: Creating a Singleton Object
We will adopt the singleton pattern to make it easier to use the MTForecastClient class in our project. This means that only one instance of the class is alive at any one time for the lifetime of the application. Chances are that you are already familiar with singleton pattern as it is a common pattern in many object-oriented programming languages. At first glance, the singleton pattern seems very convenient, but there are a number of caveats to watch out for. You can learn more about singletons by reading this excellent article by Matt Gallagher.
Creating a singleton object is pretty straightforward in Objective-C. Start by declaring a class method in MTForecastClient.h to provide public access to the singleton object (see below).
#import "AFHTTPClient.h"

@interface MTForecastClient : AFHTTPClient

#pragma mark -
#pragma mark Shared Client
+ (MTForecastClient *)sharedClient;

@end
The implementation of sharedClient may look daunting at first, but it isn't that difficult once you understand what's going on. We first declare two static variables, (1) predicate of type dispatch_once_t and (2) _sharedClient of type MTForecastClient. As its name implies, predicate is a predicate that we use in combination with the dispatch_once function. When working with a variable of type dispatch_once_t, it is important that it is declared statically. The second variable, _sharedClient, will store a reference to the singleton object.
The dispatch_once function takes a pointer to a dispatch_once_t structure, the predicate, and a block. The beauty of dispatch_once is that it will execute the block once for the lifetime of the application, which is exactly what we want. The dispatch_once function doesn't have many uses, but this is definitely one of them. In the block that we pass to dispatch_once, we create the singleton object and store a reference in _sharedClient. It is safer to invoke alloc and init separately to avoid a race condition that could potentially lead to a deadlock. Euh ... what? You can read more about the nitty gritty details on Stack Overflow.
+ (MTForecastClient *)sharedClient {
    static dispatch_once_t predicate;
    static MTForecastClient *_sharedClient = nil;

    dispatch_once(&predicate, ^{
        _sharedClient = [self alloc];
        _sharedClient = [_sharedClient initWithBaseURL:[self baseURL]];
    });

    return _sharedClient;
}
The important thing to understand about the implementation of the sharedClient class method is that the initializer, initWithBaseURL:, is invoked only once. The singleton object is stored in the _sharedClient static variable, which is returned by the sharedClient class method.
Step 3: Configuring the Client
In sharedClient, we invoke initWithBaseURL:, which in turn invokes baseURL, another class method. In initWithBaseURL:, we set a default header, which means that the client adds this header to every request that it sends. This is one of the advantages of working with the AFHTTPClient class. In initWithBaseURL:, we also register an HTTP operation class by invoking registerHTTPOperationClass:. The AFNetworking library provides a number of specialized operations classes. One of these classes is the AFJSONRequestOperation class, which makes interacting with a JSON API very easy. Because the Forecast API returns a JSON response, the AFJSONRequestOperation class is a good choice. The registerHTTPOperationClass: method works similar to how the registerClass:forCellReuseIdentifier: of the UITableView class works. By telling the client what operation class we want to use for interacting with the web service, it will instantiate instances of that class for us under the hood. Why this is useful will become clear in a few moments.
- (id)initWithBaseURL:(NSURL *)url {
    self = [super initWithBaseURL:url];

    if (self) {
        // Accept HTTP Header
        [self setDefaultHeader:@"Accept" value:@"application/json"];

        // Register HTTP Operation Class
        [self registerHTTPOperationClass:[AFJSONRequestOperation class]];
    }

    return self;
}
The implementation of baseURL is nothing more than a convenience method for constructing the client's base URL. The base URL is the URL that the client uses to reach the web service. It is the URL without any method names or parameters. The base URL for the Forecast API is https://api.forecast.io/forecast/. The API key is part of the URL as you can see. This may seem insecure and it actually is. It isn't difficult for someone to grab the API key so it is advisable to work with a proxy to mask the API key. Because this approach is a bit more involved, I won't cover this aspect in this series.
+ (NSURL *)baseURL {
    return [NSURL URLWithString:[NSString stringWithFormat:@"https://api.forecast.io/forecast/%@/", MTForecastAPIKey]];
}
You may have noticed in the implementation of baseURL that I have used another string constant for storing the API key. This might seem unnecessary since we only use the API key in one location. However, it is good practice to store application data in one location or in a property list.
#pragma mark -
#pragma mark Forecast API
extern NSString * const MTForecastAPIKey;
#pragma mark -
#pragma mark Forecast API
NSString * const MTForecastAPIKey = @"xxxxxxxxxxxxxxxxxxxxxxxxxxxxxxxx";
Step 4: Adding a Helper Method
Before we move on, I would like to extend the MTForecastClient class by adding a helper or convenience method that will make it easier to query the Forecast API. This convenience method will accept a location and a completion block. The completion block is executed when the request finishes. To make working with blocks easier, it is recommended to declare a custom block type as shown below. If you still feel uncomfortable using blocks, then I recommend reading this great article by Akiel Khan.
The block takes two arguments, (1) a boolean indicating whether the query was successful and (2) a dictionary with the response from the query. The convenience method, requestWeatherForCoordinate:completion:, takes the coordinates of a location (CLLocationCoordinate2D) and a completion block. By using a completion block, we can avoid creating a custom delegate protocol or fall back to using notifications. Blocks are a perfect fit for this type of scenario.
#import "AFHTTPClient.h"

typedef void (^MTForecastClientCompletionBlock)(BOOL success, NSDictionary *response);

@interface MTForecastClient : AFHTTPClient

#pragma mark -
#pragma mark Shared Client
+ (MTForecastClient *)sharedClient;

#pragma mark -
#pragma mark Instance Methods
- (void)requestWeatherForCoordinate:(CLLocationCoordinate2D)coordinate completion:(MTForecastClientCompletionBlock)completion;

@end
In requestWeatherForCoordinate:completion:, we invoke getPath:success:failure:, a method declared in AFHTTPClient. The first argument is the path that is appended to the base URL that we created earlier. The second and third arguments are blocks that are executed when the request succeeds and fails, respectively. The success and failure blocks are pretty simple. If a completion block was passed to requestWeatherForCoordinate:completion:, we execute the block and pass a boolean value and the response dictionary (or nil in the failure block). In the failure block, we log the error from the failure block to the console to facilitate debugging.
- (void)requestWeatherForCoordinate:(CLLocationCoordinate2D)coordinate completion:(MTForecastClientCompletionBlock)completion {
    NSString *path = [NSString stringWithFormat:@"%f,%f", coordinate.latitude, coordinate.longitude];
    [self getPath:path parameters:nil success:^(AFHTTPRequestOperation *operation, id response) {
        if (completion) {
            completion(YES, response);
        }

    } failure:^(AFHTTPRequestOperation *operation, NSError *error) {
        if (completion) {
            completion(NO, nil);

            NSLog(@"Unable to fetch weather data due to error %@ with user info %@.", error, error.userInfo);
        }
    }];
}
You may be wondering what the response object in the success blocks is or references. Even though the Forecast API returns a JSON response, the response object in the success block is an NSDictionary instance. The benefit of working with the AFJSONHTTPRequestOperation class, which we registered in initWithBaseURL:, is that it accepts the JSON response and automatically creates an object from the response data, a dictionary in this example.
2. Querying the Forecast API
Step 1: Amend setLocation:
Armed with the MTForecastClient class, it is time to query the Forecast API and fetch the weather data for the currently selected location. The most suitable place to do this is in the setLocation: method of the MTWeatherViewController class. Amend the setLocation: method as shown below. As you can see, all we do is invoke fetchWeatherData, another helper method.
- (void)setLocation:(NSDictionary *)location {
    if (_location != location) {
        _location = location;

        // Update User Defaults
        NSUserDefaults *ud = [NSUserDefaults standardUserDefaults];
        [ud setObject:location forKey:MTRainUserDefaultsLocation];
        [ud synchronize];

        // Post Notification
        NSNotification *notification1 = [NSNotification notificationWithName:MTRainLocationDidChangeNotification object:self userInfo:location];
        [[NSNotificationCenter defaultCenter] postNotification:notification1];

        // Update View
        [self updateView];

        // Request Location
        [self fetchWeatherData];
    }
}
Have you ever wondered why I use so many helper methods in my code? The reason is simple. By wrapping functionality in helper methods, it is very easy to reuse code in various places of a project. The main benefit, however, is that it helps battle code duplication. Code duplication is something you should always try to avoid as much as possible. Another advantage of using helper methods is that it makes your code much more readable. By creating methods that do one thing and providing a well chosen method name, it is easier to quickly read and process your code.
Step 2: Sending the Request
It is time to put the SVProgressHUD library to use. I really like this library because it is so simple to use without cluttering the project's code base. Take a look at the implementation of fetchWeatherData below. We start by showing the progress HUD and then pass a structure (CLLocationCoordinate2D) to the convenience method we created earlier, requestWeatherForCoordinate:completion:. In the completion block, we hide the progress HUD and log the response to the console.
- (void)fetchWeatherData {
    // Show Progress HUD
    [SVProgressHUD showWithMaskType:SVProgressHUDMaskTypeGradient];

    // Query Forecast API
    double lat = [[_location objectForKey:MTLocationKeyLatitude] doubleValue];
    double lng = [[_location objectForKey:MTLocationKeyLongitude] doubleValue];
    [[MTForecastClient sharedClient] requestWeatherForCoordinate:CLLocationCoordinate2DMake(lat, lng) completion:^(BOOL success, NSDictionary *response) {
        // Dismiss Progress HUD
        [SVProgressHUD dismiss];

        NSLog(@"Response > %@", response);
    }];
}
Before you build and run your application, import the header file of the MTForecastClient class in MTWeatherViewController.m.
#import "MTWeatherViewController.h"

#import "MTForecastClient.h"

@interface MTWeatherViewController () <CLLocationManagerDelegate> {
    BOOL _locationFound;
}

@property (strong, nonatomic) NSDictionary *location;

@property (strong, nonatomic) CLLocationManager *locationManager;

@end
What happens when the device is not connected to the web? Have you thought about that scenario? In terms of user experience, it is good practice to notify the user when the application is unable to request data from the Forecast API. Let me show how to do this with the AFNetworking library.
3. Reachability
There are a number of libraries that provide this functionality, but we will stick with AFNetworking. Apple also provides sample code, but it is a bit outdated and doesn't support ARC.
AFNetworking has truly embraced blocks, which is definitely one of the reasons that this library has become so popular. Monitoring for reachability changes is as simple as passing a block to setReachabilityStatusChangeBlock:, another method of the AFHTTPClient class. The block is executed every time the reachability status changes and it accepts a single argument of type AFNetworkReachabilityStatus. Take a look at the updated initWithBaseURL: method of the MTForecastClient class.
- (id)initWithBaseURL:(NSURL *)url {
    self = [super initWithBaseURL:url];

    if (self) {
        // Accept HTTP Header
        [self setDefaultHeader:@"Accept" value:@"application/json"];

        // Register HTTP Operation Class
        [self registerHTTPOperationClass:[AFJSONRequestOperation class]];

        // Reachability
        __weak typeof(self)weakSelf = self;
        [self setReachabilityStatusChangeBlock:^(AFNetworkReachabilityStatus status) {
            [[NSNotificationCenter defaultCenter] postNotificationName:MTRainReachabilityStatusDidChangeNotification object:weakSelf];
        }];
    }

    return self;
}
To avoid a retain cycle, we pass a weak reference to the singleton object in the block that we pass to setReachabilityStatusChangeBlock:. Even if you use ARC in your projects, you still need to be aware of subtle memory issues like this. The name of the notification that we post is another string constant declared in MTConstants.h/.m.
extern NSString * const MTRainReachabilityStatusDidChangeNotification;
NSString * const MTRainReachabilityStatusDidChangeNotification = @"com.mobileTuts.MTRainReachabilityStatusDidChangeNotification";
The reason for posting a notification in the reachability status change block is to make it easier for other parts of the application to update when the device's reachability changes. To make sure that the MTWeatherViewController class is notified of reachability changes, instances of the class are added as an observer for the notifications sent by the Forecast client as shown below.
- (id)initWithNibName:(NSString *)nibNameOrNil bundle:(NSBundle *)nibBundleOrNil {
    self = [super initWithNibName:nibNameOrNil bundle:nibBundleOrNil];

    if (self) {
        // Initialize Location Manager
        self.locationManager = [[CLLocationManager alloc] init];

        // Configure Location Manager
        [self.locationManager setDelegate:self];
        [self.locationManager setDesiredAccuracy:kCLLocationAccuracyKilometer];

        // Add Observer
        NSNotificationCenter *nc = [NSNotificationCenter defaultCenter];
        [nc addObserver:self selector:@selector(reachabilityStatusDidChange:) name:MTRainReachabilityStatusDidChangeNotification object:nil];
    }

    return self;
}
This also means that we need to remove the instance as an observer in the dealloc method. This is a detail that is often overlooked.
- (void)dealloc {
    // Remove Observer
    [[NSNotificationCenter defaultCenter] removeObserver:self];
}
The implementation of reachabilityStatusDidChange: is pretty basic at the moment. We will update its implementation once we create the application's user interface.
- (void)reachabilityStatusDidChange:(NSNotification *)notification {
    MTForecastClient *forecastClient = [notification object];
    NSLog(@"Reachability Status > %i", forecastClient.networkReachabilityStatus);
}
4. Refreshing Data
Before we wrap this post up, I want to add two additional features, (1) fetching weather data whenever the application becomes active and (2) adding the ability to manually refresh weather data. We could implement a timer that fetches fresh data every hour or so, but this is not necessary for a weather application in my opinion. Most users will launch the application, take a look at the weather and put the application in the background. It is therefore only necessary to fetch fresh data when the user launches the application. This means that we need to listen for UIApplicationDidBecomeActiveNotification notifications in the MTWeatherViewController class. As we did for monitoring reachability changes, we add instances of the class as observers of notifications of type UIApplicationDidBecomeActiveNotification.
- (id)initWithNibName:(NSString *)nibNameOrNil bundle:(NSBundle *)nibBundleOrNil {
    self = [super initWithNibName:nibNameOrNil bundle:nibBundleOrNil];

    if (self) {
        // Initialize Location Manager
        self.locationManager = [[CLLocationManager alloc] init];

        // Configure Location Manager
        [self.locationManager setDelegate:self];
        [self.locationManager setDesiredAccuracy:kCLLocationAccuracyKilometer];

        // Add Observer
        NSNotificationCenter *nc = [NSNotificationCenter defaultCenter];
        [nc addObserver:self selector:@selector(applicationDidBecomeActive:) name:UIApplicationDidBecomeActiveNotification object:nil];
        [nc addObserver:self selector:@selector(reachabilityStatusDidChange:) name:MTRainReachabilityStatusDidChangeNotification object:nil];
    }

    return self;
}
In applicationDidBecomeActive:, we verify that location is set (not nil) because this won't always be true. If the location is valid, we fetch the weather data.
- (void)applicationDidBecomeActive:(NSNotification *)notification {
    if (self.location) {
        [self fetchWeatherData];
    }
}
I have also amended fetchWeatherData to only query the Forecast API if the device is connected to the web.
- (void)fetchWeatherData {
    if ([[MTForecastClient sharedClient] networkReachabilityStatus] == AFNetworkReachabilityStatusNotReachable) return;

    // Show Progress HUD
    [SVProgressHUD showWithMaskType:SVProgressHUDMaskTypeGradient];

    // Query Forecast API
    double lat = [[_location objectForKey:MTLocationKeyLatitude] doubleValue];
    double lng = [[_location objectForKey:MTLocationKeyLongitude] doubleValue];
    [[MTForecastClient sharedClient] requestWeatherForCoordinate:CLLocationCoordinate2DMake(lat, lng) completion:^(BOOL success, NSDictionary *response) {
        // Dismiss Progress HUD
        [SVProgressHUD dismiss];

        // NSLog(@"Response > %@", response);
    }];
}
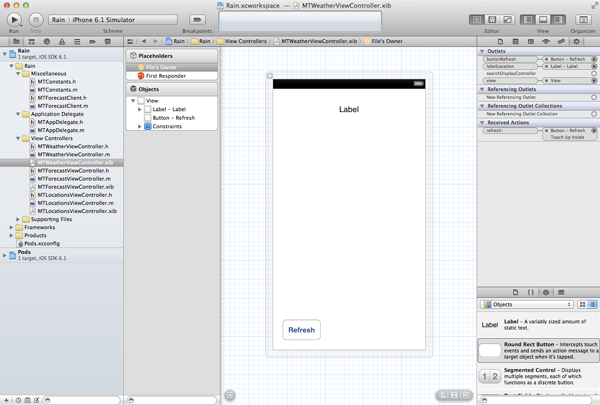
Let's add a button to the weather view controller that the user can tap to manually refresh the weather data. Create an outlet in MTWeatherViewController.h and create a refresh: action in MTWeatherViewController.m.
#import <UIKit/UIKit.h>

#import "MTLocationsViewController.h"

@interface MTWeatherViewController : UIViewController <MTLocationsViewControllerDelegate>

@property (weak, nonatomic) IBOutlet UILabel *labelLocation;
@property (weak, nonatomic) IBOutlet UIButton *buttonRefresh;

@end
- (IBAction)refresh:(id)sender {
    if (self.location) {
        [self fetchWeatherData];
    }
}
Open MTWeatherViewController.xib, add a button to the view controller's view with a title of Refresh, and connect the outlet and action with the button (figure 3). The reason for creating an outlet for the button is to be able to disable it when no network connection is available. For this to work, we need to update the reachabilityStatusDidChange: method as shown below.
- (void)reachabilityStatusDidChange:(NSNotification *)notification {
    MTForecastClient *forecastClient = [notification object];
    NSLog(@"Reachability Status > %i", forecastClient.networkReachabilityStatus);

    // Update Refresh Button
    self.buttonRefresh.enabled = (forecastClient.networkReachabilityStatus != AFNetworkReachabilityStatusNotReachable);
}
It isn't necessary to temporarily disable the refresh button when a request is being processed in fetchWeatherData because the progress HUD adds a layer on top of the view controller's view that prevents the user from tapping the button more than once. Build and run the application to test everything out.
Bonus: Removing Locations
A reader asked me how to delete locations from the list so I am including it here for the sake of completeness. The first thing that we need to do is tell the table view which rows are editable by implementing tableView:canEditRowAtIndexPath: of the UITableViewDataSource protocol. This method returns YES if the row at indexPath is editable and NO if it is not. The implementation is simple as you can see below. Every row is editable except for the first row and the currently selected location.
- (BOOL)tableView:(UITableView *)tableView canEditRowAtIndexPath:(NSIndexPath *)indexPath {
    if (indexPath.row == 0) {
        return NO;
    }

    // Fetch Location
    NSDictionary *location = [self.locations objectAtIndex:(indexPath.row - 1)];

    return ![self isCurrentLocation:location];
}
To check whether location is the current location, we use another helper method, isCurrentLocation:, in which we fetch the current location and compare the locations coordinates. It would have been better (and easier) if we had assigned a unique identifier to each location stored in the user defaults database. Not only would it make it easier to compare locations, but it would also allow us to store the current location's unique identifier in the user defaults database and look it up in the array of locations. The problem with the current implementation is that locations with the exact same coordinates cannot be distinguished from one another.
- (BOOL)isCurrentLocation:(NSDictionary *)location {
    // Fetch Current Location
    NSDictionary *currentLocation = [[NSUserDefaults standardUserDefaults] objectForKey:MTRainUserDefaultsLocation];

    if ([location[MTLocationKeyLatitude] doubleValue] == [currentLocation[MTLocationKeyLatitude] doubleValue] &&
        [location[MTLocationKeyLongitude] doubleValue] == [currentLocation[MTLocationKeyLongitude] doubleValue]) {
        return YES;
    }

    return NO;
}
When the user taps the delete button of a table view row, the table view data source is sent a tableView:commitEditingStyle:forRowAtIndexPath: message. In this method, we need to (1) update the data source, (2) save the changes to the user defaults database, and (3) update the table view. If editingStyle is equal to UITableViewCellEditingStyleDelete, we remove the location from the locations array and store the updated array in the user defaults database. We also delete the row from the table view to reflect the change in the data source.
- (void)tableView:(UITableView *)tableView commitEditingStyle:(UITableViewCellEditingStyle)editingStyle forRowAtIndexPath:(NSIndexPath *)indexPath {
    if (editingStyle == UITableViewCellEditingStyleDelete) {
        // Update Locations
        [self.locations removeObjectAtIndex:(indexPath.row - 1)];

        // Update User Defaults
        [[NSUserDefaults standardUserDefaults] setObject:self.locations forKey:MTRainUserDefaultsLocations];

        // Update Table View
        [tableView deleteRowsAtIndexPaths:@[indexPath] withRowAnimation:UITableViewRowAnimationTop];
    }
}
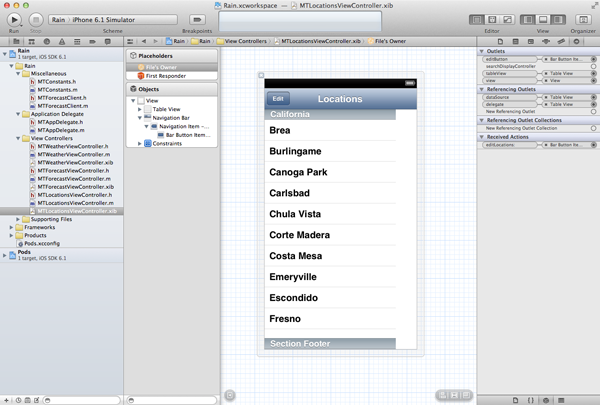
To toggle the table view's editing style, we need to add an edit button to the user interface. Create an outlet for the button in MTLocationsViewController.h and an action named editLocations: in MTLocationsViewController.m. In editLocations:, we toggle the table view's editing style.
#import <UIKit/UIKit.h>

@protocol MTLocationsViewControllerDelegate;

@interface MTLocationsViewController : UIViewController <UITableViewDataSource, UITableViewDelegate>

@property (weak, nonatomic) id<MTLocationsViewControllerDelegate> delegate;

@property (weak, nonatomic) IBOutlet UITableView *tableView;
@property (weak, nonatomic) IBOutlet UIBarButtonItem *editButton;

@end

@protocol MTLocationsViewControllerDelegate <NSObject>
- (void)controllerShouldAddCurrentLocation:(MTLocationsViewController *)controller;
- (void)controller:(MTLocationsViewController *)controller didSelectLocation:(NSDictionary *)location;
@end
- (IBAction)editLocations:(id)sender {
    [self.tableView setEditing:![self.tableView isEditing] animated:YES];
}
Open MTLocationsViewController.xib, add a navigation bar to the view controller's view, and add an edit button to the navigation bar. Connect the edit button with the outlet and action that we created a moment ago.
You may be wondering why we created an outlet for the edit button. The reason is that we need to be able to change the title of the edit button from Edit to Done, and vice versa, whenever the editing style of the table view changes. In addition, when the user deletes the last location (except for the current location) in the table view, it would be nice to automatically toggle the table view's editing style. These features are not hard to implement which is why I leave them up to you as an exercise. If you run into problems or have questions, feel free to leave a comment in the comments below this article.
Conclusion
We have successfully integrated the Forecast API in our weather application. In the next tutorial, we will implement focus on the user interface and the design of the application.

Comments