In this tutorial, I’ll walk you through the steps of setting up a widget, its settings form, and displaying it on your site. At the end of the tutorial, you can download an example plugin to build from. Of course, you can apply this to your themes as well.
Step 1: TwitterRSS Stats Widget !
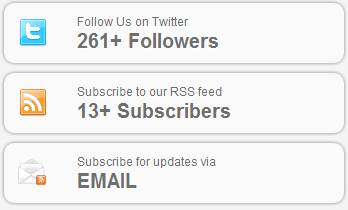
This plugin will help you to display your Twitter Followers & Rss Subscribers Stats.
As we increasingly depend on more and more social services, there rises the need to provide a simple way to let our website visitors take part of our diverse social presence. This plugin will help you to display your WordPress Blog/Site Twitter Followers & Rss Subscribers Stats at the desired sidebar in the WordPress Widgets.
Getting started
You should already have WordPress installed, either on your local machine or on a testing server. For this tutorial we will use the WordPress version 3.2 You should also have a theme that support widgets. You could use the default one or make a WordPress theme from scratch and widgetize it.
Widget name
The first task in creating a WordPress widget is to think about what the widget will do, and make a (hopefully unique) name for your widget. Check out Plugins and the other repositories it refers to, to verify that your name is unique; you might also do a Google search on your proposed name. The name can be multiple words.
Widget files
I will start by creating a folder widget-name in our wp-content/plugins/ directory, where WordPress stores all it's plugins. It's a good idea to always create a folder for your plugin, even if it consists only of 1 file, so you could add more files later. The next step is to create our main widget file widget-name.php. To make WordPress recognize it as a plugin we should add a specific header to it, that describes our widget.
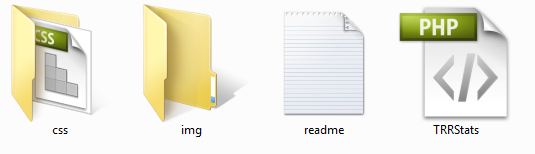
In my plugin there are 2 folder css & images, one plugin .php file and readme.txt file.
The readme.txt contains information about your plugin and can come in handy when you submit your plugin WordPress SVN plugin repository. See the readme sample.Also check How To Improve Your WordPress Plugin’s Readme.txt
The Plugin Basics
The heart of a WordPress plugins is the below 2 functions (commonly called `hooks`):
- add_action ($tag, $func) documentation
- add_filter ($tag,$func) documentation
It is very important to know the difference between the above functions.
- add_action –> does an action at various points of WordPress execution
- add_filter –> does filtering the data (eg. escaping quotes before mysql insert, or during output to browser.
Refer to the WordPress Plugin API for more better understanding.
Plugin Information
Create TRRStats.php and in the first line, add this commented plugin information to your file.Save this php file,
- Place the plugin folder to WordPress > wp-content > plugins,
- Go to your WordPress admin > plugins and you will see the new plugin listed, waiting to get activated.
Step 2: Setting Up Our Widget
As i inform you before that in this tutorial we are creating simple plug-in that displays your Twitter Followers & Rss Subscribers Stats.The first thing we have to do is load our widget when necessary. WordPress provides the widgets_init action hook that will allow us to do this. This action hook is fired right after the default WordPress widgets have been registered.
<?php
function TRR_Widget() {
	register_widget('TRRWidget');
}
add_action('widgets_init', 'TRR_Widget');
add_action('wp_head', 'addHeaderCode');
?>
we simply have to extend the preexisting WP_Widget class. So, the first step is creating a new class with a unique name.
class TRRWidget extends WP_Widget
{
Then, we’ll want to add our first function. This function will be what makes our widget unique to WordPress, and it’ll allow us to set up the widget settings. Note that the class name and first function name are the same. In this example this is TRRWidget.
function TRRWidget(){
		$widget_ops = array('classname' => 'widget_hello_world', 'description' => __( "Twitter & RSS Social Stats") );
		$control_ops = array('width' => 300, 'height' => 300);
		$this->WP_Widget('helloworld', __('Twitter & RSS Social Stats'), $widget_ops, $control_ops);
	}
Displaying the widget
The next function within our WP_Widget class will handle the display of the widget. This code might be a little confusing because we don’t know what it all means (we haven’t added the controls).
The goal here is to take the settings supplied by what the user selected for the widget and display the widget according to those values.
It’s also important to make sure you use the $before_widget, $after_widget, $before_title, and $after_title variables. These are provided by the theme and should not be hardcoded. How widgets are displayed should always be handled by the theme.
function widget($args, $instance){
		extract($args);
		$title = apply_filters('widget_title', $instance['title'] );
		$rss_email = empty($instance['rss_email']) ? 'webdesignergeeks' : $instance['rss_email'];
		$twitter = empty($instance['twitter']) ? 'webdesignergeek' : $instance['twitter'];
		$rss = empty($instance['rss']) ? 'webdesignergeeks' : $instance['rss'];

		/* Before widget (defined by themes). */
		echo $before_widget;
		/* Title of widget (before and after defined by themes). */
		if ( $title )
			echo $before_title . $title . $after_title;

		global $wpdb;
		$item_info = $wpdb->get_row("SELECT * FROM TRR_Stats WHERE id=1;");
		$rss_email_f = $item_info->rss_email;
		/*Solve RSS Date Prob*/
		$Today=date('Y-m-d');
		$NewDate=Date('Y-m-d', strtotime("-2 days"));//minus 2 days to date

		$url = file_get_contents('https://feedburner.google.com/api/awareness/1.0/GetFeedData?uri='.$rss_email.'&dates='.$NewDate);
		preg_match( '/circulation="(d+)"/', $url, $matches );
		if ( $matches[1] )
		$rss_f = $matches[1] . "+ Subscribers";
		else
		$rss_f = "0";

		$twit = file_get_contents('http://twitter.com/users/show/'.$twitter.'.xml');
		preg_match( '/<followers_count>(d+)</followers_count>/', $twit, $matches );
		if ( $matches[1] )
		$twitter_f = $matches[1] . "+ Followers";
		else
		$twitter_f = "0";

		echo '
			<div class="sidebarContainer" id="sidebarSubscribe">
			<a target="_blank" href="http://twitter.com/'.$twitter.'" class="subscribeSidebarBox" id="followTwitter">
            	<span class="icon"><img src="'.get_bloginfo('url').'/wp-content/plugins/twitter-rss-social-stats/img/twitter.png" alt="Twitter" /></span>
                <span class="title">Follow Us on Twitter</span>
                <span class="count">'.$twitter_f.'</span>
            </a>
        	<a target="_blank" href="http://feeds.feedburner.com/'.$rss.'" class="subscribeSidebarBox" id="subscribeRSS">
            	<span class="icon"><img src="'.get_bloginfo('url').'/wp-content/plugins/twitter-rss-social-stats/img/rss_feed.png" alt="RSS"/></span>
                <span class="title">Subscribe to our RSS feed</span>
                <span class="count">'.$rss_f.'</span>
            </a>
            <a target="_blank" href="http://feedburner.google.com/fb/a/mailverify?uri='.$rss_email_f.'" class="subscribeSidebarBox" id="subscribeEmail">
            	<span class="icon"><img src="'.get_bloginfo('url').'/wp-content/plugins/twitter-rss-social-stats/img/rss_email.png" alt="rss_email" /></span>
                <span class="title">Subscribe for updates via</span>
                <span class="count">EMAIL</span>
            </a>
        </div>';
		echo $after_widget;
	}
Making sure our widget is updated and saved
In this step, we’ll take each of our widget settings and save them. It’s a pretty simple procedure. We’re just updating the widget to use the new user-selected values.
Saving Widget Data to the Database -
Most WordPress Widgets will need to get some input from the site owner or blog users and save it between sessions, for use in its filter functions, action functions, and template functions. This information has to be saved in the WordPress database, in order to be persistent between sessions. There are two basic methods for saving Widget data in the database.
The $wpdb object can be used to read data from any table in the WordPress database, not just the standard tables that WordPress creates. For example to SELECT some information from a custom table called "mytable", you can do the following.
myrows = $wpdb-><a title="" href="http://codex.wordpress.org/Class_Reference/wpdb#SELECT_Generic_Results">get_results</a>( "SELECT id, name FROM mytable" );
WordPress Options -
This method is appropriate for storing relatively small amounts of relatively static, named pieces of data - the type of data you'd expect the site owner to enter when first setting up the Widget, and rarely change thereafter. Option values can be strings, arrays, or PHP objects (they will be "serialized", or converted to a string, before storage, and unserialized when retrieved). Option names are strings, and they must be unique, so that they do not conflict with either WordPress or other Plugins. Here are function you will need to modify options.
add_option($name, $value);

update_option($name, $new_value);

delete_option($name);

Create a custom database table
This method is appropriate for data associated with individual posts, pages, attachments, or comments -- the type of data that will grow as time goes on, and that doesn't have individual names. See Creating Tables with Plugins for information on how to do this.
function update($new_instance, $old_instance){
		$instance = $old_instance;
		$instance['title'] = strip_tags( $new_instance['title'] );
		$instance['rss_email'] = strip_tags(stripslashes($new_instance['rss_email']));
		$instance['twitter'] = strip_tags(stripslashes($new_instance['twitter']));
		$instance['rss'] = strip_tags(stripslashes($new_instance['rss']));
		global $wpdb;
			$wpdb->insert( 'TRR_Stats', array(
			'id'	=> 1,
			'rss_email' => $instance['rss_email'],
			'twitter' => $instance['twitter'],
			'rss' => $instance['rss']
			)
		);
		global $wpdb;
			$wpdb->update( 'TRR_Stats',
			array(
				'rss_email' => $instance['rss_email'],
				'twitter' => $instance['twitter'],
				'rss' => $instance['rss']
			),
			array(
				'id' => 1
			)
		);
		return $instance;
	}
Step 3: Creating Widget Controls or Settings
The reason the new widget class in WordPress is so cool is how easy it is to set up controls for your widgets. important things The get_field_id() and get_field_name() functions handle most of the dirty work, leaving us to concentrate on more like actually creating the widget. Take special notice of how these functions are used because it’ll make life much simpler for you.
First, we might want to set up some defaults. By setting up defaults, we can control what’s shown just in case the user doesn’t select anything.
function form($instance){
		$instance = wp_parse_args( (array) $instance, array('rss_email'=>'webdesignergeeks', 'twitter'=>'webdesignergeek', 'rss'=>'webdesignergeeks') );
		$rss_email = htmlspecialchars($instance['rss_email']);
		$twitter = htmlspecialchars($instance['twitter']);
		$rss = htmlspecialchars($instance['rss']);
		?>
		<p><label for="<?php echo $this->get_field_id( 'title' ); ?>"><?php _e('Title:', 'hybrid'); ?></label>
		<input id="<?php echo $this->get_field_id( 'title' ); ?>" name="<?php echo $this->get_field_name( 'title' ); ?>" value="<?php echo $instance['title']; ?>" style="width:100%;" />
		</p>
		<?php
		echo '<p><label for="' . $this->get_field_name('twitter') . '">' . ('Twitter:') . ' <input id="' . $this->get_field_id('twitter') . '" name="' . $this->get_field_name('twitter') . '" type="text" value="' . $twitter . '" style="width:100%;"/></label></p>';
		echo '<p>i.e: webdesignergeeks</p>';
		echo '<p><label for="' . $this->get_field_name('rss') . '">' . __('Rss:') . ' <input style="width:100%;" id="' . $this->get_field_id('rss') . '" name="' . $this->get_field_name('rss') . '" type="text" value="' . $rss . '" /></label></p>';
		echo '<p>i.e: webdesignergeeks</p>';
		echo '<p><label for="' . $this->get_field_name('rss_email') . '">' . ('Rss Email:') . ' <input style="width:100%;" id="' . $this->get_field_id('rss_email') . '" name="' . $this->get_field_name('rss_email') . '" type="text" value="' . $rss_email . '" /></label></p>';
		echo '<p>i.e: webdesignergeeks</p>';
	}?>
Step 4: Finally The Whole PHP Code Is
<?php
/*
 * Plugin Name: TwitterRSS Stats
 * Version: 1.0
 * Plugin URI: http://webdesignergeeks.com/
 * Description: Twitter & RSS Social Stats widget  <a href="http://webdesignergeeks.com/">tutorial</a>.
 * Author: Ajay Patel
 * Author URI: http://ajayy.com/
 */
?>
<?php
function addHeaderCode() {
	echo '<link type="text/css" rel="stylesheet" href="' . get_bloginfo('wpurl') . '/wp-content/plugins/twitter-rss-social-stats/css/style.css" />' . "n";
}
function my_plugin_create_table()
{
	global $wpdb;
	if($wpdb->get_var("show tables like TRR_Stats") != 'TRR_Stats')
	{
		$sql = "CREATE TABLE TRR_Stats (
		id mediumint(9) NOT NULL,
		rss_email tinytext NOT NULL,
		twitter tinytext NOT NULL,
		rss tinytext NOT NULL,
		UNIQUE KEY id (id)
		);";
		require_once(ABSPATH . 'wp-admin/includes/upgrade.php');
		dbDelta($sql);
	}
}
register_activation_hook( __FILE__, 'my_plugin_create_table' );
class TRRWidget extends WP_Widget
{
	function TRRWidget(){
		$widget_ops = array('classname' => 'widget_hello_world', 'description' => __( "Twitter & RSS Social Stats") );
		$control_ops = array('width' => 300, 'height' => 300);
		$this->WP_Widget('helloworld', __('Twitter & RSS Social Stats'), $widget_ops, $control_ops);
	}
	function widget($args, $instance){
		extract($args);
		$title = apply_filters('widget_title', $instance['title'] );
		$rss_email = empty($instance['rss_email']) ? 'webdesignergeeks' : $instance['rss_email'];
		$twitter = empty($instance['twitter']) ? 'webdesignergeek' : $instance['twitter'];
		$rss = empty($instance['rss']) ? 'webdesignergeeks' : $instance['rss'];

		/* Before widget (defined by themes). */
		echo $before_widget;
		/* Title of widget (before and after defined by themes). */
		if ( $title )
			echo $before_title . $title . $after_title;

		global $wpdb;
		$item_info = $wpdb->get_row("SELECT * FROM TRR_Stats WHERE id=1;");
		$rss_email_f = $item_info->rss_email;
		/*Solve RSS Date Prob*/
		$Today=date('Y-m-d');
		$NewDate=Date('Y-m-d', strtotime("-2 days"));//minus 2 days to date

		$url = file_get_contents('https://feedburner.google.com/api/awareness/1.0/GetFeedData?uri='.$rss_email.'&dates='.$NewDate);
		preg_match( '/circulation="(d+)"/', $url, $matches );
		if ( $matches[1] )
		$rss_f = $matches[1] . "+ Subscribers";
		else
		$rss_f = "0";

		$twit = file_get_contents('http://twitter.com/users/show/'.$twitter.'.xml');
		preg_match( '/<followers_count>(d+)</followers_count>/', $twit, $matches );
		if ( $matches[1] )
		$twitter_f = $matches[1] . "+ Followers";
		else
		$twitter_f = "0";

		echo '
			<div class="sidebarContainer" id="sidebarSubscribe">
			<a target="_blank" href="http://twitter.com/'.$twitter.'" class="subscribeSidebarBox" id="followTwitter">
            	<span class="icon"><img src="'.get_bloginfo('url').'/wp-content/plugins/twitter-rss-social-stats/img/twitter.png" alt="Twitter" /></span>
                <span class="title">Follow Us on Twitter</span>
                <span class="count">'.$twitter_f.'</span>
            </a>
        	<a target="_blank" href="http://feeds.feedburner.com/'.$rss.'" class="subscribeSidebarBox" id="subscribeRSS">
            	<span class="icon"><img src="'.get_bloginfo('url').'/wp-content/plugins/twitter-rss-social-stats/img/rss_feed.png" alt="RSS"/></span>
                <span class="title">Subscribe to our RSS feed</span>
                <span class="count">'.$rss_f.'</span>
            </a>
            <a target="_blank" href="http://feedburner.google.com/fb/a/mailverify?uri='.$rss_email_f.'" class="subscribeSidebarBox" id="subscribeEmail">
            	<span class="icon"><img src="'.get_bloginfo('url').'/wp-content/plugins/twitter-rss-social-stats/img/rss_email.png" alt="rss_email" /></span>
                <span class="title">Subscribe for updates via</span>
                <span class="count">EMAIL</span>
            </a>
        </div>';
		echo $after_widget;
	}
	/*Plugin Update */
	function update($new_instance, $old_instance){
		$instance = $old_instance;
		$instance['title'] = strip_tags( $new_instance['title'] );
		$instance['rss_email'] = strip_tags(stripslashes($new_instance['rss_email']));
		$instance['twitter'] = strip_tags(stripslashes($new_instance['twitter']));
		$instance['rss'] = strip_tags(stripslashes($new_instance['rss']));
		global $wpdb;
			$wpdb->insert( 'TRR_Stats', array(
			'id'	=> 1,
			'rss_email' => $instance['rss_email'],
			'twitter' => $instance['twitter'],
			'rss' => $instance['rss']
			)
		);
		global $wpdb;
			$wpdb->update( 'TRR_Stats',
			array(
				'rss_email' => $instance['rss_email'],
				'twitter' => $instance['twitter'],
				'rss' => $instance['rss']
			),
			array(
				'id' => 1
			)
		);
		return $instance;
	}
	function form($instance){
		$instance = wp_parse_args( (array) $instance, array('rss_email'=>'webdesignergeeks', 'twitter'=>'webdesignergeek', 'rss'=>'webdesignergeeks') );
		$rss_email = htmlspecialchars($instance['rss_email']);
		$twitter = htmlspecialchars($instance['twitter']);
		$rss = htmlspecialchars($instance['rss']);
		?>
			<p><label for="<?php echo $this->get_field_id( 'title' ); ?>"><?php _e('Title:', 'hybrid'); ?></label>
			<input id="<?php echo $this->get_field_id( 'title' ); ?>" name="<?php echo $this->get_field_name( 'title' ); ?>" value="<?php echo $instance['title']; ?>" style="width:100%;" />
			</p>
		<?php
		echo '<p><label for="' . $this->get_field_name('twitter') . '">' . ('Twitter:') . ' <input id="' . $this->get_field_id('twitter') . '" name="' . $this->get_field_name('twitter') . '" type="text" value="' . $twitter . '" style="width:100%;"/></label></p>';
		echo '<p>i.e: webdesignergeeks</p>';
		echo '<p><label for="' . $this->get_field_name('rss') . '">' . __('Rss:') . ' <input style="width:100%;" id="' . $this->get_field_id('rss') . '" name="' . $this->get_field_name('rss') . '" type="text" value="' . $rss . '" /></label></p>';
		echo '<p>i.e: webdesignergeeks</p>';
		echo '<p><label for="' . $this->get_field_name('rss_email') . '">' . ('Rss Email:') . ' <input style="width:100%;" id="' . $this->get_field_id('rss_email') . '" name="' . $this->get_field_name('rss_email') . '" type="text" value="' . $rss_email . '" /></label></p>';
		echo '<p>i.e: webdesignergeeks</p>';
	}
}
function TRR_Widget() {
	register_widget('TRRWidget');
}
add_action('widgets_init', 'TRR_Widget');
add_action('wp_head', 'addHeaderCode');
?>
Step 5: Adding CSS to this Plugin .php File
Now, every html element should look at perfect position with good style effect. CSS script will help you to do this.
function addHeaderCode() {
	echo '<link type="text/css" rel="stylesheet" href="' . get_bloginfo('wpurl') . '/wp-content/plugins/twitter-rss-social-stats/css/style.css" />' . "n";
}
add_action('wp_head', 'addHeaderCode');
CSS Code
a.subscribeSidebarBox {
    background-color: #FAFAFA;
    border-radius: 10px 10px 10px 10px;
}
a.subscribeSidebarBox {
margin-top:10px;
    border: medium none;
    cursor: pointer;
    display: block;
    height: 60px;
    margin-bottom: 8px;
    position: relative;
	font-decoration:none;
	-moz-box-shadow: 0 0 5px #888;
	-webkit-box-shadow: 0 0 5px#888;
	box-shadow: 0 0 5px #888;
}
#subscribeRSS .icon {
    background-position: 0 -50px;
}
#followTwitter .icon {
    background-position: -100px -50px;
}
#subscribeEmail .icon {
    background-position: -200px -50px;
}
#sidebarSubscribe .icon {

    height: 45px;
    left: 10px;
    top: 10px;
    width: 55px;
}
#sidebarSubscribe .count {
    font-family: arial !important;
    font-size: 20px;
    font-weight: bold;
    left: 70px;
    text-decoration: none;
    top: 23px;
}
#sidebarSubscribe .title {
    font-family: arial !important;
    font-size: 12px;
    left: 70px;
    text-decoration: none;
    top: 8px;
}
#sidebarSubscribe span {
    color: #6E6E6E;
    display: block;
    padding: 3px;
    position: absolute;
    text-shadow: 1px 1px 0 white;
}
.subscriberStats {
    height: 35px;
    padding: 5px;
    width: 220px;
}
.socialIcon {
    float: left;
    font-size: 28px;
    height: 32px;
    line-height: 32px;
    margin-right: 10px;
}

.subscriberCount {
    border-bottom: 1px dotted #CCCCCC;
    color: #999999;
    float: left;
    font-size: 28px;
    line-height: 32px;
    margin-right: 10px;
}
Conclusion
Its now time to create your own widgets !
If you’ve ever created or attempted to create a widget in WordPress, then you can probably see how much easier this is. To help people learn the new system, I’ve put together an example widget. I’ve left loads of comments about what code does what in the file, so it should be pretty easy to follow: I am enjoying working with the new widget class. I like to release a few new widgets in the near future. But, I would love to see what all you come up with. Good Luck :)

Comments