In the previous part of this tutorial series, we saw how to get started with creating a simple shopping cart using AngularJS. We created a simple design but there wasn't really enough AngularJS to call it an AngularJS application. In this part of the tutorial series, we'll create a custom AngularJS directive to implement the required functionality.
Getting Started
Let's start by cloning the source code of the previous tutorial from GitHub.
git clone https://github.com/jay3dec/AngularShoppingCart_Part1.git
After cloning the source code, navigate to the project directory and install the required dependencies.
cd AngularShoppingCart_Part1
npm install
Once the dependencies are installed, start the server.
node server.js
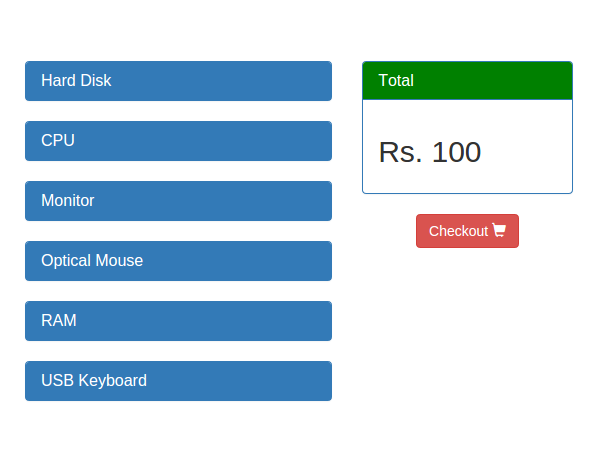
Point your browser to http://localhost:3000/ and you should have the application running.
Creating a Check List Directive
In the cart.html page, the items and its options are repeated. So we'll create an AngularJS directive for this purpose which will create items and its options as per the data in the back end. For the sake of simplicity, let's consider the following items in the shopping cart :
[{
    'item': 'Hard Disk',
    'id': 'HD',
    'selected': 0,
    'prices': [{
        'size': '200GB',
        'price': '2000'
    }, {
        'size': '400GB',
        'price': '4000'
    }]
}, {
    'item': 'CPU',
    'id': 'CPU',
    'selected': 0,
    'prices': [{
        'size': 'i3',
        'price': '20000'
    }, {
        'size': 'i5',
        'price': '25000'
    }]
}, {
    'item': 'Monitor',
    'id': 'MON',
    'selected': 0,
    'prices': [{
        'size': '16\'',
        'price': '3000'
    }, {
        'size': '19\'',
        'price': '5000'
    }]
}, {
    'item': 'Optical Mouse',
    'id': 'MOU',
    'selected': 0,
    'prices': [{
        'size': 'Optical',
        'price': '350'
    }, {
        'size': 'Advanced',
        'price': '550'
    }]
}, {
    'item': 'RAM',
    'id': 'RM',
    'selected': 0,
    'prices': [{
        'size': '4GB',
        'price': '4000'
    }, {
        'size': '8GB',
        'price': '8000'
    }]
}, {
    'item': 'USB Keyboard',
    'id': 'KEY',
    'selected': 0,
    'prices': [{
        'size': 'Standard',
        'price': '2500'
    }, {
        'size': 'Advanced',
        'price': '4500'
    }]
}]
Add the following data inside the CartCtrl.
$scope.shopData = [{
    'item': 'Hard Disk',
    'id': 'HD',
    'selected': 0,
    'prices': [{
        'size': '200GB',
        'price': '2000'
    }, {
        'size': '400GB',
        'price': '4000'
    }]
}, {
    'item': 'CPU',
    'id': 'CPU',
    'selected': 0,
    'prices': [{
        'size': 'i3',
        'price': '20000'
    }, {
        'size': 'i5',
        'price': '25000'
    }]
}, {
    'item': 'Monitor',
    'id': 'MON',
    'selected': 0,
    'prices': [{
        'size': '16\'',
        'price': '3000'
    }, {
        'size': '19\'',
        'price': '5000'
    }]
}, {
    'item': 'Optical Mouse',
    'id': 'MOU',
    'selected': 0,
    'prices': [{
        'size': 'Optical',
        'price': '350'
    }, {
        'size': 'Advanced',
        'price': '550'
    }]
}, {
    'item': 'RAM',
    'id': 'RM',
    'selected': 0,
    'prices': [{
        'size': '4GB',
        'price': '4000'
    }, {
        'size': '8GB',
        'price': '8000'
    }]
}, {
    'item': 'USB Keyboard',
    'id': 'KEY',
    'selected': 0,
    'prices': [{
        'size': 'Standard',
        'price': '2500'
    }, {
        'size': 'Advanced',
        'price': '4500'
    }]
}];
Remove the repeated .panel HTML code from cart.html. We'll create the HTML dynamically using ngRepeat and $scope.shopData. Add the following HTML code to the first column of the .row div.
<div class="col-xs-7 col-md-8 col-sm-8 col-lg-8">
    <div class="panel panel-primary" ng-repeat="q in shopData">
        <div class="panel-heading">
            <h3 class="panel-title">{{q.item}}</h3>
        </div>

    </div>
</div>
As seen in the above code, using ngRepeat we have iterated over shopData and rendered the HTML. Save the above changes and restart the server. Refresh the page and you should be able to view the items displayed on the page.
Next, we'll display the option available along with a particular item, like its size and price (refer to the JSON data). For that purpose we'll create our own custom AngularJS directive. AngularJS directives are one of the most powerful features of AngularJS. For detailed information on AngularJS directives, refer to the official docs.
Let's create a custom directive called checkList. Open cart.js and create a new directive as shown:
.directive('checkList', function() {
    return {
        restrict: 'E',
        template: function(elem, attrs) {
            return '<div class="panel-body">\
                    <div class="radio">\
                        <label><input type="radio">Option1</label>\
                    </div>\
    	    <div class="radio">\
                        <label><input type="radio">Option2</label>\
                    </div>\
		    <div class="radio">\
                        <label><input type="radio">Option2</label>\
                    </div>\
                </div>'
        }
    };
})
This directive has the name checkList. The directive checkList has two parameters, restrict and template. Restrict defines how the directive will be called. Since we have defined E it will be called as an element name, like:
<check-list></check-list>
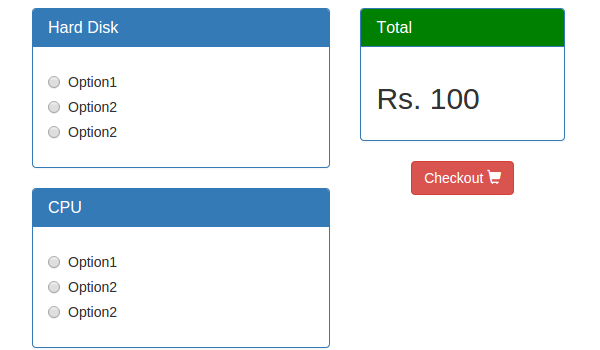
The template field defined the HTML code that will replace the checkList directive on the page. We have used the same static HTML code that we had earlier. Now call the directive checkList on the cart.html page.
<div class="panel panel-primary" ng-repeat="q in shopData">
    <div class="panel-heading">
        <h3 class="panel-title">{{q.item}}</h3>
    </div>
    <check-list></check-list>
</div>
Save the above changes and refresh the cart page. You should be able to view the static HTML options on the cart page.
Now, let's make the directive read data from $scope.shopData. Firstly, instead of repeating the options inside the directive, we'll use ngRepeat to iterate the options. Modify the directive checkList as shown to make it dynamic.
template: function(elem, attrs) {
    return '<div class="panel-body">\
                    <div class="radio" ng-repeat="i in option">\
                        <label><input type="radio">{{i.size}} Rs.{{i.price}}</label>\
                    </div>\
                </div>'
}
As you can see in the above code, we are expecting the option to be passed to the directive. So from the HTML portion we'll have to define an attribute for the checkList directive called option and pass the required data. Add the option in cart.html as shown:
<div class="panel panel-primary" ng-repeat="q in shopData">
    <div class="panel-heading">
        <h3 class="panel-title">{{q.item}}</h3>
    </div>
    <check-list option="q.prices"></check-list>
</div>
To access the passed option inside the directive we'll need to define the scope. Inside the checkList directive define scope as shown:
.directive('checkList', function() {
    return {
        restrict: 'E',
        scope: {
            option: '='
        },
        template: function(elem, attrs) {
            return '<div class="panel-body">\
                    <div class="radio" ng-repeat="i in option">\
                        <label><input type="radio">{{i.size}} Rs.{{i.price}}</label>\
                    </div>\
                </div>'
        }
    };
})
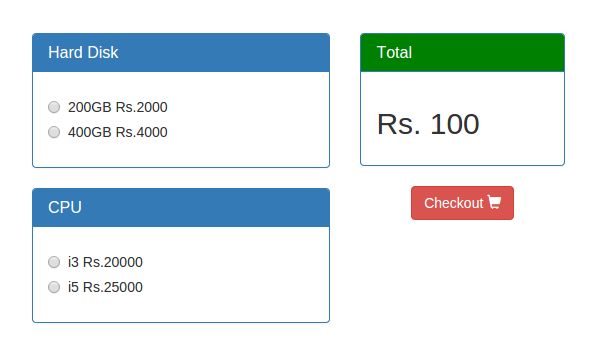
In this way the price list of different items from $scope.shopData is passed into the directive. Save the above changes and restart the server. Refresh the page and you should be able to view the size and price of each item as options in the page.
Now, if you try to click on the radio button option for a particular item, both get selected. In order to ensure that one item is selected at a time, we'll group the radio buttons. For that we'll be required to pass another name attribute to the directive from the HTML view. So add a new name attribute to check-list from the view. We'll be passing in the item ID as the name, since its unique to each item.
<check-list name="q.id" option="q.prices"></check-list>
Now add another variable to the directive scope to make it accessible in the directive template.
scope: {
    option: '=',
    name: '='
}
Inside the directive template HTML, add the passed-in name as the radio button name which would group the radio buttons of particular items.
<input type="radio" name="{{name}}"
Save the changes and refresh the page. Try selecting the radio buttons for a particular item and you should be able to select only one at a time.
Calculating the Total Based on the Options Selected
Based on the items selected by the user, we need to show a sum total of the price of all the items selected. For that we'll create a $scope function called total, which will sum up the total price. Each time a user selects an item, we update the variable selected in the $scope.shopData JSON. Then this JSON is iterated to get the total price of the selected items. Here is the total function.
$scope.total = function() {
    var t = 0;

    for (var k in $scope.shopData) {
        t += parseInt($scope.shopData[k].selected);
    }

    return t;

}
Right now we are showing a hard-coded value of Rs 100 in the total div. Instead of that we'll simply call the total function.
<h2>Rs. {{total()}}</h2>
Save the changes and refresh the page. If you try selecting the different options, the total doesn't really change. It's because the initial value of the selected variable in the JSON is 0 and is not updated on selection. So let's pass the selected value from JSON into the directive and update it when the radio button is selected. Modify the HTML view to include one more selected attribute to the checkList directive element.
<check-list name="q.id" selected="q.selected" option="q.prices"></check-list>
Add selected to the directive scope to access it inside the directive.
scope: {
    option: '=',
    name: '=',
    selected: '=selected'
}
We'll set selected to the radio button ngModel directive and the i.price to the ngValue directive. Hence, whenever the radio button is selected, its value is updated in the selected attribute of the $scope.shopData JSON.
<input type="radio" ng-model="$parent.selected" ng-value="{{i.price}}" name="{{name}}">
Save the above changes and refresh the page. Try selecting the radio button options and based on the selection the Total price should be updated.

Conclusion
In this part of the tutorial series, we created a custom directive and used it in our simple shopping cart application. In the next part of this series, we'll see how to make the total div always fixed on top while scrolling down. We'll also implement the checkout page where the selected items and prices will be shown with a button back to the cart page to customize the selection.
Source code from this tutorial is available on GitHub. Do let us know your thoughts or any corrections in the comments below!

Comments