In this tutorial, we're going to look at how easy it is to create scalable, robust and portable widgets using the latest version of the Yahoo User Interface library. YUI3 provides a Widget class for us to extend in order to create widgets in a consistent way that leverage the power of the library.
The widget that we'll create today is a Twitter search client that will query Twitter's search API and consume the JSON response in order to display tweets that contain the configured search term. We can also add additional functionality such as allowing the visitor to choose another term and do a new search, and viewing paged results. Join me after the jump!
Getting Started
All required YUI modules will be retrieved dynamically when the page running our widget is loade
We'll need the usual css, img and js folders created within a project folder for us to store our various resources in. The images our widget will use can be found in the code download. We don't need to worry about downloading a copy of the YUI library itself as all required YUI modules will be retrieved dynamically when the page running our widget is loaded (we'll look at this in more detail later).
The Widget Wrapper
Create a new script file and add to it the following code:
YUI.add("tweet-search", function (Y) {

}, "0.0.1", { requires: ["widget", "substitute", "jsonp"] });
This is the outer wrapper for our widget; all of the code we write will reside within the function passed as the second argument to YUI's add() method. The add() method of the YUI object allows us to add a new module to the library, which could be a simple function or class, a widget, an extension or a plugin.
- The first argument we provide is the name of our widget. This name is used in the
use()method when implementing the widget. - The second argument is an anonymous function that is used to define the widget's class. The argument accepted by this function is the instance of YUI that the widget is attached to.
- The third argument is used to specify the version number of the widget.
- The fourth and final argument is an object that we can use to supply additional configuration for the widget.
In this example, we use the requires property to specify an array of other YUI components that are required for our widget to function. There are other properties that can be used here, but they aren't required for this example.
As you can see, one of the required components is the Widget component. When creating a custom widget the Widget component of the library should be extended to make use of the powerful constructs that Widget sets up. We also use the Substitute component for doing some simple string substitution when building the required HTML elements, and the JSONP component in order to interact with Twitter's search API.
Top Level Variables, the Constructor and Namespacing
Now we can begin adding some of the variables our widget will require, as well as adding the class constructor and namespace. Add the following code within the anonymous function:
var Node = Y.Node,
    getClassName = Y.ClassNameManager.getClassName,
    i, j,
    baseClasses = ["_CLASS", "title", "loader", "viewer", "tweet", "ui", "label", "input", "button", "error"],
    templates = ["_TEMPLATE", "<hgroup class={titleclass}><h1>{title}</h1><h2>{subtitle}<span>{term}</span></h2></hgroup>", "<div class={loaderclass}>loading...</div>", "<div class={viewerclass}></div>", "<article><a href={userurl} title={username}><img src={avatar} alt={username} /><h1>{username}</h1></a><p>{text}</p></article>", "<div class={uiclass}></div>", "<label class={labelclass}>{labeltext}</label>", "<input class={inputclass} />", "<button class={buttonclass}>{buttontext}</button>", "<p class={errorclass}>{message}</p>"];

function TweetSearch(config) {
    TweetSearch.superclass.constructor.apply(this, arguments);
}

Y.namespace("DW").TweetSearch = TweetSearch;
The name of our widget has the first letter of its name capitalized, as is the convention for naming constructors.
First up, we cache references to the Y.Node component and the Y.ClassNameManager.getClassName() method as we'll be using these frequently. We also define a couple of variables for use in the for loop, and create two new arrays; the first containing a series of strings that will form part of the class names added to the HTML elements our widget will create, and the second containing the HTML templates, also in string format, that will be used to create the elements themselves.
Next we add the constructor function for our widget; this is the function that developers implementing our widget will call. The function can accept a single argument which will take the form of an object that sets configuration attributes exposed by our widget. The name of our widget has the first letter of its name capitalized, as is the convention for naming constructors. Within this function our widget's class is initialised by using the apply() method of the superclass's (Widget) constructor. The value of this is set to our widget instance.
We can also create a namespace for our widget using YUI’s namespace() method; this isn't mandatory but it is a very good practice to run code within a namespace in order to minimize the possibility of naming collisions when code is used in the wild. The namespace() method accepts a string which represents the namespace, to which is attached the widget name as a property and the widget as the value.
I've set the namespace to equal my initials but this can be anything you require; you may already have a namespace that all of your web apps reside in, or it could be the name of your company, the name of your client, or anything else that makes sense. This widget will be accessible via Y.DW.TweetSearch
Static Properties
Next, we can define the static constants required when extending the Widget class. Add the following code directly after the namespace() method:
TweetSearch.NAME = "tweetsearch";

for (i = 1, j = baseClasses.length; i < j; i++) {
    var current = baseClasses[i].toUpperCase(),
        prop1 = current + baseClasses[0],
        prop2 = current + templates[0];

    TweetSearch[prop1] = getClassName(TweetSearch.NAME, baseClasses[i]);
    TweetSearch[prop2] = templates[i];
}
First, we set the NAME property of our widget; the all-caps naming convention here signifies a value that will be constant throughout the life-cycle of our widget instance. The name we set is used by the widget as a prefix when firing events and creating class names for HTML elements.
Next is the for loop we use to add the required class names and mark-up templates to our widget. We initialize the i and j variables that we declare at the top of the function; the i variable that is used as the counter is initially set to 1 instead of 0 as would usually be the case (you’ll see why in just a moment) and the j variable is set to the length of our baseClasses array (the baseClasses and templates arrays are both the same length as every element we create is given a class name. This may not always be the case).
Within the loop we cache a reference to the current item from the baseClasses array and in upper case, and then create two new strings called prop1 and prop2. These strings consist of the variable we just created and the first item in our baseClasses array, so on the first iteration for example, this string will equal TITLE_CLASS for prop1 and TITLE_TEMPLATE for prop2.
We then add these new properties to our widget instance; the first property is set to the result of calling the getClassName() method (remember, we're using the cached short-cut we created earlier which points to Y.ClassNameManager.getClassName). We pass in the name of our widget as the first argument to this method, and the current item from the baseClasses array. This will result in generated class names such as yui3-tweetsearch-title, available fom the TweetSearch.TITLE_CLASS property for example.
The second property we add is the current item from the templates array. Continuing with the title example this gives us a property name of TweetSearch.TITLE_TEMPLATE with a value of <hgroup class={titleclass}><h1>{title}</h1><h2>{subtitle} <span>{term}</span></h2></hgroup>. The purpose of the for loop is simply so that we don't have to attach all of the classes and templates to our instance manually.
Configurable Attributes with Sensible Defaults
Now we can define the configurable attributes that our widget will have, which will enable developers implementing the widget to enable or disable different features. Add the following code directly after the for loop:
TweetSearch.ATTRS = {
term: {
value: "yui3",
validator: "_validateTerm"
},
numberOfTweets: {
value: 5
},
baseURL: {
value: "http://search.twitter.com/search.json?&with_twitter_user_id=true&include_entities=true&callback={callback}"
},
tweets: {
value: null
},
showTitle: {
value: true
},
showUI: {
value: true
},
strings: {
value: {
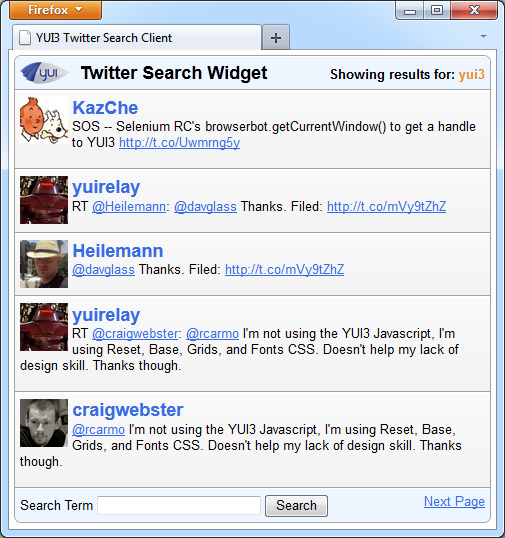
title: "Twitter Search Widget",
subTitle: "Showing results for:",
label: "Search Term",
button: "Search",
errorMsg: "I'm sorry, that search term did not return any results. Please try a different term"
}
}
};
The YUI library adds a consistent way to add attributes to any class or module.
The ATTRS constant is used to store the configurable attributes that the implementing developer can set when creating an instance of the widget. The YUI library adds a consistent way to add attributes to any class or module, and this mechanism is automatically available when extending Widget.
Instead of setting the value of each attribute to a simple native value like a sting or a Boolean, an object is used. The default for each attribute is set using the value property of this object. In the first attribute, we also make use of the validator property, which allows us to specify a function that will be automatically called whenever the value is updated. This enables us to check that the value is in a particular format, or matches other custom criteria. There are also a range of other properties we can set for each attribute including; custom get and set methods, whether the attribute is read-only, and more.
The attributes used by our widget include the search term, the number of tweets to display, the baseURL of the request sent to Twitter, whether to show a title for the widget and whether to show the search UI. There are a number of other attributes our widget will automatically get, and which we can use. We'll look at these in more detail later on in the tutorial.
The final attribute we define is the strings attribute, which is available to all modules that subclass Widget. The value of this attribute is also an object and within this we add all of the text strings that our widget will display. Using an attribute to define any words that the widget needs to display in this way makes our widget super easy to internationalize; implementing developers need only to override the strings attribute with their own collection of strings in whichever language they choose.
Built-in Support for Progressive Enhancement
The Widget superclass furnishes us with the HTML_PARSER static property that can retrieve values from any HTML elements that are present within the widget's container and use these values as attributes, which makes it incredibly easy for us to create widgets that transform underlying mark-up into something more functional and/or pretty.
We don't really need to worry about this for our widget; if JavaScript is disabled, no AJAX request will be made to Twitter's search API and there will be no data to display in any case. However, they give implementing developers more ways of instantiating the widget and configuring attributes, we can make the provision that if a text <input> is present within the widget's container, the value of the field will be used as the search term instead of the default attribute value. In order to retrieve this value we can make use of the HTML_PARSER; add the following code directly after the ATTRS definition:
TweetSearch.HTML_PARSER = {
    term: function (srcNode) {
        var input = srcNode.one("input");

        if (input) {
            var val = input.get("value");
                input.remove();
            }

            return val;
        }
    };
The HTML_PARSER property is an object literal where each property within this object maps directly to an attribute. The only attribute that we wish to add progressive-enhancement support for is the term attribute, the value of which is set to a functional that will automatically be called when our widget is initialized.
This function receives a single argument which is a referece to the srcNode attribute. This is one of the built-in attributes that all widgets automatically get access to and refers explicitly to the element that was passed into the constructor for our widget. This element becomes the content box for the widget.
The first thing we do is try to select an <input> element from the srcNode using YUI's one() method, which selects a single matching element from the DOM. If an element is retrieved, we store its value in a variable called val, and then remove the element from the page (we'll create an alternative <input> element for when the search UI is enabled later). We then return val. If val is not set, i.e. if there wasn't an <input> in the srcNode, underfined will be returned, and the term attribute will stay set to its configured value. If val does contain a value, it will become the value for the term attribute.
Extending the Widget Class
Before we end this part of the tutorial, we'll take a look at the method we use to extend the Widget class with the functionality specific to our widget. This method will form the bulk of our widget. Directly after the HTML_PARSER add the following:
TweetSearch = Y.extend(TweetSearch, Y.Widget, {

});
The YUI extend() method takes three arguments:
- The first is the object to extend, which in this example is our widget's class.
- The second argument is the object we are extending, in this case the Widget class.
- The third argument is an object containing prototype methods to add or override to our widget. The object passed as the third argument will be the wrapper for the remainder of our code, which we'll come to in the next part of this tutorial.
Save this file in the js folder as tweet-search.js.
Summary
In this part of the tutorial we setup some of the required scaffolding for our new widget. Although the widget won't actually do anything at this stage, it can still be initialised and we can see some of the container that is automatically added by the YUI library, and look in the DOM tab of Firebug to see the attributes it has inherited.
After defining some top-level variables, we first saw how to define the constructor function for our widget so that the widget can be initialized by the library, as well as seeing how easy it is to namespace our widget. We then looked at the static constants that are inherited from the underlying Widget class that we are extending. These included the NAME of the widget, the _CLASS and _TEMPLATE collections and the ATTRS object, the latter of which allowed us to set the attributes that an implementing developer can override if they so wish.
We also looked momentarily at the extend() method which is used to add the prototype methods to our widget's class in order to implement that custom functionality it provides. This custom functionality will be the subject of the next part of this tutorial.
Stay tuned and thank you so much for reading!

Comments