
This tutorial will guide you through the development of a Location-based mobile website using the Google Place search engine and Sencha Touch 2.1 . This is the second in a two-part series, and today we'll learn how to display map markers and location details.
This tutorial is the second and final part of our previous post Create a Location-Aware Site using Sencha Touch. In Part 1, we learned how to retrieve different local businesses like restaurant, hospitals, or theaters near our user's current location. We did this using HTML5 geolocation and the Google Place Search API.
In this section, we'll cover the following topics:
- How to maintain browser history using Sencha router.
- How to display multiple markers for each place in the Google map and, when selecting a marker, show an Info bubble with place information.
- How to show complete details of each place, their reviews, and how to show the place images in a Pinterest style gallery.
We will resume where we left in the previous post.
1. Layout Change
In the first post, the app we developed was fairly simple by its navigation and a Sencha Navigation View was perfect for such a layout. However, while you find that you have to add more custom controls to your toolbars, using this type of view becomes difficult because Sencha maintains the Navigation bar on its own and showing/hiding items in it increases complexity.
So, as we proceed to add more functionality in the app, we need to make couple of changes in the structure. First, we will change the Main panel to a Card layout.
Main.js
/**
 * Main view - holder of all the views.
 * Card layout by default in order to support multiple views as items
 */
Ext.define('Locator.view.Main', {
  extend: 'Ext.Container',
  xtype: 'main',
  config: {
    cls: 'default-bg',
    layout: 'card',
    items: [{
      xtype: 'categories'
    }]
  }
});
Previously we were showing all the places as a list in PlaceList List view. Now, we want to add a Map option as well that will display all the place positions as markers. So, we change the second page to a Card layout which holds two panels - PlaceList and PlaceMap:
- Places (Card layout)
- PlaceList (Sencha List View)
- PlaceMap (Sencha Map Container)
Places.js
Ext.define('Locator.view.Places',
 {
  extend: 'Ext.Container',
  xtype: 'places',
  config: {
    layout: 'card',
    items: [{
      xtype: 'placelist'
    }]
  }
});
PlaceList.js
The Places container has PlacesList panel as its children. Because we omitted the Navigation View, we have to add individual TitleBar to each child panel. Also, we add a map icon to the right of the toolbar; tapping this button, we show the Map panel with all the place markers.
Ext.define('Locator.view.PlaceList', {
  extend: 'Ext.List',
  xtype: 'placelist',
  requires: ['Ext.plugin.PullRefresh'],
  config: {
    cls: 'default-bg placelist',
    store: 'Places',
    emptyText: Lang.placeList.emptyText,
    plugins: [{
      xclass: 'Ext.plugin.PullRefresh',
      pullRefreshText: Lang.placeList.pullToRefresh
    }],
    itemTpl: Ext.create('Ext.XTemplate',
      document.getElementById('tpl_placelist_item').innerHTML, {
        getImage: function (data) {
          // If there is any image available for the place, show the first one in list item
          if (data.photos && data.photos.length > 0) {
            return '<div class="photo"><img src="' + data.photos[0].url + '" /></div>';
          }

          // If there is no image available, then we will show the icon of the place
          // which we get from the place data itself
          return ['<div class="icon-wrapper">',
            '<div class="icon" style="-webkit-mask-image:url(' + data.icon + ');" ></div>',
            '</div>'].join('');
        },

        getRating: function (rating) {
          return Locator.util.Util.getRating(rating);
        }
      }),
    items: [{
      xtype: 'titlebar',
      docked: 'top',
      name: 'place_list_tbar',
      items: [{
        xtype: 'button',
        ui: 'back',
        name: 'back_to_home',
        text: 'Home'
      }, {
        xtype: 'button',
        align: 'right',
        iconCls: 'locate4',
        iconMask: true,
        name: 'show_map',
        ui: 'dark'
      }]
    }]
  }
});
The PlaceList looks like this:
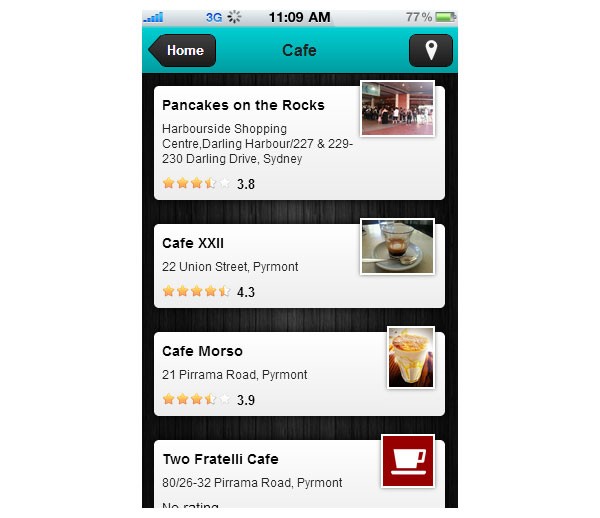
Notice the map icon at top right corner. Tapping this, we create and activate the Map panel. Let's create a PlaceMap view which will be a simple container with the map and a toolbar which has another button to come back to PlaceList.
PlaceMap.js
Ext.define('Locator.view.PlaceMap', {
  extend: 'Ext.Container',
  xtype: 'placemappanel',
  config: {
    layout: 'fit',
    items: [{
      xtype: 'map',
      name: 'place_map',
      mapOptions: {
        zoom: 15
      }
    }, {
      xtype: 'titlebar',
      docked: 'top',
      name: 'place_map_tbar',
      items: [{
        xtype: 'button',
        ui: 'back',
        name: 'back_to_home',
        text: 'Home'
      }, {
        xtype: 'button',
        align: 'right',
        iconCls: 'list',
        iconMask: true,
        name: 'show_place_list',
        ui: 'dark'
      }]
    }]
  }
});
Now, in the controller we will add three functions to create and activate these panels. I always prefer to have an individual navigation function for each page that separates the navigation from the functional part.
References in Controller/App.js
Let's list down all the refs we need inside the controller.
refs: {
  // Containers
  categoriesList: 'categories',
  main: 'main',
  placesContainer: 'places',
  placeList: 'placelist',
  placeMapPanel: 'placemappanel',
  placeMap: 'map[name="place_map"]',

  // Buttons
  showMapBtn: 'button[name="show_map"]',
  showPlaceListBtn: 'button[name="show_place_list"]',
  backToHomeBtn: 'button[name="back_to_home"]',
  backToPlaceListBtn: 'button[name="back_to_placelist"]'
}
We will have a showHome method which we call while PlaceList and PlaceMap panel back buttons are pressed. It brings the user back to the home screen.
showHome()
/**
 * Show Home Panel
 **/
showHome: function () {
  var me = this;

  if (me.getMain().getActiveItem() !== me.getCategoriesList()) {
    me.util.showActiveItem(me.getMain(), me.getCategoriesList());
  }
}
While a category item is pressed, we create the Places container, set the title of each panel to the name of that category and activate the PlaceList panel within. The last part is necessary so that every time you land to the place list page from Home page.
showPlacesContainer()
/**
 * Show places container
 */
showPlacesContainer: function (type) {
  var me = this,
    name = me.util.toTitleCase(type.split('_').join(' '));

  if (!me.getPlacesContainer()) {
    this.getMain().add({
      xtype: 'places'
    });
  }

  // Set the placelist title to Category name
  Ext.each(me.getPlacesContainer().query('titlebar'), function (titleBar) {
    titleBar.setTitle(name);
  }, me);

  me.getPlacesContainer().setActiveItem(0);
  me.util.showActiveItem(me.getMain(), me.getPlacesContainer());
}
showPlaceList() / showPlacesMap()
We show/hide PlaceList and PlaceMap containers depending on what is pressed - the list icon or the map icon.
/**
 * Show place list
 */
showPlaceList: function () {
  var me = this;

  me.util.showActiveItem(me.getPlacesContainer(), me.getPlaceList(), {
    type: 'flip',
    reverse: true
  });
},

/**
 * Show places map
 */
showPlacesMap: function () {
  var me = this;

  if (!me.getPlaceMapPanel()) {
    me.getPlacesContainer().add({
      xtype: 'placemappanel'
    });
  }

  // Get the active category type and set it to title after changing to titlecase
  me.getPlaceMapPanel().down('titlebar').setTitle(me.util.toTitleCase(me.activeCategoryType.split('_').join(' ')));

  me.util.showActiveItem(me.getPlacesContainer(), me.getPlaceMapPanel(), {
    type: 'flip'
  });
}
this.activeCategoryType - this variable is set while the user selects a category. We will come in to that in a moment. In the controller control, we add the button tap events:
showMapBtn: {
  tap: 'showPlacesMap'
},

showPlaceListBtn: {
  tap: 'showPlaceList'
}
You should now be able to test the app in browser and see how the layout change is working. We are done with the views related to multiple places. We will look into the placing the map markers soon but before that I want to cover how we can maintain browser history in these single page websites.
2. Maintain Browser History
While creating a single page website, it becomes absolutely necessary to maintain the browser history. Users navigates back and forth in a website and many times network issues or unresponsiveness forces the user to reload a page again. In these scenarios, if history is not maintained, refreshing a page will eventually bring the user back to the first page which becomes really annoying in certain cases.
In this section we will see how we can use Sencha's routing functionality to find a solution to this problem. Always remember to incorporate history maintenance from the start of your application. Otherwise, it will be a tedious job to implement this functionality while your app is already half done.
We will add two routes for the Categories and Places pages respectively.
routes: {
  '': 'showHome',
  'categories/:type': 'getPlaces'
}
Sencha Controller has a method named redirectTo which accepts a relative url and calls the function matched to that. We will use an empty string to go to the first page (i.e the Categories list) and a specific category type to go to the Place list page.
So, while we want to come back to the Categories list from the Places container, instead of calling the showHome() function, we just redirect to the specific route and it will automatically call the required method.
backToHomeBtn: {
  tap: function () {
    this.redirectTo('');
  }
}
You may question: what difference is there between these two while both can be achieved in a single line of code? Basically, there is no difference but while you are going to maintain all the navigation via routing, I prefer to follow a single trend throughout. In addition, you have to maintain the window hash yourself if you call the function directly.
We saw the loadPlaces() method in part 1 of this tutorial which sends an Ajax request to retrieve the places data. This time we are going to add a bit there for saving the current category type in the controller instance which will be needed in future. Also, we want to disable the map button until all the places are loaded. We want to display the marker as soon as the map is rendered and for that, the places should be loaded first.
launch() / getPlaces()
launch: function () {
  var me = this;

  me.getApplication().on({
    categorychange: {
      fn: function (newCategory) {
        me.activeCategoryType = newCategory;
      }
    },

    placechange: {
      fn: function (newPlaceReference) {
        me.activePlaceReference = newPlaceReference;
      }
    }
  });
},

/**
 * Retrieve all the places for a particlur category
 */
getPlaces: function (type) {
  var me = this;

  // Show the place list page
  me.showPlacesContainer(type);

  // Disable the show map button until the list gets loaded
  me.getShowMapBtn().disable();

  // Keep a reference of the active category type in this controller
  me.getApplication().fireEvent('categorychange', type);

  var store = Ext.getStore('Places'),
    loadPlaces = function () {

      me.util.showLoading(me.getPlaceList(), true);

      // Set parameters to load placelist for this 'type'
      store.getProxy().setExtraParams({
        location: me.util.userLocation,
        action: me.util.api.nearBySearch,
        radius: me.util.defaultSearchRadius,
        sensor: false,
        key: me.util.API_KEY,
        types: type
      });

      // Fetch the places
      store.load(function () {
        me.util.showLoading(me.getPlaceList(), false);

        // Enable show map button
        me.getShowMapBtn().enable();
      });
    }

    // If user's location is already not set, fetch it.
    // Else load the places for the saved user's location
  if (!me.util.userLocation) {
    Ext.device.Geolocation.getCurrentPosition({
      success: function (position) {
        me.util.userLocation = position.coords.latitude + ',' + position.coords.longitude;
        me.util.userLocation = me.util.defaultLocation;
        loadPlaces();
      },
      failure: function () {
        me.util.showMsg(Lang.locationRetrievalError);
      }
    });
  } else {
    // Clean the store if there is any previous data
    store.removeAll();
    loadPlaces();
  }
}
In launch(), we add an event "categorychange" to the Application object and fire it once we get a new category type. It sets a Controller variable activeCategoryType to that type. Now the question is, why do we set the variable via an event than assigning it directly? It is because we may want to set the type from other views or controllers. Doing it this way also increases the feasibility a lot.
Hence, for the category list item tap event also, we are not going to call the getPlaces() function directly. Rather, we will use the redirectTo method to load places for that particular category type. Let's add that in Controller's control:
categoriesList: {
  itemtap: function (list, index, target, record) {
    this.redirectTo('categories/' + record.get('type'));
  }
}
So, while you select a category type, say "art_gallery", your browser url changes to "/locator/locator/#categories/art_gallery" and a PlaceList panel will open with all the Art Galleries. Now, if you reload the page, it will again open the same PlaceList page - not the first page.
3. Display Places on the Map
We are done with all the views needed to show the places. We will create and show the PlaceMap container every time the user taps the Map button. We do not want to render the map unless the user wants to see it.
Also, instead of removing the markers one by one and adding others, I prefer to remove the map panel completely once the user comes back to the category listing page. So, let's add this part for the home button tap:
backToHomeBtn: {
  tap: function () {
    this.redirectTo('');

    // Destroy the mappanel completely so that we do not need to
    // save and remove existing markers
    if (this.getPlaceMapPanel()) {
      this.getPlacesContainer().remove(this.getPlaceMapPanel());
    }
  }
},
placeMap: {
  // Create the markers in maprender event
  maprender: 'showPlacesMarkers'
}
We create the markers in the "maprender" event.
showPlaceMarkers()
/**
 * Create markers for user's location and all the
 * places. On clicking a marker, show Infobubble with details
 */

showPlacesMarkers: function (extMap, gMap)
{
  var me = this,
    location, data, marker,
    userLocation = me.util.userLocation.split(','),
    currentPosition = new google.maps.LatLng(userLocation[0], userLocation[1]),

    image = new google.maps.MarkerImage('resources/images/marker.png',
      new google.maps.Size(32, 32),
      new google.maps.Point(0, 0)
    ),

    // Create an InfoBubble instance
    ib = new InfoBubble({
      shadowStyle: 1,
      padding: 0,
      backgroundColor: 'rgb(0,0,0)',
      borderRadius: 4,
      arrowSize: 15,
      borderWidth: 1,
      borderColor: '#000',
      disableAutoPan: true,
      hideCloseButton: true,
      arrowPosition: 30,
      backgroundClassName: 'infobubble',
      arrowStyle: 2
    }),

    /*
     * Showing InfoBubble
     **/
    setupInfoBubble = function (data, _marker) {
      google.maps.event.addListener(_marker, 'mousedown', function (event) {
        // Close existing info bubble
        if (ib) {
          ib.close();
        }

        // Kepp an instance of the active place's id in
        // the infobubble instance for accessing it later
        ib.placeReference = data.reference;

        // Set teh content of infobubble
        ib.setContent([
          '<div class="infobubble-content">',
          data.name,
          '</div>'
        ].join(''));

        ib.open(gMap, this);
      });
    };

  /**
   * Tap on InfoBubble handled here
   */
  google.maps.event.addDomListener(ib.bubble_, 'click', function () {
    if (me.activeCategoryType) {
      me.redirectTo('categories/' + me.activeCategoryType + '/' + ib.placeReference);
    }
  });

  // For all the places create separate markers
  me.getPlaceList().getStore().each(function (record) {
    data = record.getData(),
    location = data.geometry.location,
    marker = new google.maps.Marker({
      position: new google.maps.LatLng(location.lat, location.lng),
      map: gMap,
      icon: image
    });

    setupInfoBubble(data, marker);
  }, me);

  // Create a different marker for user's current location
  new google.maps.Marker({
    position: currentPosition,
    map: gMap,
    icon: new google.maps.MarkerImage('resources/images/currentlocation.png',
      new google.maps.Size(32, 32),
      new google.maps.Point(0, 0)
    )
  });

  // Center the map at user's location. A delay is given because from
  // second time onward it doesn't center the map at user's position
  Ext.defer(function () {
    gMap.setCenter(currentPosition);
  }, 100);
}
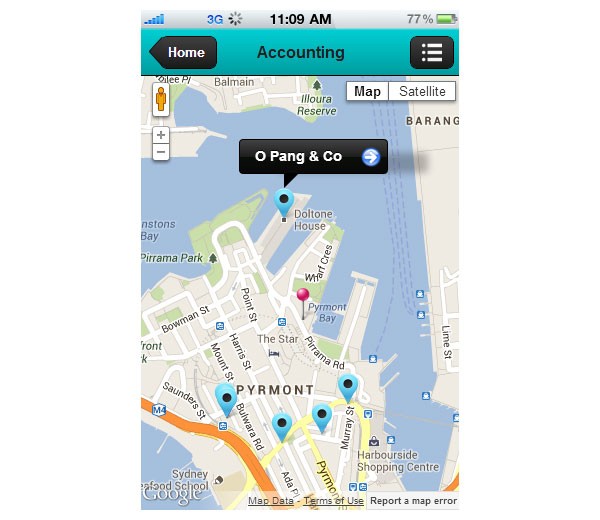
Multiple aspects of functionality are handled in this function:
- Create markers and show
- Show user's current location
- Show info bubble while tapped on a marker
- On tapping an info bubble, go to the Place Details page
Create Markers and Show Them
Showing markers is pretty easy. Just instantiate a marker passing the position and google map instance. You can also use a different image in the marker like what we did here. For each record in the Places store we create a marker and on mouse down (which actually works as tap event) we call the setupInfoBubble() method passing the data and the marker instance.
Show the User's Current Location
We retrieve the user's current location in the getPlaces() method and save it in the Util singleton class. We create a different marker for that position.
Show Infobubble While Tapped on a Marker
Google map's utility library has a great component named Infobubble for showing custom info windows. You may get a detailed discussion on the implementation at iPhone like infobubble with Sencha Touch. Mostly, we create a new instance of InfoBubble with requires new config options. Because only one infobubble is shown at a certain point of time, we just replace the content of infobubble every time it is opened. We keep a reference to the place's "reference" property which will be required to go to the PlaceDetails page.
Go to the Place Details page
/**
 * Tap on InfoBubble handled here
 */
google.maps.event.addDomListener(ib.bubble_, 'click', function () {
  if (me.activeCategoryType) {
    me.redirectTo('categories/' + me.activeCategoryType + '/' + ib.placeReference);
  }
});
On tapping the infobubble, we redirect the browser to a url like categories/:type/:reference. We will handle this part in another controller dedicated to place details functionality.
4. Place Details
The Place Details page opens up while the user selects a place either from list or from map. I categorized the details in 3 parts - Info, Image Gallery and Reviews. A TabPanel is most suited for such a layout. Let's see how the Views can be structured:
Views
- details.Main
- details.Info
- details.Gallery
- details.GalleryCarousel
- details.Review
Controller
- PlaceDetails
We create a another subset of namespace and put all these files inside the "details" directory of the "view" folder. Also, we create a separate controller that maintains only place details related functions. Remember to add all these views and controller in the app.js file.
View/Details.Main
The main panel is a simple tab panel with three child panels and a titlebar.
Ext.define('Locator.view.details.Main', {
  extend: 'Ext.tab.Panel',
  xtype: 'detailspanel',
  config: {
    cls: 'details-tabpanel default-bg',
    tabBar: {
      docked: 'bottom'
    },
    items: [{
      xtype: 'info'
    }, {
      xtype: 'gallery'
    }, {
      xtype: 'review'
    }, {
      xtype: 'titlebar',
      docked: 'top',
      title: 'Details',
      items: [{
        text: 'Places',
        ui: 'back',
        name: 'back_to_placelist'
      }]
    }]
  }
});
Place Info
In the info page, we will show the basic information about the place, its website, phone, Google+ profile, and a map with only the place's marker.
View/Details.Info
Ext.define('Locator.view.details.Info', {
  extend: 'Ext.Container',
  xtype: 'info',
  config: {
    cls: 'transparent details-info',
    iconCls: 'info',
    title: Lang.info,
    scrollable: true,
    tpl: Ext.create('Ext.XTemplate',
      document.getElementById('tpl_place_details_info').innerHTML, {
        getRating: function (rating) {
          return Locator.util.Util.getRating(rating);
        }
      })
  }
});
Info Template
<!-- Place Details Info Page -->
<script type="text/template" id="tpl_place_details_info">
  <div class="block content">
    <div class="container">
      <div class="name">{name}</div>
      <div class="address">{formatted_address}</div>
      {rating:this.getRating}
    </div>
    <div class="actions">
      <div class="website">
        <a href="{website}" target="_blank">
          <div class="icon"></div>
          <div class="text">Website</div>
        </a>
      </div>
      <div class="phone">
        <a href="tel:{phone}">
          <div class="icon"></div>
          <div class="text">Call</div>
        </a>
      </div>
      <div class="profile">
        <a href="{url}" target="_blank">
          <div class="icon"></div>
          <div class="text">Profile</div>
        </a>
      </div>
    </div>
  </div>

  <div class="block map"></div>
</script>
The DIV element with the "map" css class is used later to render the Google Map. I used different styling in all the details pages - I am not including all those CSS details in this tutorial content to keep it tidy. You will get all the CSS properly structured in the project files.
The info view is created. Now, we have to load the place details and apply its data in an Info page template. Let's define the PlaceDetails controller.
Controller/PlaceDetails
Ext.define('Locator.controller.PlaceDetails', {
    extend: 'Ext.app.Controller',
    util: Locator.util.Util,
    config: {
      routes: {
        'categories/:type/:reference': 'showDetails'
      },

      refs: {
        main: 'main',
        placeDetailsPanel: 'detailspanel',

        placeDetailsInfo: 'info',
        placeDetailsGallery: 'gallery',
        placeDetailsReview: 'review'
      },

      control: {}
    }
});
We will need a showDetails method which will create and open the details.Main tab panel. While selecting a particular place, we have both its category type and place reference. We need to store both these values - the place reference will be used to get further details of the place and the category type will be needed if user directly opens up a place details page and then try to go back to the places list page.
showDetails()
/**
 * Maintain details panel routes and show the details panel
 */
showDetails: function (categoryType, placeReference) {
  var me = this;

  if (!me.getPlaceDetailsPanel()) {
    me.getMain().add({
      xtype: 'detailspanel'
    });
  }

  me.util.showActiveItem(me.getMain(), me.getPlaceDetailsPanel());

  // Load place data
  me.loadPlaceDetails(placeReference);

  // Fire the category change and place change events
  // so that the category id and place reference can be kept
  // which is needed if users press back button
  me.getApplication().fireEvent('categorychange', categoryType);
  me.getApplication().fireEvent('placechange', placeReference);
}
We fire both the "categorychange" and "placechange" event on the Application object to save the type and the reference. Also, we call the loadPlaceDetails() method passing the places response to retrieve the complete information of that place.
The PHP function is pretty simple as we have used earlier:
getPlaceDetails()
/**
  * Get place details along with all the photo urls.
  * @return String
  */
public static function getPlaceDetails() {
  try {
    $data = json_decode(self::sendCurlRequest());
    $item = $data->result;

    if (isset($item->photos)) {
      for ($i = 0; $i < count($item->photos); $i++) {
        $item->photos[$i]->url = BASE_API_URL . "photo?photoreference=" . $item->photos[$i]->photo_reference
                . "&sensor=false"
                . "&maxheight=" . IMAGE_MAX_HEIGHT
                . "&maxwidth=" . IMAGE_MAX_WIDTH
                . "&key=" . $_REQUEST["key"];
      }
    }

    return json_encode($data);
  } catch (Exception $e) {
    print "Error at getPlaceDetails : " . $e->getMessage();
  }
}
The images for a place do not come automatically - rather, all the images are to be requested separately with their reference, api key and dimension. Complete details on it can be found here. We store all the photo urls in a "photos" property of the Place data.
loadPlaceDetails()
/**
 * Load the complete details of the place
 * and apply the details to all the panels' template in the tabpanel
 */
loadPlaceDetails: function (placeReference) {
  var me = this;

  me.util.showLoading(me.getPlaceDetailsPanel(), true);

  Ext.Ajax.request({
    url: me.util.api.baseUrl,
    method: 'GET',
    params: {
      action: me.util.api.details,
      reference: placeReference,
      key: me.util.API_KEY,
      sensor: true
    },
    success: function (response) {
      me.util.showLoading(me.getPlaceDetailsPanel(), false);
      var json = me.currentLocation = Ext.decode(response.responseText);

      // Apply the data in panel templates
      me.getPlaceDetailsInfo().setData(json.result);
      me.getPlaceDetailsGallery().setData(json.result);
      me.getPlaceDetailsReview().setData(json.result);

      // CShow the location of the place as a marker
      me.showPlaceLocation();
    },
    failure: function () {
      me.util.showMsg(Lang.serverConnectionError);
    }
  });
}
Once we get the place details object, we apply the result to all the child container of the Tab Panel because all of them are utilizing Sencha's template fnctionality. Also, we call showPlaceLocation() method which creates a Google map, renders it in Info panel and display a marker for the place inside the map.
showPlaceLocation()
/**
 * Create the map and show a marker for that position in the map
 */
showPlaceLocation: function () {
  var me = this,
    showMarker = function () {
      var location = me.currentLocation.result.geometry.location,
        latLng = new google.maps.LatLng(location.lat, location.lng),
        image = new google.maps.MarkerImage('resources/images/marker.png',
          new google.maps.Size(32, 32),
          new google.maps.Point(0, 0)
        );

      // Create the marker for that place
      me.singleMapMarker = new google.maps.Marker({
        position: latLng,
        map: me.gmap,
        icon: image
      });

      // Set the marker to center. A timeout is needed in order to
      // bring the marker at center. Else, it will be shown at top-left corner
      Ext.defer(function () {
        me.gmap.setCenter(latLng);
      }, 100);

    };

  if (me.singleMap) {
    me.singleMap.destroy();
  }

  // Create a map and render it to certain element
  me.singleMap = Ext.create('Ext.Map', {
    renderTo: me.getPlaceDetailsInfo().element.down('.map'),
    height: 140,
    mapOptions: {
      zoom: 15
    },
    listeners: {
      maprender: function (mapCmp, gMap) {
        me.gmap = gMap;
        showMarker();
      }
    }
  });
}
So, we are done with the basic info page and this is how it looks:
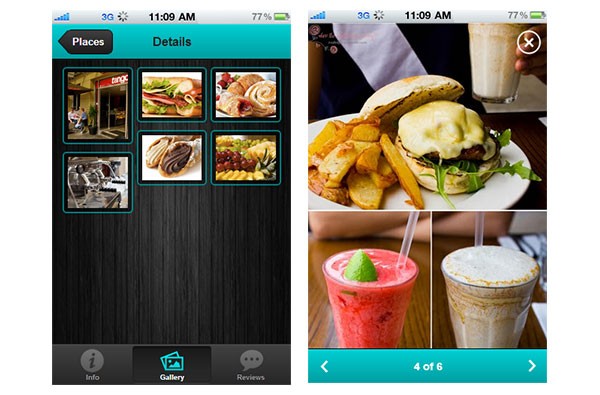
Place Image Gallery
We will create a Pinterest style image gallery for the Place images and show the full view of the images in a carousel. I have developed a component for the same and wrote a detailed blog post on it which you can find here Mosaic image gallery with Sencha Touch. The same components are used here - just the data properties are different.
Here is how the gallery looks like. -webkit-column property of CSS3 is used here to get a mosaic like layout for the images.
View/Details.Gallery
Ext.define('Locator.view.details.Gallery', {
  extend: 'Ext.Container',
  xtype: 'gallery',
  config: {
    title: Lang.gallery,
    iconCls: 'photos2',
    cls: 'transparent gallery',
    scrollable: true,
    // Template to show the thumbnail images
    tpl: Ext.create('Ext.XTemplate',
      '<tpl if="this.isEmpty(values)">',
      '<div class="empty-text empty-gallery">', Lang.placeDetails.emptyGallery, '</div>',
      '</tpl>',
      '<div class="gallery body" id="photos">',
      '<tpl for="photos">',
      '<img src="{url}" class="thumbnail" />',
      '</tpl>',
      '</div>', {
        isEmpty: function (result) {
          if (!result.photos || result.photos.length === 0) {
            return true;
          }

          return false;
        }
      })
  },

  initialize: function () {
    var me = this;

    // Add tap event on the images to open the carousel
    me.element.on('tap', function (e, el) {
      me.showGalleryCarousel(el);
    }, me, {
      delegate: 'img.thumbnail'
    });

    me.callParent(arguments);
  },

  /**
   * Show the gallery carousel with all the images
   */
  showGalleryCarousel: function (clickedImage) {
    var me = this,
      clickedImgIndex = 0;

    // Query all the images and save in an array
    me.images = me.element.query('img.thumbnail');

    // Create the Gallery Carousel
    var galleryCarousel = Ext.Viewport.add({
      xtype: 'gallerycarousel',
      images: me.images
    });

    // On clicking close icon, hide the carousel
    // and destroy it after a certain perdiod
    galleryCarousel.element.on('tap', function (e, el) {
      galleryCarousel.hide(true);

      Ext.defer(function () {
        Ext.Viewport.remove(galleryCarousel);
      }, 300);
    }, this, {
      delegate: 'div[data-action="close_carousel"]'
    });

    // Get the image index which is clicked
    while ((clickedImage = clickedImage.previousSibling) != null) {
      clickedImgIndex++;
    }

    // Set the clicked image container as the active item of the carousel
    galleryCarousel.setActiveItem(clickedImgIndex);

    // Show the carousel
    galleryCarousel.show();
  }
});
View/Details.GalleryCarousel
Ext.define('Locator.view.details.GalleryCarousel', {
  extend: 'Ext.carousel.Carousel',
  xtype: 'gallerycarousel',
  config: {
    fullscreen: true,
    modal: true,
    images: [],
    html: '<div class="close-gallery" data-action="close_carousel"></div>',
    cls: 'gallery-carousel',
    showAnimation: 'popIn',
    hideAnimation: 'popOut',
    indicator: false,
    listeners: {
      initialize: 'changeImageCount',

      // Call image count checker for each image change
      activeitemchange: 'changeImageCount'
    }
  },

  initialize: function () {
    var me = this,
      images = me.getImages();

    // Create a bottom bar which will show the image count
    me.bottomBar = Ext.create('Ext.TitleBar', {
      xtype: 'titlebar',
      name: 'info_bar',
      title: '',
      docked: 'bottom',
      cls: 'gallery-bottombar',
      items: [{
        xtype: 'button',
        align: 'left',
        iconCls: 'nav gallery-left',
        ui: 'plain',
        handler: function () {
          me.previous();
        }
      }, {
        xtype: 'button',
        align: 'right',
        iconCls: 'nav gallery-right',
        ui: 'plain',
        handler: function () {
          me.next();
        }
      }]
    });

    // Add the images as separate containers in the carousel
    for (var i = 0; i < images.length; i++) {
      me.add({
        xtype: 'container',
        html: '<img class="gallery-item" src="' + images[i].src + '" />',
        index: i + 1
      });
    }

    me.add(me.bottomBar);
    me.callParent(arguments);
  },

  /**
   * Change image count at bottom bar
   */
  changeImageCount: function () {
    var me = this;
    me.bottomBar.setTitle((me.getActiveIndex() + 1) + ' of ' + me.getImages().length);
  }
});
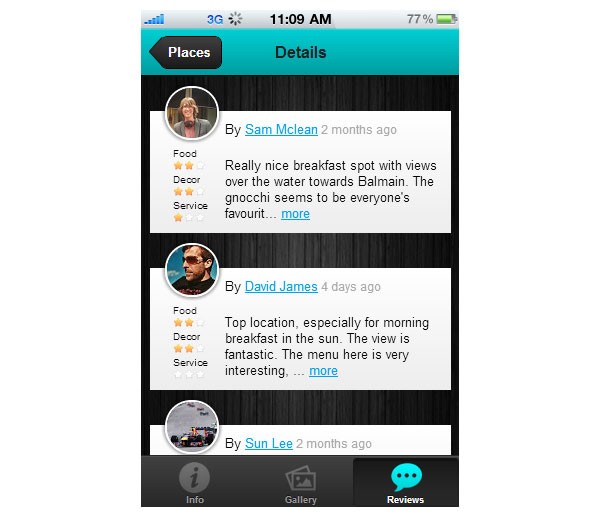
Place Reviews
Place reviews is a simple list of the reviews - which I utilized with a plain Sencha container instead of a list view. Adding some custom styling becomes easy here and also makes it look cool. We used the same rating system to show individual ratings.
The profile images of the users are their Google+ user profile image. We use a set of custom template functions to edit the content on the fly.
Reviews Template
<!-- Place Details Review Page -->
<script type="text/template" id="tpl_place_details_reviews">
  <div class="details-item body">
    <tpl if="this.isEmpty(values)">
      <div class="empty-text"> No review available for this place. </div>
    </tpl>
    <tpl for="reviews">
      <div class="review">
        <a href="{author_url}" target="_blank">
           <img
             class="profile-img"
             src="{author_url:this.getUserImage}"
             <!-- Show a default user icon if there is no user image available -->
             onerror="Locator.util.Util.onBrokenProfileImage(this)"/>
        </a>
        <div class="heading">
           By <a href="{author_url}" target="_system">{author_name:this.toTitleCase}</a>
           <span> {time:this.getDate}</span>
        </div>
        <div class="details">
          <div class="rating">
            <tpl for="aspects">
              <div class="aspect">
                <div class="type">{type:this.toTitleCase}</div>
                <div class="stars">{rating:this.getStars}</div>
              </div>
            </tpl>
          </div>
          <div class="text">{[this.applyExpandable(values)]}</div>

          <!-- A hidden element which holds the complete review text -->
          <div class="full-review">{text}</div>
        </div>
      </div>
    </tpl>
  </div>
</script>
view/details.Review
Ext.define('Locator.view.details.Review', {
  extend: 'Ext.Container',
  xtype: 'review',
  config: {
    cls: 'transparent',
    title: Lang.reviews,
    iconCls: 'chat2',
    scrollable: true,
    tpl: Ext.create('Ext.XTemplate',
      document.getElementById('tpl_place_details_reviews').innerHTML, {
        toTitleCase: function (str) {
          return Locator.util.Util.toTitleCase(str);
        },

        getDate: function (timestamp) {
          return Locator.util.Util.prettyDate(timestamp * 1000);
        },

        getUserImage: function (authorUrl) {
          if (authorUrl) {
            var arr = authorUrl.split('/');
            return 'https://plus.google.com/s2/photos/profile/' + arr[arr.length - 1] + '?sz=50';
          }

          return Locator.util.Util.defaultUserImage;
        },

        getStars: function (rating) {
          return Locator.util.Util.getRating(rating, 3, true);
        },

        isEmpty: function (result) {
          if (!result.reviews || result.reviews.length === 0) {
            return true;
          }

          return false;
        },

        applyExpandable: function (data) {
          var text = data.text;

          if (text.length > 120) {
            text = Ext.String.ellipsis(text, 120) +
              ' <span data-action="more" class="resize-action">more</span>';
          }

          return text;
        }
      })
  }
});
From the template and XTemplate functions, we notice a number of new things:
Default User Profile Image
We add an onerror event on the IMG tag. This event gets fired if the src attribute is empty or null. We create a function onBrokenProfileImage() in our Util file and call it if there is any error and set the src attribute to a default user image.
onBrokenProfileImage: function (image) {
  image.onerror = "";
  image.src = Locator.util.Util.defaultUserImage;
  return true;
}
Use Pretty Date
Instead of just showing the date, we prefer a Twitter style date like "2 hours ago", "3 mins ago" etc. We add a prettyDate() method to Util class which converts the date to pretty date.
/**
 * Give the date a format like 2 hours ago, 5 mins ago
 */
prettyDate: (function () {
  var ints = {
    second: 1,
    minute: 60,
    hour: 3600,
    day: 86400,
    week: 604800,
    month: 2592000,
    year: 31536000
  };

  return function (time) {

    time = +new Date(time);

    var gap = ((+new Date()) - time) / 1000,
      amount, measure;

    for (var i in ints) {
      if (gap > ints[i]) {
        measure = i;
      }
    }

    amount = gap / ints[measure];
    amount = gap > ints.day ? (Math.round(amount * 100) / 100) : Math.round(amount);
    amount = Math.ceil(amount);
    amount += ' ' + measure + (amount > 1 ? 's' : '') + ' ago';

    return amount;
  };

})()
I got this function somewhere in the web while browsing. It works like a charm.
Expand/Collapse Reviews
Most of the user reviews are large chunk of texts and showing full text in a list is not very mobile friendly. So, we add an option to show/hide a full review if it has more than 120 characters. We add a XTemplate method applyExpandable() which checks the length of the text and add a "more" link to the end of the text after ellipsis.
applyExpandable()
applyExpandable: function (data) {
  var text = data.text;

  if (text.length > 120) {
    text = Ext.String.ellipsis(text, 120) +
      ' <span data-action="more" class="resize-action">more</span>';
  }

  return text;
}
We handle the user actions on "more" link in the PlaceDetails controller. Lets add a method which takes care of the same.
handleReviewExpansion()
/**
 * Handle text expansion of long reviews.
 */
handleReviewExpansion: function (panel) {
  panel.element.on('singletap', function (e, el) {
    el = Ext.get(el),
    textEl = el.parent('.text');

    // If "more" is pressed, get the complete text from hidden element and a "less" button
    if (el.getAttribute('data-action') === 'more') {
      textEl.setHtml(textEl.next('.full-review').getHtml() +
      ' <span data-action="less" class="resize-action">less</span>');
    }

    // If "less" is pressed, ellipsis the text and show
    if (el.getAttribute('data-action') === 'less') {
      textEl.setHtml(Ext.String.ellipsis(textEl.getHtml(), 120) +
      ' <span data-action="more" class="resize-action">more</span>');
    }
  }, this, {
    delegate: '.resize-action'
  });
}
On singletap on the review panel's element, we capture the event and if the text is already collapsed, expand it with a "less" link and vice versa with a "more" link. We use the reviewer profile link to wrap both the user image and name - so, clicking it will open user's profile in Google+.
5. A New Theme
Probably you have already noticed that I changed the theme from my previous version of the app. It was because the background of the app is dark and a lighter toolbar color will make it look nice. Also, I used dark colored buttons in toolbar for a better contrast. Here is the SASS file I used:
app.scss
// Basic color definitions
$base-color: #00E7EB;
$base-gradient: 'matte';
$active-color: #00BABD;

// Toolbar styles
$toolbar-base-color: $base-color;
$toolbar-button-color: #111;

// Tabbar styles
$tabs-dark: #333;
$tabs-dark-active-color: $base-color;

// List styles
$list-header-bg-color : #ddd;

@import 'sencha-touch/default/all';

// Default styling with only those components which are required
@include sencha-panel;
@include sencha-buttons;
@include sencha-tabs;
@include sencha-toolbar;
@include sencha-indexbar;
@include sencha-list;
@include sencha-layout;
@include sencha-carousel;
@include sencha-loading-spinner;
@include sencha-list-pullrefresh;

// Icons
@include pictos-iconmask('locate4');
@include pictos-iconmask('list');
@include pictos-iconmask('photos2');
@include pictos-iconmask('chat2');

// Buttons
@include sencha-button-ui('back', #333, 'matte');
@include sencha-button-ui('dark', #333, 'matte');
This is it. We are done with all the pages for the application and now it is a full fledged mobile website. You can try to wrap it with Phonegap and it should work as a native app as well without any issue.
Conclusion
In this final post of the series we covered a number of interesting topics which include:
- Sencha routing
- Display map with markers
- iPhone like Infobubble
- Mosaic image gallery similar to Pinterest layout
Along with these, we learnt how with CSS we can make an app look beautiful and professional. Do notice how we structured the application at start, used lazy rendering of components whenever required, destroyed a component while its not in use and commented our code thoroughly. These things improves your app's performance and coding standards a lot. Happy coding!

Comments