As great as the official WordPress theme and plugin directories are, there are times when you don't want to use them for distributing your plugin or theme. Maybe it's because you are selling your plugins or themes, or maybe you just want to keep them to yourself, making them only available within your organization or group of friends.
But what about updates?
If you are the only user, just uploading the plugin or theme manually works quite well. But when you have more users than that, using the Updates admin page inside WordPress would come in handy.
The WordPress Updates functionality has been designed with just the official WordPress plugin and theme directories in mind, but no worries: WordPress has actions and filters that make it possible for us to hook into that functionality and add a server of our own in the mix.
What You'll Learn
In this first tutorial in the series, we will start by creating a WordPress plugin to turn your website into a license management server. In part two, we will continue building the plugin by adding an API to it. In part three, we will use the API to make a WordPress plugin or theme talk back to the license manager for updates.
While creating the plugin, in this first part, you will learn about the following WordPress plugin development techniques:
- Using the WordPress Plugin Boilerplate to get started quickly.
- Creating a new custom post type with a meta box for storing custom meta data.
- Creating a maintainable database table for your plugin.
- Adding items to that database table.
- Listing items using WordPress's own list table implementation.
If you want to see the plugin in action, you can download the most recent version of the plugin from WordPress.org. For the exact source code used in this tutorial, check out the linked Tuts+ Github repository (on the right). We'll go through every step of creating the plugin one by one, but if you don't want to build everything from the ground up, following along with the source code is a good way to organize your learning.
Now, let's get to work.
1. Create the Plugin Using the WordPress Plugin Boilerplate
Getting started with a new WordPress plugin consists of a lot of repetitive work that you do over and over again with every plugin you create, such as writing new code or copying and cleaning up old projects.
But there is a better way.
This time, instead of copying an existing project or starting from scratch, we will use Tom McFarlin's WordPress Plugin Boilerplate, a starting point designed to get you started with a well structured, object-oriented WordPress plugin in no time.
So, before we start adding our own functionality, let's set up the basic plugin using the plugin boilerplate.
Download the Boilerplate and Make It Your Own
The easiest way to download the plugin boilerplate is to visit the project's web site and download the latest version as a zip file.
Once you have downloaded and unpacked the zip package, locate the trunk folder inside it, copy it to your preferred location and rename it wp-license-manager.
Then, it's time to go through the plugin boilerplate files and make them our own:
- Go through all of the files in the plugin directory (and its subdirectories) renaming all occurrences of
plugin-nametowp-license-managerandPlugin_NametoWp_License_Manager. Make sure to rename both the class names and their containing files. This will take a little bit of time and manual work, so using a PHP IDE to help in the renaming is a good idea. - Add the plugin's information to the plugin bootstrap file, now called
wp‑license-manager.phpand located in the plugin's root directory. You'll find the information in the comment block at the top of the file, right after the PHPDoc tag@wordpress-plugin.
Now, you have created an empty plugin with some basic configuration, and it's just waiting for you to start adding functionality. It's time to build our license manager!
If you want to read more about using the boilerplate, check Tom McFarlin's tutorial series, Developing Plugins With WordPress Boilerplates. It's based on an earlier version of the boilerplate, but will still give you a deeper understanding of the ideas behind a plugin boilerplate and working with one.
2. Create a Custom Post Type for Products
Our license manager plugin is quite simple and will store and use just two types of data: products and licenses. As products are required for creating licenses (and products are the easier of the two), that's where we'll start.
Here's what you will be building in this section:
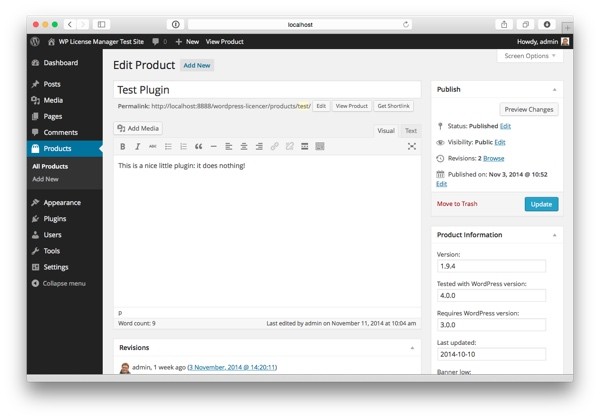
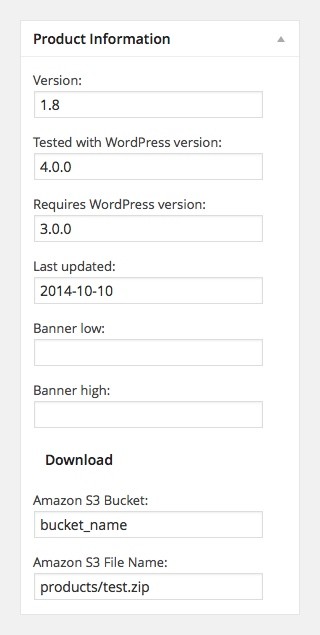
A product will represent a WordPress plugin or theme you want to manage through your license manager server. Just like a blog post or page, a product has a name and a description. In addition to this, it has a number of additional fields for defining product specific information:
- Version: The product's version number. This field will be used for checking for updates in parts two and three of this tutorial series.
- File bucket: The Amazon S3 bucket in which the file is stored.
- File name: The file name of the product zip stored in Amazon S3. We'll talk about these file options in part two of the series.
- Tested with WordPress version, Requires WordPress version, Last updated, Banner high, and Banner low: These options are shown in the plugin update UI in part three of the tutorial series.
Now, let's build this by creating a custom post type and adding a meta box to it.
Step 1: Create the Post Type
The plugin boilerplate divides the plugin's functionality logically into two sections: public facing functionality and admin functionality. While this separation makes sense in most cases, post types are somewhere in between, and you could argue for placing them in either of the two. I decided to go with public.
So, look up the function define_public_hooks inside the class Wp_License_Manager in includes/class-wp-license-manager.php, and add the following new action right after the two wp_enqueue_scripts actions already present:
$this->loader->add_action( 'init', $plugin_public, 'add_products_post_type' );
This line uses the boilerplate's action and filter loader to add an action handler to the WordPress action init. The function, add_products_post_type, goes into the class Wp_License_Manager_Public.
Here's the entire function:
/**
 * Register the new "products" post type to use for products that
 * are available for purchase through the license manager.
 */
public function add_products_post_type() {
    register_post_type( 'wplm_product',
        array(
            'labels' => array(
                'name' => __( 'Products', $this->plugin_name ),
                'singular_name' => __( 'Product', $this->plugin_name ),
                'menu_name' => __( 'Products', $this->plugin_name ),
                'name_admin_bar' => __( 'Products', $this->plugin_name ),
                'add_new' => __( 'Add New', $this->plugin_name ),
                'add_new_item' => __( 'Add New Product', $this->plugin_name ),
                'edit_item' => __( 'Edit Product', $this->plugin_name ),
                'new_item' => __( 'New Product', $this->plugin_name ),
                'view_item' => __( 'View Product', $this->plugin_name ),
                'search_item' => __( 'Search Products', $this->plugin_name ),
                'not_found' => __( 'No products found', $this->plugin_name ),
                'not_found_in_trash' => __( 'No products found in trash', $this->plugin_name ),
                'all_items' => __( 'All Products', $this->plugin_name ),
            ),
            'public' => true,
            'has_archive' => true,
            'supports' => array( 'title', 'editor', 'author', 'revisions', 'thumbnail' ),
            'rewrite' => array( 'slug' => 'products' ),
            'menu_icon' => 'dashicons-products',
        )
    );
}
Let's go through the function and what it does—in other words, the parameters to the WordPress function register_post_type.
The first parameter, $post_type, (line 6) defines the identifier of the post type used in the WordPress admin links and querying posts of this type (I went with wplm_product to keep it from colliding with post types created by other plugins and themes).
The second parameter (lines 7–28) is an array that defines the properties of the post type (for a full list of options you can use, check the WordPress Codex):
-
labelsdefines a set of string labels used for referring to the post type in the WordPress admin area. -
publicdefines the visibility of the posts of this new type. I wanted products to be browsable by people visiting the site so I set this totrue. If, on the other hand, you want to keep products a private thing, just set this option tofalse. -
has_archivedefines whether WordPress serves an archive page for listing the posts of this type or not. -
supportsdefines which post editing features are shown in the post editor. -
rewritedefines how permalinks for this product type will look. -
menu_icondefines the icon to use for the post type in the admin menu. Visit the WordPress Developer site for a full list of dashboard icons available.
Listing, adding, and editing products are now all handled by WordPress. What's left for us to do is to add the meta box with the custom settings listed above.
Step 2: Add a Meta Box for Product Information
Now that we have created the custom post type for products, we have everything we need for storing products in the license management system. But to make the post type more usable, let's continue by adding a meta box for the product specific information.
Here's what the meta box will look like:
First, let's pick an action for adding the meta box. add_meta_boxes_{post_type} is a great choice: simply add the post type in place of {post_type} and your action gets called just when it's time to add meta boxes for a post of this given type (in our case, wplm_product).
As we're working on the admin area, add the following code in the function define_admin_hooks() inside the main plugin class Wp_License_Manager:
$this->loader->add_action( 'add_meta_boxes_wplm_product', $plugin_admin, 'add_product_information_meta_box' );
The function, add_product_information_meta_box() in Wp_License_Manager_Admin, simply defines the meta box and a rendering function for displaying its content:
/**
 * Registers a meta box for entering product information. The meta box is
 * shown in the post editor for the "product" post type.
 *
 * @param   $post   WP_Post The post object to apply the meta box to
 */
public function add_product_information_meta_box( $post ) {
    add_meta_box(
        'product-information-meta-box',
        __( 'Product Information', $this->plugin_name ),
        array( $this, 'render_product_information_meta_box' ),
        'wplm_product',
        'side'
    );
}
The function contains just a call to the WordPress function add_meta_box that will define the meta box. The parameters in order of appearance are the following:
-
$id: The HTML id field value for the meta box element. -
$title: The title of the meta box, shown at the top of the box. -
$callback: The function that will do the meta box rendering. -
$post_type: The post type of the page editor on which this meta box should be shown. -
$context: Where the meta box should be placed ('normal', 'advanced', or 'side').
Next, add the rendering function we defined in the third parameter:
/**
 * Renders the product information meta box for the given post (wplm_product).
 *
 * @param $post     WP_Post     The WordPress post object being rendered.
 */
public function render_product_information_meta_box( $post ) {
    $product_meta = get_post_meta( $post->ID, 'wp_license_manager_product_meta', true );

    if ( ! is_array( $product_meta ) ) {
        $product_meta = array(
            'file_bucket' => '',
            'file_name' => '',
            'version' => '',
            'tested' => '',
            'requires' => '',
            'updated' => '',
            'banner_low' => '',
            'banner_high' => ''
        );
    }

    $this->render_nonce_field( 'product_meta_box' );

    require( 'partials/product_meta_box.php' );
}
Line 7: The function begins by reading in the current meta data.
Lines 9–20: If the meta data is empty (it is at this point, actually...), create a default meta data array with empty values.
Line 22: Print out a nonce field that will be used for some added security when saving the meta data. render_nonce_field is a helper function I created to help me with remembering the nonce's name. We'll add it in a little while.
Line 24: Include the actual meta box HTML. The partials directory is a part of the WordPress plugin boilerplate and meant for separating HTML code from the PHP. Here's how the template file for the meta box should look:
<?php
/**
 * The view for the plugin's product meta box. The product meta box is used for
 * entering additional product information (version, file bucket, file name).
 *
 * @package    Wp_License_Manager
 * @subpackage Wp_License_Manager/admin/partials
 */
?>
<p>
    <label for="wp_license_manager_product_version">
        <?php _e( 'Version:', $this->plugin_name ); ?>
    </label>
    <input type="text" id="wp_license_manager_product_version"
           name="wp_license_manager_product_version"
           value="<?php echo esc_attr( $product_meta['version'] ); ?>"
           size="25" >
</p>
<p>
    <label for="wp_license_manager_product_tested">
        <?php _e( 'Tested with WordPress version:', $this->plugin_name ); ?>
    </label>
    <input type="text" id="wp_license_manager_product_tested"
           name="wp_license_manager_product_tested"
           value="<?php echo esc_attr( $product_meta['tested'] ); ?>"
           size="25" >
</p>
<p>
    <label for="wp_license_manager_product_requires">
        <?php _e( 'Requires WordPress version:', $this->plugin_name ); ?>
    </label>
    <input type="text" id="wp_license_manager_product_requires"
           name="wp_license_manager_product_requires"
           value="<?php echo esc_attr( $product_meta['requires'] ); ?>"
           size="25" >
</p>
<p>
    <label for="wp_license_manager_product_updated">
        <?php _e( 'Last updated:', $this->plugin_name ); ?>
    </label>
    <input type="text" id="wp_license_manager_product_updated"
           name="wp_license_manager_product_updated"
           value="<?php echo esc_attr( $product_meta['updated'] ); ?>"
           size="25" >
</p>

<p>
    <label for="wp_license_manager_product_banner_low">
        <?php _e( 'Banner low:', $this->plugin_name ); ?>
    </label>
    <input type="text" id="wp_license_manager_product_banner_low"
           name="wp_license_manager_product_banner_low"
           value="<?php echo esc_attr( $product_meta['banner_low'] ); ?>"
           size="25" >
</p>

<p>
    <label for="wp_license_manager_product_banner_high">
        <?php _e( 'Banner high:', $this->plugin_name ); ?>
    </label>
    <input type="text" id="wp_license_manager_product_banner_high"
           name="wp_license_manager_product_banner_high"
           value="<?php echo esc_attr( $product_meta['banner_high'] ); ?>"
           size="25" >
</p>

<h3>Download</h3>

<p>
    <label for="wp_license_manager_product_bucket">
        <?php _e( 'Amazon S3 Bucket:', $this->plugin_name ); ?>
    </label>
    <input type="text" id="wp_license_manager_product_bucket"
           name="wp_license_manager_product_bucket"
           value="<?php echo esc_attr( $product_meta['file_bucket'] ); ?>"
           size="25" />
</p>
<p>
    <label for="wp_license_manager_product_file_name">
        <?php _e( 'Amazon S3 File Name:', $this->plugin_name ); ?>
    </label>
    <input type="text" id="wp_license_manager_product_file_name"
           name="wp_license_manager_product_file_name"
           value="<?php echo esc_attr( $product_meta['file_name'] ); ?>"
           size="25" />
</p>
The template is rather straightforward HTML, a series of labels followed by input elements with their values read from the $product_meta array we retrieved in the function above.
Now, with the meta box created, let's take care of saving its data.
Step 3: Save the Meta Box Data
As you have probably noticed by now, when developing a WordPress plugin, adding a new piece of functionality always begins with finding a suitable action or filter for it.
This is true also for saving the meta box data.
This time, the action to hook to is save_post, an action that is activated whenever a post is saved in the WordPress admin. Again, in the class Wp_License_Manager and its function define_admin_hooks(), add a new line:
$this->loader->add_action( 'save_post', $plugin_admin, 'save_product_information_meta_box' );
The function, save_product_information_meta_box, goes in the Wp_License_Manager_Admin class:
/**
 * Saves the product information meta box contents.
 *
 * @param $post_id  int     The id of the post being saved.
 */
public function save_product_information_meta_box( $post_id ) {
    if ( ! $this->is_nonce_ok( 'product_meta_box' ) ) {
        return $post_id;
    }

    // Ignore auto saves
    if ( defined( 'DOING_AUTOSAVE' ) && DOING_AUTOSAVE ) {
        return $post_id;
    }

    // Check the user's permissions
    if ( !current_user_can( 'edit_posts', $post_id ) ) {
        return $post_id;
    }

    // Read, sanitize, and store user input
    $meta = get_post_meta( $post_id, 'wp_license_manager_product_meta', true );
    if ( $meta == '' ) {
        $meta = array();
    }

    $meta['file_bucket'] = sanitize_text_field( $_POST['wp_license_manager_product_bucket'] );
    $meta['file_name'] = sanitize_text_field( $_POST['wp_license_manager_product_file_name'] );
    $meta['version'] = sanitize_text_field( $_POST['wp_license_manager_product_version'] );
    $meta['tested'] = sanitize_text_field( $_POST['wp_license_manager_product_tested'] );
    $meta['requires'] = sanitize_text_field( $_POST['wp_license_manager_product_requires'] );
    $meta['updated'] = sanitize_text_field( $_POST['wp_license_manager_product_updated'] );
    $meta['banner_low'] = sanitize_text_field( $_POST['wp_license_manager_product_banner_low'] );
    $meta['banner_high'] = sanitize_text_field( $_POST['wp_license_manager_product_banner_high'] );

    // Update the meta field
    update_post_meta( $post_id, 'wp_license_manager_product_meta', $meta );
}
Let's go through the function to see what it does:
-
Lines 7–9: As you remember, we added a nonce field right before rendering the product meta box. In this function, we use that nonce to verify that the person who is posting the data is coming from that form (we'll add the function
is_nonce_oksoon). - Lines 11–14: Don't save the meta box data when WordPress is doing its periodic auto saves. This is because by default, WordPress doesn't pass the meta box data when it makes an AJAX call to do the autosave, and so updating the meta box data at that point would mess things up.
- Lines 16–19: Only allow saving the data if the user can edit posts. One thing to consider in the future would be adding a custom capability for editing license manager products.
-
Lines 22–25: Read the existing product meta data, or create a new data array if no meta data has been saved yet (
get_post_metareturns an empty string when the meta data item isn't found and the third parameter is set totrue). - Lines 27–34: Read in the submitted data, doing some basic sanitation.
- Line 37: Everything is OK, save the data.
Now, before we move on to licenses, let's do that one final thing I've been promising and add the helper functions for rendering and verifying the meta box nonce.
First, creating one:
/**
 * A helper function for creating and rendering a nonce field.
 *
 * @param   $nonce_label  string  An internal (shorter) nonce name
 */
private function render_nonce_field( $nonce_label ) {
    $nonce_field_name = $this->plugin_name . '_' . $nonce_label . '_nonce';
    $nonce_name = $this->plugin_name . '_' . $nonce_label;

    wp_nonce_field( $nonce_name, $nonce_field_name );
}
The core of this function is the call to wp_nonce_field that does the actual work of creating the one-time token used for the nonce and writing it out in a hidden HTML field.
Then, the check:
/**
 * A helper function for checking the product meta box nonce.
 *
 * @param   $nonce_label string  An internal (shorter) nonce name
 * @return  mixed   False if nonce is not OK. 1 or 2 if nonce is OK (@see wp_verify_nonce)
 */
private function is_nonce_ok( $nonce_label ) {
    $nonce_field_name = $this->plugin_name . '_' . $nonce_label . '_nonce';
    $nonce_name = $this->plugin_name . '_' . $nonce_label;

    if ( ! isset( $_POST[ $nonce_field_name ] ) ) {
        return false;
    }

    $nonce = $_POST[ $nonce_field_name ];

    return wp_verify_nonce( $nonce, $nonce_name );
}
The nonce checking function uses the same naming conventions from the function above, and then uses them to retrieve the nonce from the submitted form data (lines 11–15). Then, if the nonce is found, it uses the WordPress function wp_verify_nonce to check that the submitted code matches the saved one (line 17).
3. Add Licenses
We are now about halfway through this first tutorial in the series: products are in place and it's time to take a look at licenses.
A license at its simplest consists of two elements: a license key and a user id (we'll use an email address for it). For more control over the license, we'll also add a third element: a license expiration date, a date after which the license is no longer valid and will not receive updates from our license manager server.
The admin UI for licenses will be quite similar to the one we created for products: a list of licenses and an option for creating new ones. The implementation, however, will be quite different: while a product matches the post metaphor nicely and was therefore natural to implement as a custom post type, licenses are best implemented using a database table of their own.
Step 1: Create a Database Table
Building the licenses functionality begins with creating the database table that will hold the licenses. The most natural time for creating a new database table is right at plugin activation, before the user has the chance to try and do anything with the table.
The WordPress Plugin Boilerplate makes this easy by providing an empty function that we can start writing our code in. The function, activate, in the class Wp_License_Manager_Activator, is called every time the plugin is activated, either by clicking on Activate in the Plugins menu or when a plugin update finishes.
First, add the following variable definition at the top of the class:
/**
 * The database version number. Update this every time you make a change to the database structure.
 *
 * @access   protected
 * @var      string    $db_version   The database version number
 */
protected static $db_version = 1;
And then, update the activation function with the following code:
/**
 * Code that is run at plugin activation.
 */
public static function activate() {
    // Update database if db version has increased
    $current_db_version = get_option( 'wp-license-manager-db-version' );
    if ( ! $current_db_version ) {
        $current_db_version = 0;
    }

    if ( intval( $current_db_version ) < Wp_License_Manager_Activator::$db_version ) {
        if ( Wp_License_Manager_Activator::create_or_upgrade_db() ) {
            update_option( 'wp-license-manager-db-version', Wp_License_Manager_Activator::$db_version );
        }
    }
}
Here's what the function does:
Lines 6–9: Read in the option wp-license-manager-db-version. We will use this option to store the plugin's database version currently active on the site.
Line 11: Compare the current database version with the one defined in the plugin's codebase ($db_version, defined above). If the version number set in the plugin's code is higher than the one stored in WordPress options, a database update is needed.
Line 12: Run the database update.
Line 13: If the database update was successful, update the option wp-license-manager-db-version to match with the version in code.
Now, we have created a system for keeping track of database versions and can move to creating the database table. Add the following function to Wp_License_Manager_Activator:
/**
 * Creates the database tables required for the plugin if
 * they don't exist. Otherwise updates them as needed.
 *
 * @return bool true if update was successful.
 */
private static function create_or_upgrade_db() {
    global $wpdb;

    $table_name = $wpdb->prefix . 'product_licenses';

    $charset_collate = '';
    if ( ! empty( $wpdb->charset ) ) {
        $charset_collate = "DEFAULT CHARACTER SET {$wpdb->charset}";
    }
    if ( ! empty( $wpdb->collate ) ) {
        $charset_collate .= " COLLATE {$wpdb->collate}";
    }

    $sql = "CREATE TABLE " . $table_name . "("
         . "id mediumint(9) NOT NULL AUTO_INCREMENT, "
         . "product_id mediumint(9) DEFAULT 0 NOT NULL,"
         . "license_key varchar(48) NOT NULL, "
         . "email varchar(48) NOT NULL, "
         . "valid_until datetime DEFAULT '0000-00-00 00:00:00' NOT NULL, "
         . "created_at datetime DEFAULT '0000-00-00 00:00:00' NOT NULL, "
         . "updated_at datetime DEFAULT '0000-00-00 00:00:00' NOT NULL, "
         . "UNIQUE KEY id (id)"
         . ")" . $charset_collate. ";";

    require_once( ABSPATH . 'wp-admin/includes/upgrade.php' );
    dbDelta( $sql );

    return true;
}
Most of this function is about creating the SQL CREATE TABLE query that we will use for creating the database table:
Line 10: Construct the name for the database table.
Lines 12–18: Some charset definitions that will be used in the final SQL.
Lines 20–29: The SQL for the CREATE TABLE query. The table will have the following columns:
-
id: A unique id for the license row. -
product_id: The id of the product to which the license is linked. -
license_key: A string license key used as a password. -
email: The license owner's email address, which works as the user name. -
valid_until: The license's expiration date. -
created_at: The timestamp of when the license was created. -
updated_at: The timestamp of the most recent update.
Lines 31–32: Use WordPress's database update method dbDelta to create or update the database table. Notice that dbDelta doesn't actually run the CREATE TABLE query as is, but analyzes it and compares it to the current table structure, doing modifications as necessary.
So, later, if you decide to make changes to the table's structure, instead of writing a new SQL query, you will just edit this CREATE TABLE query, update the $db_version parameter, and let dbDelta handle the rest.
For more information about creating database tables in WordPress and using dbDelta, read the article Creating Tables with Plugins in the WordPress codex.
And that's it. The next time you activate the plugin, a database table for the licenses will be created. If you have already activated the plugin, you'll need to do it again (deactivate and then activate again) to create the database.
Step 2: Create the License Menu Pages
Now that we have created the database table for storing licenses, let's create the menu pages: "Licenses" and "Add new".
Again, we begin by hooking to the right action in Wp_License_Manager's function define_admin_hooks:
$this->loader->add_action( 'admin_menu', $plugin_admin, 'add_licenses_menu_page' );
The action function, add_license_menu_page, goes to Wp_License_Manager_Admin and looks like this:
/**
 * Creates the settings menu and sub menus for adding and listing licenses.
 */
public function add_licenses_menu_page() {
    add_menu_page(
        __( 'Licenses', $this->plugin_name ),
        __( 'Licenses', $this->plugin_name ),
        'edit_posts',
        'wp-licenses',
        array( $this, 'render_licenses_menu_list' ),
        'dashicons-lock',
        '26.1'
    );

    add_submenu_page(
        'wp-licenses',
        __( 'Licenses', $this->plugin_name ),
        __( 'Licenses', $this->plugin_name ),
        'edit_posts',
        'wp-licenses',
        array( $this, 'render_licenses_menu_list' )
    );

    add_submenu_page(
        'wp-licenses',
        __( 'Add new', $this->plugin_name ),
        __( 'Add new', $this->plugin_name ),
        'edit_posts',
        'wp-licenses-new',
        array( $this, 'render_licenses_menu_new' )
    );
}
Let's take a closer look:
Lines 5–13: Create a top level menu page, with the title, "Licenses". The function, add_menu_page, takes the following parameters:
-
$page_title: The title of the menu page (HTML title tag value). -
$menu_title: The on-screen title for the menu page. -
$capability: The capability required for viewing the page. I usededit_posts, but in the future, I'll probably consider adding a capability of my own in its place. -
$menu_slug: The identifier for the menu page, used in the page's URL. -
$function: The function that will handle the rendering of this menu page. -
$icon_url: This field can be used in many different ways, but I chose to go with the dashboard icons as explained earlier in this tutorial. -
$position: The placement of the menu item in the WordPress menu. A problem with using this parameter is that if two menu items have the same$positionvalue, only one of them will be shown. According to WordPress documentation, using a decimal number, as we have done here, helps a little.
Lines 15–22: Add a submenu for listing the licenses. The parameters for add_submenu_page are otherwise identical to those for add_menu_page but the first parameter should be the id of the top menu to which the submenu should be added.
Also worth noticing is that we point the first submenu to the same action function as the top menu. What this does is that when a user clicks on the top level menu, this first submenu is opened right away.
Lines 24–31: The second submenu is the one we'll start with, the page for adding a new license.
To make the code run without errors, add two empty functions:
public function render_licenses_menu_list() {

}

public function render_licenses_menu_new() {

}
Step 3: Create the Add New License Page
With the two settings pages created, let's add the functionality to the first one, the "Add New License" page.
The page will look like this:
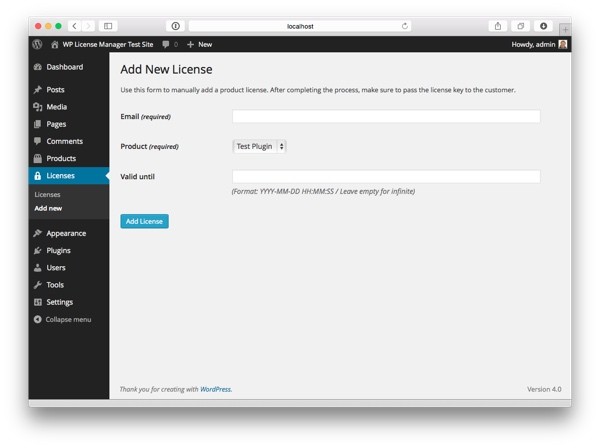
As we defined above, the function that will do the rendering for the Add new page is called render_licenses_menu_new. The function itself is simple, with most of its lines spent on populating a list of products that will be used for rendering a drop-down list:
/**
 * Renders the list add new license menu page using
 * the "licenses_new.php" partial.
 */
public function render_licenses_menu_new() {
    // Used in the "Product" drop-down list in view
    $products = get_posts(
        array(
            'orderby'           => 'post_title',
            'order'             => 'ASC',
            'post_type'         => 'wplm_product',
            'post_status'       => 'publish',
            'nopaging'          => true,
            'suppress_filters'  => true
        )
    );

    require plugin_dir_path( dirname( __FILE__ ) ) . 'admin/partials/licenses_new.php';
}
Lines 7–16: Retrieve all published posts of our custom type wplm_product.
Line 18: Include the partial that contains the HTML for this menu page.
And here's what goes inside the HTML template:
<?php
/**
 * The view for the admin page used for adding a new license.
 *
 * @package    Wp_License_Manager
 * @subpackage Wp_License_Manager/admin/partials
 */
?>
<div class="wrap">
    <div id="icon-edit" class="icon32 icon32-posts-post"></div>

    <h2><?php _e( 'Add New License', $this->plugin_name ); ?></h2>
    <p>
        <?php
            $instructions = 'Use this form to manually add a product license. '
                . 'After completing the process, make sure to pass the license key to the customer.';

            _e( $instructions, $this->plugin_name );
        ?>
    </p>

    <form action="<?php echo admin_url( 'admin-post.php' ); ?>" method="post">
        <?php wp_nonce_field( 'wp-license-manager-add-license', 'wp-license-manager-add-license-nonce' ); ?>
        <input type="hidden" name="action" value="license_manager_add_license">

        <table class="form-table">
            <tr class="form-field form-required">
                <th scope="row">
                    <label for="email">
                        <?php _e( 'Email', $this->plugin_name ); ?>
                        <span class="description"><?php _e( '(required)', $this->plugin_name ); ?></span>
                    </label>
                </th>
                <td>
                    <input name="email" type="text" id="email" aria-required="true">
                </td>
            </tr>
            <tr class="form-field form-required">
                <th scope="row">
                    <label for="email">
                        <?php _e( 'Product', $this->plugin_name ); ?>
                        <span class="description"><?php _e( '(required)', $this->plugin_name ); ?></span>
                    </label>
                </th>
                <td>
                    <select name="product" id="product" aria-required="true">
                        <?php foreach ( $products as $product ) : ?>
                            <option value="<?php echo $product->ID; ?>"><?php echo $product->post_title; ?></option>
                        <?php endforeach; ?>
                    </select>
                </td>
            </tr>
            <tr class="form-field form-required">
                <th scope="row">
                    <label for="valid_until">
                        <?php _e( 'Valid until', $this->plugin_name ); ?>
                    </label>
                </th>
                <td>
                    <input name="valid_until" type="text" id="valid_until" aria-required="false" />
                    <p class="description">
                        <?php _e( '(Format: YYYY-MM-DD HH:MM:SS / Leave empty for infinite)', $this->plugin_name );?>
                    </p>
                </td>
            </tr>
        </table>

        <p class="submit">
            <input type="submit" name="add-license" class="button button-primary"
                   value="<?php _e( 'Add License', $this->plugin_name ); ?>" >
        </p>
    </form>

</div>
It's a rather basic form, using a few CSS classes defined in the WordPress admin to make everything look the way a WordPress admin screen is supposed to look.
Some lines that you should pay attention to are:
Line 22: When the user submits the form, it will be posted to WordPress's admin-post.php.
Line 23: Just like with the meta box, add a nonce to make sure someone posting to add a license is actually doing so through this page.
Line 24: Define a hidden field named action with the value 'license_manager_add_license'. This field will be used for adding a handling function for the form's submission—we'll get to this next.
Step 4: Save the License
In the previous step, we created our "Add New License" form. Now's the time to create the functionality for saving it.
Go back to the function define_admin_hooks in Wp_License_Manager and add a new action:
$this->loader->add_action( 'admin_post_license_manager_add_license', $plugin_admin, 'handle_add_license' );
This time, we use admin_post_{action}, a clever action for handling custom forms.
When a form with the hidden field action is posted, WordPress looks up the field's value and uses it to create call a matching action. The value we used for the hidden field was "license_manager_add_license" and so we can add an action with the name admin_post_license_manager_add_license.
The function, handle_add_license, goes to Wp_License_Manager_Admin:
/**
 * Handler for the add_license action (submitting
 * the "Add New License" form).
 */
public function handle_add_license() {
    global $wpdb;

    if ( ! empty( $_POST )
        && check_admin_referer( 'wp-license-manager-add-license',
            'wp-license-manager-add-license-nonce' ) ) {

        // Nonce valid, handle data

        $email = sanitize_text_field( $_POST['email'] );
        $valid_until = sanitize_text_field( $_POST['valid_until'] );
        $product_id = intval( $_POST['product'] );

        $license_key = wp_generate_password( 24, true, false );

        // Save data to database
        $table_name = $wpdb->prefix . 'product_licenses';
        $wpdb->insert(
            $table_name,
            array(
                'product_id' => $product_id,
                'email' => $email,
                'license_key' => $license_key,
                'valid_until' => $valid_until,
                'created_at' => current_time( 'mysql' ),
                'updated_at' => current_time( 'mysql' )
            ),
            array(
                '%d',
                '%s',
                '%s',
                '%s',
                '%s',
                '%s'
            )
        );

        // Redirect to the list of licenses for displaying the new license
        wp_redirect( admin_url( 'admin.php?page=wp-licenses' ) );
    }
}
Let's go through the function to see what it does:
Lines 8–10: Verify the nonce added in the HTML form.
Lines 14–16: Collect and sanitize the submitted license data.
Line 18: Generate a license key. In this plugin, we treat the license key like a password that is always used together with the user's email address, so I decided not to require license keys to be unique. WordPress's password generation function is a simple way to create a random password—probably not the most secure option of all time, but good enough.
Lines 21–40: Save the data to our database table. The first parameter to the insert function in $wpdb is the name of the table. The second is an array with database columns and their values. The third specifies the types of the parameters for formatting the query (%s means a string and is quoted, numeric values specified with %d are left without quotes).
Line 43: Redirect the user to the license list. We'll build it next.
4. List Licenses
Now that we have saved some data for licenses, it's time for the last step in this tutorial: building the list for browsing licenses.
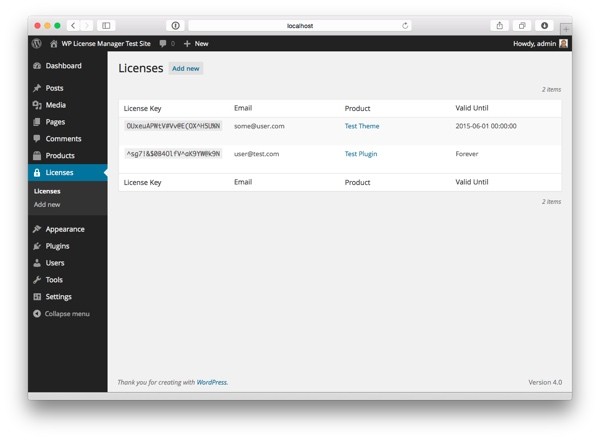
I always like to make my admin UIs look as much like the WordPress admin itself as I can, and so, when creating this list, I decided to go with the same code that the WordPress core uses for rendering its own lists: the Wp_List_Table class, described as a "[b]ase class for displaying a list of items in an ajaxified HTML table" in its PHPDoc documentation.
The class makes it very easy to create good looking list tables such as the one you see above in WordPress, but it comes with a caveat:
WordPress developers have documented the class as @private, meaning that they reserve the right to change it radically any time they please. In other words, using the class is a risk and means that you'll have to test your plugin carefully before any new WordPress release to make sure the lists are still working.
If that sounds too risky to you, there is another option: copy the current version of the class into your own project, rename it and use the copied file as your own list's base class. In the end, I decided to go with the copying option myself, to make sure everything works still in the future.
Step 1: Create the List Table Class
First, locate the Wp_List_Table class (it's in wp-admin/includes/class-wp-list-table.php) and copy it to your own project. Make sure to rename the class and file so they won't conflict with the original class from the WordPress core (for example Wp_License_Manager_List_Table).
Then, create a class of your own class to extend this base class. Call the class Licenses_List_Table and place it in the admin directory. Then add the following require_once lines to the function load_dependencies in Wp_License_Manager:
/**
 * The classes responsible for rendering the list of licenses.
 */
require_once plugin_dir_path( dirname( __FILE__ ) ) . 'includes/class-wp-license-manager-list-table.php';
require_once plugin_dir_path( dirname( __FILE__ ) ) . 'admin/class-licenses-list-table.php';
Open your newly created class, Licenses_List_Table, and add a constructor that takes the text domain for localization as a parameter and a field for storing the value. This one doesn't need explanations:
class Licenses_List_Table extends Wp_License_Manager_List_Table {

    /**
    * The plugin's text domain.
    *
    * @access  private
    * @var     string  The plugin's text domain. Used for localization.
    */
    private $text_domain;

    /**
     * Initializes the WP_List_Table implementation.
     *
     * @param $text_domain  string  The text domain used for localizing the plugin.
     */
    public function __construct( $text_domain ) {
        parent::__construct();

        $this->text_domain = $text_domain;
    }

}
Step 2: Define the List Columns
Wp_List_Table comes with a set of functions that we can override to define the data and formatting rules for the list.
Let's start by defining the columns to show in the list, their order, and the headers for each column. Add this function to the Licenses_List_Table class.
/**
 * Defines the database columns shown in the table and a
 * header for each column. The order of the columns in the
 * table define the order in which they are rendered in the list table.
 *
 * @return array    The database columns and their headers for the table.
 */
public function get_columns() {
    return array(
        'license_key' => __( 'License Key', $this->text_domain ),
        'email'       => __( 'Email', $this->text_domain ),
        'product_id'  => __( 'Product', $this->text_domain ),
        'valid_until' => __( 'Valid Until', $this->text_domain ),
        'created_at'  => __( 'Created', $this->text_domain )
    );
}
Notice that the keys in the array need to match with the column names in the database table.
If we don't want to display the created_at column, we can easily hide it using the function get_hidden_columns:
/**
 * Returns the names of columns that should be hidden from the list table.
 *
 * @return array    The database columns that should not be shown in the table.
 */
public function get_hidden_columns() {
    return array( 'created_at' );
}
Defining the columns that can be used for sorting the list data is done in a similar way:
/**
 * Returns the columns that can be used for sorting the list table data.
 *
 * @return array    The database columns that can be used for sorting the table.
 */
public function get_sortable_columns() {
    return array(
        'email' => array( 'email', false ),
        'valid_until' => array( 'valid_until', false )
    );
}
Next, let's look at formatting the column data. Formatting can be done in one of two ways: either by defining a custom formatting function with the name column_{column_name} where column_name is the name of the column as listed in get_columns above, or by using a default renderer function, column_default.
Let's use column_default for the columns that are simply printed out. The function takes two parameters: the database row being handled ($item) and the name of the column ($column_name).
/**
 * Default rendering for table columns.
 *
 * @param $item         array   The database row being printed out.
 * @param $column_name  string  The column currently processed.
 * @return string       The text or HTML that should be shown for the column.
 */
function column_default( $item, $column_name ) {
    switch( $column_name ) {
        case 'email':
        case 'created_at':
            return $item[$column_name];

        default:
            break;
    }

    return '';
}
Then, let's take an example of the custom output functions. Looking at the plugin source code, you can see that I have created a bunch of those.
Here's an example, the renderer for the valid_until column:
/**
 * Custom renderer for the valid_until field.
 *
 * @param $item     array   The database row being printed out.
 * @return string   The text or HTML that should be shown for the column.
 */
function column_valid_until( $item ) {
    $valid_until = $item['valid_until'];

    if ($valid_until == '0000-00-00 00:00:00') {
        return __( 'Forever', $this->text_domain );
    }

    return $valid_until;
}
This renderer displays "Forever" when the value of the field is '0000-00-00 00:00:00' and otherwise the value itself. You get the point.
Step 3: Query List Data
Now that we have defined the rendering settings for the list, let's add some data to the mix. This is done in the WP_List_Table function prepare_items.
Here's the function:
/**
 * Populates the class fields for displaying the list of licenses.
 */
public function prepare_items() {
    global $wpdb;
    $table_name = $wpdb->prefix . 'product_licenses';

    $columns = $this->get_columns();
    $hidden = $this->get_hidden_columns();
    $sortable = $this->get_sortable_columns();

    $this->_column_headers = array( $columns, $hidden, $sortable );

    // Pagination
    $licenses_per_page = 20;
    $total_items = $wpdb->get_var( "SELECT COUNT(id) FROM $table_name" );

    $offset = 0;
    if ( isset( $_REQUEST['paged'] ) ) {
        $page = max( 0, intval( $_REQUEST['paged'] ) - 1 );
        $offset = $page * $licenses_per_page;
    }

    $this->set_pagination_args(
        array(
            'total_items' => $total_items,
            'per_page' => $licenses_per_page,
            'total_pages' => ceil( $total_items / $licenses_per_page )
        )
    );

    // Sorting
    $order_by = 'email'; // Default sort key
    if ( isset( $_REQUEST['orderby'] ) ) {
        // If the requested sort key is a valid column, use it for sorting
        if ( in_array( $_REQUEST['orderby'], array_keys( $this->get_sortable_columns() ) ) ) {
            $order_by = $_REQUEST['orderby'];
        }
    }

    $order = 'asc'; // Default sort order
    if ( isset( $_REQUEST['order'] ) ) {
        if ( in_array( $_REQUEST['order'], array( 'asc', 'desc' ) ) ) {
            $order = $_REQUEST['order'];
        }
    }

    // Do the SQL query and populate items
    $this->items = $wpdb->get_results(
        $wpdb->prepare( "SELECT * FROM $table_name ORDER BY $order_by $order LIMIT %d OFFSET %d", $licenses_per_page, $offset ),
        ARRAY_A );
}
Let's go through the function to see what it does:
Lines 8–12: Collect the column header and sorting information using the functions we created above.
After this, the remaining part is about querying data.
Lines 15–22: Calculate pagination information. If the user has requested a page, the parameter paged contains the page number (starting from 1), so we can use it to calculate the offset for the SQL query.
Lines 24–30: Pass the pagination information to the the list table so it can show the correct navigation buttons when rendering the table.
Lines 33–46: Prepare the sort column and order based on user input.
Lines 49–51: Use the variables defined earlier in the function to do a database query and populate the $items class variable.
And that's it: you have now created a paged and sortable table for displaying the licenses.
Step 4: Use the List Table
Earlier in this tutorial, we created an empty function for showing the contents of the Licenses page. Now that we have created the list table, we can fill that function (render_licenses_menu_list in Wp_License_Manager_Admin) and finally make the licenses visible:
/**
 * Renders the list of licenses menu page using the "licenses_list.php" partial.
 */
public function render_licenses_menu_list() {
    $list_table = new Licenses_List_Table( $this->plugin_name );
    $list_table->prepare_items();

    require plugin_dir_path( dirname( __FILE__ ) ) . 'admin/partials/licenses_list.php';
}
The function first creates an instance of our class, Licenses_List_Table, then calls its function prepare_items (defined above) to initialize the data, and finally includes an HTML template to render the page.
This template also contains a call to $list_table->display(), which renders the list on the page:
<?php
/**
 * The view for the admin page used for listing licenses.
 *
 * @package    Wp_License_Manager
 * @subpackage Wp_License_Manager/admin/partials
 */
?>

<div class="wrap">
    <h2>
        <?php _e( 'Licenses', $this->plugin_name ); ?>
        <a class="add-new-h2" href="<?php echo admin_url( 'admin.php?page=wp-licenses-new' );?>">
            <?php _e( 'Add new', $this->plugin_name ) ?>
        </a>
    </h2>

    <?php $list_table->display(); ?>
</div>
What's Next?
We have now created a basic plugin for storing products and licenses. This is not where it ends, however.
In the second part of the tutorial series, we will continue working on the plugin and extend it with an API that your plugins and themes can use to check a user's license and download updates.
See you next time!

Comments