In the first two tutorials in the series, we have built a WordPress plugin for managing software licenses. In part 1, we built the administration tools needed for adding products and licenses, and in part 2, we created an API that plugins and themes can use to access the license and product information.
Now, it's time to tie it all together and make a WordPress theme and a WordPress plugin use the license server to check for updates. To do this, we will create a class that can be dropped into any WordPress plugin or theme's codebase to make the theme or plugin use a WordPress site running our WP License Manager plugin to check for updates.
In this tutorial, you will learn about the following topics:
- How to hook into the WordPress theme update system.
- How to hook into the WordPress plugin update system (yes, the two are separate—but similar—and need to be addressed one by one).
- How to call an external API from WordPress.
The functionality we will create in this tutorial requires us to dig deeper into how WordPress works under its hood, which makes this tutorial a bit more advanced than the first two in the series. However, we will go through every step thoroughly, so if you have been following the tutorial this far, there should be no problem finishing this one.
Just like in the previous parts, you can follow the tutorial writing your own code as we go, or download the final class and use it as a reference.
Let's get started.
1. Setting Up the Testing Environment
To build the license manager client class and to test it, you need a testing environment with the following components:
- A WordPress server running the WP License Manager plugin created in parts 1 and 2 of the tutorial series. We'll call it the license server.
- A WordPress server for running the plugin and theme to be updated. We'll call it the test server.
- A theme for testing the update system.
- A plugin for testing the update system.
You can use one of your existing themes and plugins for testing, or create a placeholder with no real content or functionality other than the updates, following the instructions below.
Step 1: Create a WordPress Theme for Testing
In wp-content/themes, create a new directory called hello-world-theme (for example).
In that directory, add a style.css file with the standard theme heading. This is needed for WordPress to find the theme.
/*
Theme Name: Hello World Theme
Description: A test theme that says Hello.
Version: 0.1
*/
Add an index.php file. It can be empty, or you can use the following placeholder HTML:
<html>
    <head>
        <title>Hello, World</title>
    </head>
    <body>
        <h1>Hello, World!</h1>
    </body>
</html>
For testing the license manager client class, we still need a functions.php file. This is where you'll initialize the class we will create in this tutorial—for now, you can leave the file empty.
With this minimum setup, WordPress will accept the theme without errors. Activate it now.
Once you have decided on the theme to use, add a product to represent it on the license server. Call the new product "Hello World Theme" and set its version number to something higher than the 0.1 we defined in the theme header above.
Mark down the "post slug" part of the product's permalink (hello-world-theme) as it will be used as the product's ID when talking to the license manager API.
Step 2: Create a WordPress Plugin for Testing
Creating an empty test plugin is even faster than creating a test theme. All you need is a PHP file with a bare-bones plugin header.
In wp-content/plugins, create a directory called hello-world-plugin and inside it, a file, hello-world.php, with the following content:
<?php
/*
Plugin Name: Hello World Plugin
Description: A test plugin that says Hello.
Version: 0.1
*/
The plugin is now ready so go ahead and activate it.
Just like you did for the theme, create a product for this plugin on the license manager server. Call the product "Hello World Plugin"—this should give you the id (slug) hello-world-plugin—and set its version number to something higher than the 0.1 defined in the plugin header.
Now that you have set up your testing environment and have a plugin and a theme ready for testing, it's time to get started with the license manager client class itself.
2. Setting Up the License Manager Client Class
Let's start creating the License Manager Client class by building the common functionality that is shared by both themes and plugins. As we need to test the code in some context, we'll start with the theme and add plugin specific stuff once the theme updates are working.
Step 1: Create the License Manager Client Class and Initialize It
In your theme directory (hello-world-theme), add a new class called Wp_License_Manager_Client (using the file name class-wp-license-manager-client.php). This class will hold all the code related to checking the licenses and handling the theme's updates.
As this class file is meant to be included in any number of WordPress themes and plugins, surround it with a class_exists check. This way, if there are many installed plugins and themes that use this class, they won't break the system by trying to create the class many times.
<?php
if ( ! class_exists( 'Wp_License_Manager_Client' ) ) {

    class Wp_License_Manager_Client {

    }

}
Let's continue with some initialization before moving to actual functionality.
First, add some variables that will be initialized in the class's constructor. The code comments explain the variables, and I will mention them again when we use them in the code.
/**
 * The API endpoint. Configured through the class's constructor.
 *
 * @var String  The API endpoint.
 */
private $api_endpoint;

/**
 * The product id (slug) used for this product on the License Manager site.
 * Configured through the class's constructor.
 *
 * @var int     The product id of the related product in the license manager.
 */
private $product_id;

/**
 * The name of the product using this class. Configured in the class's constructor.
 *
 * @var int     The name of the product (plugin / theme) using this class.
 */
private $product_name;

/**
 * The type of the installation in which this class is being used.
 *
 * @var string  'theme' or 'plugin'.
 */
private $type;

/**
 * The text domain of the plugin or theme using this class.
 * Populated in the class's constructor.
 *
 * @var String  The text domain of the plugin / theme.
 */
private $text_domain;

/**
 * @var string  The absolute path to the plugin's main file. Only applicable when using the
 *              class with a plugin.
 */
private $plugin_file;
Then, add a constructor for setting these instance variables:
/**
 * Initializes the license manager client.
 *
 * @param $product_id   string  The text id (slug) of the product on the license manager site
 * @param $product_name string  The name of the product, used for menus
 * @param $text_domain  string  Theme / plugin text domain, used for localizing the settings screens.
 * @param $api_url      string  The URL to the license manager API (your license server)
 * @param $type         string  The type of project this class is being used in ('theme' or 'plugin')
 * @param $plugin_file  string  The full path to the plugin's main file (only for plugins)
 */
public function __construct( $product_id, $product_name, $text_domain, $api_url,
                             $type = 'theme', $plugin_file = '' ) {
        // Store setup data
        $this->product_id = $product_id;
        $this->product_name = $product_name;
        $this->text_domain = $text_domain;
        $this->api_endpoint = $api_url;
        $this->type = $type;
        $this->plugin_file = $plugin_file;
    }
}
To better understand what these parameters are used for, and to link the class to your theme, open your theme's functions.php file and create an instance of the Wp_License_Manager_Client class:
<?php
require_once( 'class-wp-license-manager-client.php' );

if ( is_admin() ) {
    $license_manager = new Wp_License_Manager_Client(
        'hello-world-theme',
        'Hello World Theme',
        'hello-world-text',
        'http://<URL_TO_LICENSE_SERVER>/api/license-manager/v1'
    );
}
Let's go through the code line by line:
Line 2: Include the license manager class we are about to create.
Line 4: The license manager client is only needed in admin screens, so in order to not create unnecessary objects, check for whether the user is viewing one of WordPress's admin screens or not.
Lines 5–9: Create the Wp_License_Manager_Client instance using the following parameter values:
-
hello-world-theme: The slug (id) of the product (theme) on the license server. -
Hello World Theme: The name of the theme. It will be used for settings screens and other situations where we need to refer to the product by its name. -
hello-world-text: The text domain your theme uses for localization. Using the same text domain for the license management screens makes it easier for localizers to translate the entire theme at once. -
http://<URL_TO_LICENSE_SERVER>/api/license-manager/v1: This is the URL to the API we created in the previous part of the tutorial series. ReplaceURL_TO_LICENSE_SERVERwith the URL to the WordPress site on which you installed the WP License Manager plugin.
The remaining two parameters in the constructor are only needed when the class is used with a plugin, so we'll leave them to their default values for now and come back to them later in the tutorial when we move to plugin updates.
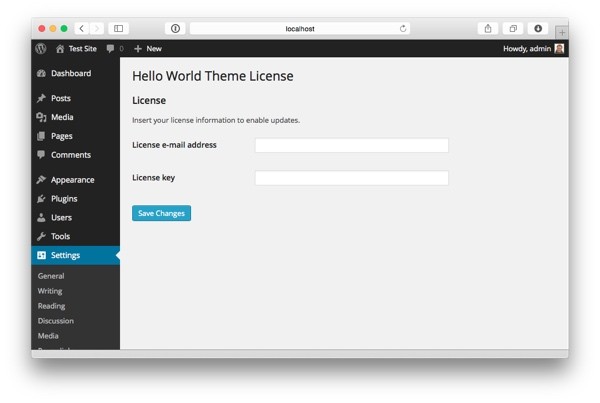
Step 2: Create a Settings Screen for Entering the License Key
The first thing a user needs to be able to use the license manager API is a valid license key—and a way to enter it into the theme.
For this, we will now create a new options screen.
As we have already created a number of similar screens in parts 1 and 2 of the tutorial series, I will go through the code only briefly.
Notice that every piece of functionality that goes into the license manager client class should be activated by attaching one of the class's functions to a WordPress action or filter. This way, everything stays clean and easy to manage. To keep things as simple as possible for the theme developer who will be using this class, I have put all the initialization in the class's constructor.
Add the settings screen related hooks to the constructor, right below the initialization code we added in the previous step:
// Add actions required for the class's functionality.
// NOTE: Everything should be done through actions and filters.
if ( is_admin() ) {
    // Add the menu screen for inserting license information
    add_action( 'admin_menu', array( $this, 'add_license_settings_page' ) );
    add_action( 'admin_init', array( $this, 'add_license_settings_fields' ) );
}
Then, create the two functions mentioned, add_license_settings_page and add_license_settings_fields. Notice how we use the $product_name and $text_domain variables from the constructor when defining the title for the settings page.
/**
 * Creates the settings items for entering license information (email + license key).
 */
public function add_license_settings_page() {
    $title = sprintf( __( '%s License', $this->text_domain ), $this->product_name );

    add_options_page(
        $title,
        $title,
        'read',
        $this->get_settings_page_slug(),
        array( $this, 'render_licenses_menu' )
    );
}

/**
 * Creates the settings fields needed for the license settings menu.
 */
public function add_license_settings_fields() {
    $settings_group_id = $this->product_id . '-license-settings-group';
    $settings_section_id = $this->product_id . '-license-settings-section';

    register_setting( $settings_group_id, $this->get_settings_field_name() );

    add_settings_section(
        $settings_section_id,
        __( 'License', $this->text_domain ),
        array( $this, 'render_settings_section' ),
        $settings_group_id
    );

    add_settings_field(
        $this->product_id . '-license-email',
        __( 'License e-mail address', $this->text_domain ),
        array( $this, 'render_email_settings_field' ),
        $settings_group_id,
        $settings_section_id
    );

    add_settings_field(
        $this->product_id . '-license-key',
        __( 'License key', $this->text_domain ),
        array( $this, 'render_license_key_settings_field' ),
        $settings_group_id,
        $settings_section_id
    );
}
Both functions created above define a number of callbacks for rendering the settings page and the settings fields. Add the callback functions:
/**
 * Renders the description for the settings section.
 */
public function render_settings_section() {
    _e( 'Insert your license information to enable updates.', $this->text_domain);
}

/**
 * Renders the settings page for entering license information.
 */
public function render_licenses_menu() {
    $title = sprintf( __( '%s License', $this->text_domain ), $this->product_name );
    $settings_group_id = $this->product_id . '-license-settings-group';

    ?>
        <div class="wrap">
            <form action='options.php' method='post'>

                <h2><?php echo $title; ?></h2>

                <?php
                    settings_fields( $settings_group_id );
                    do_settings_sections( $settings_group_id );
                    submit_button();
                ?>

            </form>
        </div>
    <?php
}

/**
 * Renders the email settings field on the license settings page.
 */
public function render_email_settings_field() {
    $settings_field_name = $this->get_settings_field_name();
    $options = get_option( $settings_field_name );
    ?>
        <input type='text' name='<?php echo $settings_field_name; ?>[email]'
           value='<?php echo $options['email']; ?>' class='regular-text'>
    <?php
}

/**
 * Renders the license key settings field on the license settings page.
 */
public function render_license_key_settings_field() {
    $settings_field_name = $this->get_settings_field_name();
    $options = get_option( $settings_field_name );
    ?>
        <input type='text' name='<?php echo $settings_field_name; ?>[license_key]'
           value='<?php echo $options['license_key']; ?>' class='regular-text'>
    <?php
}
To minimize the risk of a typo when typing the settings field's name, I have created a helper function, get_settings_field_name, that is used throughout the code snippets above. Another helper function, get_settings_page_slug, is used for defining the path to the settings screen.
Add those two function at the end of the class to make the code run without errors:
/**
 * @return string   The name of the settings field storing all license manager settings.
 */
protected function get_settings_field_name() {
    return $this->product_id . '-license-settings';
}

/**
 * @return string   The slug id of the licenses settings page.
 */
protected function get_settings_page_slug() {
    return $this->product_id . '-licenses';
}
The functions use the $product_id passed in the constructor to create the settings field and the settings page slug. This way, every theme or plugin using the class will get their own settings and there will be no conflicts.
The settings page is now ready and looks like this:
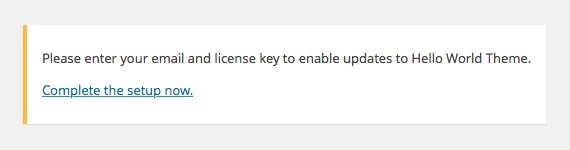
Step 3: Add a Reminder For the User
It's easy for a user to miss a setting like this and end up wondering why the theme isn't getting updates. That's why it's a good idea to create a reminder that will be shown in the admin, until the user configures the theme and enters the license key.
It's time for another WordPress action. The admin_notices action is used for all WordPress notifications and errors, therefore fitting our purposes perfectly.
In the constructor, right below the two actions we added earlier, add:
// Add a nag text for reminding the user to save the license information
add_action( 'admin_notices', array( $this, 'show_admin_notices' ) );
Then, add the function, show_admin_notices:
/**
 * If the license has not been configured properly, display an admin notice.
 */
public function show_admin_notices() {
    $options = get_option( $this->get_settings_field_name() );

    if ( !$options || ! isset( $options['email'] ) || ! isset( $options['license_key'] ) ||
        $options['email'] == '' || $options['license_key'] == '' ) {

        $msg = __( 'Please enter your email and license key to enable updates to %s.', $this->text_domain );
        $msg = sprintf( $msg, $this->product_name );
        ?>
            <div class="update-nag">
                <p>
                    <?php echo $msg; ?>
                </p>

                <p>
                    <a href="<?php echo admin_url( 'options-general.php?page=' . $this->get_settings_page_slug() ); ?>">
                        <?php _e( 'Complete the setup now.', $this->text_domain ); ?>
                    </a>
                </p>
            </div>
        <?php
    }
}
The function first checks if the options have been set. If the options item doesn't exist or any of the two required fields are empty, it shows the notice and a link to the theme's license settings page where the user can complete the setup. The class, update-nag, defines the look of the notification.
Here's what the "nag" looks like, appearing at the top of the admin dashboard:
Now, to make the nag go away, let's put in the license information.
First, visit the license server's WordPress admin area and create a new license for the test theme (Hello World Theme). After you have clicked on Add License, you will see the list of licenses.
Copy the license key that was generated by the license manager plugin. Then, go back to your test site and configure the theme's license settings by entering your email address and the license key copied from the license manager server.
Your nag is gone and your theme settings are in place for testing the functionality we will create next.
3. Communicating With the License Manager API
With the basic framework in place, let's look at communicating with our license manager API.
Step 1: Add Functions for Calling the API
First, add a function for calling the License Manager API. The function takes two parameters: the API method or action to call on the license manager server, and an array with parameters for the action:
//
// API HELPER FUNCTIONS
//

/**
 * Makes a call to the WP License Manager API.
 *
 * @param $method   String  The API action to invoke on the license manager site
 * @param $params   array   The parameters for the API call
 * @return          array   The API response
 */
private function call_api( $action, $params ) {
    $url = $this->api_endpoint . '/' . $action;

    // Append parameters for GET request
    $url .= '?' . http_build_query( $params );

    // Send the request
    $response = wp_remote_get( $url );
    if ( is_wp_error( $response ) ) {
        return false;
    }

    $response_body = wp_remote_retrieve_body( $response );
    $result = json_decode( $response_body );

    return $result;
}
Line 13: Create the URL to call, using the base URL passed as a constructor parameter ($api_endpoint), and the action passed in as a parameter ($method).
Line 16: Use the PHP function http_build_query to create a URL encoded parameter string and append it to the GET request.
Line 19: Use WordPress's built-in HTTP function wp_remote_get to send a GET request to the URL generated on the previous lines.
Lines 20–22: Do some basic error handling to see if an error occurred. We'll add the is_api_error function next.
Lines 24–25: Read the response and parse it from a JSON encoded string to an array containing the data received from the license server.
Line 27: Return the response.
Next, add the error checking function. The handling is very rough and doesn't go into any detail about what went wrong—just enough to know if there was an error or not:
/**
 * Checks the API response to see if there was an error.
 *
 * @param $response mixed|object    The API response to verify
 * @return bool     True if there was an error. Otherwise false.
 */
private function is_api_error( $response ) {
    if ( $response === false ) {
        return true;
    }

    if ( ! is_object( $response ) ) {
        return true;
    }

    if ( isset( $response->error ) ) {
        return true;
    }

    return false;
}
Step 2: Add Functions for Retrieving License and Update Information
Now that we have created the function for talking with the API, we can use it to call the license server to get some information about the current theme or plugin.
Add the following function for calling the info action:
/**
 * Calls the License Manager API to get the license information for the
 * current product.
 *
 * @return object|bool   The product data, or false if API call fails.
 */
public function get_license_info() {
    $options = get_option( $this->get_settings_field_name() );
    if ( ! isset( $options['email'] ) || ! isset( $options['license_key'] ) ) {
        // User hasn't saved the license to settings yet. No use making the call.
        return false;
    }

    $info = $this->call_api(
        'info',
        array(
            'p' => $this->product_id,
            'e' => $options['email'],
            'l' => $options['license_key']
        )
    );

    return $info;
}
Line 8: Retrieve the license manager client's options.
Lines 9–12: Verify that the license key and email options have been set. If we don't have them, calling the API will be a waste of time—we already know that the request will fail.
Lines 14–21: Call the license manager API's info action with the following parameters:
-
p: The product ID defined in theWp_License_Manager_Clientconstructor. -
e: The license owner's email address, read from settings. -
l: The license key, read from settings.
Line 23: Return the license data. The data will include the following fields:
-
name: The name of the product (theme or plugin). -
description: A description of the product. -
version: Current version available on the server. -
package_url: The download URL for the product. This is a URL to the get API action on the license manager server. -
last_updated: When the product has been updated. -
description_url: A URL to a page that can be used for showing more information about the product. -
tested: The highest WordPress version on which the product has been tested (needed only for plugins). -
banner_low: Low resolution (regular) version of the product banner image (only needed for plugins). -
banner_high: High resolution (retina) version of the product banner image (only needed for plugins).
Next, let's use the function to check if there is an update waiting to be downloaded. Add the following function:
/**
 * Checks the license manager to see if there is an update available for this theme.
 *
 * @return object|bool  If there is an update, returns the license information.
 *                      Otherwise returns false.
 */
public function is_update_available() {
    $license_info = $this->get_license_info();
    if ( $this->is_api_error( $license_info ) ) {
        return false;
    }

    if ( version_compare( $license_info->version, $this->get_local_version(), '>' ) ) {
        return $license_info;
    }

    return false;
}
Line 8: Request product information using the get_license_info function you just created.
Lines 9–11: If an error occurred while making the API call, return false. It would also be a good idea to show the error to the user—to keep things simple, I left that functionality out for now.
Line 13: Use PHP's version_compare to see if the version number received from the server is higher than the local version number.
Line 14: If an update is available, return the license data. By returning the data right away, we save ourselves the need to make an extra API call to get the data again.
To complete this function, we still need to implement the function for retrieving the local version number, used on line 13. Plugin and theme data are accessed a little differently, so the function will have separate implementations for both:
/**
 * @return string   The theme / plugin version of the local installation.
 */
private function get_local_version() {
    if ( $this->is_theme() ) {
        $theme_data = wp_get_theme();
        return $theme_data->Version;
    } else {
        $plugin_data = get_plugin_data( $this->plugin_file, false );
        return $plugin_data['Version'];
    }
}
Line 2: Get the current theme's data.
Line 3: Read the current version and return it.
Line 5: Plugin data is read using a different function, get_plugin_data, that uses the plugin's main file name as the identifier. We will set the variable, $this->plugin_file, later when integrating to our test plugin.
Line 6: Return the plugin's version number.
Add the function is_theme for checking for the type of the product inside which we are operating:
private function is_theme() {
    return $this->type == 'theme';
}
We have now created the functions needed for connecting to the license server and checking if there is a newer version available. Next, it's time for the really interesting part: tying this to the WordPress update functionality.
4. How WordPress Checks for Updates
The framework for building our theme and plugin update system is in place. It's time to start digging deeper into the WordPress update functionality.
At the admin_init action (and a number of other, more specific, actions), if enough time has passed since the last update check, WordPress compares its plugins and themes against the versions hosted in the WordPress.org Plugin and Theme directories to see if new versions have been released.
After the check, WordPress stores the results into a site transient: update_themes for themes and update_plugins for plugins.
Then, when you visit the Updates page (or the Themes and Plugins pages), WordPress checks these transients to see and mark themes and plugins that have updates available.
When you look at the code for this functionality (which you can find in wp-includes/update.php) you can see that it has been designed to work with the official directories and nothing else: there are no hooks for specifying the server to check against or for sniffing the requests before they are sent.
But that hasn't stopped plugin and theme developers from using their own license servers—and it's not going to stop us either.
The solution lies in the way the results of the update check are saved. I mentioned above that the results of the update lookup are stored in a transient. And right at the beginning of the WordPress function set_site_transient, we find:
/**
 * Filter the value of a specific site transient before it is set.
 *
 * The dynamic portion of the hook name, $transient, refers to the transient name.
 *
 * @since 3.0.0
 *
 * @param mixed $value Value of site transient.
 */
$value = apply_filters( 'pre_set_site_transient_' . $transient, $value );
This filter gives us access to the contents of the plugin and theme update data before it is saved, just in time to add our own data to it!
5. Hooking Into WordPress Theme Updates
Let's begin implementing our own update checking code, starting from themes.
Step 1: Create a Filter to Hook Into the Theme Update Check
As we saw above, when WordPress has finished checking for theme updates from the WordPress.org theme directory, it stores the information about themes in need of an update in a transient called update_themes.
To check for our own updates and add the data into the transient before it is saved, we will hook a function of our own to the filter, pre_set_site_transient_update_themes. In this function, we will call the license server to check for this theme's updates, and then, if there is an update available, add the information in the transient.
First, add the filter at the end of Wp_License_Manager_Client's constructor:
if ( $type == 'theme' ) {
    // Check for updates (for themes)
    add_filter( 'pre_set_site_transient_update_themes', array( $this, 'check_for_update' ) );
}
Then, create the function, check_for_update:
/**
 * The filter that checks if there are updates to the theme or plugin
 * using the WP License Manager API.
 *
 * @param $transient    mixed   The transient used for WordPress
 *                          	theme / plugin updates.
 *
 * @return mixed        The transient with our (possible) additions.
 */
public function check_for_update( $transient ) {
    if ( empty( $transient->checked ) ) {
        return $transient;
    }

    $info = $this->is_update_available();
    if ( $info !== false ) {

        if ( $this->is_theme() ) {
            // Theme update
            $theme_data = wp_get_theme();
            $theme_slug = $theme_data->get_template();

            $transient->response[$theme_slug] = array(
                'new_version' => $info->version,
                'package' => $info->package_url,
                'url' => $info->description_url
            );
        } else {
            // Plugin updates will be added here.
        }
    }

    return $transient;
}
Lines 10–13: $transient->checked is an array with all currently installed themes and their version numbers (theme stylesheet as key and version as value). If you were to check updates for multiple themes at once, you could use this array to collect the data and send it all to your license server. In this simple version, however, we just verify that the array isn't empty and move on.
Lines 15–16: Check if there is an update available for this product (theme) on our license server, using the is_update_available function we created earlier. The function returns the product information if the version on the license server is higher than the installed one and false if there are no updates available.
Line 18: Check if this is a theme or a plugin. At this point, we'll only focus on the theme updates, so I have left the else branch empty for now.
Lines 20–21: Find the theme's "slug" to use it as a key for marking the current theme in need of update.
Lines 23–27: Insert the information related to the theme update into the transient's $response array, using the theme's slug as key.
-
new_version: Theme version on server. -
package: The URL for downloading the theme package. As WordPress needs to be able to download the theme directly from this URL, we created the license manager to return a fully formed URL in the license information, including the user's email address and license key. -
url: A URL for a page to show information about the theme. This parameter is used when clicking for more information on the Themes page.
Line 33: Return the transient so that WordPress can save it—with our theme update information appended to it.
And that's it! You have now built a complete update system for your self-hosted WordPress themes. Let's test the functionality and then move on to updating plugins.
Step 2: Test the Theme Update
Before moving on to updating plugins, let's test the functionality to see the update in action.
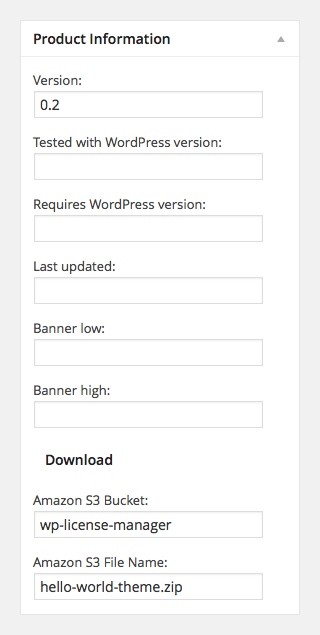
Updating the theme you are using for testing will overwrite the theme, so as the first thing, create a new zip file using its files. Then upload the zip file to Amazon S3 as we did in part 2 of the tutorial series.
Next, log in to your license server and edit the Hello World Theme's product information, making sure it uses the zip file you just uploaded to Amazon S3 and that the product's version number is higher than the one of the theme installed locally.
Save the changes and head back to the test server to test the update.
On the test server, click on Dashboard > Updates. WordPress will now perform the API calls to check if there are themes in need of an update. If nothing happens, it could be that the previous check has just taken place and WordPress is still waiting for the time limit in between version checks to pass. In that case, wait for a minute and click on Check Again to force the check.
Now, you should see your theme in the list of themes that can be updated.

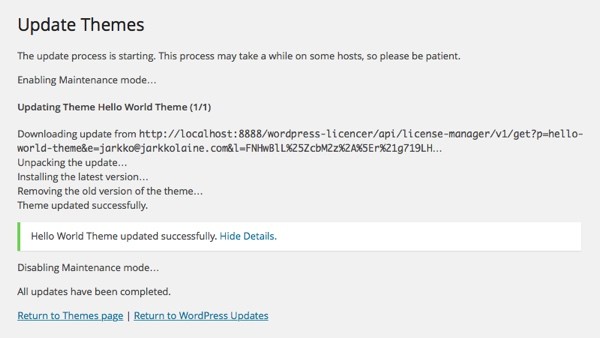
Next, try doing the update. If all goes well — as it should — you will see the following output. By default, the details are not show unless there is an error, so you'll have to click on Show Details to see what happened in the update.
Notice how the theme is not downloaded from WordPress.org but rather your own license manager server.
6. Hooking to WordPress Plugin Updates
With the theme updates done and tested, we are almost finished with the tutorial. A big part of the code that will be needed for updating plugins is already in place. But there are some differences and additions needed, so let's get to work and add support for plugins to our license manager client class.
Step 1: Include the Client Class in Your Plugin
Copy the file class-wp-license-manager-client.php over to your test plugin's source folder. Then, in a suitable place in the plugin, place the following initialization code.
If you are using the empty test plugin, just drop it into the main plugin file, right below the plugin header. Remember to replace <URL_TO_LICENSE_SERVER> with your own server URL.
require_once( 'class-wp-license-manager-client.php' );

if ( is_admin() ) {
    $license_manager = new Wp_License_Manager_Client(
        'hello-world-plugin',
        'Hello World Plugin',
        'hello-world-plugin-text',
        'http://<URL_TO_LICENSE_SERVER>/api/license-manager/v1',
        'plugin',
        __FILE__
    );
}
Most of the parameters are the same as when initializing the class for use with a theme—with different, product specific values (e.g. hello-world-plugin instead of hello-world-theme).
The last two parameters were not used when creating a theme, so let's take a look at them:
-
$type(with valueplugin) tells theWp_License_Manager_Clientinstance to use the plugin specific functionality. -
$plugin_file(last parameter) is used for retrieving the plugin's identifier for requesting plugin data such as its current version. When this initialization is done in the plugin's main class, we can use__FILE__.
Step 2: Check for Plugin Updates
Earlier in this tutorial, we hooked our Wp_License_Manager_Client class to look for changes in the update_themes transient by placing an add_filter row at the end of the constructor. Plugin updates will be handled similarly, only using the transient update_plugins instead of update_themes.
So, right after the existing filter, add the plugin specific code (lines 1–3 were already present in the constructor, so I'm including them here to show where the new code should go):
if ( $type == 'theme' ) {
    // Check for updates (for themes)
    add_filter( 'pre_set_site_transient_update_themes', array( $this, 'check_for_update' ) );
} elseif ( $type == 'plugin' ) {
    // Check for updates (for plugins)
    add_filter( 'pre_set_site_transient_update_plugins', array( $this, 'check_for_update' ) );
}
As you notice from the code above, the new filter uses the same function as the one we added for themes, check_for_update.
Earlier, when we created the check_for_update function, we left one else branch empty, waiting to be filled with the code for handling plugin updates. Now, let's add content to that section. Here's the entire function with the plugin-related code added starting from line 27:
/**
 * The filter that checks if there are updates to the theme or plugin
 * using the License Manager API.
 *
 * @param $transient    mixed   The transient used for WordPress theme updates.
 * @return mixed        The transient with our (possible) additions.
 */
public function check_for_update( $transient ) {
    if ( empty( $transient->checked ) ) {
        return $transient;
    }

    if ( $this->is_update_available() ) {
        $info = $this->get_license_info();

        if ( $this->is_theme() ) {
            // Theme update
            $theme_data = wp_get_theme();
            $theme_slug = $theme_data->get_template();

            $transient->response[$theme_slug] = array(
                'new_version' => $info->version,
                'package' => $info->package_url,
                'url' => $info->description_url
            );
        } else {
            // Plugin update
            $plugin_slug = plugin_basename( $this->plugin_file );

            $transient->response[$plugin_slug] = (object) array(
                'new_version' => $info->version,
                'package' => $info->package_url,
                'slug' => $plugin_slug
            );
        }
    }

    return $transient;
}
Looking at the code, it's good to notice that while the function is the same, now we're handling a different transient, update_plugins rather than update_themes. One way this shows is that while the data in update_themes is stored as an array, update_plugins uses an object (line 30)!
The calls to our License Manager API are the same as when using a theme, but the data stored to the transient is a little different—based on what WordPress expects to find in the transient.
With this code in place, you can already test for updates in the same way we did with the theme (create a zip file, upload it to S3, edit product properties). Make sure the plugin's version number on the license server is higher than the installed one, and navigate to the test server's Updates page. An update for the Hello World Plugin should appear:

When you update the plugin, you will see that it is downloaded from your own server just like the theme.
But we are not quite done yet: If you look at the plugin information in the screen shot above, you'll notice that "Compatibility with WordPress 4.0.1" says "Unknown". Also, if you click on View version 0.2 details, an error message is shown.
Let's fix this.
Step 3: Provide Plugin Information
To collect the information it shows about plugins, WordPress uses a function called plugins_api. By default, the function calls the WordPress.org API, just like the version checks. However, unlike the version check, this function contains three powerful filters: plugins_api_args for editing the parameters sent to the API, plugins_api for overriding the default API requests, and plugins_api_result for editing the results received from the API.
We will use plugins_api as it gives us the greatest level of control over the functionality: when WordPress initiates a Plugins API call to get information about the current plugin, our function will jump in and handle the request using the license server instead of WordPress.org. The rest of the requests will be left for WordPress to process.
First, add the filter in the Wp_License_Manager_Client constructor's plugin specific else branch:
// Showing plugin information
add_filter( 'plugins_api', array( $this, 'plugins_api_handler' ), 10, 3 );
Then, add the function:
/**
 * A function for the WordPress "plugins_api" filter. Checks if
 * the user is requesting information about the current plugin and returns
 * its details if needed.
 *
 * This function is called before the Plugins API checks
 * for plugin information on WordPress.org.
 *
 * @param $res      bool|object The result object, or false (= default value).
 * @param $action   string      The Plugins API action. We're interested in 'plugin_information'.
 * @param $args     array       The Plugins API parameters.
 *
 * @return object   The API response.
 */
public function plugins_api_handler( $res, $action, $args ) {
    if ( $action == 'plugin_information' ) {

        // If the request is for this plugin, respond to it
        if ( isset( $args->slug ) && $args->slug == plugin_basename( $this->plugin_file ) ) {
            $info = $this->get_license_info();

            $res = (object) array(
                'name' => isset( $info->name ) ? $info->name : '',
                'version' => $info->version,
                'slug' => $args->slug,
                'download_link' => $info->package_url,

                'tested' => isset( $info->tested ) ? $info->tested : '',
                'requires' => isset( $info->requires ) ? $info->requires : '',
                'last_updated' => isset( $info->last_updated ) ? $info->last_updated : '',
                'homepage' => isset( $info->description_url ) ? $info->description_url : '',

                'sections' => array(
                    'description' => $info->description,
                ),

                'banners' => array(
                    'low' => isset( $info->banner_low ) ? $info->banner_low : '',
                    'high' => isset( $info->banner_high ) ? $info->banner_high : ''
                ),

                'external' => true
            );

            // Add change log tab if the server sent it
            if ( isset( $info->changelog ) ) {
                $res['sections']['changelog'] = $info->changelog;
            }

            return $res;
        }
    }

    // Not our request, let WordPress handle this.
    return false;
}
Line 16: Check the requested Plugin API action. We are currently only interested in plugin_information, so if WordPress asks for something else, we just return false and let the request go all the way to WordPress.org.
Line 19: Check if the request is about the current plugin. If yes, we'll take the request and handle it. If not, return false so we don't break other plugins' Plugins API requests.
Line 20: Call our license server to retrieve the information for the current product.
Lines 22–48: Collect all the plugin data we got from the info request. Now, we are finally using all of the fields returned by the API.
Line 50: Return the result object.
To test this functionality, edit the Hello World Plugin product on your license server and add values to all of the product settings fields. In addition to the settings defined earlier, enter the following, setting the values to anything you like—we are just testing...
- Tested with WordPress version: The highest WordPress version you have tested the plugin on.
- Requires WordPress version: The minimum WordPress version required to run your plugin.
-
Last Updated: The date of the last update to this plugin, in
YYYY-MM-DDformat. - Banner low and Banner high: These fields define the normal (low) and retina (high) versions of the banner shown on top of the plugin information screen. Insert URLs to images of the following sizes: 772x250 for low and 1544x500 for high.
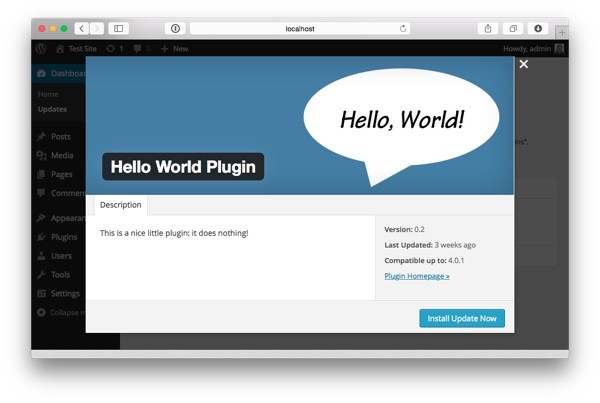
Save the product and head back to the test site's Updates page. Now, you will see that there the WordPress version compatibility field is no longer Unknown, and when you click on View version 0.2 details, you will see this popup:
Conclusion
We have now created a fully functional, license controlled WordPress plugin and theme update system. It's still rather basic, but can already be used for passing updates to your organization's internal users or your premium plugin and theme customers.
Hopefully, you have also learned something new about working with WordPress plugins and themes and can use the knowledge in creating your own projects.

Comments