In this series, we are creating a Hangman game for the Android platform. In the first tutorial, we set the application up to present two screens to the user and we also made a start with the user interface elements, the images and shape drawables to be precise. In the second tutorial, we will zoom in on the game's layout.
Introduction
Creating the game's layout will involve using an adapter to create letter buttons and positioning the body parts we will display when users select incorrect letters. We will also store the player's answers in XML, retrieve them, and choose a random word using Java.
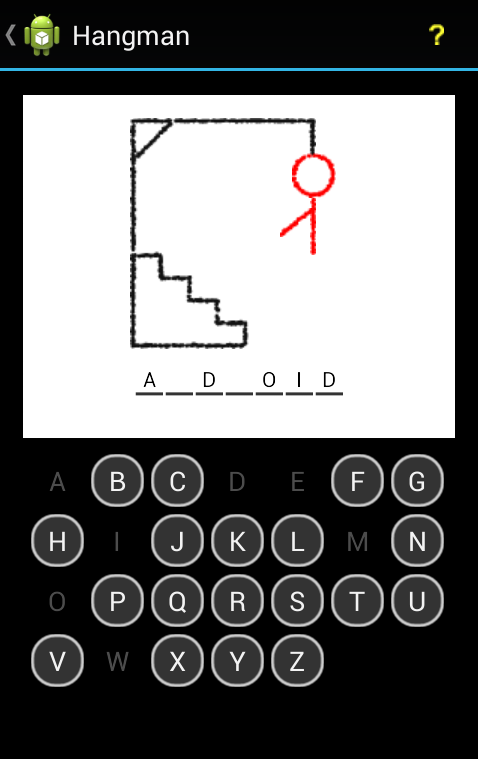
To refresh your memory, this is what the final game will look like.
1. Position the Body Parts
Step 1
In the previous tutorial, we created images for the gallows and for the six body parts. We will place these inside the game's layout in this tutorial. The positions you set for these elements need to be determined by the image elements that you are using. One approach is to import the images into a image editor, such as Adobe's Photoshop, position them manually, and then use their x and y positions relative to the gallows image to work out the correct positions to apply to each image in the XML layout. If you are starting with the demo images we included in the previous tutorial, you can use the values listed in this tutorial.
Start by opening activity_game.xml. Inside the linear layout that we added in the previous tutorial, enter a relative layout to hold the seven images that will make up the gallows area.
<RelativeLayout
  android:layout_width="fill_parent"
  android:layout_height="wrap_content"
  android:background="#FFFFFFFF"
  android:gravity="center"
  android:paddingTop="15dp" >
</RelativeLayout>
Step 2
Inside the relative layout you just created, start by adding the gallows image as shown below.
<ImageView
  android:layout_width="wrap_content"
  android:layout_height="wrap_content"
  android:contentDescription="@string/gallows"
  android:paddingLeft="0dp"
  android:paddingTop="0dp"
  android:src="@drawable/android_hangman_gallows" />
Remember to modify the drawable name if the image you're using is named differently. We set the image's left and top padding to 0 so that we can position the other images relative to its position. We'll add string resources for the content descriptions a bit later in this tutorial. Next up is the head.
<ImageView
  android:id="@+id/head"
  android:layout_width="wrap_content"
  android:layout_height="wrap_content"
  android:contentDescription="@string/head"
  android:paddingLeft="108dp"
  android:paddingTop="23dp"
  android:src="@drawable/android_hangman_head" />
If you're using your own images, you'll need to alter the left and top padding accordingly. We use an id attribute so that we can refer to the image in code. This is necessary to make it appear and disappear depending on the user's input. The next image we add is the body.
<ImageView
  android:id="@+id/body"
  android:layout_width="wrap_content"
  android:layout_height="wrap_content"
  android:contentDescription="@string/body"
  android:paddingLeft="120dp"
  android:paddingTop="53dp"
  android:src="@drawable/android_hangman_body" />
This looks very similar to what we did for the head and, as you can see below, the arms and legs are pretty similar.
<ImageView
  android:id="@+id/arm1"
  android:layout_width="wrap_content"
  android:layout_height="wrap_content"
  android:contentDescription="@string/arm"
  android:paddingLeft="100dp"
  android:paddingTop="60dp"
  android:src="@drawable/android_hangman_arm1" />

<ImageView
  android:id="@+id/arm2"
  android:layout_width="wrap_content"
  android:layout_height="wrap_content"
  android:contentDescription="@string/arm"
  android:paddingLeft="120dp"
  android:paddingTop="60dp"
  android:src="@drawable/android_hangman_arm2" />
<ImageView
  android:id="@+id/leg1"
  android:layout_width="wrap_content"
  android:layout_height="wrap_content"
  android:contentDescription="@string/leg"
  android:paddingLeft="101dp"
  android:paddingTop="90dp"
  android:src="@drawable/android_hangman_leg1" />

<ImageView
  android:id="@+id/leg2"
  android:layout_width="wrap_content"
  android:layout_height="wrap_content"
  android:contentDescription="@string/leg"
  android:paddingLeft="121dp"
  android:paddingTop="90dp"
  android:src="@drawable/android_hangman_leg2" />
Open the project's res/values strings XML file and add the content description strings that we've used in the above code snippets.
<string name="gallows">The Gallows</string>
<string name="head">The Head</string>
<string name="body">The Body</string>
<string name="arm">An Arm</string>
<string name="leg">A Leg</string>
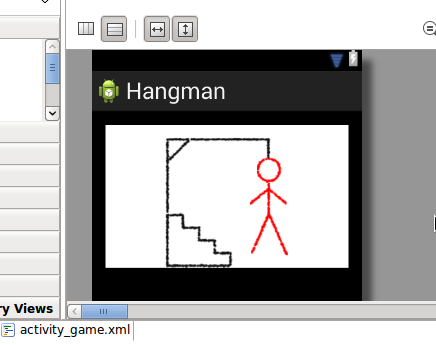
Go back to the layout file and switch to the Graphical Layout tab to see the result of our work. Adjust the top and left padding of each image to adjust their position if necessary.
Whenever a new game is started, the body parts need to be hidden. Each body part is revealed if the player chooses a letter that is not present in the target word.
2. Store the Answer Words
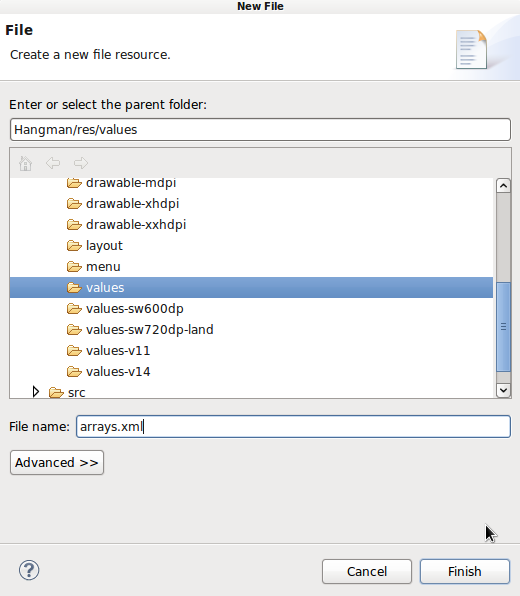
The game will use a collection of predefined words, which we will store in XML. In your project resources values folder, add a new file and name it arrays.xml.
Switch to the XML tab, create an array, and add a few words to it.
<resources>
  <string-array name="words">
    <item>CHARGER</item>
    <item>COMPUTER</item>
    <item>TABLET</item>
    <item>SYSTEM</item>
    <item>APPLICATION</item>
    <item>INTERNET</item>
    <item>STYLUS</item>
    <item>ANDROID</item>
    <item>KEYBOARD</item>
    <item>SMARTPHONE</item>
  </string-array>
</resources>
3. Choose and Present a Word
Step 1
Back in your game's activity layout file, add a linear layout immediately after the relative layout we added for the gallows area. The linear layout is reserved for the answer area.
<LinearLayout
  android:id="@+id/word"
  android:layout_width="fill_parent"
  android:layout_height="wrap_content"
  android:layout_marginBottom="5dp"
  android:background="#FFFFFFFF"
  android:gravity="center"
  android:orientation="horizontal"
  android:padding="10dp" >
</LinearLayout>
We store each character of the target word within its own text view so that we can reveal each letter separately. We will use the id of the linear layout in code to add the text views each time a new word is chosen.
Step 2
Open the GameActivity class and start by adding the following import statements at the top.
import android.content.res.Resources;
import android.graphics.Color;
import android.view.Gravity;
import android.view.ViewGroup.LayoutParams;
import android.widget.LinearLayout;
import android.widget.TextView;
Inside the class declaration, add an onCreate method as shown below.
@Override
protected void onCreate(Bundle savedInstanceState) {
  super.onCreate(savedInstanceState);
  setContentView(R.layout.activity_game);
}
We set the content view to the layout file we created a moment ago.
Step 3
Before we move on, we need to declare a few instance variables. Add the declaration immediately before the onCreate method.
private String[] words;
private Random rand;
private String currWord;
private LinearLayout wordLayout;
private TextView[] charViews;
The collection of words are stored in an array and the application uses the rand object to select a word from the array each time the user starts a new game. We keep a reference to the current word (currWord), the layout we created to hold the answer area (wordLayout), and an array of text views for the letters (charViews). Back in onCreate, after setting the content view, request the application's resources, read the collection of words, and store them into the words instance variable.
Resources res = getResources();
words = res.getStringArray(R.array.words);
Note that we use the name we gave the word array in XML. Initialize the rand object and currWord string.
rand = new Random();
currWord = "";
Get a reference to the layout area we created for the answer letters.
wordLayout = (LinearLayout)findViewById(R.id.word);
Step 4
A number of tasks need to be performed every time a new game is started by the player. Let's create a helper method to keep everything organized. After the onCreate method, add the following method outline.
private void playGame() {
  //play a new game
}
Inside the playGame method, start by choosing a random word from the array.
String newWord = words[rand.nextInt(words.length)];
Because the playGame method is invoked when the user chooses to play again after winning or losing a game, it is important that we make sure we don't pick the same word two times in a row.
while(newWord.equals(currWord)) newWord = words[rand.nextInt(words.length)];
Update the currWord instance variable with the new target word.
currWord = newWord;
Step 5
The next step is to create one text view for each letter of the target word. Still inside our helper method, create a new array to store the text views for the letters of the target word.
charViews = new TextView[currWord.length()];
Next, remove any text views from the wordLayout layout.
wordLayout.removeAllViews();
Use a simple for loop to iterate over each letter of the answer, create a text view for each letter, and set the text view's text to the current letter.
for (int c = 0; c < currWord.length(); c++) {
  charViews[c] = new TextView(this);
  charViews[c].setText(""+currWord.charAt(c));
}
The string is stored as an array of characters. The charAt method allows us to access the characters at a specific index. Still inside the for loop, set the display properties on the text view and add it to the layout.
for (int c = 0; c < currWord.length(); c++) {
  charViews[c] = new TextView(this);
  charViews[c].setText(""+currWord.charAt(c));

  charViews[c].setLayoutParams(new LayoutParams(LayoutParams.WRAP_CONTENT, LayoutParams.WRAP_CONTENT));
  charViews[c].setGravity(Gravity.CENTER);
  charViews[c].setTextColor(Color.WHITE);
  charViews[c].setBackgroundResource(R.drawable.letter_bg);
  //add to layout
  wordLayout.addView(charViews[c]);
}
We set the text color to white so that the user will not be able to see it against the white background. If they guess the letter correctly, the text color property is se to black to reveal it to the player. Back in the onCreate method, call the helper method we just created.
playGame();
We'll expand both the onCreate and the helper method a bit later.
4. Create the Letter Buttons
Step 1
The next step is to create an area for the player to choose letters to guess. Revisit the game's activity layout and add the following grid view to hold the letter buttons. Insert the grid view immediately after the linear layout we added for the answer word.
<GridView
  android:id="@+id/letters"
  android:layout_width="fill_parent"
  android:layout_height="wrap_content"
  android:layout_gravity="center"
  android:layout_marginBottom="5dp"
  android:background="#FF000000"
  android:horizontalSpacing="5dp"
  android:numColumns="7"
  android:padding="5dp"
  android:stretchMode="columnWidth"
  android:verticalSpacing="5dp" />
We're going to use an adapter to map the letters of the alphabet to buttons in the grid view. We lay out seven buttons per row as you can see from the numColumns attribute.
Step 2
Each letter is going to be a button added to the layout using an adapter. Add a new file in your project layout folder, name it letter.xml, and populate it with the following code snippet.
<Button xmlns:android="http://schemas.android.com/apk/res/android"
  android:layout_width="wrap_content"
  android:layout_height="35dp"
  android:background="@drawable/letter_up"
  android:onClick="letterPressed" />
We use one of the drawable shapes we created last time as background and set an onClick method we will implement next time. If you are enhancing the application to target different screen densities, you can consider tailoring the height attribute accordingly.
Step 3
Add a new class to your project's src package, name it LetterAdapter, and choose android.widget.BaseAdapter as its superclass.

As you'll see, an adapter class includes a series of standard methods we will implement. Add the following import statements to the new class.
import android.content.Context;
import android.view.LayoutInflater;
import android.widget.Button;
Inside the class declaration, add two instance variables as shown below.
private String[] letters;
private LayoutInflater letterInf;
The letters array will store the letters of the alphabet and the layout inflater will apply the button layout we defined to each view handled by the adapter. After the instance variables, add a constructor method for the adapter.
public LetterAdapter(Context c) {
  //setup adapter
}
Inside the constructor, instantiate the alphabet array and assign the letters A-Z to each position.
letters=new String[26];
for (int a = 0; a < letters.length; a++) {
  letters[a] = "" + (char)(a+'A');
}
Each character is represented as a number so that we can set the letters A to Z in a loop starting at zero by adding the value of the character A to each array index. Still inside the constructor method, specify the context in which we want to inflate the layout, which will be passed from the main activity later.
letterInf = LayoutInflater.from(c);
Eclipse should have created a getCount method outline. Update its implementation as follows.
@Override
public int getCount() {
  return letters.length;
}
This represents the number of views, one for each letter. We don't call the methods in the adapter class explicitly within the application. It's the operating system that uses them to build the user interface element we apply the adapter to, which in this case will be the grid view.
Update the implementation of getView as shown in the code snippet below.
@Override
public View getView(int position, View convertView, ViewGroup parent) {
  //create a button for the letter at this position in the alphabet
  Button letterBtn;
  if (convertView == null) {
    //inflate the button layout
    letterBtn = (Button)letterInf.inflate(R.layout.letter, parent, false);
  } else {
    letterBtn = (Button) convertView;
  }
  //set the text to this letter
  letterBtn.setText(letters[position]);
  return letterBtn;
}
Take a moment to let everything sink in. Essentially, this method builds each view mapped to the user interface element through the adapter. We inflate the button layout we created and set the letter according to the position in the alphabet that the view represents. We have stated that there will be 26 views being mapped, with the position of each reflecting its position in the alphabet array. You can leave the other methods in the adapter class as they are.
@Override
public Object getItem(int arg0) {
  return null;
}

@Override
public long getItemId(int arg0) {
  return 0;
}
Step 4
Revisit the game's activity class and add an instance variable for the grid view and the adapter.
private GridView letters;
private LetterAdapter ltrAdapt;
You also need to add another import statement.
import android.widget.GridView;
In the onCreate method, before the line in which you call the playGame helper method, get a reference to the grid view.
letters = (GridView)findViewById(R.id.letters);
Append the playGame's current implementation with the following snippet. In this snippet, we instantiate the adapter and set it on the grid view.
ltrAdapt=new LetterAdapter(this);
letters.setAdapter(ltrAdapt);
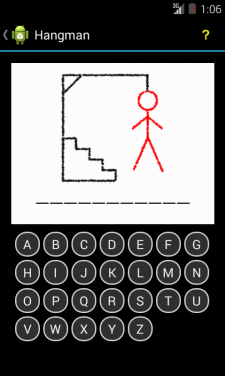
Run the application in the emulator and you should see the user interface. However, you won't be able to interact with the buttons yet. That's what we will focus on in the third and final installment of this series.
Conclusion
If you run your application at this point, it will present you with the game's interface, but it won't respond to user interaction yet. We will implement the remaining functionality in the final part of this series.
When a player clicks the letter buttons, the application needs to verify if the selected letter is included in the target word and update the answer and gallows accordingly. We will also present a dialog to the player if they win or lose, and we'll also add a help button. Finally, we'll add basic navigation through an action bar.

Comments