The Facebook style sliding menu has become a widely used design pattern in mobile applications. In this tutorial, you'll learn how to use the power of HTML5 and Sencha Touch's Menu class to create your own sliding menu.
Introduction
I'm not sure if they were the first, but Facebook has certainly popularised the sliding menu design pattern. You are probably already familiar with the concept, but it looks like this:
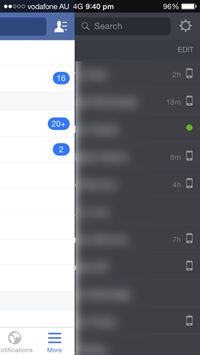
The main content slides left or right, revealing a menu. The benefits of this approach include that it frees up more screen real estate—as opposed to having, for example, tabbed buttons at the bottom of the screen—and allows us to add more menu options without running out of space. It has become so ubiquitous that most users will immediately understand how to interact with it.
Given the usefulness and popularity of this approach, naturally Sencha Touch developers would want to include a sliding menu in their applications. People came up with some great solutions and ways to implement a sliding menu in Sencha Touch, but it often involved quite a bit of work.
Fortunately, since version 2.3.0, Sencha Touch supports sliding menus with the Ext.Menu class. In this tutorial, we will be walking through how to add a sliding menu to a newly generated Sencha Touch application.
1. Generate a New Application
I will assume at this point that you already have your environment set up for Sencha Touch development. If not, visit the Sencha Touch website and follow the instructions to get up and running.
Open up the command prompt and change your current directory to your Sencha Touch installation. In my case that is:
cd c:\xampp\htdocs\touch-2.4.0
Next, run the following command to generate a new application called SlidingMenu that will be stored in the htdocs folder:
sencha generate app SlidingMenu ../SlidingMenu
2. Restructuring the Application
The example application automatically generated by Sencha Cmd contains a tabbed navigation view by default, which we don't want. We will have to make a few changes to this before we add our menu. Open up your app/view/Main.js file and go through the following steps.
Step 1
Remove the default items added by Sencha Cmd so that your items config is empty. You should also remove the tabBarPosition configuration. Your config should now look like this:
    config: {
        items: [

        ]
    }
Step 2
We won't need Ext.TitleBar or Ext.Video so you can remove those and instead add Ext.Menu as shown below.
    requires: [
        'Ext.Menu'
    ],
Step 3
We're going to use a card layout for our application. Rather than extending the Ext.tab.Panel class we're going to be extending the more generic Ext.Container class. After making these changes, your Main.js file should look like this:
Ext.define('SlidingMenu.view.Main', {
    extend: 'Ext.Container',
    xtype: 'main',
    requires: [
        'Ext.Menu'
    ],
    config: {
        layout: {
            type: 'card'
        },
        items: [

        ]
    }
});
3. Adding a Button
We have a basic template to work from now and we can begin creating the functional elements of our sliding menu. Before we create the menu itself, we want a toolbar that runs across the top of the application. This toolbar will contain a button the user can tap to open and close the menu. All of the following changes will be made in app/view/Main.js.
Step 1
Add a toolbar as your first item and add a button as an item in the toolbar.
        items: [
            {
                xtype: 'toolbar',
                docked: 'top',
                title: 'Sliding Menu',
                items: [
                    {
                        xtype: 'button',
                        iconCls: 'list',
                        ui: 'plain'
                    }
                ]
            }
        ],
By giving the button an iconCls of list we will get the typical hamburger icon that is generally used for sliding menus. The plain configuration removes additional styling, leaving just the icon. I find this looks better, but feel free to omit that option.
Step 2
Add a handler to the button that will open and close the menu when tapped.
        items: [
            {
                xtype: 'toolbar',
                docked: 'top',
                title: 'Sencha Login',
                items: [
                    {
                        xtype: 'button',
                        id: 'listButton',
                        iconCls: 'list',
                        ui: 'plain',
                        handler: function(){
                            if(Ext.Viewport.getMenus().left.isHidden()){
                                Ext.Viewport.showMenu('left');
                            }
                            else
                            {
                                Ext.Viewport.hideMenu('left');
                            }
                        }
                    }
                ]
            }
        ],
A handler is one of many ways to catch events in Sencha Touch. Every time the button is tapped our handler function will run, toggling the menu in and out as necessary.
It simply checks if the left menu is visible and, if it is, it will hide it. If it isn't visible, it will show it. Although typically on the left, menus can also be added to the top, right, and bottom. If your menu is going to be on a different side, then you should reflect that here.
Step 3
At this point, you can load the application in your browser to see your progress. You should see something like this.

Tapping the menu button will not work yet though. We need to create and add our menu to the application first.
4. Creating the Menu
We are going to create a function that will create the menu for us. This will be created outside of the config section.
Step 1
Start by adding a createMenu function as shown below.
Ext.define('SlidingMenu.view.Main', {
    extend: 'Ext.Container',
    xtype: 'main',
    requires: [
        'Ext.Menu'
    ],
    config: {
        //..snip
    },

    //function goes here
    createMenu: function(){

    }

});
Step 2
Create a new Ext.Menu instance in the createMenu function with the following options and return it.
    createMenu: function(){

        var menu = Ext.create('Ext.Menu', {
            width: 250,
            scrollable: 'vertical',
            items: [
                {
                    xtype: 'button',
                    text: 'Option 1',
                },
                {
                    xtype: 'button',
                    text: 'Option 2',
                }
            ]
        });

        return menu;
    }
You can add as many buttons as you like here. The final step to take before we have a functional sliding menu is to set the menu onto the Viewport.
Step 3
Create an initialize function to add the menu to the Viewport.
    initialize: function(){
        Ext.Viewport.setMenu(this.createMenu(),{
            side: 'left',
            reveal: true
        });
    },
This function is also added after the config, just like the createMenu function was. The initialize function will automatically run when our view is ready. As soon as the view is ready our menu will be too.
Step 4
The Main.js file should now look like this:
Ext.define('SlidingMenu.view.Main', {
    extend: 'Ext.Container',
    xtype: 'main',
    requires: [
        'Ext.Menu'
    ],
    config: {

        layout: {
            type: 'card'
        },

        items: [
            {
                xtype: 'toolbar',
                docked: 'top',
                title: 'Sliding Menu',
                items: [
                    {
                        xtype: 'button',
                        id: 'listButton',
                        iconCls: 'list',
                        ui: 'plain',
                        handler: function(){
                            if(Ext.Viewport.getMenus().left.isHidden()){
                                Ext.Viewport.showMenu('left');
                            }
                            else
                            {
                                Ext.Viewport.hideMenu('left');
                            }
                        }
                    }
                ]
            }
        ]
    },

    initialize: function(){
        Ext.Viewport.setMenu(this.createMenu(),{
            side: 'left',
            reveal: true
        });
    },

    createMenu: function(){
        var menu = Ext.create('Ext.Menu', {
            width: 250,
            scrollable: 'vertical',
            items: [
                {
                    xtype: 'button',
                    text: 'Option 1',
                },
                {
                    xtype: 'button',
                    text: 'Option 2',
                }
            ]
        });
        return menu;
    }
});
If you load your application in your browser again, you should now be able to tap the list button to reveal the menu. It should look something like this:
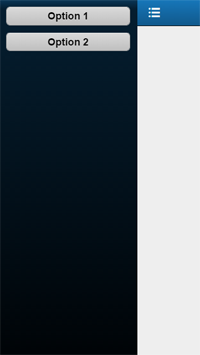
To hide the menu, you should be able to tap the list icon again or swipe left on the container that has been pushed off to the right.
5. Listening for Events
There's not much point in creating a menu if the options don't do anything when tapped. We're now going to look at how to listen for button taps and how we might do something useful with those events, for example, changing the view. As we did before, we are going to use handler functions to achieve this.
Add a handler function to each of the buttons. If you tap on either of the menu items, you should see the corresponding line printed out to the console. Although it is out of scope for this tutorial, you could use this handler function in a similar fashion to trigger a switch to a new view.
createMenu: function(){
    var menu = Ext.create('Ext.Menu', {
        width: 250,
        scrollable: 'vertical',
        items: [
            {
                xtype: 'button',
                text: 'Option 1',
                handler: function(){
                    console.log("Option 1 Tapped");
                }
            },
            {
                xtype: 'button',
                text: 'Option 2',
                handler: function(){
                    console.log("Option 2 Tapped");
                }
            }
        ]
    });
    return menu;
}
Conclusion
In this tutorial, we covered how to generate a new Sencha Touch application, create a sliding menu, and allow users to hide and show the menu. The menu currently uses the default Sencha Touch styling so as an extension to this tutorial you may wish to add your own custom styling by editing your app.scss file. If you have any questions, feel free to leave them in the comments.

Comments