If you haven’t gone through the first part of this series, I would recommend you do so as that’s something essential to go through before you develop the files in this article.
As a quick reminder, we’re developing a Recent Products plugin that lists X number of products in the front-end. You can configure the number of products to be displayed from the back-end configuration form that was built in part one of this series. We also went through the plugin architecture of OpenCart, and it’ll be applied to the front-end plugin development as well.
A Quick Recap
As mentioned earlier, in the course of this tutorial we’ll develop front-end plugin files, so let’s have a quick look at the list of files that need to be implemented.
-
catalog/language/english/module/recent_products.php: It's a file that holds static labels used throughout the front-end application area. -
catalog/controller/module/recent_products.php: It's a controller file that holds the application logic of our module. -
catalog/model/module/recent_products.php: It’s a model file that is used to interact with the database to fetch products. -
catalog/view/theme/default/template/module/recent_products.tpl: It's a view template file and holds XHTML code.
The obvious difference you'll have noticed here is that it’s the catalog directory that holds the front-end plugin files as opposed to the admin directory that was used to create the back-end plugin files. Also, there’s a model file, which was not created for the back-end, that holds the business logic of our plugin to fetch recent products from the database.
The other important thing to note is the placement of the view template file recent_products.tpl. Generally in the front-end, you would have more than one theme to deal with, and that’s handled with an additional theme directory. It’s the default theme directory of OpenCart that provides most of the template files.
Apart from this, it’s a very similar plugin structure that also contains language and controller files.
Create the Plugin Files
To start with, let’s create a language file catalog/language/english/module/recent_products.php with the following contents.
<?php
// catalog/language/english/module/recent_products.php
// Heading
$_['heading_title'] = 'Recent Products';
It’s used to set up static labels that will be used in a view template file. It’s almost identical to that of the admin language file.
Next, we’ll create a controller file that should placed at catalog/controller/module/recent_products.php.
<?php
// catalog/controller/module/recent_products.php
class ControllerModuleRecentProducts extends Controller {
    public function index($setting) {
        $this->load->language('module/recent_products');

        $data['heading_title'] = $this->language->get('heading_title');

        $this->load->model('module/recent_products');

        $this->load->model('tool/image');

        $data['products'] = array();

        $results = $this->model_module_recent_products->getRecentProducts($setting['limit']);

        if ($results) {
            foreach ($results as $result) {
                if ($result['image']) {
                    $image = $this->model_tool_image->resize($result['image'], 100, 100);
                } else {
                    $image = $this->model_tool_image->resize('placeholder.png', 100, 100);
                }

                if (($this->config->get('config_customer_price') && $this->customer->isLogged()) || !$this->config->get('config_customer_price')) {
                    $price = $this->currency->format($this->tax->calculate($result['price'], $result['tax_class_id'], $this->config->get('config_tax')));
                } else {
                    $price = false;
                }

                if ((float)$result['special']) {
                    $special = $this->currency->format($this->tax->calculate($result['special'], $result['tax_class_id'], $this->config->get('config_tax')));
                } else {
                    $special = false;
                }

                $data['products'][] = array(
                    'product_id'  => $result['product_id'],
                    'thumb'       => $image,
                    'name'        => $result['name'],
                    'description' => utf8_substr(strip_tags(html_entity_decode($result['description'], ENT_QUOTES, 'UTF-8')), 0, $this->config->get('config_product_description_length')) . '..',
                    'price'       => $price,
                    'special'     => $special,
                    'href'        => $this->url->link('product/product', 'product_id=' . $result['product_id'])
                );
            }

            if (file_exists(DIR_TEMPLATE . $this->config->get('config_template') . '/template/module/recent_products.tpl')) {
                return $this->load->view($this->config->get('config_template') . '/template/module/recent_products.tpl', $data);
            } else {
                return $this->load->view('default/template/module/recent_products.tpl', $data);
            }
        }
    }
}
Again, the index method is the place where most of our code should go in. As with most of the other plugins, you’ll find an argument $setting is available in the index method. Recall the admin configuration form developed in part one that was used to configure plugin parameters—that is what the $setting variable stands for. It holds plugin configuration values in the form of an array.
The $this->load->language shorthand loads the front-end plugin language file, and we've already it discussed in depth in the first part. Similarly, the $this->load->model shorthand loads the plugin model file created at catalog/model/module/recent_products.php. We’re also loading the Image model defined under the tool directory as it contains utility methods to resize images.
The most important call in the index method is the call to the getRecentProducts method that provides an array of recent products from the database. Of course, we’ll see it in detail during the discussion of the model file. As an argument of the method, the $setting['limit'] value configured in the back-end configuration form is passed.
$results = $this->model_module_recent_products->getRecentProducts($setting['limit']);
Next, we iterate through an array of products and prepare the $data['products'] array that will be used in the view template file. In the process, we use the resize method of the Image model class to create thumbnail images, as it won’t make any sense to display original product images in the front-end.
You’ll also find $this->config->get kind of snippets that are used to fetch global store configuration values. You could configure your store settings under System > Settings.
Also, the $this->url->link shorthand is used to create SEO-friendly product page links. Finally, there’s a snippet to load the template file recent_products.tpl that prepares the actual output using the $data array.
As opposed to the back-end, you’ll see conditional loading of the view template file as shown below. The reason is that you could have configured a different theme, other than the default theme, for your front-end. If there’s no other theme configured, it’s a default theme that is always used as a fallback.
if (file_exists(DIR_TEMPLATE . $this->config->get('config_template') . '/template/module/recent_products.tpl')) {
    return $this->load->view($this->config->get('config_template') . '/template/module/recent_products.tpl', $data);
} else {
    return $this->load->view('default/template/module/recent_products.tpl', $data);
}
So, that’s the end of the controller file. Let’s go ahead and create a model file at catalog/model/module/recent_products.php.
<?php
// catalog/model/module/recent_products.php
class ModelModuleRecentProducts extends Model {
    public function getRecentProducts($limit) {
        $this->load->model('catalog/product');
        $product_data = $this->cache->get('product.recent.' . (int)$this->config->get('config_language_id') . '.' . (int)$this->config->get('config_store_id') . '.' . $this->config->get('config_customer_group_id') . '.' . (int)$limit);

        if (!$product_data) {
            $query = $this->db->query("SELECT p.product_id FROM " . DB_PREFIX . "product p LEFT JOIN " . DB_PREFIX . "product_to_store p2s ON (p.product_id = p2s.product_id) WHERE p.status = '1' AND p.date_available <= NOW() AND p2s.store_id = '" . (int)$this->config->get('config_store_id') . "' ORDER BY p.date_added DESC LIMIT " . (int)$limit);

            foreach ($query->rows as $result) {
                $product_data[$result['product_id']] = $this->model_catalog_product->getProduct($result['product_id']);
            }

            $this->cache->set('product.recent.' . (int)$this->config->get('config_language_id') . '.' . (int)$this->config->get('config_store_id') . '.' . $this->config->get('config_customer_group_id') . '.' . (int)$limit, $product_data);
        }

        return $product_data;
    }
}
As per the conventions, the model class name starts with the Model keyword and follows the directory structure. It also extends the base Model class that provides utility objects and methods to interact with the database.
We’re also loading the Product model defined under the catalog directory using $this->load->model('catalog/product') syntax, since we’ll need to use methods defined in that class.
A couple of other handy shorthands are $this->cache->set and $this->cache->get. The first one is used to set the value in the cache, and the latter one gets the already stored cache value by key. It’s a good habit to use caching appropriately to improve the overall performance of your store.
Finally, we’re executing a database query to fetch recent products, and the $this->db->query syntax helps us to do that. It’s a shorthand that runs the query method of the database class.
Next, we iterate through all the product records and load product information by calling the getProduct method of the Product model class. At the end, we save the array information to the cache so that in the subsequent requests we don’t have to do all the heavy lifting again!
Finally, there’s only the view file recent_products.tpl that needs to be created to complete our custom plugin. Let’s do that by creating it at catalog/view/theme/default/template/module/recent_products.tpl.
<!-- catalog/view/theme/default/template/module/recent_products.tpl -->
<h3><?php echo $heading_title; ?></h3>
<div class="row">
  <?php foreach ($products as $product) { ?>
  <div class="product-layout col-lg-3 col-md-3 col-sm-6 col-xs-12">
    <div class="product-thumb transition">
      <div class="image"><a href="<?php echo $product['href']; ?>"><img src="<?php echo $product['thumb']; ?>" alt="<?php echo $product['name']; ?>" title="<?php echo $product['name']; ?>" class="img-responsive" /></a></div>
      <div class="caption">
        <h4><a href="<?php echo $product['href']; ?>"><?php echo $product['name']; ?></a></h4>
        <p><?php echo $product['description']; ?></p>
        <?php if ($product['price']) { ?>
        <p class="price">
          <?php if (!$product['special']) { ?>
          <?php echo $product['price']; ?>
          <?php } else { ?>
          <span class="price-new"><?php echo $product['special']; ?></span> <span class="price-old"><?php echo $product['price']; ?></span>
          <?php } ?>
        </p>
        <?php } ?>
      </div>
    </div>
  </div>
  <?php } ?>
</div>
In the view file, we’re just iterating through the $products array supplied by the controller to produce the product listing XHTML.
So, that’s the end of our front-end plugin files! In the next section, I’ll show you how to assign our plugin to the OpenCart layout so that it can be displayed on the front-end.
Assign the Plugin to a Layout
For any plugin to be displayed on the front-end, we need to assign it to one of the available layouts. For example purposes, we’ll go ahead and assign our plugin to the Content Top position.
Head over to the back-end and navigate to System > Design > Layouts. That should list all the available layouts in your store. Edit the Home layout, and it brings you the layout editing screen. You just need to add a new module entry as shown in the following screenshot.
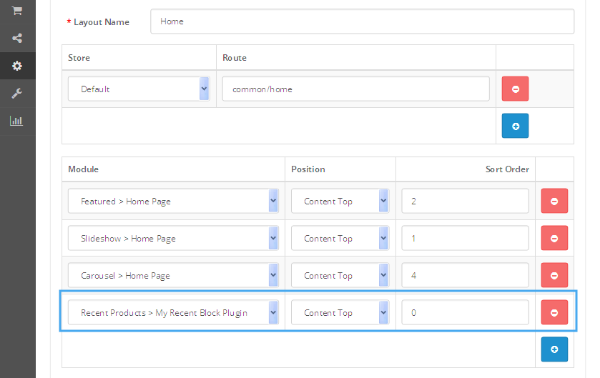
As you can see, we’ve picked up the Recent Products > My Recent Block Plugin and assigned it to the Content Top position. Save the settings and you’re good to go!
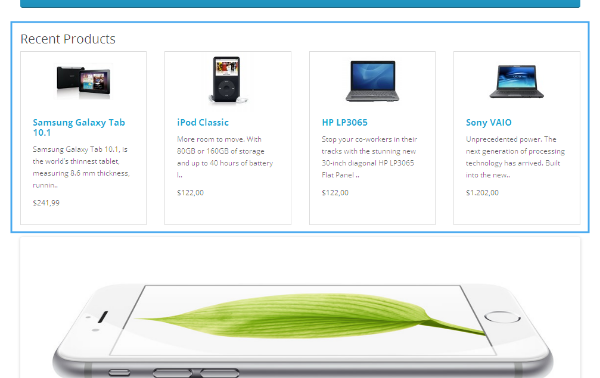
Demo in the Front-End
Go ahead to the front-end and you should be able to see a pretty decent-looking Recent Products block, as shown in the following screenshot.
So, that ends the journey of our custom plugin development series in OpenCart. Although the series was aimed at beginners, it should also provide a nice custom plugin template that could be extended as per your requirements.
I encourage you to explore it on your own and add more functionalities. That should be a decent exercise after leaving this tutorial!
Conclusion
In this series, we’ve discussed custom plugin development in OpenCart. As it was targeted for beginners, we ended up developing a very simple custom plugin that lists recent products in a block in the front-end. Earlier, in the first part, we also created a back-end configuration form for our plugin.
For additional OpenCart tools, utilities, extensions, and so on that you can leverage in your own projects or for your own education, don't forget to see what we have available in the marketplace.
Don’t hesitate to leave your feedback and queries using the comment feed below!

Comments