In this series, we're working on how to create a custom payment method extension in Magento. In the first part, we created a basic back-end configuration for our custom payment method. We created a basic module, and we'll extend it in this article. Today, we'll see how to list our custom payment method in the front-end checkout process and save custom fields related to our custom payment method along with other order information.
I assume that you're familiar with the basic module creation process in Magento. If not, here's a nice article explaining the basics of custom module creation.
Also, if you haven't gone through the first part of this series yet, it's recommended to do that, as you'll need module files from the first part in order to have a complete working module. Let's have a quick look at the list of files we created in the first part:
- app/etc/modules/Envato_All.xml
- app/code/local/Envato/Custompaymentmethod/etc/config.xml
- app/code/local/Envato/Custompaymentmethod/etc/system.xml
- app/code/local/Envato/Custompaymentmethod/sql/custompaymentmethod_setup/install1.0.0.0.php
Today, we'll create files which will help us to list our custom payment method in the checkout process, and which will also display payment method information in the right sidebar as a summary.
A Glance at the Files Setup
Let's have a look at the list of files we're going to create today.
-
app/code/local/Envato/Custompaymentmethod/Block/Form/Custompaymentmethod.php: It's a block file which will call the related template file to display a custom payment form for our custom payment method. -
app/design/frontend/base/default/template/custompaymentmethod/form/custompaymentmethod.phtml: It's a template file used to display a custom payment form for our custom payment method. -
app/code/local/Envato/Custompaymentmethod/Model/Paymentmethod.php: It's a model file used to validate and save the custom payment fields information. -
app/code/local/Envato/Custompaymentmethod/Block/Info/Custompaymentmethod.php: It's a block file which will set up the necessary information for the summary section in the right sidebar.
Checkout Page Setup: Setting Up Files
Create a file app/code/local/Envato/Custompaymentmethod/Block/Form/Custompaymentmethod.php and paste the following contents in that file.
<?php
// app/code/local/Envato/Custompaymentmethod/Block/Form/Custompaymentmethod.php
class Envato_Custompaymentmethod_Block_Form_Custompaymentmethod extends Mage_Payment_Block_Form
{
  protected function _construct()
  {
    parent::_construct();
    $this->setTemplate('custompaymentmethod/form/custompaymentmethod.phtml');
  }
}
In this file, we've set up a template file path which will be used when Magento tries to show our payment method related form. Let's create the related template file as well at app/design/frontend/base/default/template/custompaymentmethod/form/custompaymentmethod.phtml.
<div class="form-list" id="payment_form_<?php echo $this->getMethodCode() ?>" style="display:none;">
  <div>
    <label><?php echo $this->__('Custom Field One') ?>*</label>
    <span>
      <input type="text" title="<?php echo $this->__('Custom Field One') ?>" name="payment[custom_field_one]" value="<?php echo $this->htmlEscape($this->getInfoData('custom_field_one')) ?>" />
    </span>
  </div>
  <div>
    <label><?php echo $this->__('Custom Field Two') ?>*</label>
    <span>
      <input type="text" title="<?php echo $this->__('Custom Field Two') ?>" name="payment[custom_field_two]" value="<?php echo $this->htmlEscape($this->getInfoData('custom_field_two')) ?>" />
    </span>
  </div>
</div>
<div>
    <?php echo $this->getMethod()->getConfigData('message');?>
</div>
Recall that in the first part of this series, we created two custom fields, custom_field_one and custom_field_two, using a sql install file. So in the above template file, we display those two fields in the form of simple text fields.
Now, Magento won't detect the above form block setup automatically. For that, we need to set up a model file, so let's do that by creating the model file app/code/local/Envato/Custompaymentmethod/Model/Paymentmethod.php with the following contents.
<?php
// app/code/local/Envato/Custompaymentmethod/Model/Paymentmethod.php
class Envato_Custompaymentmethod_Model_Paymentmethod extends Mage_Payment_Model_Method_Abstract {
  protected $_code  = 'custompaymentmethod';
  protected $_formBlockType = 'custompaymentmethod/form_custompaymentmethod';
  protected $_infoBlockType = 'custompaymentmethod/info_custompaymentmethod';

  public function assignData($data)
  {
    $info = $this->getInfoInstance();

    if ($data->getCustomFieldOne())
    {
      $info->setCustomFieldOne($data->getCustomFieldOne());
    }

    if ($data->getCustomFieldTwo())
    {
      $info->setCustomFieldTwo($data->getCustomFieldTwo());
    }

    return $this;
  }

  public function validate()
  {
    parent::validate();
    $info = $this->getInfoInstance();

    if (!$info->getCustomFieldOne())
    {
      $errorCode = 'invalid_data';
      $errorMsg = $this->_getHelper()->__("CustomFieldOne is a required field.\n");
    }

    if (!$info->getCustomFieldTwo())
    {
      $errorCode = 'invalid_data';
      $errorMsg .= $this->_getHelper()->__('CustomFieldTwo is a required field.');
    }

    if ($errorMsg)
    {
      Mage::throwException($errorMsg);
    }

    return $this;
  }

  public function getOrderPlaceRedirectUrl()
  {
	return Mage::getUrl('custompaymentmethod/payment/redirect', array('_secure' => false));
  }
}
The $_code defines the unique code of our payment method. Further, $_formBlockType defines the location of the block file which will be called when our payment method is selected. We've already set up form block files related to this in the previous section! Next, $_infoBlockType defines a block file which will display payment method related information in the right sidebar, as we'll see in the next section.
The validate method is used for the data validation of our custom payment related fields, and the assignData method is used to save our custom payment related fields along with other order information. And finally, the getOrderPlaceRedirectUrl method returns the URL which is used to redirect the user after the order is placed.
With this setup, you should be able to see our custom payment method listed in the front-end checkout process.
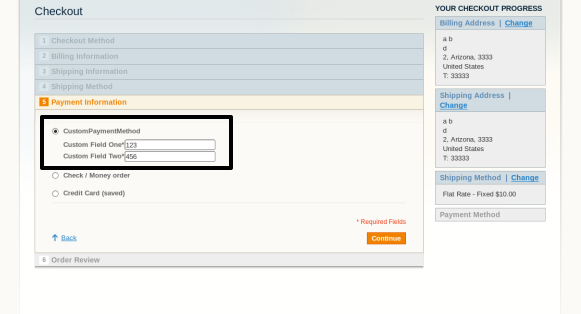
As you can see in the screenshot, when you select "CustomPaymentMethod" it displays two custom fields: "Custom Field One" and "Custom Field Two"!
Now, let's create the last file of this tutorial, app/code/local/Envato/Custompaymentmethod/Block/Info/Custompaymentmethod.php, and paste the following contents in that file. It's a file mentioned by the $_infoBlockType property in a model file we defined earlier.
<?php
// app/code/local/Envato/Custompaymentmethod/Block/Info/Custompaymentmethod.php
class Envato_Custompaymentmethod_Block_Info_Custompaymentmethod extends Mage_Payment_Block_Info
{
  protected function _prepareSpecificInformation($transport = null)
  {
    if (null !== $this->_paymentSpecificInformation)
    {
      return $this->_paymentSpecificInformation;
    }

    $data = array();
    if ($this->getInfo()->getCustomFieldOne())
    {
      $data[Mage::helper('payment')->__('Custom Field One')] = $this->getInfo()->getCustomFieldOne();
    }

    if ($this->getInfo()->getCustomFieldTwo())
    {
      $data[Mage::helper('payment')->__('Custom Field Two')] = $this->getInfo()->getCustomFieldTwo();
    }

    $transport = parent::_prepareSpecificInformation($transport);

    return $transport->setData(array_merge($data, $transport->getData()));
  }
}
With this file in place, you'll be able to see the payment summary in the right sidebar of the checkout page.
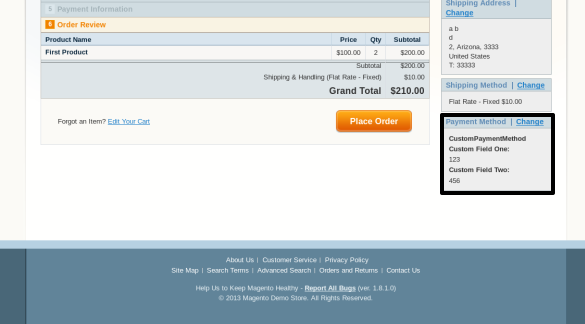
So, we've almost completed the checkout process. Now, when a user clicks on the Place Order button, Magento will redirect him or her to the URL which we've defined in the getOrderPlaceRedirectUrl method in a model file.
In the next and last part of this series, we'll continue from there onwards and demonstrate the demo payment gateway page!
Conclusion
In this part, we implemented module files related to the front-end checkout process. Specifically, we set up form and info blocks for our custom payment method. I hope that you're enjoying this series, and don't forget to post your views using the feed below.
![Admin Panels That Don't Suck! [Slides]](themes/nongdanviet/images/img-size/news.png)
Comments